Good attempt so far, but you need more practice.
Some pointers are:
- Start with a clean pcb if there are oils oxides and surface contaminants this will cause bad wetting (spreading) and the solder to ball up. You can use a clean cloth or wipe and IPA. For more aggressive cleaning there is PCB (abrasive) erasers etc.
- Components can have oxidized surfaces as well, so having new quality parts helps.
- Keep the solder clean and dirt free by wiping a few inches down at a time with IPA on a clean cloth or wipe.
- Prior to soldering the iron tip should be cleaned of all contaminants. Something like the Hakko 559B works really well (I prefer this to the damp sponge).
- Apply solder to the work not the tip.
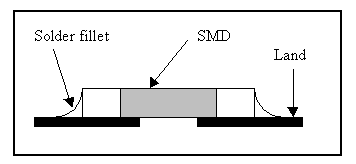
- Practice getting the melting point of you solder down and just enough heat for quick thermal transfer. With enough heat and flux the solder should naturally settle to coat any solderable surface, surface tension will keep more solder near the joint which you want to become a smooth concave "fillet" (see picture below).
- Too much heat and the solder bubbles, and does not wet (spread) correctly.
- Too much solder and your joints ball up and becomes harder to inspect (they hide other issues like cold joints).
- The way you exit with the soldering iron is everything, try to wipe away in the direction of the component or across the pad. Pulling up can leave a blob of solder especially if too much solder is used.
- Clean the tip regularly between uses. Excess solder will naturally want to wet to the iron tip (if it's nice and clean) so you can use this to your advantage to keep just the right amount of solder on the work.
- Clean and wet the iron tip well when returning it to the stand and switching off, this will prevent the bare tip oxidizing and burning contaminants that make soldering harder.