Author Topic: HP 3410A AC Microvoltmeter Restoration ** In operation added**  (Read 33891 times)

0 Members and 1 Guest are viewing this topic.

Offline robrenzTopic starter

  • Super Contributor
  • ***
  • Posts: 3035
  • Country: us
  • Real Machinist, Wannabe EE
I got this almost a year ago for doing low level AC measurements (original thread here).  Its lowest scale is 3µV full scale and 50nV per division.  Max is 3V full scale. I bought it mainly to do power supply ripple measurements and to characterize the below spec AC performance of my 8846A. This is a phase locking voltmeter with a tunable frequency range from 5Hz to 600kHz. It seems pretty rare as I have not seen a listing since. I finally got around to restoring it and though I would share some of the process.

Manual here
HP Journal article about it (takes a while to load and it is the second article)

The only actual electrical repairs it needed were a new incandescent range indicator bulb and the range switches needed cleaned and lubed. It also needed calibration but it basically worked as received. It had been exposed to some type of corrosive situation that is evident in some of the pictures.
Before


After, Stickers removed with xylene and Melamine foam sponges (Magic erasers). Main panel was very lightly wet sanded with a very fine sanding sponge (type used for fingernails) just enough to get rid of fine scratches. Then the paint was polished with Mequires PlastX to restore the shine. The metal parts of the two switches were polished with Simichrome applied to a 25mm diameter fabric buff on a flexible shaft. Everything else will be covered below


Before


Same treatment to the paint of the top rail. Yes those magic sponges are magic, you just have to rub vigorously and not be afraid to use up several whole sponges on a restoration.


Before


After


After,  Ahh…. be still my heart!


After


After


More to follow….
« Last Edit: May 18, 2014, 03:34:50 pm by robrenz »
 
The following users thanked this post: Priestblood, eetechTom, tozitom, enut11, kj7e

Offline robrenzTopic starter

  • Super Contributor
  • ***
  • Posts: 3035
  • Country: us
  • Real Machinist, Wannabe EE
Re: HP 3410A AC Microvoltmeter Restoration
« Reply #1 on: April 27, 2014, 06:45:50 pm »
Simichrome was used on all the metal. Fabric buff on the outside and a very hard felt bob with a hole drilled in it to clear the center of the BNC and the OD. turned to a snug fit in the BNC ID. Both used at slow speed in a flexible shaft.


Before


After


Pretty nasty, they used something like clear fingernail polish to seal down the Dymo label to the lid.


Label carefully picked off and the clear stuff could also be picked off.


After about a quarter of a magic sponge later using citrus based cleaner and IPA. Then a thorough application of “Mothers back to black” to restore the luster to the vinyl.


Less drastic situation


Succumbed to the same treatment as above


A real nightmare, permanent marker on vinyl!


I finally ended up using toluene and magic sponges using a light touch. It took quite a while and the Toluene tends to soften the vinyl so be very carefull if you try this. Several applications of back to black brought the vinyl luster back.


The bakelite knobs came back to life by polishing with the PlastX (EDIT: Simichrome works even better on the bakelite) using felt buffs, fabric buffs, and natural bristle brushes on a flexible shaft. The white indicators were refilled with new white paint.


Frequency dial showing corrosion under the clear seal. The right hand side has the clear sealant removed.


Glass bead blast to remove the corrosion and get a uniform satin finish.


Graduations filled with epoxy loaded with carbon black. I used a very small hypo needle on my solder paste dispenser unit.


When partially cured I used a popsicle stick wet with MEK to rub off the sloppy feather edges of the filling.


Whole thing sealed with Permalac. Very expensive but very good stuff for extreme long term durability.


More to follow….
« Last Edit: April 30, 2014, 05:22:23 pm by robrenz »
 
The following users thanked this post: Priestblood

Offline SeanB

  • Super Contributor
  • ***
  • Posts: 16284
  • Country: za
Re: HP 3410A AC Microvoltmeter Restoration
« Reply #2 on: April 27, 2014, 06:56:01 pm »
Another neat restoration there.
 

Offline robrenzTopic starter

  • Super Contributor
  • ***
  • Posts: 3035
  • Country: us
  • Real Machinist, Wannabe EE
Re: HP 3410A AC Microvoltmeter Restoration
« Reply #3 on: April 27, 2014, 07:03:30 pm »
The meter face was a major concern as it was very yellowed and peeling.


Looks like the emusion was affected by whatever the corrosive atmosphere was.


This is after I cleaned off what looked like a fine powdery fur over all the metal parts. I used one of those adjustable fiberglass brushes which worked very well at removing it without disturbing the metal. Extremely sensitive parts here, it would be tempting to blow this out with an air duster but that could easily bend/break the movement. I used a soft artist brush to sweep all the debris out.


At first I wondered how I was going to replicate the meter face with my camera and keep the scale. And I was thinking I would have to use some photo shop to remove the flaking and fading. Then I read a thread on here about taking pictures of circuit boards with a scanner. That took care of the scaling issue, now I just need to learn how to touch up the image. Then the light bulb went on, set the scanner to one bit mode. That gave a perfect black/white only image that was perfect with no processing needed. Notice the brownish fading on the original on the right.


The new face assembled in the meter.


The new meter face printed out on Papillo self adhesive photo film (upper left). Meter face plate with the original graphic removed (lower right). Notice chromed surface for when it would be used for a mirrored face. It was very polished but I scuffed it with a sanding sponge for better adhesion. I had to figure out how to get the photo film applied precisely on the meter face plate. The cardboard is about 2mm thick which is slightly thicker than the meter face plate. The two cardboard pieces were cutout together with a window slightly larger than the meter face plate.


Double stick tape applied to the perimeter of the opening of one cardboard piece.


The protective strip of the double stick is removed and then the cardboard is stuck to the printed side of the sticky photo film. Notice the alignment windows that I cut at the corners so I will be able to see the metal meter face plate through the overlay.


The above flipped over and the protective layer of the sticky photo film is removed and the other cardboard piece is stuck down on the sticky side of the film.


The metal meter face plate is placed on the table and then the whole cardboard framed photo film unit is carefully aligned over it. The cardboard being slightly thicker than the metal face plate allows precise positioning without sticking until you want it to.  When in position I used a piece of the protective backing to press down the film to contact the faceplate. It is very important to press down in a wave from one edge to another to not trap any air bubbles.


Flipped over showing the faceplate stuck in proper position


An Exacto knife trip around the perimeter to free the meter face.


Two rubber washers and Nylon screws keep the face plate electrically isolated from the meter mechanics. Notice the stud that gets connected to a ground wire to drain charge of the faceplate that could influence the needle.


Aged bakelite and dirt.


After a polish with PlastX


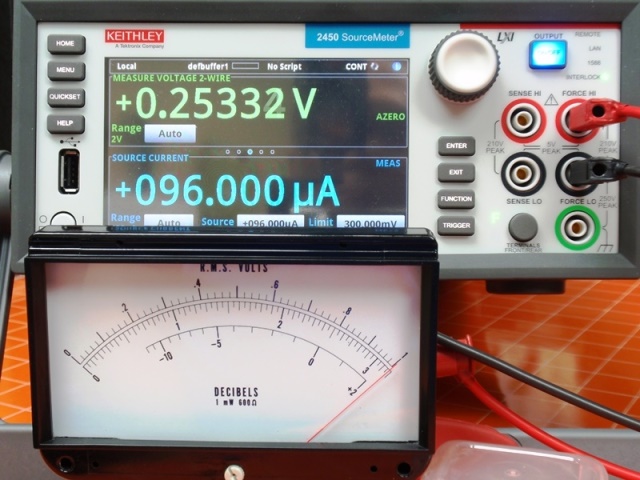
Using the 2450 SMU to test the meter at full scale. It is a 100µA meter so not bad being only 4µA off at full scale. The smallest increment that I could see needle response was about 100pA


More to follow…
« Last Edit: April 27, 2014, 07:06:53 pm by robrenz »
 
The following users thanked this post: Priestblood, enut11

Offline Carrington

  • Super Contributor
  • ***
  • Posts: 1202
  • Country: es
Re: HP 3410A AC Microvoltmeter Restoration
« Reply #4 on: April 27, 2014, 07:06:39 pm »
Amazing, looks like new.  :clap:
My English can be pretty bad, so suggestions are welcome. ;)
Space Weather.
Lightning & Thunderstorms in Real Time.
 

Online max-bit

  • Frequent Contributor
  • **
  • Posts: 672
  • Country: pl
Re: HP 3410A AC Microvoltmeter Restoration
« Reply #5 on: April 27, 2014, 07:07:32 pm »
good job !!!
 

Offline robrenzTopic starter

  • Super Contributor
  • ***
  • Posts: 3035
  • Country: us
  • Real Machinist, Wannabe EE
Re: HP 3410A AC Microvoltmeter Restoration
« Reply #6 on: April 27, 2014, 07:11:49 pm »
One of the foot bars showing the effects of the corrosive atmosphere.


Wet sanding all the scratches and dings out. I know… I need help.


Fingernail sanding sponges and sanding sticks to clean up all the surfaces and edges


PlastX, hard and soft felt buffs, fabric buff and flexible shaft to polish the plastic. This is a flexible plastic so it took quite a while to get the right pressure speed technique combination to get a good finish. (I warned you)


Before top, after bottom


Corrosion on the side frames


Nothing a trip to the glass bead cabinet can’t cure.


Refinishing all the polished edges of the frames. This is a cast iron surface plate with 240 grit silicon carbide paper lightly contact cemented in place with 3M77 spray.  You could use a piece of tempered glass to do the same thing. First the face and all 4 edges are sanded until they clean up completely. All the edges are filed to have a uniform edge break.  I used sanding sticks with 320, 400 and 600 grits before polishing with Simichrome on a hard felt buff in the flexible shaft.


Edges before.


Edges after.


Homemade sanding stick method.  Lay out craft store popsicle sticks and the silicon carbide paper on some scrap cardboard and lightly spray with the 3M77 spray contact cement. Stay far enough away that you don’t blow the sticks and paper away!


Give the glue some time flash off and flip the paper over onto the sticks and press down to bond. Put this on a cutting board and trim both edges right next to the stick to separate them.


Very handy and inexpensive.


More to follow…
« Last Edit: April 29, 2014, 01:29:42 pm by robrenz »
 
The following users thanked this post: enut11

Offline PedroDaGr8

  • Super Contributor
  • ***
  • Posts: 1283
  • Country: us
  • A sociable geek chemist
Re: HP 3410A AC Microvoltmeter Restoration
« Reply #7 on: April 27, 2014, 07:23:43 pm »


Just when I don't think you can impress me any more. You do it again. Truly impressive, that must be how it looked RIGHT when it came off the factory line.

How are you liking the Mothers Back To Black? I remember I recommended that to you in the 6114A restoration thread. The buttons on my 6114A are still as black and shiny as the day I applied it.

The very existence of flamethrowers proves that some time, somewhere, someone said to themselves, "You know, I want to set those people over there on fire, but I'm just not close enough to get the job done." -George Carlin
 

Offline robrenzTopic starter

  • Super Contributor
  • ***
  • Posts: 3035
  • Country: us
  • Real Machinist, Wannabe EE
Re: HP 3410A AC Microvoltmeter Restoration
« Reply #8 on: April 27, 2014, 07:25:48 pm »
Left side. That circuit board is the input section and has a full cover that is not in place.


Right side.


Bottom


Top.


Frequency setting potentiometers. Notice the shielded conductors on the last two ganged pots.


Front panel removed and everything hanging in the breeze.


The A4 circuit board


The A3 circuit board


The A2 circuit board


The A1 circuit board


The switches were treated with Deoxit D100L and cycled thoroughly. Then washed with electronic cleaner spray and blown out with compressed air. This shows final application of Deoxit G100L to lube then thoroughly cycled and blowing off any excess.


This is the cover plate that is behind the frequency dial. It was originaly contact cemented to the bakelite frame. It had to be removed to get to the screws that hold the body of the dial reduction unit. So I punched two holes where the screws are so the plate could remain permanently. The corner pads are 3M high strength adhesive. The extra thickness was not a problem as the dial was pretty far away to begin with.


I have done an initial full calibration and the performance is impressive but I will save that for another thread.
« Last Edit: April 30, 2014, 05:27:55 pm by robrenz »
 
The following users thanked this post: Priestblood, enut11

Offline david77

  • Frequent Contributor
  • **
  • Posts: 934
  • Country: de
Re: HP 3410A AC Microvoltmeter Restoration
« Reply #9 on: April 27, 2014, 07:35:56 pm »
 :clap:

It is truly impressive to see how you get all these old and well-used pieces of gear to look as good or maybe even better as the day they were produced. I wish I had the patience and experience to do that.

Can you tell how many hours you invested in this restoration?
 

Offline SeanB

  • Super Contributor
  • ***
  • Posts: 16284
  • Country: za
Re: HP 3410A AC Microvoltmeter Restoration
« Reply #10 on: April 27, 2014, 08:08:43 pm »
Very nice. I coud not afford a surface block, so I use a granite floor tile that is attached to a plywood backing with flexible polyurethane, which is pretty close to being optically flat.

On those boards I would suggest looking at the seals of those Sprague capacitors and looking for a white discolouration on the red rubber ( regular electrolytic ) or green rubber ( wet slug tantalum capacitor) end seals. If they are faded with the white film then the seal has degraded, and you probably would need to replace them. If not then simply check each in circuit ( first rough approximation to say if it is nailed to the perch or is still squawking) for ESR, and then decide if you want to replace the still usable ones.
 

Offline Vgkid

  • Super Contributor
  • ***
  • Posts: 2710
  • Country: us
Re: HP 3410A AC Microvoltmeter Restoration
« Reply #11 on: April 27, 2014, 09:49:00 pm »
Very good job on the resoration. Does the meter use thermal, or diode based rms conversion.
If you own any North Hills Electronics gear, message me. L&N Fan
 

Offline fpliuzzi

  • Regular Contributor
  • *
  • Posts: 157
  • Country: us
Re: HP 3410A AC Microvoltmeter Restoration
« Reply #12 on: April 28, 2014, 12:02:01 am »
Spectacular restoration indeed. Bill Hewlett and Dave Packard would have been touched by the level of respect you've shown to this formerly crusty 3410A. Your craftsmanship is inspiring.

Regards
 

Offline Vgkid

  • Super Contributor
  • ***
  • Posts: 2710
  • Country: us
Re: HP 3410A AC Microvoltmeter Restoration
« Reply #13 on: April 28, 2014, 12:22:26 am »
I just answered my own question, it utilizes a pll to lock the frequency. Then takes the vpp vals and determines the vrms value.
If you own any North Hills Electronics gear, message me. L&N Fan
 

Offline robrenzTopic starter

  • Super Contributor
  • ***
  • Posts: 3035
  • Country: us
  • Real Machinist, Wannabe EE
Re: HP 3410A AC Microvoltmeter Restoration
« Reply #14 on: April 28, 2014, 12:37:42 am »
I just answered my own question, it utilizes a pll to lock the frequency. Then takes the vpp vals and determines the vrms value.

Its uses the filtered output of a synchronous rectifier that is basically average responding not really true RMS.
The HP Journal link above has a very good discussion about it.

Offline TiN

  • Super Contributor
  • ***
  • Posts: 4543
  • Country: ua
    • xDevs.com
Re: HP 3410A AC Microvoltmeter Restoration
« Reply #15 on: April 28, 2014, 12:41:09 am »
Top notch work!  :-+ :-DMM
YouTube | Metrology IRC Chat room | Let's share T&M documentation? Upload! No upload limits for firmwares, photos, files.
 

Offline robrenzTopic starter

  • Super Contributor
  • ***
  • Posts: 3035
  • Country: us
  • Real Machinist, Wannabe EE
Re: HP 3410A AC Microvoltmeter Restoration
« Reply #16 on: April 28, 2014, 12:43:24 am »
Thanks everyone for the very kind words.

@PedroDaGr8  Thanks for that tip, the Back to Black is far superior to Armor All.

@David77  Approximately 30 hours.

@SeanB   Thanks I will check those caps.

Tac Eht Xilef

  • Guest
Re: HP 3410A AC Microvoltmeter Restoration
« Reply #17 on: April 28, 2014, 12:53:51 am »
Very nice job! And an interesting unit; I've got to get myself one of those.

Yes, the Mother's stuff is a nice very light cut and polish that beats the pants off ArmorAll. Come to think of it, does anyone know what the hell ArmorAll is good for?
 

Offline lowimpedance

  • Super Contributor
  • ***
  • Posts: 1247
  • Country: au
  • Watts in an ohm?
Re: HP 3410A AC Microvoltmeter Restoration
« Reply #18 on: April 28, 2014, 01:03:16 am »
Yet again a truly magnificent restoration, Are you game to actually use it now :).
I particularly liked the BNC restoration, learned something that will come in handy.
 :-+ :-+
The odd multimeter or 2 or 3 or 4...or........can't remember !.
 

Offline Vgkid

  • Super Contributor
  • ***
  • Posts: 2710
  • Country: us
Re: HP 3410A AC Microvoltmeter Restoration
« Reply #19 on: April 28, 2014, 01:55:26 am »
Its uses the filtered output of a synchronous rectifier that is basically average responding not really true RMS.
The HP Journal link above has a very good discussion about it.
There is nothing wrong with using average measurements, its not like this is for super accurate measurements. Though avg responding meters can be rather accurate.
If you own any North Hills Electronics gear, message me. L&N Fan
 

Offline han

  • Frequent Contributor
  • **
  • Posts: 311
  • Country: 00
Re: HP 3410A AC Microvoltmeter Restoration
« Reply #20 on: April 28, 2014, 03:30:46 am »
Amazing. That truly an restoration art   :clap:   :-+
 

Offline quarks

  • Frequent Contributor
  • **
  • Posts: 874
  • Country: de
Re: HP 3410A AC Microvoltmeter Restoration
« Reply #21 on: April 28, 2014, 03:35:40 am »
Great work :-+
 

Offline BravoV

  • Super Contributor
  • ***
  • Posts: 7547
  • Country: 00
  • +++ ATH1
Re: HP 3410A AC Microvoltmeter Restoration
« Reply #22 on: April 28, 2014, 03:44:11 am »
Thank you Robrenz, amazing restoration works and also appreciate the documentation efforts as well.  :-+

Also learned useful tricks, especially on cleaning the bnc connector, btw since Simichrome is not available locally here, does Autosol has similar performance for this kind of job ?

Offline calexanian

  • Super Contributor
  • ***
  • Posts: 1881
  • Country: us
    • Alex-Tronix
Re: HP 3410A AC Microvoltmeter Restoration
« Reply #23 on: April 28, 2014, 05:56:36 am »
Looking good!  :-+
Charles Alexanian
Alex-Tronix Control Systems
 

Offline HKJ

  • Super Contributor
  • ***
  • Posts: 2904
  • Country: dk
    • Tests
Re: HP 3410A AC Microvoltmeter Restoration
« Reply #24 on: April 28, 2014, 06:10:31 am »
There is nothing wrong with using average measurements, its not like this is for super accurate measurements. Though avg responding meters can be rather accurate.

The difference between average and rms are not that great when the meter is tuned to a single frequency :)


Share me

Digg  Facebook  SlashDot  Delicious  Technorati  Twitter  Google  Yahoo
Smf