Author Topic: 3D print help for germanium telescope (apologies if slightly OT)  (Read 7808 times)

0 Members and 1 Guest are viewing this topic.

Offline UltrapurpleTopic starter

  • Super Contributor
  • ***
  • Posts: 1027
  • Country: gb
  • Just zis guy, you know?
    • Therm-App Users on Flickr
Apologies if this is off-topic but...

For a long time I have been trying to construct a decent mount for my Therm-App cameras to an Inframetrics x3 telescope (like Fraser's, pictured below - I have shamelessly stolen his photo for this post).


The problem is that the Therm-App (and Therm-App Pro, on the right) don't have a flat front surface:


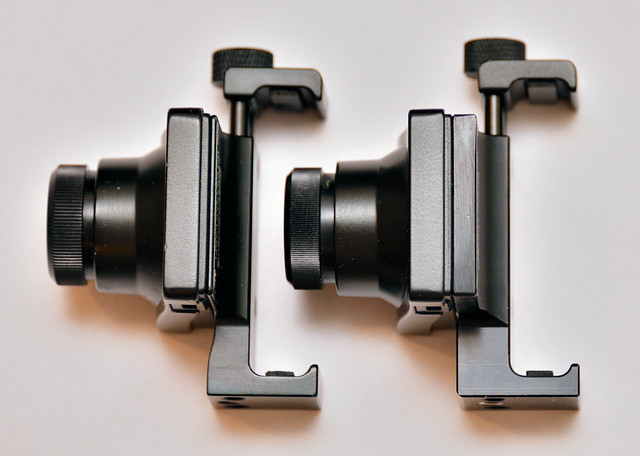
It's not just that it has a conical section surrounding the lens, the two sides are about 3 or 4mm different heights. This makes it (for me) a very difficult task to make anything fit.

If you haven't come across these telescopes before, they're wonderful - you just place your thermal imager behind it, focused at infinity, and you get an image three times the size (and inverted).

I have done some work previously using a precision-crafted water bottle, gaffer tape and rubber bands:


but this is not a particularly rigid (or professional) approach. The results, however were encouraging, even with the 384x288 sensor


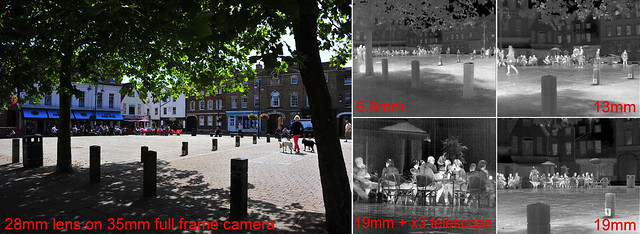
(larger version here)

I have tested the setup, hand-held, with the 640x480 Therm-App Pro and 35mm lens with very heartening results.


(original file here).

I figure it would probably be fairly simple for someone with 3D design and print experience to come up with something that will interface mechanically between the two devices, including perhaps a tripod mount so I can attach the whole caboodle to a Gigapan head and make some really high resolution thermal images.

Has anyone got the necessary skills, or can you point me in the direction to go? For various reasons I'm not really able to rise up the necessary learning curve to do this entirely for myself, even though 35 years ago I did scrape a pass in my Technical Drawing CSE.
« Last Edit: October 31, 2017, 09:04:17 am by Ultrapurple »
Rubber bands bridge the gap between WD40 and duct tape.
 

Offline Vipitis

  • Frequent Contributor
  • **
  • Posts: 867
  • Country: de
  • aspiring thermal photography enthusiast
Re: 3D print help for germanium telescope (apologies if slightly OT)
« Reply #1 on: October 29, 2017, 06:59:13 pm »
hey Ultrapurple,

I am rather jealous of your scopes and imagers. I followed the whole process, I wanted to mention a few of your project in the lepton fov post as well. A 3D Printed solution is possible. Although an augmented one, for example a tripod mount.... won't really print in a usable manner. But you can embed a quater inch nut into a 3D print with some tricks like friction fit or heat.

For your project, be sure to google around a little or look on websites like thingiverse.com, to see if anybody has already done something like you want, or something similar. If you are going to do a custom model, or ask for somebodies help. It really helps to do some sketches, like a cross section form different axis. Annotate with exact measurements. Try to find a 3D (CAD) model of the therm app or a technical drawing, or measure the important parts with calipers and provide annotated pictures. A 3D printed solution is always a process of iterating and prototyping, there are many things that can go bad during the print or some design flaws which might have been overlooked during designing and only come apparent when the model is printed out.
Not every model can be printed on an FDM system - sometimes support is needed and sometimes models are impossible, but a lot of things are possible if design correctly. Professional power printing can get expensive really quick.

I own a printed and I have access to good CAD software. I have done some really basic custom adapters for optical systems before. I would love to help --- and I got the whole week to finally design and print again. Share some sketches and measurements, and I will see what I can do.
 

Offline IwuzBornanerd

  • Frequent Contributor
  • **
  • Posts: 318
  • Country: us
Re: 3D print help for germanium telescope (apologies if slightly OT)
« Reply #2 on: October 30, 2017, 12:08:52 am »
Nice kluge! :-+

As an interim, perhaps more stable kluge, and something that might help you visualize what you need from the printer, you might try what I do in such situations:  I roll tubes out of thin (easy bending) cardboard such as that used for file folders, gluing as I go (you could use 2-sided tape if you want to avoid glue near the lens).  I would cut a strip a bit wider than the height of the collar on the lens holder & wrap it around until it is at the same diameter as the top part of the camera housing.  Then I would cut a strip of cardboard a bit wider than the sum of the first one and the height of that top part of the housing and wrap that on top of the first strip, gluing it to the first strip first (assuming the top of the housing is circular; this is probably no good if it is not circular).  You would wrap that out to some convenient diameter & make another tube long enough to span the required distance to your telescope.  You would use the same technique to match diameters at the other end.  The tubes naturally keep things aligned.  A piece of PVC pipe could also be used to span the distance between the camera & telescope & would provide something solid to mount to the tripod.
I am not opposed to exercise, unless it is an exercise in futility.
 

Offline UltrapurpleTopic starter

  • Super Contributor
  • ***
  • Posts: 1027
  • Country: gb
  • Just zis guy, you know?
    • Therm-App Users on Flickr
Re: 3D print help for germanium telescope (apologies if slightly OT)
« Reply #3 on: October 30, 2017, 08:57:04 am »
hey Ultrapurple,

For your project ... It really helps to do some sketches, like a cross section form different axis. Annotate with exact measurements.

Yes, no problem. I will ask Opgal if they are prepared to release any dimensioned drawings; failing that I'll dust off my calipers.

Quote
I own a printed and I have access to good CAD software. I have done some really basic custom adapters for optical systems before. I would love to help --- and I got the whole week to finally design and print again. Share some sketches and measurements, and I will see what I can do.

That would be absolutely brilliant - thanks! I'll be in touch via PM as soon as I have any details.
Rubber bands bridge the gap between WD40 and duct tape.
 

Offline UltrapurpleTopic starter

  • Super Contributor
  • ***
  • Posts: 1027
  • Country: gb
  • Just zis guy, you know?
    • Therm-App Users on Flickr
Re: 3D print help for germanium telescope (apologies if slightly OT)
« Reply #4 on: October 30, 2017, 09:03:07 am »
Nice kluge! :-+

Thank you!

Actually, great minds think more-or-less alike. Instead of being smart and using cardboard I bought some carefully-chosen sample lengths of Perspex tube, added some Sugru, and came up with the version in the photos. It doesn't solve the issue with the non-flat front of the camera, but I used some more Sugru to attach a spare Therm-App (!) to the assembly so I could do some initial experiments. My Tower Bridge panoramic image was done with that rig and a small Gigapan head, but it wasn't what I consider very successful because I had problems with wobble (too heavy for the head) and drift (sensor calibration changing with ambient temperature), not to mention time pressure (as always) and flat batteries. And I believe I attracted the attention of a couple of plain-clothes officials who wanted to know what I was doing - but that may just be paranoia on my part. Certainly, several 'normal' people expressed an interest too.
Rubber bands bridge the gap between WD40 and duct tape.
 

Offline UltrapurpleTopic starter

  • Super Contributor
  • ***
  • Posts: 1027
  • Country: gb
  • Just zis guy, you know?
    • Therm-App Users on Flickr
Re: 3D print help for germanium telescope (apologies if slightly OT)
« Reply #5 on: October 30, 2017, 04:00:11 pm »
Here are some sketches and more-or-less equivalent photographs of the Therm-App (the Pro is essentially the same, just a little thicker of body). I've included dimensions in mm where appropriate. Note that they accuracy is no better than about 0.5-1mm; I haven't yet checked the dimensions with an accurate measuring stick and in particular the dimension on Image 14 looks suspect. (I took the dimension from an unpublished CAD drawing, but may have made a mistake when I scaled it. I'll take a real measurement when I've got my caliper to hand and update accordingly).

The + on Image 15 marks the optical centre.
« Last Edit: October 30, 2017, 06:52:03 pm by Ultrapurple »
Rubber bands bridge the gap between WD40 and duct tape.
 

Offline IwuzBornanerd

  • Frequent Contributor
  • **
  • Posts: 318
  • Country: us
Re: 3D print help for germanium telescope (apologies if slightly OT)
« Reply #6 on: October 30, 2017, 08:35:20 pm »
Nice kluge! :-+

Thank you!

Actually, great minds think more-or-less alike. Instead of being smart and using cardboard I bought some carefully-chosen sample lengths of Perspex tube, added some Sugru, and came up with the version in the photos. It doesn't solve the issue with the non-flat front of the camera...

Yup, you got the idea.   ;D

But I would have necked it down a step or 2 to fit snug on that collar behind the Therm-App lens & have that as the interface to the camera rather than going all the way to the non-flat or tapered surfaces--using the cardboard if plastic tube sizes couldn't get there.  The issue might be that the collar is too short to prevent it from getting crooked or falling off, but your rubber bands could prevent falling off.  :)

I'm always using cardboard because there is always some laying around, so I don't have to order or go get something.
I am not opposed to exercise, unless it is an exercise in futility.
 

Offline UltrapurpleTopic starter

  • Super Contributor
  • ***
  • Posts: 1027
  • Country: gb
  • Just zis guy, you know?
    • Therm-App Users on Flickr
Re: 3D print help for germanium telescope (apologies if slightly OT)
« Reply #7 on: October 30, 2017, 09:22:32 pm »
Yes, I see what you mean about necking down to the lens mount. However, the 35mm lens is of significantly larger diameter than the mounting barrel area so that would cause a problem.

It may be that, for this one-off, the answer is to use Sugru to build a nice snug mount and rubber-band the camera in place. I will need to find something that Sugru doesn't stick to though, otherwise the camera will get (semi-) permanently mounted, a situation I wish to avoid.

Does anyone know something that Sugru doesn't stick to?
« Last Edit: October 30, 2017, 09:25:43 pm by Ultrapurple »
Rubber bands bridge the gap between WD40 and duct tape.
 

Offline Vipitis

  • Frequent Contributor
  • **
  • Posts: 867
  • Country: de
  • aspiring thermal photography enthusiast
Re: 3D print help for germanium telescope (apologies if slightly OT)
« Reply #8 on: October 31, 2017, 12:04:30 am »
Hey,

The images and sketches you sent look good. I got something else in the way right now and will be able to work on it in 2 or 3 days. I got some ideas already, but I need to realise them in software first.

My understanding right now is that you use your telescope and some clear tubing, but the solution you need is between the tubing and your imager - did I understand this correctly? I would need to know the size of the tubing you use and the distance it needs to the camera.
 

Offline IwuzBornanerd

  • Frequent Contributor
  • **
  • Posts: 318
  • Country: us
Re: 3D print help for germanium telescope (apologies if slightly OT)
« Reply #9 on: October 31, 2017, 01:11:50 am »
Yes, I see what you mean about necking down to the lens mount. However, the 35mm lens is of significantly larger diameter than the mounting barrel area so that would cause a problem.
...

Does anyone know something that Sugru doesn't stick to?

Ah, yes, I had not thought of your 35mm lens; I was only considering what is in the photos above.  Yes, with an F/1.1 aperture it will stick out, as I see from your dimensions that the housing is around 36mm.  So if you did use the mounting barrel as a mounting reference you'd end up with a disk a few mm thick and maybe 50mm+ in diameter sticking out behind your lenses & you'd have to take the 35mm lens off in order to install that... As I alluded to earlier, if it is only a few mm thick it might still get cocked off axis in your tube.  I like rolling tubes because they keep things concentric & on the same axis more easily than trying to cut a clean circular hole perfectly in the center of a circular piece of material, and when I roll my own I can get the size I need, but if the "tube" is too short at larger diameters it doesn't work as well.  I hope I'm not belaboring this point here.

I had never heard of this Sugru before so I looked it up.  Their "about" page has a little fine print that says "*Sugru does not bond to oily plastics like polypropylene, polyethylene or Teflonâ„¢."  Also of interest, one "one star" reviewer on Amazon claimed that mixing cornstarch with silicone caulk gets you the same thing.  Really?  The MSDS & Wikipedia say is contains 25-50% talc, but no mention of cornstarch.  Wikipedia says it is not resistant to Isopropyl acohol so you might see if that takes it off of stuff...but the quoted reference said it had to soak a couple weeks.
I am not opposed to exercise, unless it is an exercise in futility.
 

Offline UltrapurpleTopic starter

  • Super Contributor
  • ***
  • Posts: 1027
  • Country: gb
  • Just zis guy, you know?
    • Therm-App Users on Flickr
Re: 3D print help for germanium telescope (apologies if slightly OT)
« Reply #10 on: October 31, 2017, 08:50:10 am »
Sorry, I guess I should have included some more detailed information on the 35mm lens. The lens housing diameter is a touch under 40mm according to my desktop ruler.

Here are the relevant mugshots.

Please do not scale from any of my photos or sketches unless they say they have measurements of a specified accuracy. I am unqualified in the use of a micrometer and dangerous with a ruler; my favourite units of measure are the piece of string, barn, Sheppey, attoparsec, Helen, Lenat, Warhol and, in certain limited circumstances, the Garn.   

Students of computer science will realise why the Potrzebie system of weights and measures also has its attractions.
« Last Edit: October 31, 2017, 10:40:33 am by Ultrapurple »
Rubber bands bridge the gap between WD40 and duct tape.
 

Offline IwuzBornanerd

  • Frequent Contributor
  • **
  • Posts: 318
  • Country: us
Re: 3D print help for germanium telescope (apologies if slightly OT)
« Reply #11 on: October 31, 2017, 11:37:38 pm »
The 35mm lens is not sticking out as far as I had imagined.
 
I fear I may have hijacked this discussion, so let me know if I should just shut up & let you & @Vipitis work this out.  I see he is asking what the extent of the adapter is.  I thought you would want the printed object to go all the way to the telescope's mounting ring but if that Sugru sticks as well as claimed you might literally be "stuck" with the tubes.

Another thing I think he needs to know is what is critical in the interface between the camera & the telescope.  I am thinking the camera needs to be perfectly centered on the axis of the telescope and aimed straight down that axis.  If that is true I would think also that you had a tough time achieving and maintaining that with your water bottle.  Is that the case?
I am not opposed to exercise, unless it is an exercise in futility.
 

Offline UltrapurpleTopic starter

  • Super Contributor
  • ***
  • Posts: 1027
  • Country: gb
  • Just zis guy, you know?
    • Therm-App Users on Flickr
Re: 3D print help for germanium telescope (apologies if slightly OT)
« Reply #12 on: November 01, 2017, 07:33:37 am »
@IwuzBornanerd - please DO keep contributing your ideas - the more the merrier! (I haven't yet been in PM contact with Vipitis on this or even decided for certain what approach I want to try next).

The thing that surprised me most about this telescope arrangement is how easy and forgiving the alignment actually is. As long as you've got the telescope and imager lens more or less lined up - hand-held in a car park is fine - you get pretty good images. Period.

I think the reason for this is that the telecope outputs a wide cylinder of parallel light, roughly the diameter of its final lens (?50mm, haven't measured it). As long as the imager's lens is mostly within that circle, you get a good image. The distance between the telescope and imager lens isn't critical - as long as the output lens fills the imager lens field of view it works fine. With the 35mm lens it's possible to have several inches of separation. On the other hand, if I used the rather wide-angle 6.8mm it would have to be fairly close to the telescope, maybe 10-20mm.

As you move the imager laterally in relation to the telescope you see slightly different parts of the distant scene; I assume this is because the telescope's active area is wider than the imager's lens (or at least its field of view). I don't know offhand what optical system the telescope was originally designed for but I imagine it had a large(ish) front optic, about the same size as the telescope output lens. Fraser has lots of experience and information on this stuff.

Focus is easy. Focus the imager lens at infinity and use the telescope's focus control to adjust for what you want to look at. The only problem is that the depth of field is rather limited (especially relatively close-up - the quickly-snatched samples below of my neighbour walking his dog were at about 10 or 15 feet, IIRC, and with a not-warmed-up 384x288 Therm-App, but give an idea of the DOF).


The bottom line is that the required mount is not a high precision item. As long as it points the imager roughly square-on and roughly central, it'll work fine. Tolerances of at least a couple of mm either way are acceptable. The main problem is simply that the curved front of the Therm-App means it isn't amenable to mounting flat up against things. Perhaps the simplest answer would be to build a wedge (semi-) permanently onto the front of the camera, then ruse rubber bands etc to secure it to the telescope. One of the goals is for it to be quick and easy to mount / dismount; rubber bands are compatible with that aim!
« Last Edit: November 01, 2017, 09:08:13 am by Ultrapurple »
Rubber bands bridge the gap between WD40 and duct tape.
 

Offline Vipitis

  • Frequent Contributor
  • **
  • Posts: 867
  • Country: de
  • aspiring thermal photography enthusiast
Re: 3D print help for germanium telescope (apologies if slightly OT)
« Reply #13 on: November 01, 2017, 10:39:19 am »
I understand your setup more, little by little.

What I could work on, with the images supplied. Is a negavite mold of the front of he ThermApp, with the big lens. So you can insert it at the back and secure it with rubber bands.

I will start to work at it this evening.

Given your plan to make panoramas, you get the most effective panoramas by mounting your imager on a panorama head for a tripod, and rotate on exactly the image null point. In both axis.
 

Offline UltrapurpleTopic starter

  • Super Contributor
  • ***
  • Posts: 1027
  • Country: gb
  • Just zis guy, you know?
    • Therm-App Users on Flickr
Re: 3D print help for germanium telescope (apologies if slightly OT)
« Reply #14 on: November 01, 2017, 10:45:30 am »
Hi Vipitis

Many thanks! Please hold on for a moment - I will make the necessary measurements and sketch a design later today (1 Nov) and send you the details.
Rubber bands bridge the gap between WD40 and duct tape.
 

Online Fraser

  • Super Contributor
  • ***
  • Posts: 13168
  • Country: gb
Re: 3D print help for germanium telescope (apologies if slightly OT)
« Reply #15 on: November 01, 2017, 01:51:37 pm »
For info, the Inframetrics X3 telescope was designed for use with the Inframetrics scanning thermal cameras. The bayonet mount adapter was fitted (and is easily removed) to suit the later 600 series scanners. Without the bayonet mount, the telescope fits the earlier 500 series scanners via a coarse screw thread.

The Inframetrics scanners have a large front window through which thermal energy is received. There may be a transition lens behind it but I think not. The thermal scene is presented to a galvanometer driven mirror that forms one axis of the image scan. The mirror passes the energy to another galvanometer driven mirror that produces the second axis of the scan. The second mirror passes the image energy to a set of Germanium lenses that in turn present the energy to the single pixel thermal sensor.

The X3 Telescope contains four very nice quality Germanium lenses of diameter approx 50mm. The front objective lens element combined with the second lens element form a Keplerian telescope. The distance between the two lenses is adjustable to set the focus. The output of the Keplerian telescope is then presented a pair of lenses that perform image collimating. The energy beams coming out of the rear of the Telescope are virtually parallel to eachother. These parallel energy beams would have been presented to the first scanning mirror inside the Inframetrics camera.

Note that the Inframetrics scanner does not need a lens mounted in its lens mount to work. The Telescope is an auxiliary lens, hence its parallel image beam output.

The inversion of the image occurs between the front Objective lens element and the second lens element.

As I have previously detailed, the X3 telescope was part of a lens system that could be fitted with additional auxiliary lenses that I have in my collection. A choice of close-up lenses and expensive a right angle microscope lens may be screwed onto the front of the telescope. This provides the combination of X3 magnification with close-up working capability :) an impressive lens system that cost a fortune to buy new. Lots of Germanium and quality exudes from the lens assemblies. The transmission figure for the telescope and other auxiliary lenses is provided on their storage boxes. The X3 telescope has a transmission figure of around 86% but it is measures for each lens. Yes that is correct, each individual lens assemblies was tested and characterised before sale. No wonder they were expensive. This is why the transmission figure can be different with two visually identical telescopes. I own three and they are all roughly the same transmission figure. The transmission figure for auxiliary lenses may be entered into some thermal cameras and the camera compensates for such in its measurements. When such is not available, manual compensation may be instigated by tweaking the emissivity setting ;)

Fraser
« Last Edit: November 01, 2017, 02:36:37 pm by Fraser »
If I have helped you please consider a donation : https://gofund.me/c86b0a2c
 

Online Fraser

  • Super Contributor
  • ***
  • Posts: 13168
  • Country: gb
Re: 3D print help for germanium telescope (apologies if slightly OT)
« Reply #16 on: November 01, 2017, 02:01:56 pm »
I have. X-Ray images of the X3 telescope and produced a ray trace diagram of it some time ago. I used the X-Ray images to obtain the lens element physical characteristics. The Ray Tracing program could not cope with a RI of 4 so I had to scale it for an RI of 2. I will see if I can find them and upload them here.

I personally use a long lens support bracket when wanting to attach a camera behind a telescope. It is basically a flat bat that is bolted to the underside of the camera (to its tripod mount threaded hole) and I use nylon pipe stand-off clamps or proper camera tripod rings to attach the reels ope to the flat bracket. The flat bracket has a tripod mount threaded hole at the centre of balance or tripod mounting. It works well and a simple bellows or light tube may be used between the camera Objective and rear of the telescope.

Sadly I sold my bracket with a telescope but I still have parts knocking around to build another. I will see if I can find them. This solution permits Solid mounting of the telescope on a tripid and places no stress on the camera lens assembly.

Fraser
« Last Edit: November 01, 2017, 03:27:35 pm by Fraser »
If I have helped you please consider a donation : https://gofund.me/c86b0a2c
 

Online Fraser

  • Super Contributor
  • ***
  • Posts: 13168
  • Country: gb
Re: 3D print help for germanium telescope (apologies if slightly OT)
« Reply #17 on: November 01, 2017, 02:17:22 pm »
Examples of similar brackets to those I have used to mount cameras behind telescopes. These are just examples that present the principle. Such breketry is cheap from China and decent quality. It just becomes a Mechano set to assemble the brackets to meet your specific needs.

Fraser
If I have helped you please consider a donation : https://gofund.me/c86b0a2c
 

Offline cdev

  • Super Contributor
  • ***
  • !
  • Posts: 7350
  • Country: 00
Re: 3D print help for germanium telescope (apologies if slightly OT)
« Reply #18 on: November 01, 2017, 02:39:01 pm »
Are any ebay (aliexpress, ??) sellers's stores particularly good for finding this kind of stuff, especially decent quality at low prices? 

Although they are good for looking, buying those kinds of items from stores here in the US rapidly adds up, making it prohibitively expensive.

I want to build a kind of enclosure around a digital still camera I have so it can be used for video a bit more easily. (It's autofocus is not meant for film so it really needs to be set to manual focus and to do that I need to make its control surfaces more available while is being used.)

Examples of similar brackets to those I have used to mount cameras behind telescopes. These are just examples that present the principle. Such bracketry is cheap from China and decent quality. It just becomes a Mechano set to assemble the brackets to meet your specific needs.

Fraser
"What the large print giveth, the small print taketh away."
 

Online Fraser

  • Super Contributor
  • ***
  • Posts: 13168
  • Country: gb
Re: 3D print help for germanium telescope (apologies if slightly OT)
« Reply #19 on: November 01, 2017, 02:45:23 pm »
There is a partial teardown of the Inframetrics Telescope in my post that is to be found on this E4 teardown page....

https://www.eevblog.com/forum/thermal-imaging/flir-e4-thermal-imaging-camera-teardown/3875/

Fraser
If I have helped you please consider a donation : https://gofund.me/c86b0a2c
 

Offline UltrapurpleTopic starter

  • Super Contributor
  • ***
  • Posts: 1027
  • Country: gb
  • Just zis guy, you know?
    • Therm-App Users on Flickr
Re: 3D print help for germanium telescope (apologies if slightly OT)
« Reply #20 on: November 01, 2017, 02:45:30 pm »
Thanks Fraser

Now you're bringing these things to my attention I wonder if I have been barking up the wrong tree looking at a 3D printed solution. Bill Kraus, who wrote ThermApp Plus, made a rig using adapters like those you mention, and seems to have been doing OK with it. (He wrote ThermApp Plus for better control of the Therm-App camera when imaging bats at night!). Unfortunately I can't include his photo as an inline image, but the link to Flickr works. One of his 'secret life of bats' videos (my title) is here.

Perhaps my best bet will be to re-visit some of the things you suggest. I have various mounts and adapters that I can press into service, a soldering iron, Sugru and an arc welder that I'm absolutely rubbish at using. Between those toys I may be able to conjure something up. Watch this space - I'll post what I do...
« Last Edit: November 01, 2017, 03:14:46 pm by Ultrapurple »
Rubber bands bridge the gap between WD40 and duct tape.
 

Online Fraser

  • Super Contributor
  • ***
  • Posts: 13168
  • Country: gb
Re: 3D print help for germanium telescope (apologies if slightly OT)
« Reply #21 on: November 01, 2017, 02:51:23 pm »
Regarding parts sourcing, I just browse the eBay photographic section searching on bracket, tripod mount, lens support, lens tripod mount, camera mount, camera plate etc, until I find the brackets I need. I avoid plastic brackets as they are too flexible. All of the aluminium brackets that I have received have been very nice CNC machined or cast and good quality. They are sooo cheap compared to UK camera shops.

Fraser
If I have helped you please consider a donation : https://gofund.me/c86b0a2c
 

Online Fraser

  • Super Contributor
  • ***
  • Posts: 13168
  • Country: gb
Re: 3D print help for germanium telescope (apologies if slightly OT)
« Reply #22 on: November 01, 2017, 05:36:46 pm »
Off Topic but may be of interest.

It would be worth keeping your eyes open for a compact Telescope such as FLIR and FLUKE offer. These Telescopes are normally only a X2 magnification with 12 Degrees FOV but they match to many thermal cameras for which they were never intended ! All that is normally needed is a short 3D printed adapter to join the bayonet mount of the auxiliary lens to the camera in question. If you do build a 3D Therm App camera lens mount adapter for your Inframetrics, you will also have half the job done for attaching other, more compact, lenses :)

I attach some pictures of two of my X2 auxiliary lenses. They are both little beauties. Because they are designed to sit in front of a cameras normal objective lens, they are relatively easy to match into other cameras. The FLIR/AGEMA lens is larger to accommodate the approx 50mm objective on the PM 5xx and 6xx series cameras.

These are very useful lenses but sadly they are not that common on the secondary market, and when they do appear they cost a lot of money. That is the pure Germanium lenses for you. The FLUKE "TELE2" lens was made in March 2017 and I was fortunate to get it relatively cheaply. RRP is $1200.

Fraser
« Last Edit: November 01, 2017, 05:51:48 pm by Fraser »
If I have helped you please consider a donation : https://gofund.me/c86b0a2c
 

Online Fraser

  • Super Contributor
  • ***
  • Posts: 13168
  • Country: gb
Re: 3D print help for germanium telescope (apologies if slightly OT)
« Reply #23 on: November 01, 2017, 06:08:27 pm »
Ultrapurple,

For your bracket design you may wish to consider the attached pictures. That bracket costs £70 but is nothing special.
The bracket provides an adjustable height tripod screw mount for your Therm App and the long flat bar on which you can mount the Inframerics lens using a pair of standard Telephoto lens tripod mounts as I detailed earlier. You can sit a simple plastic or metal tube between the telephoto lens rear and the Therm-App to exclude off axis influences if you feel it is needed. The whole assembly may be tripod mounted via the long flat bar so that solves the issue of how to provide a solid tripod mount as well.

You would end up with a very nice rigid telephoto camera assembly and the mobile phone can still mount on the Therm App if needed.

Happy Experimenting. I will look for a cheaper version of the mount and post here if I find one.

Fraser
If I have helped you please consider a donation : https://gofund.me/c86b0a2c
 

Online Fraser

  • Super Contributor
  • ***
  • Posts: 13168
  • Country: gb
Re: 3D print help for germanium telescope (apologies if slightly OT)
« Reply #24 on: November 01, 2017, 06:33:29 pm »
Even FLIR resort to bracketry to make some of their lenses mount solidly onto their cameras as seen in these pictures.

Fraser
If I have helped you please consider a donation : https://gofund.me/c86b0a2c
 

Offline UltrapurpleTopic starter

  • Super Contributor
  • ***
  • Posts: 1027
  • Country: gb
  • Just zis guy, you know?
    • Therm-App Users on Flickr
Re: 3D print help for germanium telescope (apologies if slightly OT)
« Reply #25 on: November 01, 2017, 07:41:55 pm »
I think you missed a word...

Even FLIR resort to EXPENSIVE bracketry to make some of their lenses mount solidly onto their cameras as seen in these pictures.

Fraser
« Last Edit: November 02, 2017, 09:33:24 am by Ultrapurple »
Rubber bands bridge the gap between WD40 and duct tape.
 

Offline Vipitis

  • Frequent Contributor
  • **
  • Posts: 867
  • Country: de
  • aspiring thermal photography enthusiast
Re: 3D print help for germanium telescope (apologies if slightly OT)
« Reply #26 on: November 01, 2017, 08:18:12 pm »
Slight question to Fraser:

in the background of your images I see books or DVDs with the topic of 3D Printing with SketchUp and SketchUp for Dummies - my personal suggestion is AutoCAD and Fusio360, as Autodesk provides free access for hobbyists.

But back to the topic. 3D Printing can help to mount the ThermApp onto the rail, and custom brackets can be 3D printed - there are several examples found on thingiverse or  other websites like DIY and photography blogs. I a have even seen 3D printed parts for mounting solution in a university lab. Designing something that is perfect for the ThermApp can be done.
 

Offline IwuzBornanerd

  • Frequent Contributor
  • **
  • Posts: 318
  • Country: us
Re: 3D print help for germanium telescope (apologies if slightly OT)
« Reply #27 on: November 01, 2017, 09:03:23 pm »
Ultrapurple,

For your bracket design you may wish to consider the attached pictures. That bracket costs £70 but is nothing special....
Fraser

I like that bracket, but it's apparently worth much more than its weight in British pounds.  ;)  Maybe that's why we had not yet thought of looking for such things.  It might be all that is needed, though, at least if there is a screw mount on the ThermApp or its phone clamp.

To avoid dealing with the non-flat front, I was thinking of something that would just clip to the 2 ends that are parallel to the phone bracket.
I am not opposed to exercise, unless it is an exercise in futility.
 

Online Fraser

  • Super Contributor
  • ***
  • Posts: 13168
  • Country: gb
If I have helped you please consider a donation : https://gofund.me/c86b0a2c
 

Offline UltrapurpleTopic starter

  • Super Contributor
  • ***
  • Posts: 1027
  • Country: gb
  • Just zis guy, you know?
    • Therm-App Users on Flickr
Re: 3D print help for germanium telescope (apologies if slightly OT)
« Reply #29 on: November 02, 2017, 08:30:02 am »
I realise I've probably committed a sin of omission in not mentioning clearly that the Therm-App design includes a threaded tripod mount in its foot, which may simplify matters. See photo.

(As an aside, I'm amazed at the quality of technical photos I can get from a modern mobile phone with a plain sheet of paper as a backdrop, in normal office lighting. I know not everything in the one below is in sharp focus - it doesn't have to be - but something that I would once have spent at least an hour setting up is now do-able in a couple of minutes, including the time spent faffing around trying to find a clean sheet of paper and an A4-size clear space on the desk. And yes, it is a single photo of two Therm-App imagers; my biggest problem was holding the one on the left at a reasonable angle without getting my fingers in shot. If you look carefully you can see the merest hint of the tip of a fingernail beneath the lens barrel).

I like the 'T' style mounts Fraser has been finding: I'll mull on those as a more-permanent solution. It certainly looks as though something like that, with the adjustable height and reach, will solve the immediate issues - particularly if I use a collar arrangement to secure the Inframetrics auxiliary lens.

Heath Robinson and Rube Goldberg can rest a little easier now.
« Last Edit: November 02, 2017, 09:39:36 am by Ultrapurple »
Rubber bands bridge the gap between WD40 and duct tape.
 

Offline IwuzBornanerd

  • Frequent Contributor
  • **
  • Posts: 318
  • Country: us
Re: 3D print help for germanium telescope (apologies if slightly OT)
« Reply #30 on: November 03, 2017, 07:04:01 am »

... the Therm-App design includes a threaded tripod mount in its foot, which may simplify matters. See photo.


Heath Robinson and Rube Goldberg can rest a little easier now.

Excellent!  It was good of them to include that; it even looks like it lines up with the center of the lens and is on the "bottom" of the camera.  If that's the case you're almost there.  :)  You just have to have the bracket on top while using the telescope.

That telescope is pretty nifty.  If you have a narrow FOV lens on the camera & you put it closer than necessary you effectively get more magnification, right?

My 25.4mm ZnSe lens arrived Wednesday, so I can show you an example of my "roll your own" lens assemblies.  Not too cumbersome yet, but I need to get the 100mm one put together yet.
I am not opposed to exercise, unless it is an exercise in futility.
 

Offline UltrapurpleTopic starter

  • Super Contributor
  • ***
  • Posts: 1027
  • Country: gb
  • Just zis guy, you know?
    • Therm-App Users on Flickr
Re: 3D print help for germanium telescope (apologies if slightly OT)
« Reply #31 on: November 03, 2017, 08:44:57 am »
Yes, the thread is very useful but unfortunately it's not aligned with the optical centre - it's offset about 16mm. My Image15 and Photo15 on the previous page show what I mean.

The magnification of the telescope is fixed at x3. It makes no difference how close or far the lenses are apart (within reason - from touching to a couple of inches). It may be that it's possible to cheat the system very slightly by offsetting the focus of the telescope and imager, but it's unlikely to be worthwhile.

Magnification is most strongly dependent on the focal length of the Therm-App lens. I've used it with 13mm, 19mm and (briefly) 35mm, all with success. It doesn't make sense to use the 6.8mm with an x3 extender because 6.8x3=20.4 - a very clumsy and heavy way to get essentially the same as the 19mm lens, but with less sensitivity.

The 35mm lens does appear to work rather well with the telescope. I estimate it makes the equivalent of a ~200mm lens on a full frame 35mm SLR. With a setup like that you can not only prove definitively whether bears do indeed *ahem* in the woods, but where, and how much. But if you're that interested in the habits of bears, either get therapy or a scholarship.
« Last Edit: November 03, 2017, 10:38:00 am by Ultrapurple »
Rubber bands bridge the gap between WD40 and duct tape.
 

Offline IwuzBornanerd

  • Frequent Contributor
  • **
  • Posts: 318
  • Country: us
Re: 3D print help for germanium telescope (apologies if slightly OT)
« Reply #32 on: November 04, 2017, 01:13:11 am »
Yes, the thread is very useful but unfortunately it's not aligned with the optical centre - it's offset about 16mm. My Image15 and Photo15 on the previous page show what I mean.


Well, crap, I thought maybe they did something right.  So you can't get away with a simple straight bar, but need a right-angle or 2 to get everything aligned.

What I was thinking with the "extra" magnification is that if you could put the camera close enough to the back lens of the telescope such that the camera's field of view only captured, say half, of the telescope's image scene, then the camera frame would be filled with half of the telescope's scene and you would effectively have another 2x magnification.  Conversely, if you have the camera too far away such that the camera field of view takes in more than the telescope's output, you would get images with a round magnified scene in the middle surrounded by the telescope tube & surrounding un-magnified scenery.  Perhaps the back lens element in the telescope is too far ahead of the mounting ring to allow you to get "too close"...Or maybe I'm just "all wet".

The full moon is not much more interesting than a bear turd with a mere 25.4mm lens.  :=\
I am not opposed to exercise, unless it is an exercise in futility.
 

Offline UltrapurpleTopic starter

  • Super Contributor
  • ***
  • Posts: 1027
  • Country: gb
  • Just zis guy, you know?
    • Therm-App Users on Flickr
Re: 3D print help for germanium telescope (apologies if slightly OT)
« Reply #33 on: November 04, 2017, 01:40:36 pm »

I thought maybe they did something right.

I think they did get it right for its intended purpose. Remember, the Therm-App is supposed to be a device that clips onto a phone and has a handle so you can wave it around at things. What I'm trying to do with auxiliary lenses etc is way beyond what it was designed for, so anything extra we manage to achieve is a bonus.

I have bitten the bullet and ordered some of the bracketry Fraser identified on eBay. It will be interesting to see (a) if it turns up before Christmas and (b) if it will do what I want.

Meanwhile, I have been having some fun filming fireworks with the Therm-App Pro. For some reason it's a bit jerky (not enough computing horsepower maybe?) but there are samples here and here. Completely OT, I tried some visible slo-mo on fireworks, too.
« Last Edit: November 04, 2017, 03:17:22 pm by Ultrapurple »
Rubber bands bridge the gap between WD40 and duct tape.
 

Online Fraser

  • Super Contributor
  • ***
  • Posts: 13168
  • Country: gb
Re: 3D print help for germanium telescope (apologies if slightly OT)
« Reply #34 on: November 06, 2017, 08:46:07 pm »
Tracking helicopters across the cold sky can be fun as well :) The Large Chinooks fly over us at around 100 feet as we are in the countryside. Sadly I have yet to have my thermal camera to hand when they unexpectedly rumble over our house :( The Local Police Helicopter often hovers over a major A5 roundabout near by and he would make a nice thermal image if I had my X3 telescope attached to a camera and tripod mounted it.

Fraser.
If I have helped you please consider a donation : https://gofund.me/c86b0a2c
 

Offline Vipitis

  • Frequent Contributor
  • **
  • Posts: 867
  • Country: de
  • aspiring thermal photography enthusiast
Re: 3D print help for germanium telescope (apologies if slightly OT)
« Reply #35 on: November 07, 2017, 06:47:41 am »
Imaging aircraft is great, at first I thought the detection range would be great because they are large targets and really hot at some ends. Then I tried it at the airport.

I believe part of the detection is just the reflective surface of the plane I got... Others only a shadow in front of the cold background.

Images are with MSX
 
The following users thanked this post: Ultrapurple

Offline UltrapurpleTopic starter

  • Super Contributor
  • ***
  • Posts: 1027
  • Country: gb
  • Just zis guy, you know?
    • Therm-App Users on Flickr
Re: 3D print help for germanium telescope (apologies if slightly OT)
« Reply #36 on: November 07, 2017, 08:08:10 am »
I love that sky! That image deserves a place in the Thermal Imaging Gallery thread.
Rubber bands bridge the gap between WD40 and duct tape.
 

Offline IwuzBornanerd

  • Frequent Contributor
  • **
  • Posts: 318
  • Country: us
Re: 3D print help for germanium telescope (apologies if slightly OT)
« Reply #37 on: November 07, 2017, 09:01:02 am »
I love that sky! That image deserves a place in the Thermal Imaging Gallery thread.

I agree.  I saw that same effect back in early August when I took the PiZero out for a brief look around the back yard.  I didn't have as pretty a palette and no airplane, but there is a sort of bird in a cloud formation at the beginning of this video.  Watch the temperature markers as I scan from the sky around to the back of the house & back.  :)

Hopefully I'll find out someday if that banding is an everyday occurrence or not.
I am not opposed to exercise, unless it is an exercise in futility.
 

Offline Vipitis

  • Frequent Contributor
  • **
  • Posts: 867
  • Country: de
  • aspiring thermal photography enthusiast
Re: 3D print help for germanium telescope (apologies if slightly OT)
« Reply #38 on: November 07, 2017, 10:46:12 am »
Hm... The gradient is nice. But I believe that is flir post processing.

I got a few hundred pictures of the sky, mostly trying to shoot the moon or satellites.

I can send you a .zip with most of them, they are radiometric .jpegs and you can edit them in flir tools or in thermovision to change pallette and scale.


It looks nice in rainbow HC, arktis also looks nice.

I will attempt to shoot a few pictures of the night clear sky and stack them for a great gradient.

I am waiting for something special before I post in the gallery.
 

Offline UltrapurpleTopic starter

  • Super Contributor
  • ***
  • Posts: 1027
  • Country: gb
  • Just zis guy, you know?
    • Therm-App Users on Flickr
Re: 3D print help for germanium telescope (apologies if slightly OT)
« Reply #39 on: November 07, 2017, 12:22:42 pm »
However the effect happened - post-processing, artifacts, leprechaun wee or whatever - does not change the fact that it is a very nice image that deserves wider recognition.

As far as I'm aware there is no rule that you can only submit one image to the Gallery, so there's no reason why you shouldn't add this and then more, later, that you're even happier with.
Rubber bands bridge the gap between WD40 and duct tape.


Share me

Digg  Facebook  SlashDot  Delicious  Technorati  Twitter  Google  Yahoo
Smf