Author Topic: Thermal Imaging Gallery  (Read 116193 times)

0 Members and 1 Guest are viewing this topic.

Offline Great61

  • Newbie
  • Posts: 4
  • Country: se
Re: Thermal Imaging Gallery
« Reply #225 on: October 09, 2018, 11:48:39 am »
My Beachcomber 360 hot bath

Flir E4, upgraded to E8 thermopicture Only.

Skickat från min SM-G950F via Tapatalk
« Last Edit: October 09, 2018, 11:50:46 am by Great61 »
 

Offline Vipitis

  • Frequent Contributor
  • **
  • Posts: 867
  • Country: de
  • aspiring thermal photography enthusiast
Re: Thermal Imaging Gallery
« Reply #226 on: October 11, 2018, 05:57:38 pm »
Little bit different... but it is a gallery so it fits here:

http://coolcosmos.ipac.caltech.edu/image_galleries/ir_zoo/zoo.html

this is from an old educational website that NASA made to explain infrared. The actual website today is really great if you want to learn something about Infrared in general and especially about infrared astronomy.
http://coolcosmos.ipac.caltech.edu/

the new galleries have sliders to switch between visual and infrared.
 

Offline Vipitis

  • Frequent Contributor
  • **
  • Posts: 867
  • Country: de
  • aspiring thermal photography enthusiast
Re: Thermal Imaging Gallery
« Reply #227 on: October 11, 2018, 09:44:02 pm »
Camera: CAT S60 (Lepton 2 80x60)
Lens: DIY 3 Ge elements in 3d printed housing
Software: TheramlCamera+ with superresolution on medium sharpening and nearest neighbor scaling
Post processing: panorama stitching in ICE. 13 individual frames just panned handheld, iron palette was locked.
Subject: neighborhood from my window.

I will try to go multiple rows and columns soon but I need to use a tripod than and find the rotation axis. I might also experiment with stacking before stitching.
 

Offline Sheldon

  • Newbie
  • Posts: 3
  • Country: hu
Re: Thermal Imaging Gallery
« Reply #228 on: October 13, 2018, 01:17:21 pm »
Subject: Raspberry Pi Zero
Camera: Flir C2


Offline Nicosrap

  • Newbie
  • Posts: 3
  • Country: cl
Re: Thermal Imaging Gallery
« Reply #229 on: October 23, 2018, 08:55:56 pm »
 En una inspección de hotel en chile.
 

Offline Ultrapurple

  • Super Contributor
  • ***
  • Posts: 1027
  • Country: gb
  • Just zis guy, you know?
    • Therm-App Users on Flickr
Re: Thermal Imaging Gallery
« Reply #230 on: November 01, 2018, 11:09:53 am »
Brrr!

The weather is getting colder here as Autumn falls, so it was time to switch on the office heater. And, of course, time to check it was working using a thermal camera rather than risking waving a hand in its direction to test for warmth!

Therm-App Pro 640x480, 13mm f/1.0 lens, ThermViewer software with integral superresolution to 1280x960.
« Last Edit: November 01, 2018, 11:12:12 am by Ultrapurple »
Rubber bands bridge the gap between WD40 and duct tape.
 

Offline Ultrapurple

  • Super Contributor
  • ***
  • Posts: 1027
  • Country: gb
  • Just zis guy, you know?
    • Therm-App Users on Flickr
Re: Thermal Imaging Gallery
« Reply #231 on: November 04, 2018, 12:24:13 pm »
"Just One Tree"


(click image for access to full resolution original)


"In the studio"


(click image for access to full resolution original)


Both images made with a Therm-App Pro (640x480) with ThermViewer software, composited using Microsoft Image Composite Editor.

Apart from the fact that these are composites, each sub-image is exactly as it came out of the camera.
« Last Edit: November 07, 2018, 08:23:03 am by Ultrapurple »
Rubber bands bridge the gap between WD40 and duct tape.
 
The following users thanked this post: DaneLaw

Offline Vipitis

  • Frequent Contributor
  • **
  • Posts: 867
  • Country: de
  • aspiring thermal photography enthusiast
Re: Thermal Imaging Gallery
« Reply #232 on: November 04, 2018, 11:39:14 pm »
Your shots are great, they inspired me.

So I went out around the house with my phone and my new lens and looked for the next best tree. Lucky there is a really nice tree against the sky just around the corner. It wasn't easy to lock the temperature scale to get a good image because the vignetting plastic corners are always like 26C and ruin the histogram. I also had to lock the automatic image tuning(shutter) so my panorama is having the same "exposure" overall. I did 8 in a row and 4 rows and 8 columns, although I somehow only have 7 in the first one... ICE was able to fix it for me.... there are a lot of stiching errors due to this being handheld without any lens correction - but the result is nice. I have no clue why the superresolution sharpening looks this agressive, I might have to change my settings here.

Subject: Tree
Camera: CAT S60 with DIY Lens
Processing: Images taken with ThermalCamera+ Superresolution on medium, nearest neighbor scaling, Rainbow palette locked and tuning set to automatic. 4x8 Panorama aligned and stacked in Microsoft ICE.


image resolution is not correct due to upscaling(someone help me with the [image]magick here.
« Last Edit: November 07, 2018, 09:58:30 am by Vipitis »
 

Offline mahony

  • Regular Contributor
  • *
  • Posts: 156
  • Country: de
Re: Thermal Imaging Gallery
« Reply #233 on: November 06, 2018, 08:48:18 pm »
Subject: Another test-panorama 'just out of the window'
Camera: Thermal Expert V1
Lens: Ophir SupIr 35mm f/1.4
Stitching: Photoshop CS2
Postprocessing: Enhanced constrast and minor sharpening

Is image is 5MPixel without any superresolution or similar enhancement. Next time I give a try to the 100mm - this would ideally result in ~45MPixel for the same field of view. :wtf:
« Last Edit: November 06, 2018, 08:53:15 pm by mahony »
 

Offline Ultrapurple

  • Super Contributor
  • ***
  • Posts: 1027
  • Country: gb
  • Just zis guy, you know?
    • Therm-App Users on Flickr
Re: Thermal Imaging Gallery
« Reply #234 on: November 07, 2018, 08:21:34 am »
That is a superb piece of work, mahony!

On occasion I have used a low-end Gigapan scan mount to make panoramic images such as this one, which I never got round to completing:


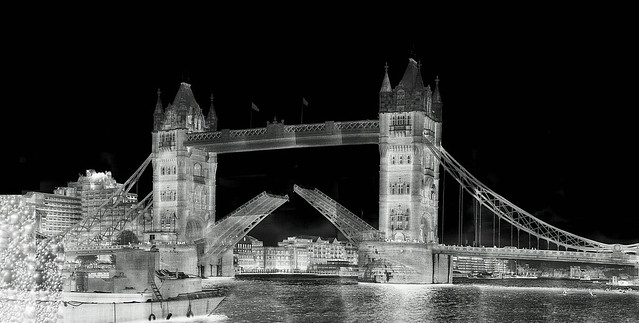
(This used a Therm-App 384x288 with a 19mm lens and x3 telescope, if I remember correctly; it was too unwieldy to wave around by hand. Image Composite Editor, though, didn't like all the areas of black and couldn't manage to stitch the image, so I ended up doing it laboriously by hand.)

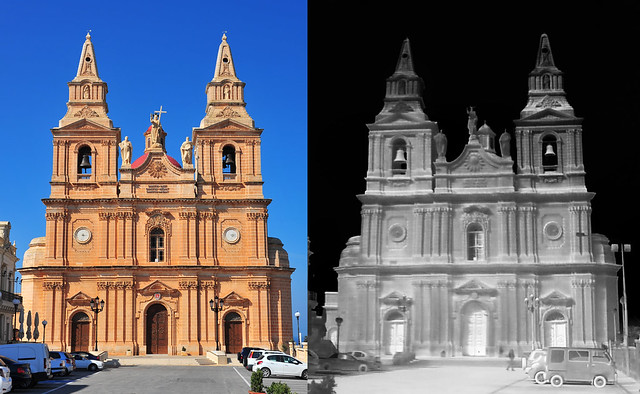
Experience shows that, in most instances, hand-held pan and scan works well enough, provided you make sure you have good enough coverage (and that comes with practice). This image was a hand-held composite:


As was this (the visible and thermal images were taken from slightly different positions, to my enduring annoyance):


Either way, I salute your experiments and look forward to seeing more results.
Rubber bands bridge the gap between WD40 and duct tape.
 

Offline Ultrapurple

  • Super Contributor
  • ***
  • Posts: 1027
  • Country: gb
  • Just zis guy, you know?
    • Therm-App Users on Flickr
Re: Thermal Imaging Gallery
« Reply #235 on: November 07, 2018, 08:38:43 am »
Your shots a great, they inspired me.

Thanks!

<snip>
It wasn't easy to lock the temperature scale to get a good image because the vignetting plastic corners are always like 26C and ruin the histogram. I also had to lock the automatic image tuning(shutter) so my panorama is having the same "exposure" overall.

That is one of my biggest problems too. ThermApp Plus for the Therm-App camera lets you lock the temperature range, which helps a lot. If you have access to the raw data from the sensor, and can process that, you can lock the sensor range that way.

If you're working in monochrome you can of course apply a correction to the image in <your favourite image editing application> using a 'bull's eye' that lightens the corners. Many image editors also have vignette correction options, which will do the job for you. It's tedious doing it on 32 or more images!


I did 8 in a row and 4 rows and 8 columns, although I somehow only have 7 in the first one... ICE was able to fix it for me.... there are a lot of stiching errors due to this being handheld without any lens correction - but the result is nice. I have no clue why the superresolution sharpening looks this agressive, I might have to change my settings here.


Even with a low resolution image sensor you can build up high resolution composite if you can find a way to narrow the field of view. I was lucky enough to acquire an x3 Keplarian telescope (mentioned earlier), which turns a 19mm lens into 57mm, albeit at the expense of aperture. But if you have a hot target that's not too much of a problem.


Keep your eyes open on eBay! And, of course, make sure you get something that's LWIR rather than MWIR.
Rubber bands bridge the gap between WD40 and duct tape.
 

Offline IwuzBornanerd

  • Frequent Contributor
  • **
  • Posts: 318
  • Country: us
Re: Thermal Imaging Gallery
« Reply #236 on: November 08, 2018, 09:35:32 am »
@Ultrapurple I don't see an "L bracket" in that photo.  Did you never receive the bracket you ordered long ago or was it not as useful as you had hoped?  I don't recall seeing anything more on the thread where you were looking for something 3D printed.

All I see here are the standard rubber bands and duct tape.  ;)
I am not opposed to exercise, unless it is an exercise in futility.
 

Offline Ultrapurple

  • Super Contributor
  • ***
  • Posts: 1027
  • Country: gb
  • Just zis guy, you know?
    • Therm-App Users on Flickr
Re: Thermal Imaging Gallery
« Reply #237 on: November 08, 2018, 10:31:57 am »
Don't knock rubber bands and duct tape!

All joking apart, that was the only photo I had readily available to illustrate my comment. I did get the various bits of bracketry I mentioned and did manage to contrive a reasonable mount where everything lined up. Unfortunately life took some "interesting" turns (more than doubling of workload due to a colleague becoming seriously ill for many months, plus a family bereavement) and I haven't had the chance to do anything thermal this year - or, really, with regular photography except for a couple of work assignments. That's also why I've been absent from EEVblog for so long.

Meanwhile, a lens like this may show some promise for creating hi-res thermal panoramas - provided you've got the patience to take the hundreds or thousands of images required:

(click image for access to full resolution original, and notes)


More on this lens later, when I've got it working properly. It's a bit off-topic from "thermal imaging gallery" so any discussion should probably get its own thread. I am in private discussion with a forum member about how to get the lens up and running: it is not as simple as just whacking a sensor on the back.
« Last Edit: November 08, 2018, 11:26:01 am by Ultrapurple »
Rubber bands bridge the gap between WD40 and duct tape.
 

Offline mahony

  • Regular Contributor
  • *
  • Posts: 156
  • Country: de
Re: Thermal Imaging Gallery
« Reply #238 on: November 11, 2018, 06:30:00 pm »
That is a superb piece of work, mahony!


Thank you very much! Very nice reflective lens this may give some nice long range shots!

I finally got the 100mm on and threw it onto my DIY Pan-Tilt to get some test shots and this one of the moon. The moon diameter in the image should be ~51 pixels at its current size (~8.7mrad) and the iFOV of my combination (0.17mrad).

I plan on mount the TE-V1 on my beginner-telescope too (650mm f/5.6) - not sure if the rather small aperture will give any useful imagery but at least it should be ~330 pixels+ in size than...  ;)

Subject: Moon @16%
Camera: Thermal Expert V1
Lens: Ophir SupIr 100mm f/1.6
Postprocessing: none (linear mapping of min/max to greyscale)
« Last Edit: November 11, 2018, 06:32:04 pm by mahony »
 

Offline Ultrapurple

  • Super Contributor
  • ***
  • Posts: 1027
  • Country: gb
  • Just zis guy, you know?
    • Therm-App Users on Flickr
Re: Thermal Imaging Gallery
« Reply #239 on: November 11, 2018, 06:54:30 pm »
That is very impressive - well done!

I can see I'm going to have to up my game!
Rubber bands bridge the gap between WD40 and duct tape.
 

Offline mahony

  • Regular Contributor
  • *
  • Posts: 156
  • Country: de
Re: Thermal Imaging Gallery
« Reply #240 on: November 11, 2018, 07:38:19 pm »
To be honest - I expected a bit more.  ;D But maybe I really get something out of the telecope from the moon. The sun maybe interesting too … we will see.

But anyway what I intended to do was a first pano-shot with the 100mm and here we go.
The pan-tilt range (see images 2 and 3) was set to 24°x12° and I just used 142 images of roughly 2000+ available. Again 5MPixel+ but on roughly the same FOV as the stock 19mm lens.

The focus is already a bit off at close range due to some vignetting and quite shallow depth-of-field plus some of the detail is lost due to camera movement and the stitching too.
 
Subject: Again the same city view - but much smaller region
Camera: Thermal Expert V1
Lens: Ophir SupIr 100mm f/1.6
Stitching: Microsoft ICE (Photoshop did not finish the job... :-//)
Postprocessing: IrfanView (-10 brightness, +50 contrast)
« Last Edit: November 11, 2018, 07:40:30 pm by mahony »
 

Offline elninjo888

  • Contributor
  • Posts: 20
  • Country: lt
Re: Thermal Imaging Gallery
« Reply #241 on: November 15, 2018, 07:43:40 am »
Subject: Wife with daughter  reading book on electric heated floor.
Camera: Xtherm T3S
Lens: 13mm
Postprocessing: non
 

Offline elninjo888

  • Contributor
  • Posts: 20
  • Country: lt
Re: Thermal Imaging Gallery
« Reply #242 on: November 15, 2018, 07:48:20 am »
Subject: water heated floor.
Camera: Xtherm T3S and TE-Q1,
Lens: 13mm
Postprocessing: non
 

Offline mahony

  • Regular Contributor
  • *
  • Posts: 156
  • Country: de
Re: Thermal Imaging Gallery
« Reply #243 on: November 18, 2018, 04:03:36 pm »
Played a little bit with the TE and the 100mm again. Subject here is the Zugspitze mountain south of Munich. It is roughly 80km away and was completely invisible by the naked eye today - but quite good to see in LWIR.  ;D
The tree line in the foreground is about 800m away.
The first image is an average of a short sequence of 60 frame to get rid of some noise - the second is a single raw frame from the sequence, just as a reference of the noise reduction.

Edit: I also did an accidental move across the (already quite low) sun. Image 3 is a 2x logarithmic scaled version of the raw image on a white-black-blue-red-yellow-palette. It is always interesting to see how low the atmospheric scattering of the suns energy is in LWIR compared to all other optical wavebands - there almost no halo around the sun even in this aggressively spread image. The bolometer recovered the heated pixel within a couple of seconds - nothing to spot after roughly 20s...  ::)

Subject: Zugspitze
Camera: Thermal Expert V1
Lens: Ophir SupIr 100mm f/1.6
Postprocessing: PS CS3 brightness -90, constrast +100
« Last Edit: November 18, 2018, 04:19:46 pm by mahony »
 

Offline frenkyTopic starter

  • Supporter
  • ****
  • Posts: 1003
  • Country: si
    • Frenki.net
Re: Thermal Imaging Gallery
« Reply #244 on: November 20, 2018, 07:13:02 am »
i3system finally added 3:4 capture ratio in android app. Now they should just fix it to size 288*384 or 576*768 (x2). And save in lossless jpg or png.
Because images from android app still look pretty bad:

ThemalExpert Q1 Plus:
« Last Edit: November 20, 2018, 07:15:22 am by frenky »
 

Offline Ultrapurple

  • Super Contributor
  • ***
  • Posts: 1027
  • Country: gb
  • Just zis guy, you know?
    • Therm-App Users on Flickr
Re: Thermal Imaging Gallery
« Reply #245 on: November 20, 2018, 09:03:48 am »
Perhaps it's time we started asking Jinhua (Mr ThermViewer) if he would like to consider extending his software to cover the ThermalExpert cameras. ThermViewer is a great app that gives a lot of manual control, noise reduction (and background noise elimination) and not only outputs moving and still images in various forms, lossless and otherwise, but can also produce data dumps to file.
Rubber bands bridge the gap between WD40 and duct tape.
 
The following users thanked this post: frenky

Offline frenkyTopic starter

  • Supporter
  • ****
  • Posts: 1003
  • Country: si
    • Frenki.net
Re: Thermal Imaging Gallery
« Reply #246 on: November 20, 2018, 09:32:41 am »
Yes. I have no problem paying up to 20€ for a good android application.
 

Offline Ultrapurple

  • Super Contributor
  • ***
  • Posts: 1027
  • Country: gb
  • Just zis guy, you know?
    • Therm-App Users on Flickr
Re: Thermal Imaging Gallery
« Reply #247 on: November 20, 2018, 10:08:46 am »
I honestly don't know how much ThermViewer costs, or if it has been made free. I was a beta tester, particularly for the Therm-App Pro.

In the professional world, I believe the software to exploit thermal imaging data can easily cost as much or more than the camera itself. So paying up to, say, 5-10% of the cost of the camera doesn't seem too bad.
Rubber bands bridge the gap between WD40 and duct tape.
 

Offline elninjo888

  • Contributor
  • Posts: 20
  • Country: lt
Re: Thermal Imaging Gallery
« Reply #248 on: November 20, 2018, 11:05:42 am »
I honestly don't know how much ThermViewer costs, or if it has been made free. I was a beta tester, particularly for the Therm-App Pro.

In the professional world, I believe the software to exploit thermal imaging data can easily cost as much or more than the camera itself. So paying up to, say, 5-10% of the cost of the camera doesn't seem too bad.
I paid 35 USD.

Sent from my SM-G930F using Tapatalk


Offline Ultrapurple

  • Super Contributor
  • ***
  • Posts: 1027
  • Country: gb
  • Just zis guy, you know?
    • Therm-App Users on Flickr
Re: Thermal Imaging Gallery
« Reply #249 on: November 20, 2018, 11:50:30 am »
I honestly don't know how much ThermViewer costs, or if it has been made free. I was a beta tester, particularly for the Therm-App Pro.

In the professional world, I believe the software to exploit thermal imaging data can easily cost as much or more than the camera itself. So paying up to, say, 5-10% of the cost of the camera doesn't seem too bad.
I paid 35 USD.


So, probably around 5% of the cost of your thermal camera.

The alternative, for ThermApp cameras, is Therm-App Plus, which does have some excellent features (in particular, manual level control is better) but it doesn't have superresolution or drive the Xtherm cameras. On the other hand, Therm-App Plus is significantly cheaper than ThermViewer.
Rubber bands bridge the gap between WD40 and duct tape.


Share me

Digg  Facebook  SlashDot  Delicious  Technorati  Twitter  Google  Yahoo
Smf