Author Topic: Build Thread: Reflow Toaster Oven Conversion Project  (Read 1677 times)

0 Members and 1 Guest are viewing this topic.

Offline bmwman91Topic starter

  • Newbie
  • Posts: 9
  • Country: us
Build Thread: Reflow Toaster Oven Conversion Project
« on: December 30, 2023, 05:30:37 am »
As if there are not a zillion of these threads already... :horse:

Anyway, now that I have completed a large car project that has been a few years in the making, I am dabbling back into some electronics fun. Or at least non-car related electronics projects. This all started out as wanting to design a new ring light for my binocular microscope that I use for rework, soldering, inspection, and other stuff that one might find a microscope useful for. The cheap "80 LED" ring light that I was using had met a hot and smelly end when I over-drove it with my bench PSU lol...it was not really bright enough with the stock AC-DC converter onboard, so I drove it directly from a variable DC supply up until I got a little too excited with the output level. While there are plenty of inexpensive ring lights out there, they all use junk white LEDs with awful spectral coverage. Aside from this being a little straining on my eyes, it also makes for lousy digital photos when I have the camera attached.

So, I set out to design a much nicer ring light using some Bridgelux BXEN LEDs which have some of the best spectral coverage of any white LEDs out there. As part of the over-designing fun, I took thermals fully into consideration and the PCB is 2oz copper on an aluminum board, with generous copper pours for all of the LED pads and the LED current driver ICs. Hand soldering is not going to be a thing here. Of course, a hot plate and heat gun would very likely suffice for this simple board, but I'd really like to adhere to the specified reflow profile limits in the LEDs' datasheet to avoid messing up the output spectrum since that was sort of a central design consideration that kicked all of this off. That, and I plan to make a fair number of LED strip modules with aluminum boards for workspace illumination, so I will need a good way to do a large batch of those.

With the background pedantry out of the way, here's the part that has to do with the thread title. I spent several evenings looking up what people have been doing for converting toaster ovens into reflow ovens. Lots of pro's and con's all over the board. The general consensus seems to be that you can DIY a better reflow oven for the same cost as many of the AliExpress-type commercial offerings, at least if you take some time to think through what you are doing. I do not have the space or money for a proper hot air or vapor phase reflow oven, so I'll be doing the best that I can going down the toaster route. This is a hobbyist operation over here, not a commercial endeavor.

The first challenge was simply to find a suitable toaster oven. The Controleo3 solution is well documented and has some good recommendations for ovens, but I want a slightly larger oven which could (at least in theory) handle a 305mm (12 inch) long PCB. Yes yes, thermal stratification and all that...I'll see how things look when I get there. Trying to identify a suitable oven online was proving to be challenging since many models / listings have no information about the power draw, number of heating elements, or type of heating elements. Aside from the ~305mm internal width criteria, I also decided that the oven should have quartz heater tubes, preferably 4 of them (2 top, 2 bottom), and a power draw of at least 1400W. Ultimately, I just went to a local home goods store and started poking around in the toaster oven aisle. It probably isn't every day that they get someone poking a tape measure into toaster ovens lol.

Thankfully, a suitable candidate was present, in stock, and even on sale for the reasonable price of US$69.99. It had a convection function, which I was sort of ambivalent about since it sounds like that can be a double-edged sword, but all other requirements were met so I figured that I could decide later whether or not to use the fan.

NOTE / TO-DO: Post internal dimensions of oven for everyone. Will do in a future post. Very roughly, the internal volume is ~18L, and will probably be more like 16L after walling-off the rear "pizza bulge."


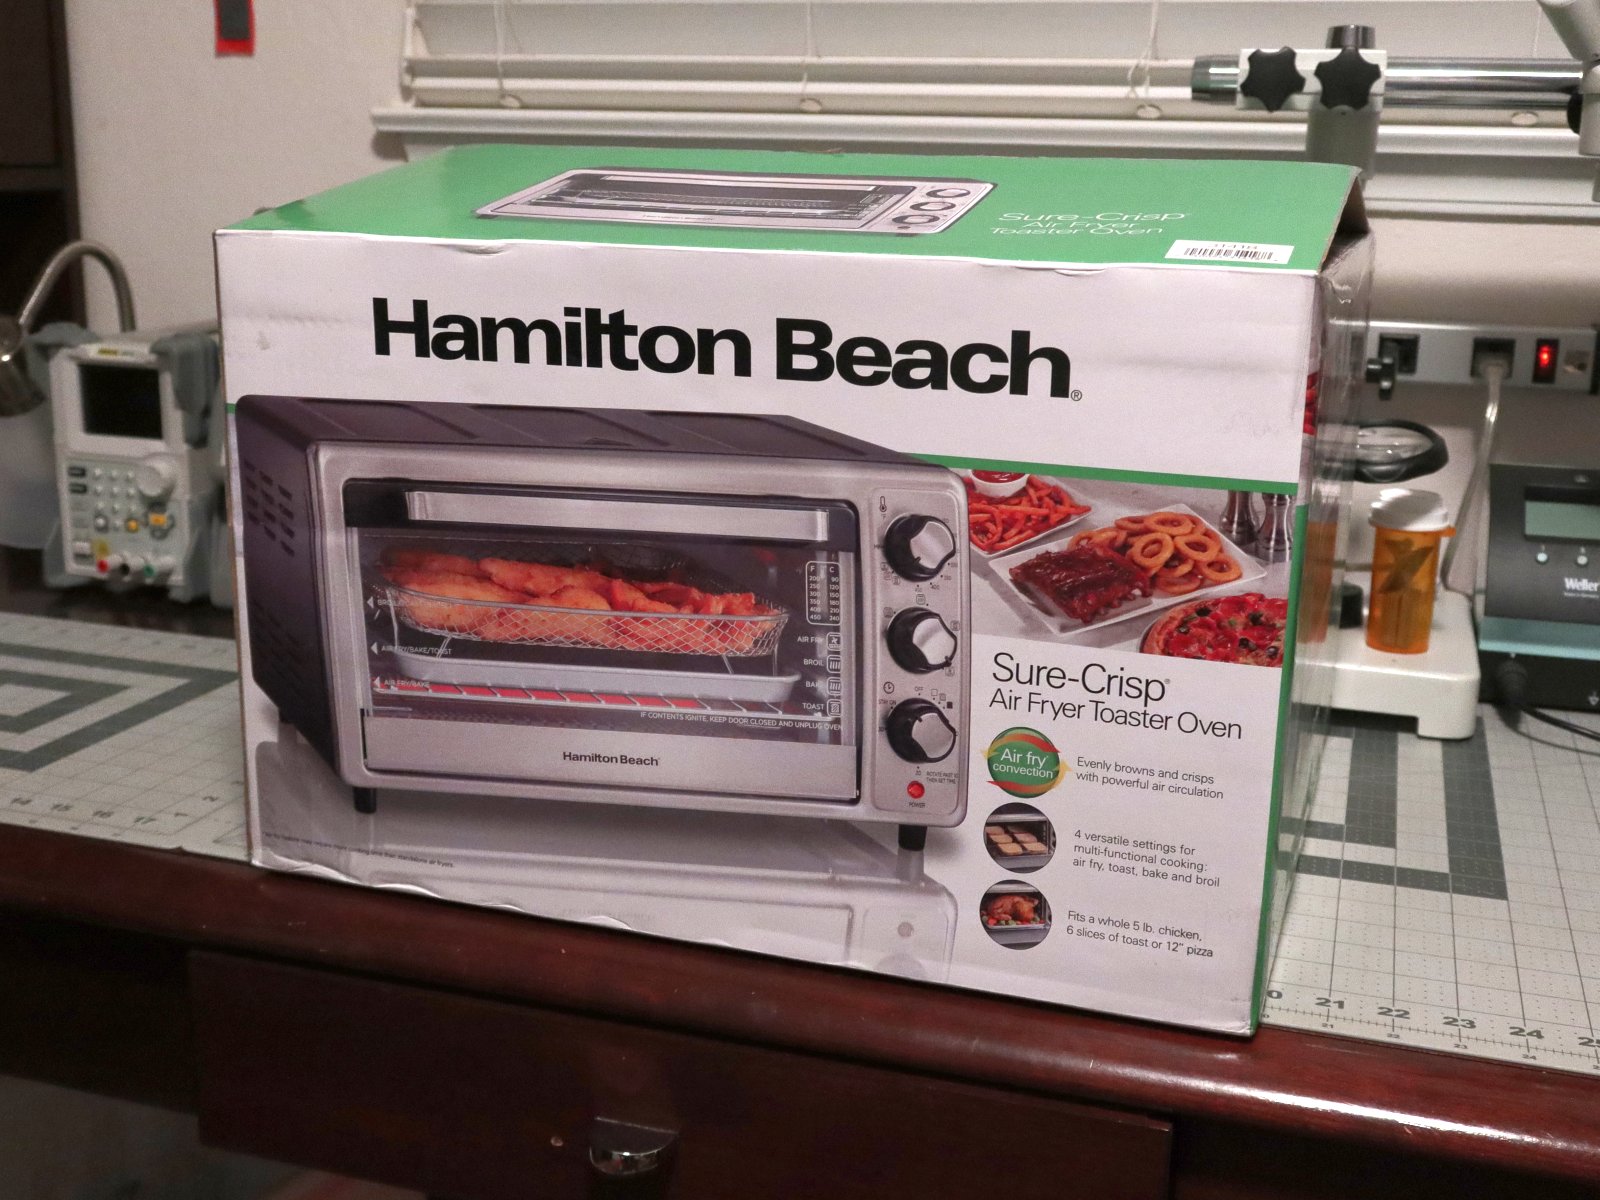
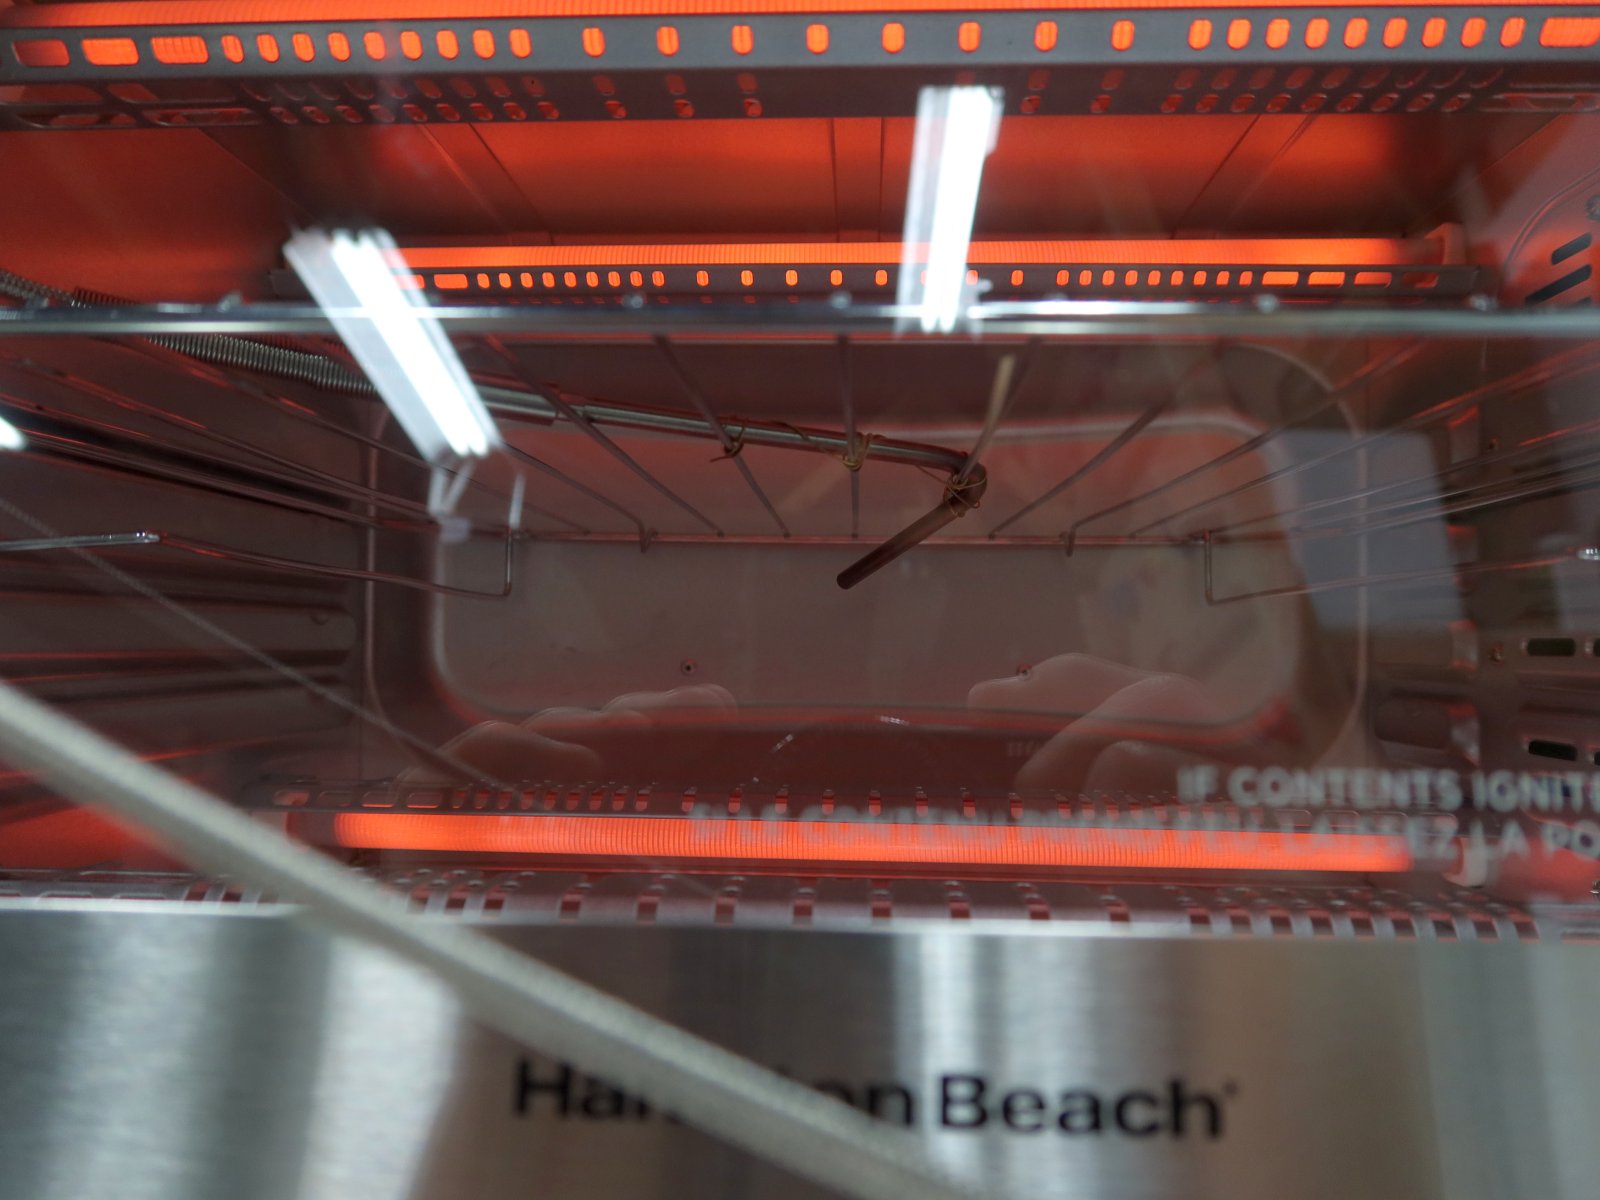
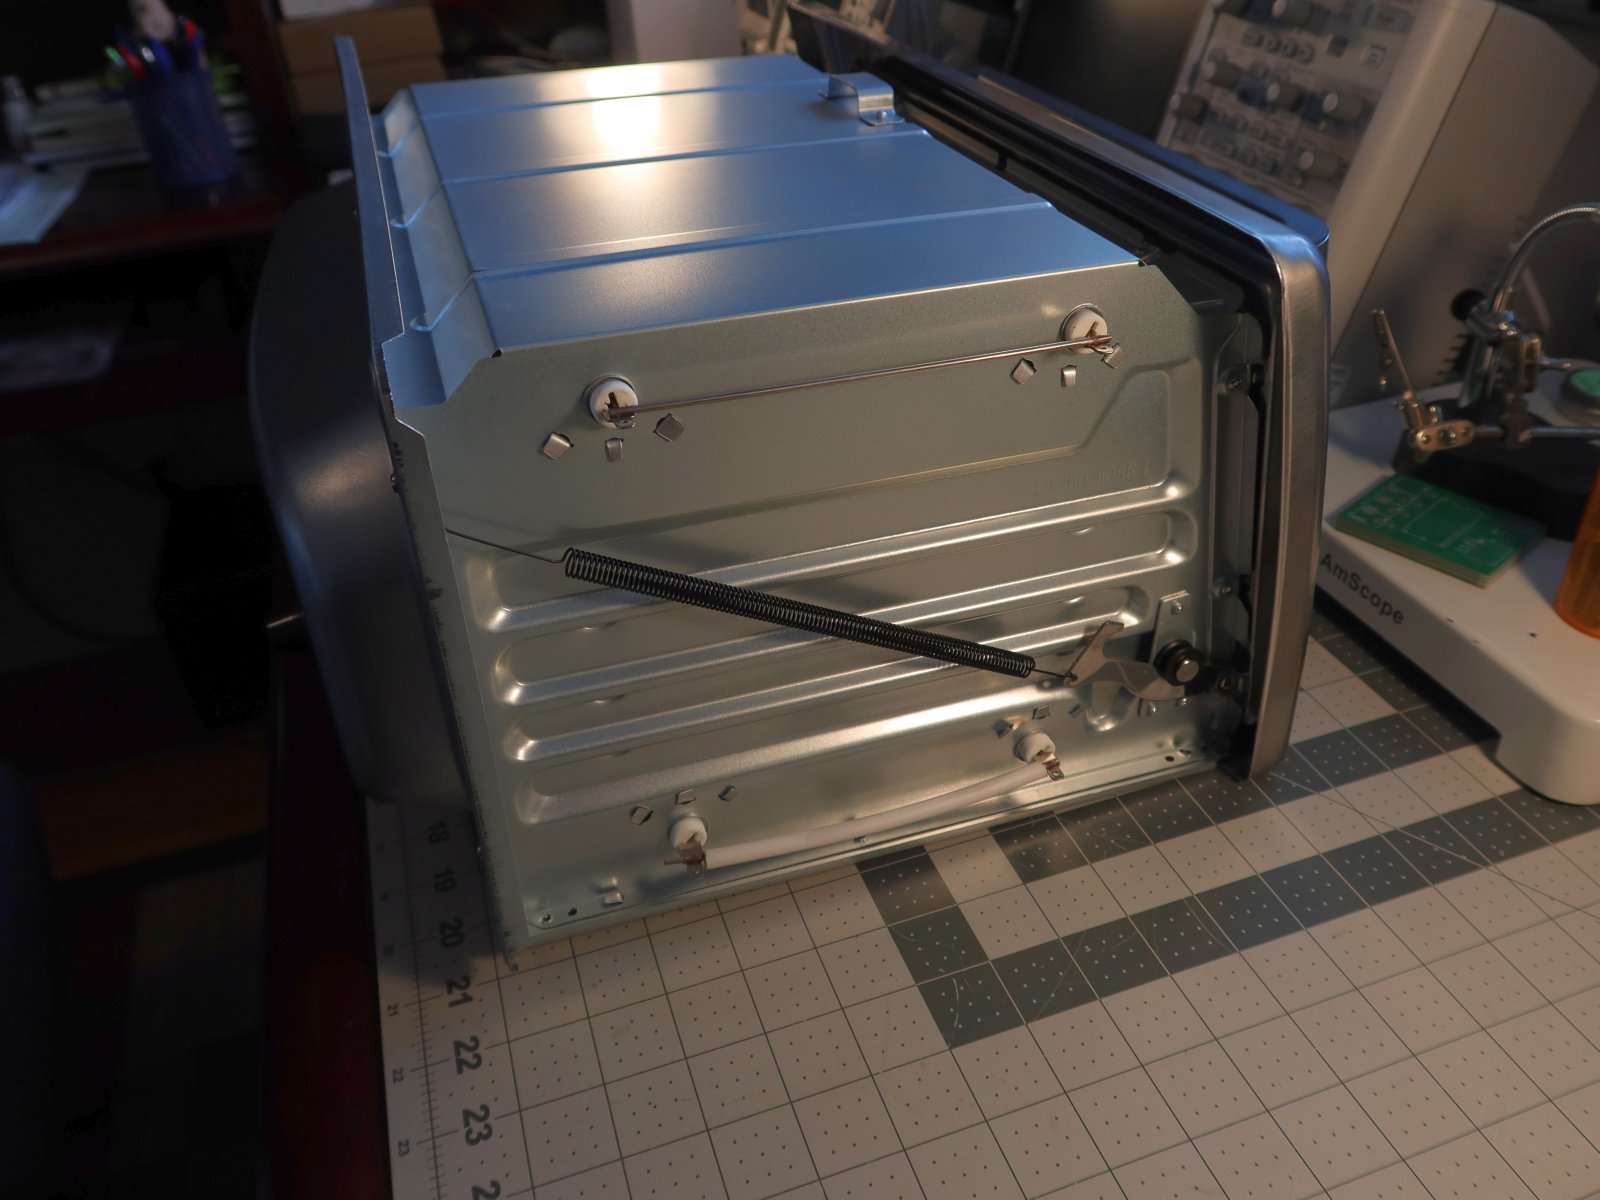
Ladies and gents, behold the majesty of the Hamilton Beach model 31418.


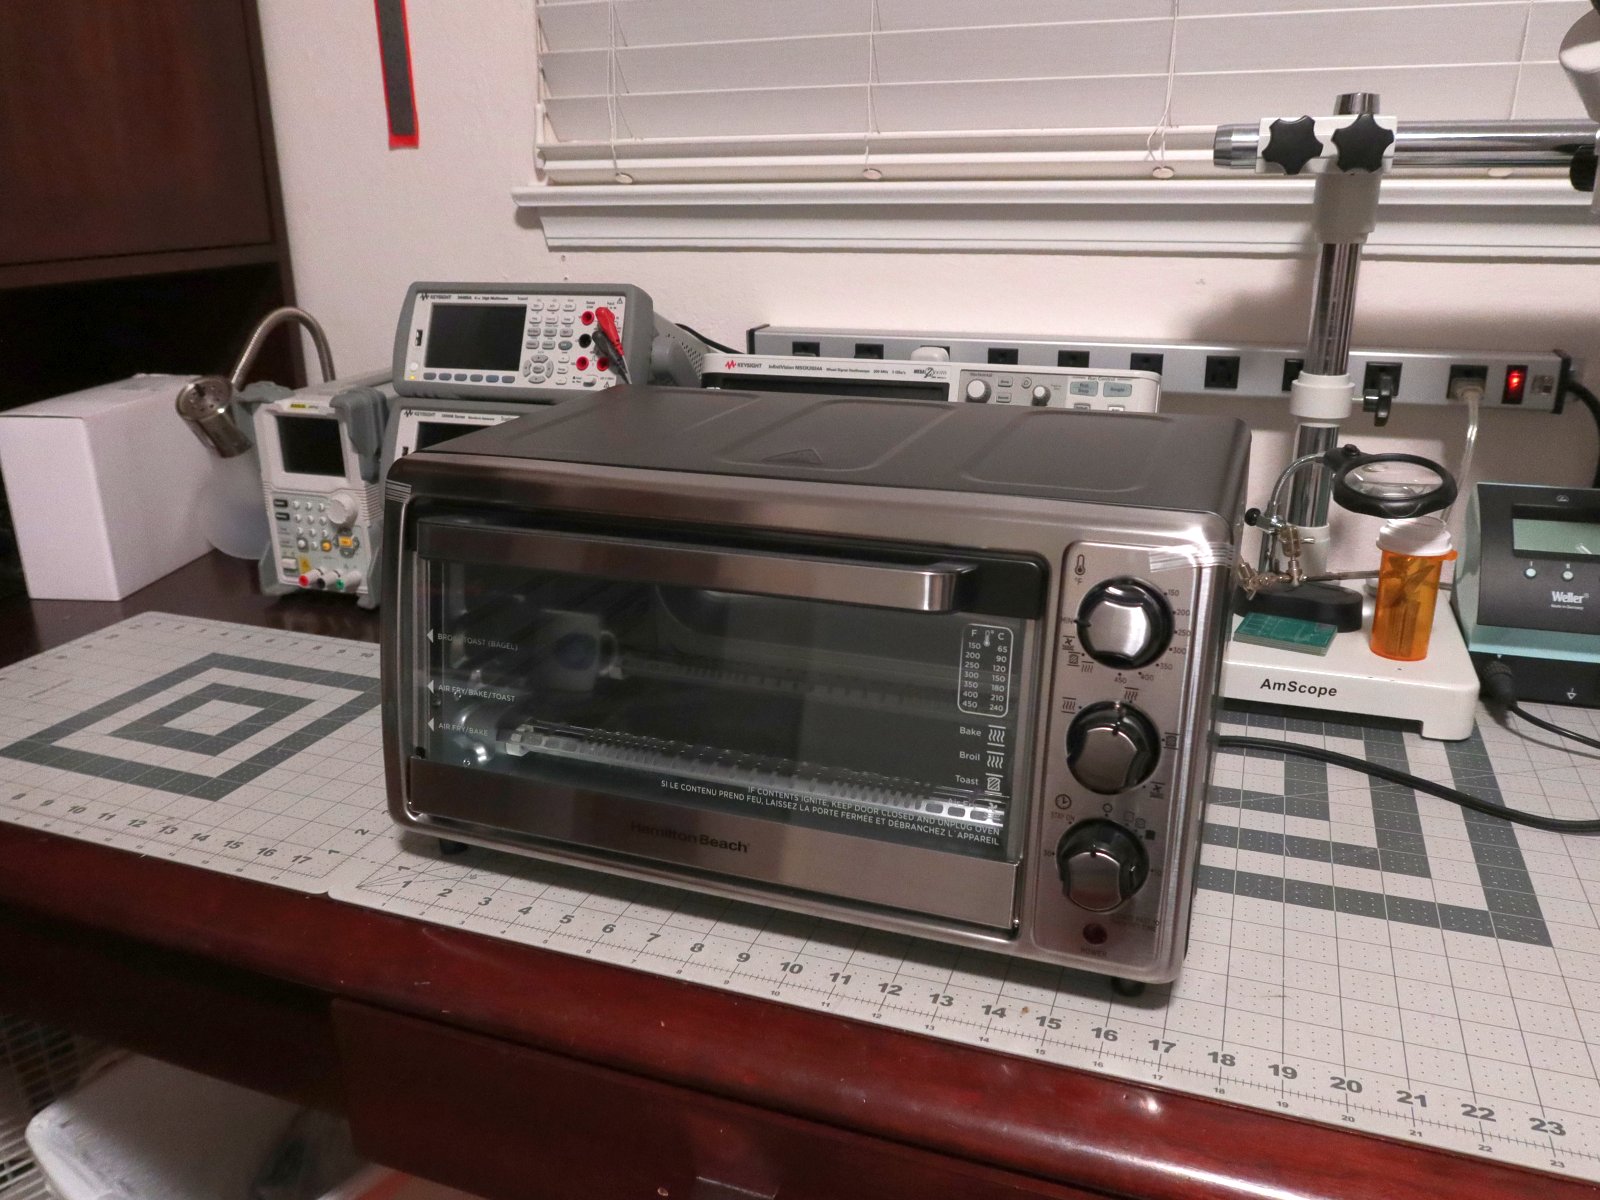
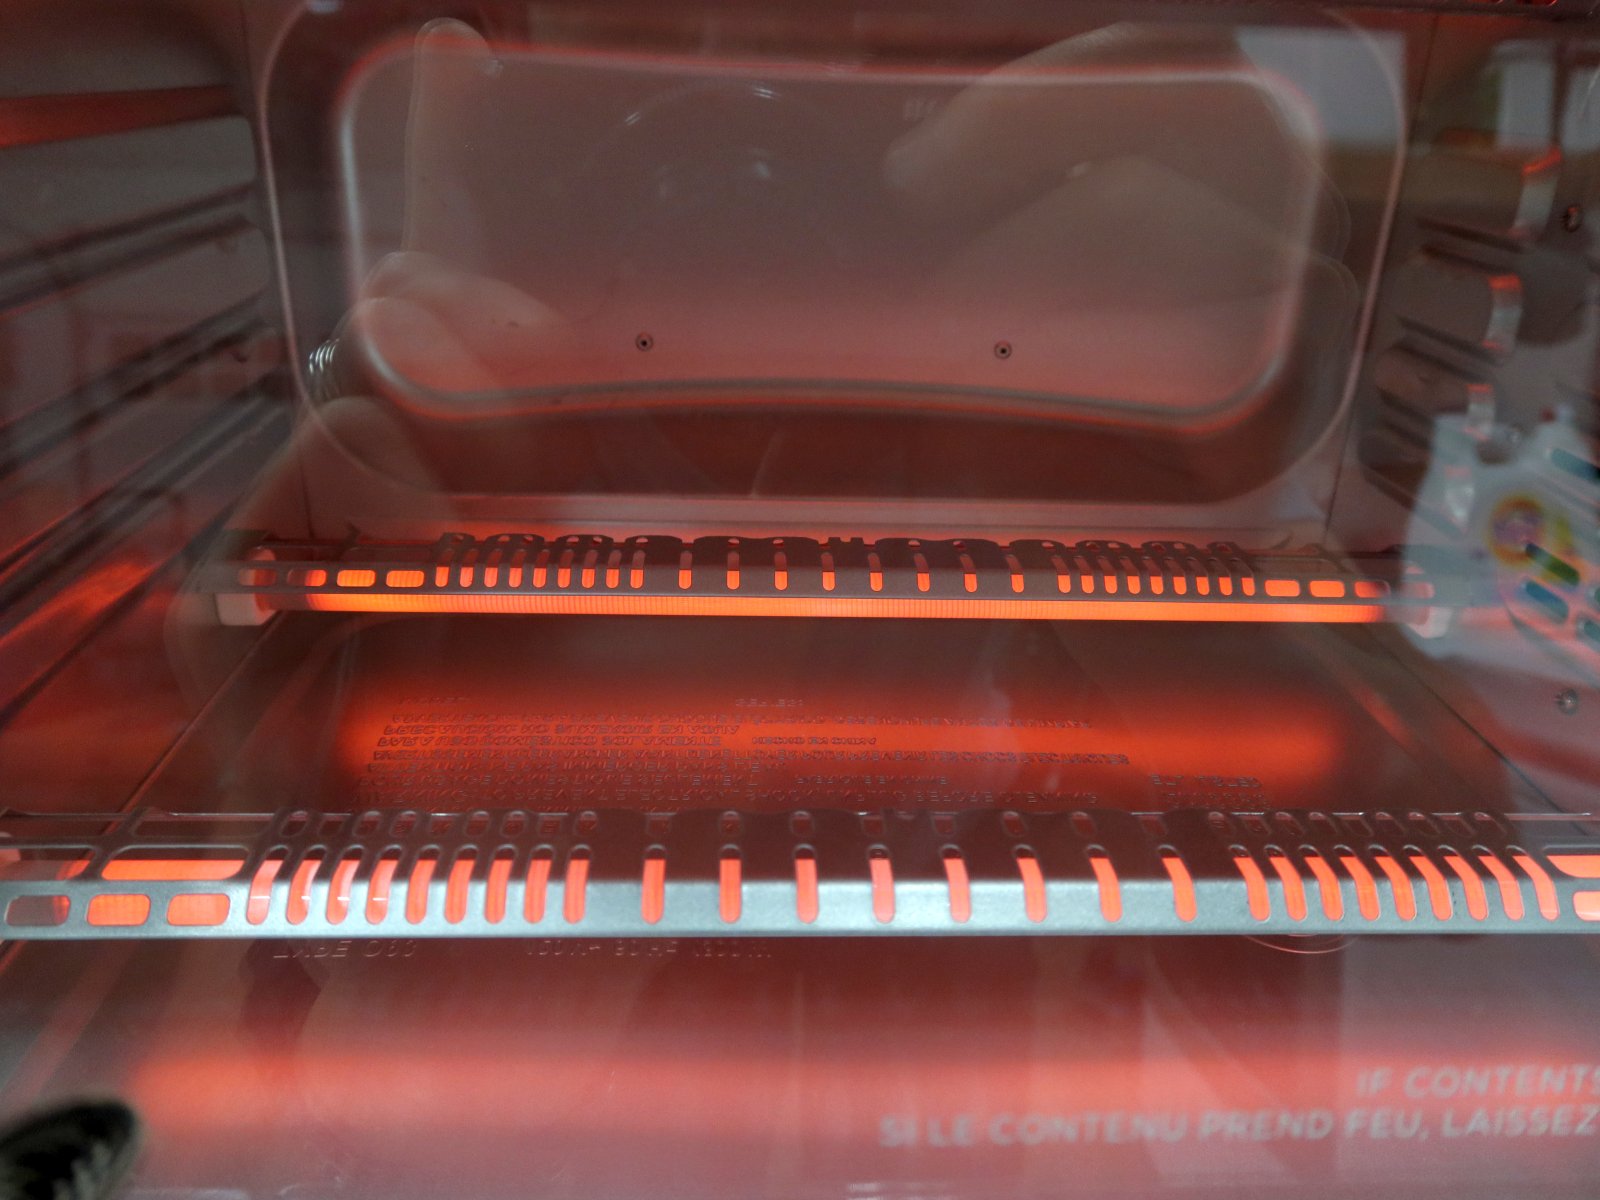
The first task was to crank this beauty up to the highest temperature and let it dwell (in my garage) for a good hour in order to release the enticing musk of burning oils and plasticizers from its supple frame. All 4 heaters looked to be working as expected. It did not smoke at all, but let's just say that I would never put food into one of these without first doing an initial burn-off cycle.


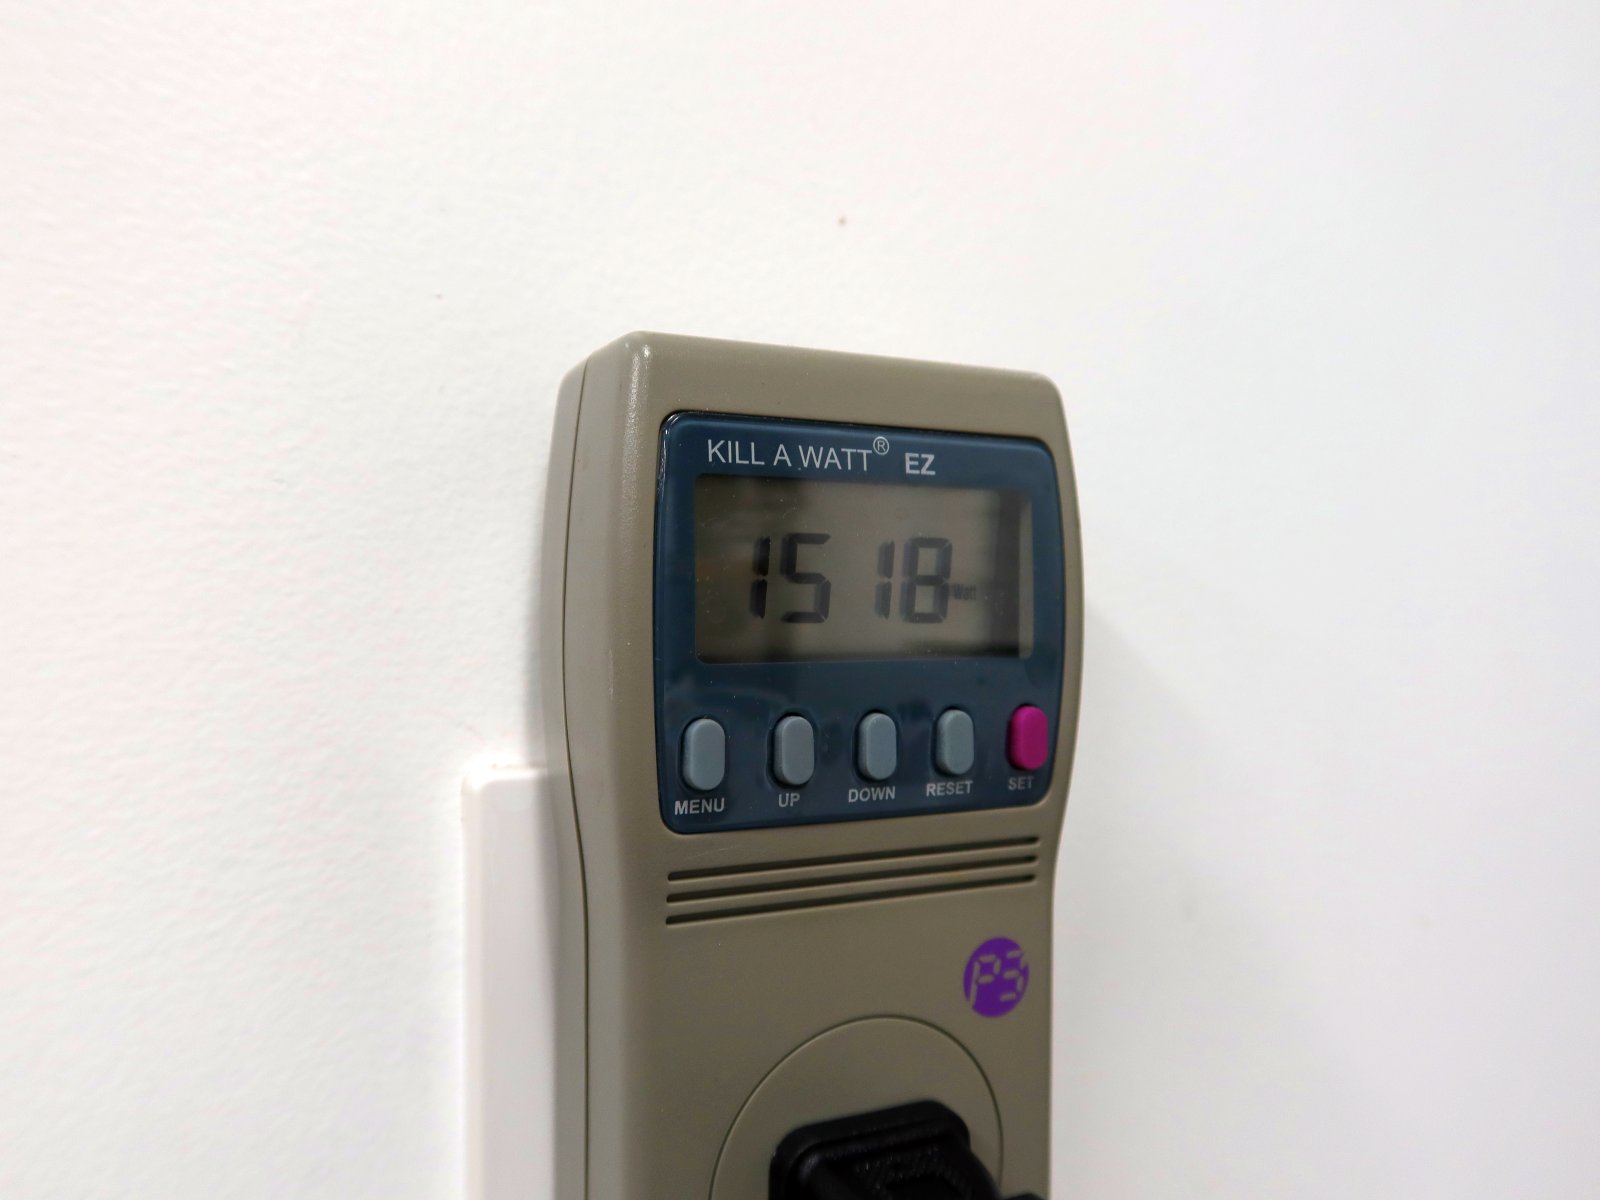
Power draw after 10 minutes was about as-rated. After an hour, the draw seemed to level out at 1490W, probably due to metallurgical changes in the heating coils or something.


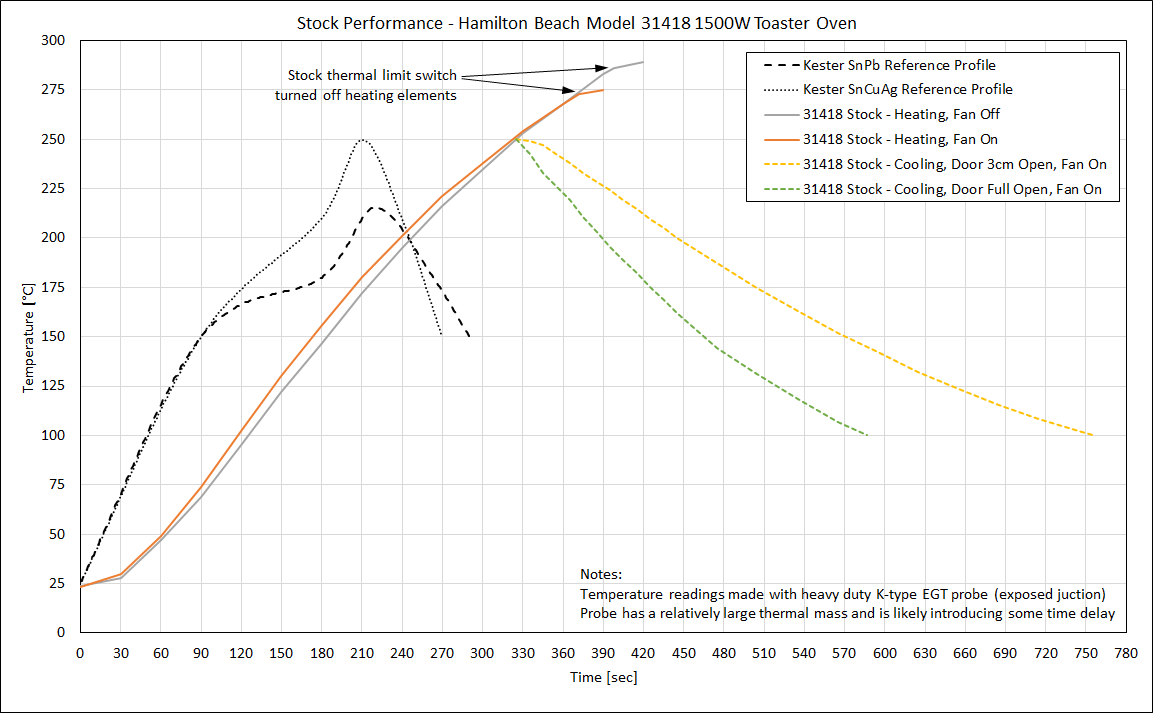
The next order of business was to do some really rough performance characterization on it before hacking it apart. I had some K-type EGT (exhaust gas temperature) probes sitting around since they are going to be used in a future car project where I convert to an aftermarket ECU and will need to do a lot of tuning on a dynamometer. The probes are intended to handle considerably higher temperatures than what this oven can produce, and they were all that I had on-hand to use anyway. Better than nothing.


Now, take the values with a grain of salt. The EGT probes are not made with SLE-grade thermocouple alloys, and I had them plugged into my handheld Keysight DMM where I was taking readings visually next to a stopwatch. I'd guess that the absolute values are within 10°C of actual. The EGT probes have a relatively large thermal mass, even with the exposed junction, so this probably introduces several seconds of lag in the readings. At the same time, this might help things get a little closer to what an actual PCB would see. Much later on in this project I will actually check this on a real PCB with some 30ga K-type thermocouples, but that is a long way off.

Overall, I think that this unit has sufficient power. The system is too slow in heating and cooling, but that should change with proper insulation. The little convection fan does very little overall as far as I can tell. There is also a ~30 second lag when you first turn on the heaters. They are reasonably large and have their own thermal mass. So, really the curves could shift left in time by about 30 seconds. It still isn't any good for an actual reflow profile, but it is closer to the target at least.


With the baseline measurements out of the way, I popped off the outer cover to see what was inside. The guts were entirely unremarkable, and looked like every other toaster oven that has been used for this.


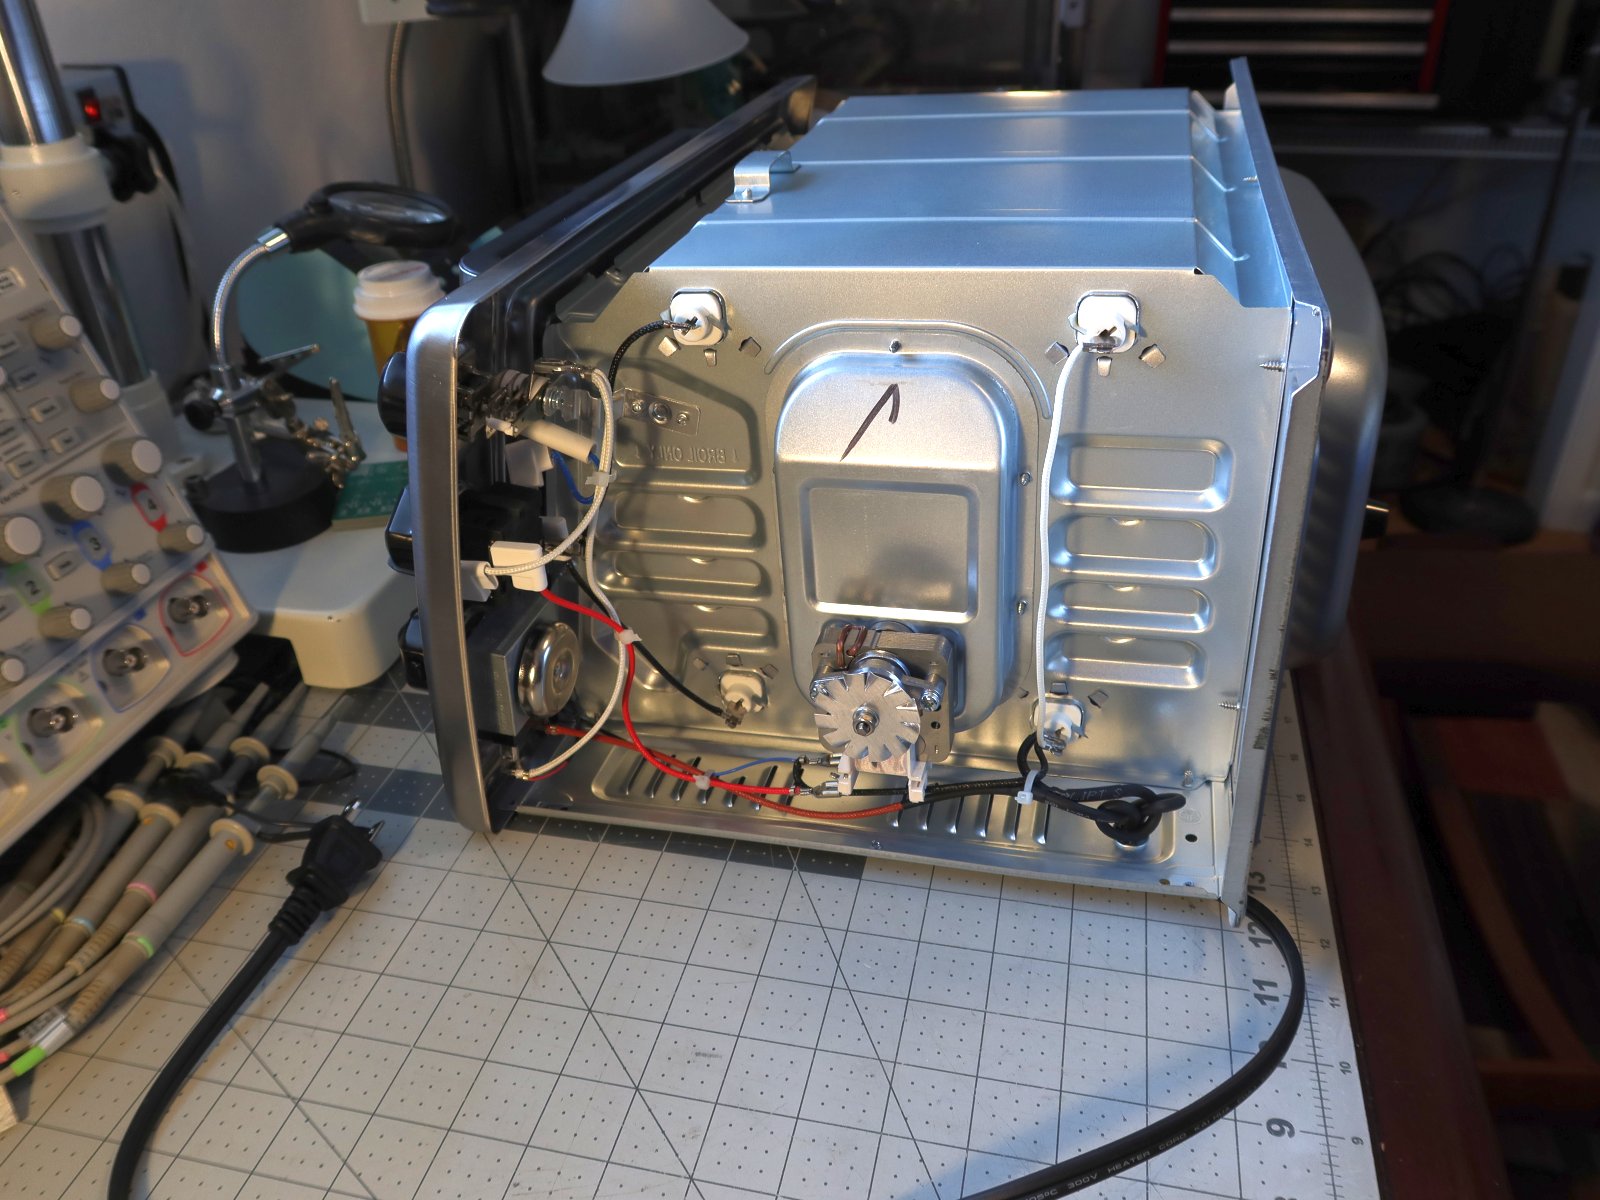
Snip snip. Out went the stock controls and whatnot.


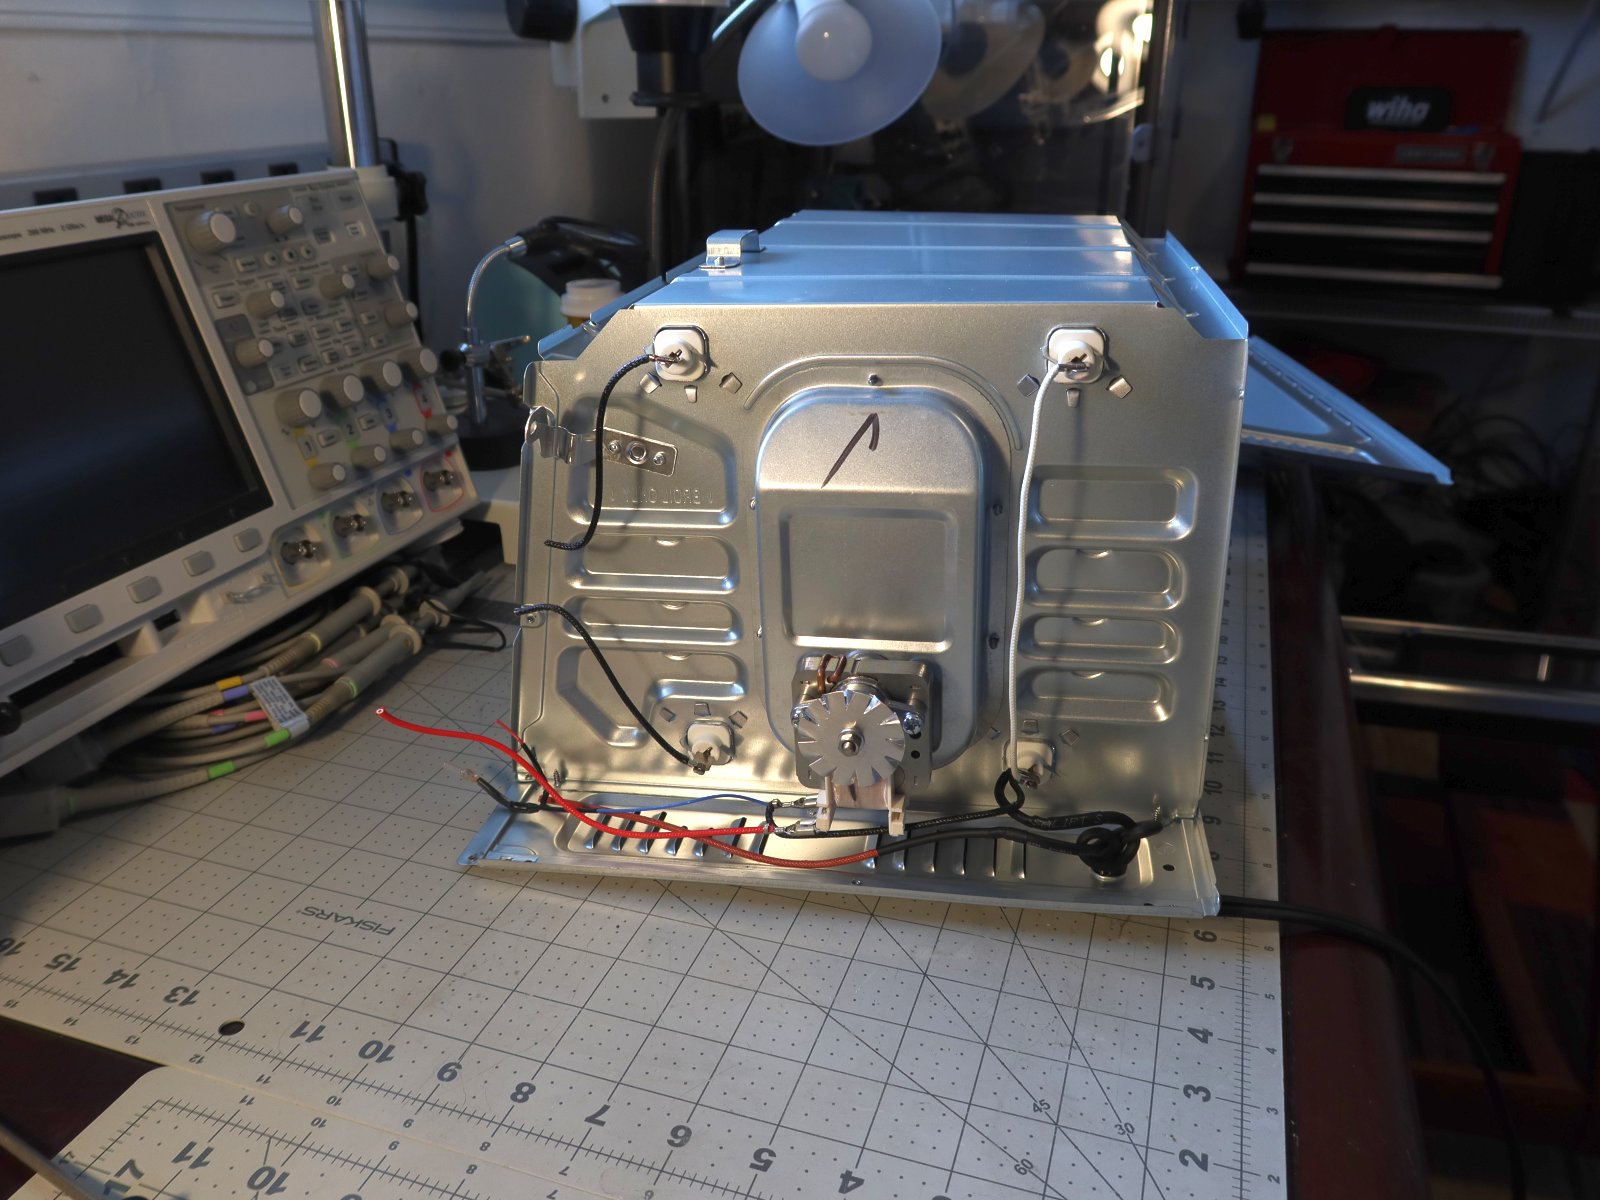
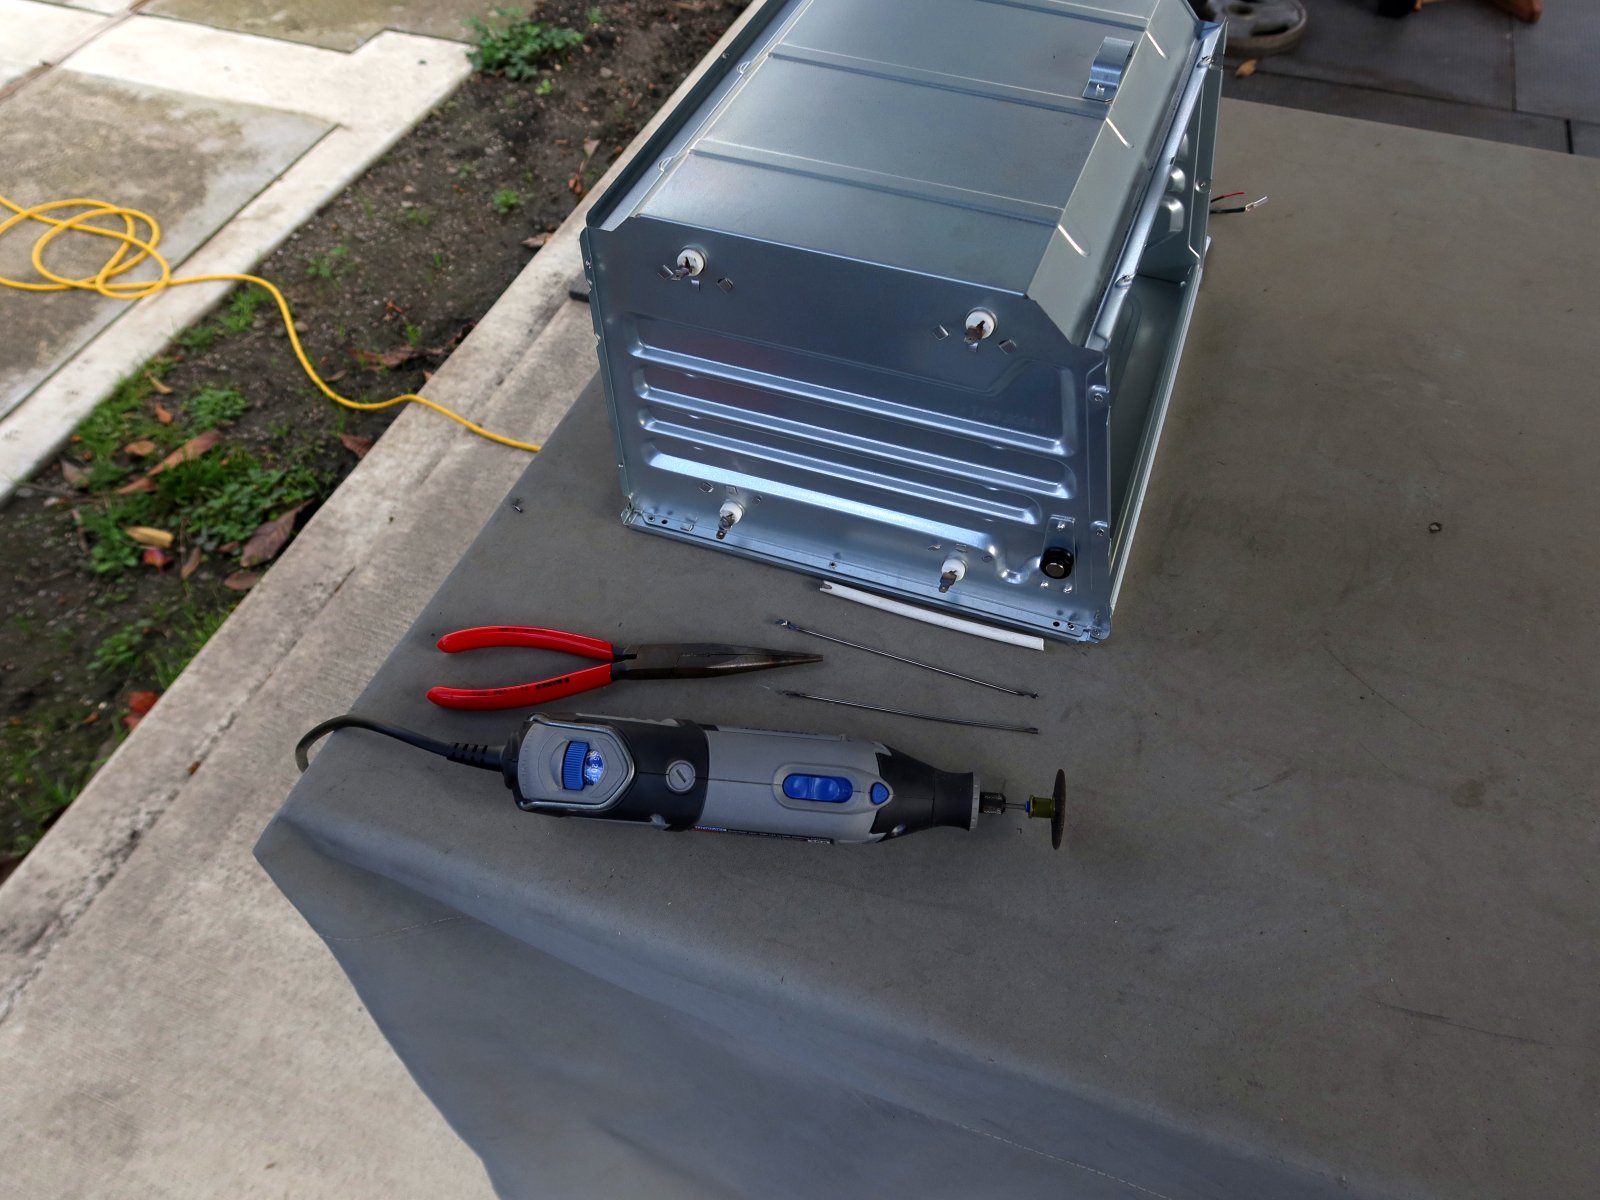
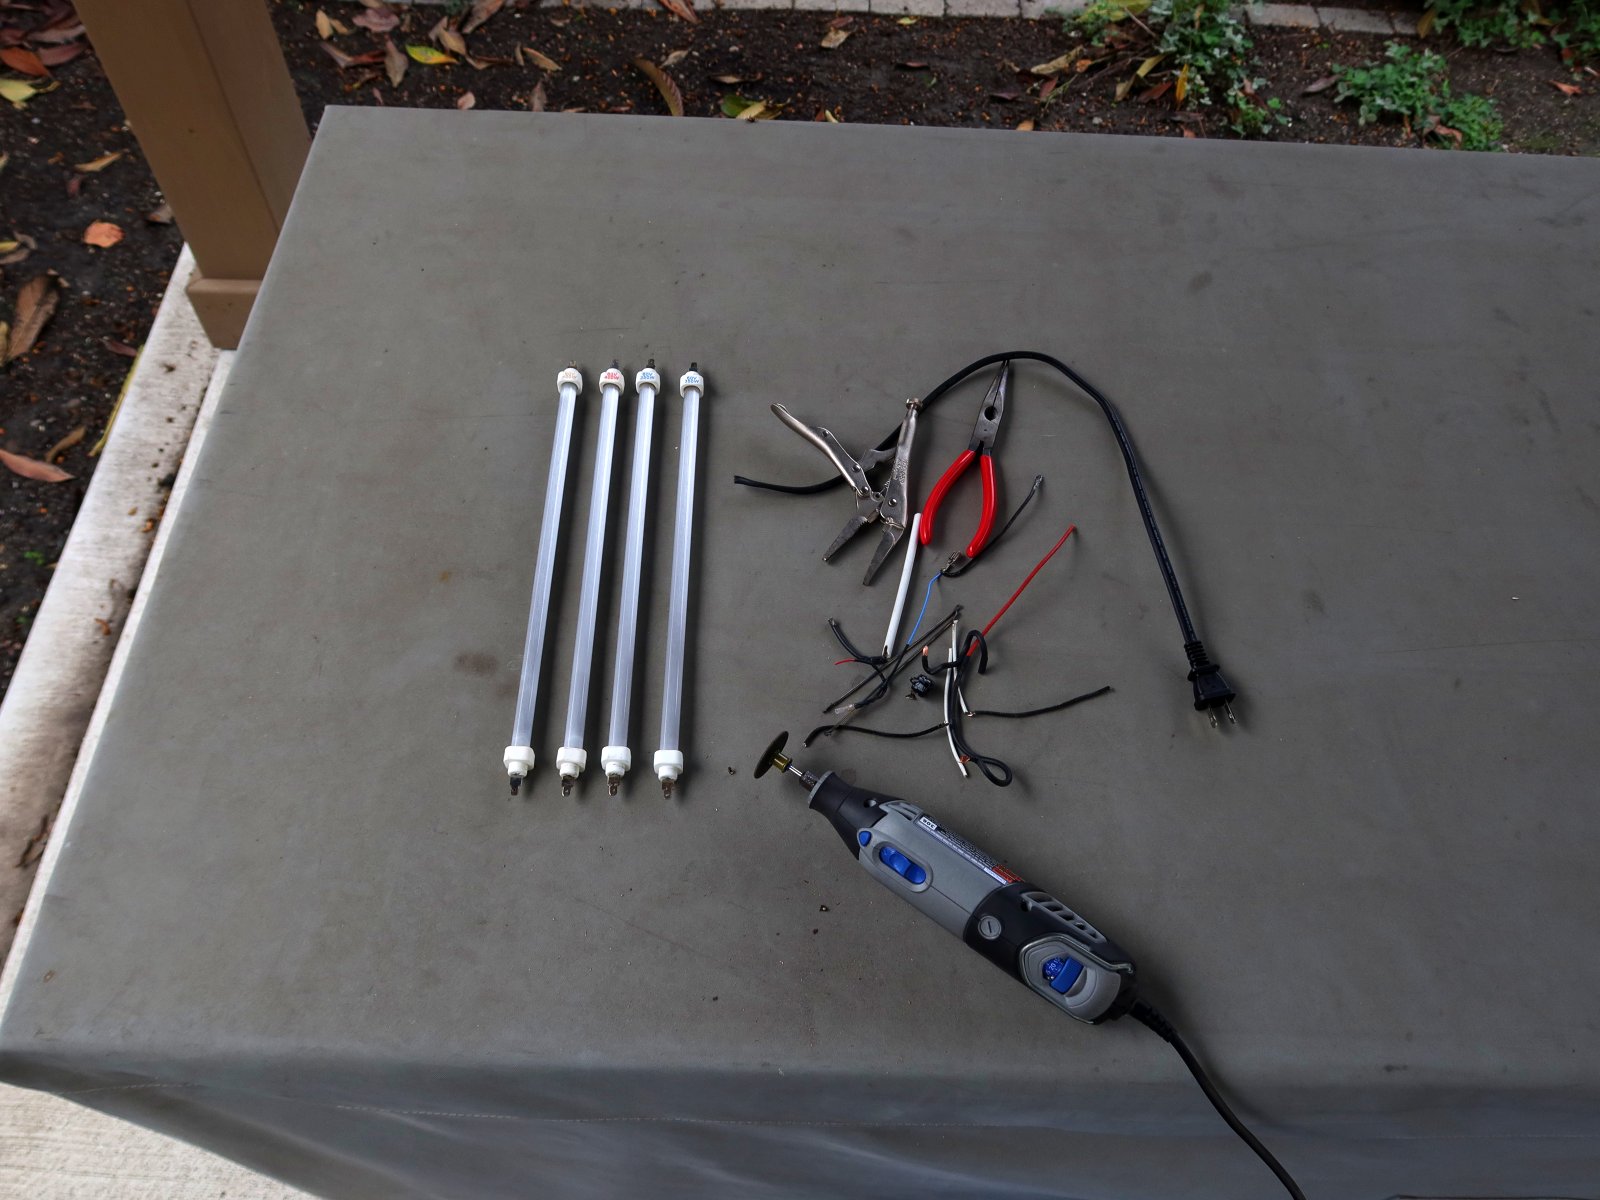
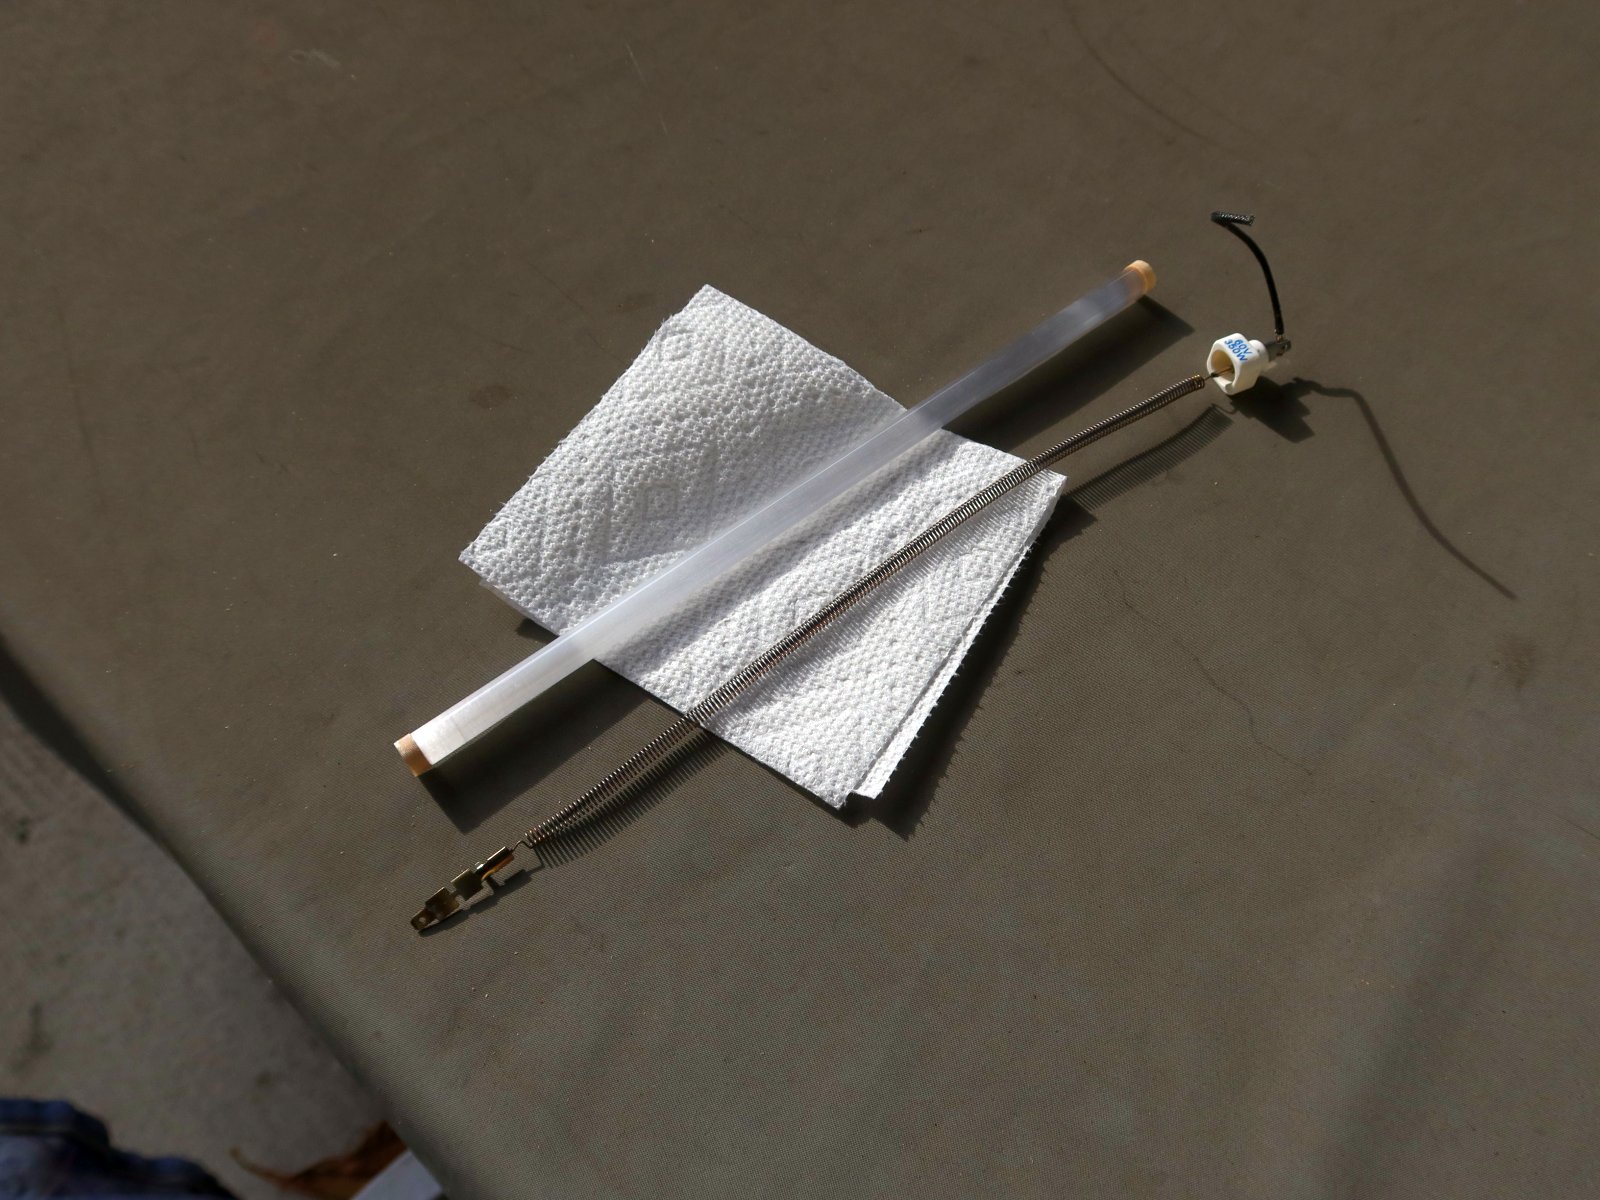
Unfortunately, the heating element connections were all spot-welded. The top elements were in series, as were the bottom elements. This was done with some (nichrome?) busbars on the left side. I wanted to completely disassemble the oven in order to be able to neatly apply the heat shielding / insulation to the interior, so out came the Dremel with a cut-off wheel. That quickly freed up the heating elements.


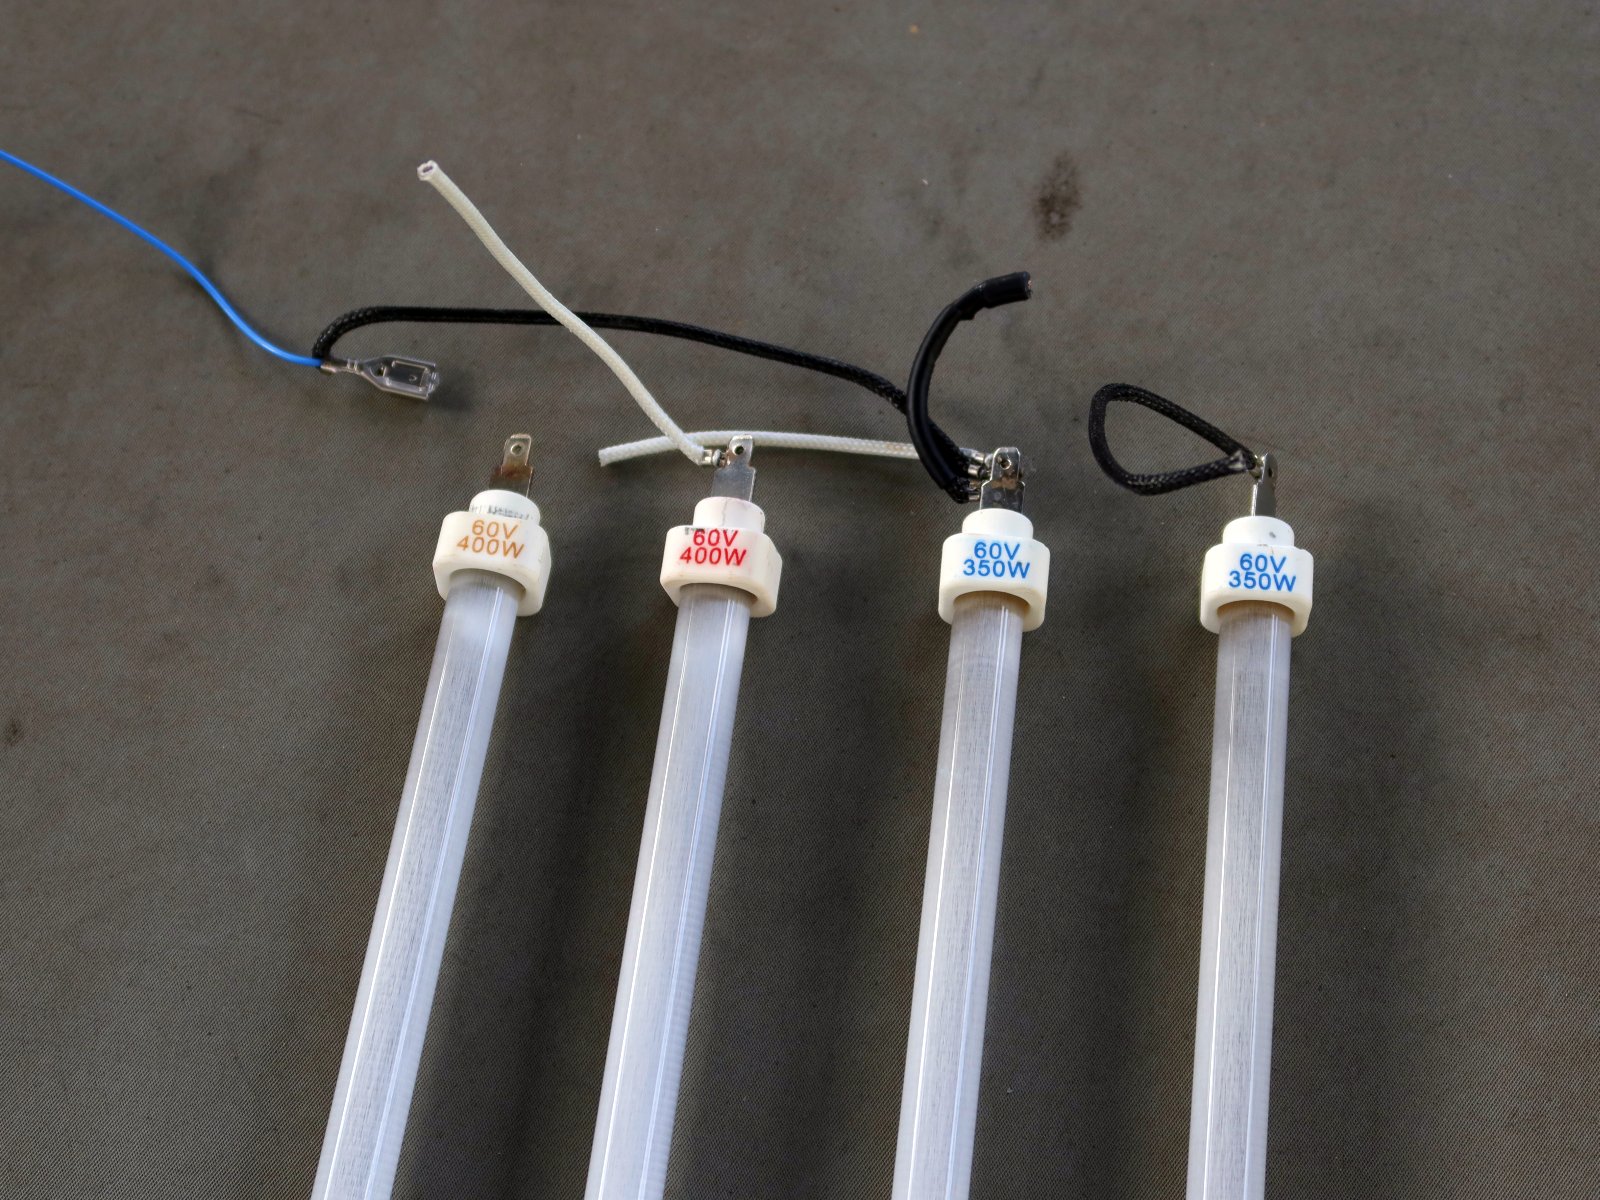
Interestingly, the top used two 400W heaters, and the bottom used two 350W heaters. I am glad that I pulled these out because I want the (slightly) higher power ones in the bottom.


After grinding off the wire terminals on the opposite side, I carefully disassembled each heater so that I could blow out any dust from the grinding operations. The last thing I need is conductive crud in these things causing trouble.


So that is where I am at right now. The oven is completely taken apart, and I need to start ordering the heat shielding, insulation, MG wire, high temperature spade terminals, and of course the ramp/soak controller.


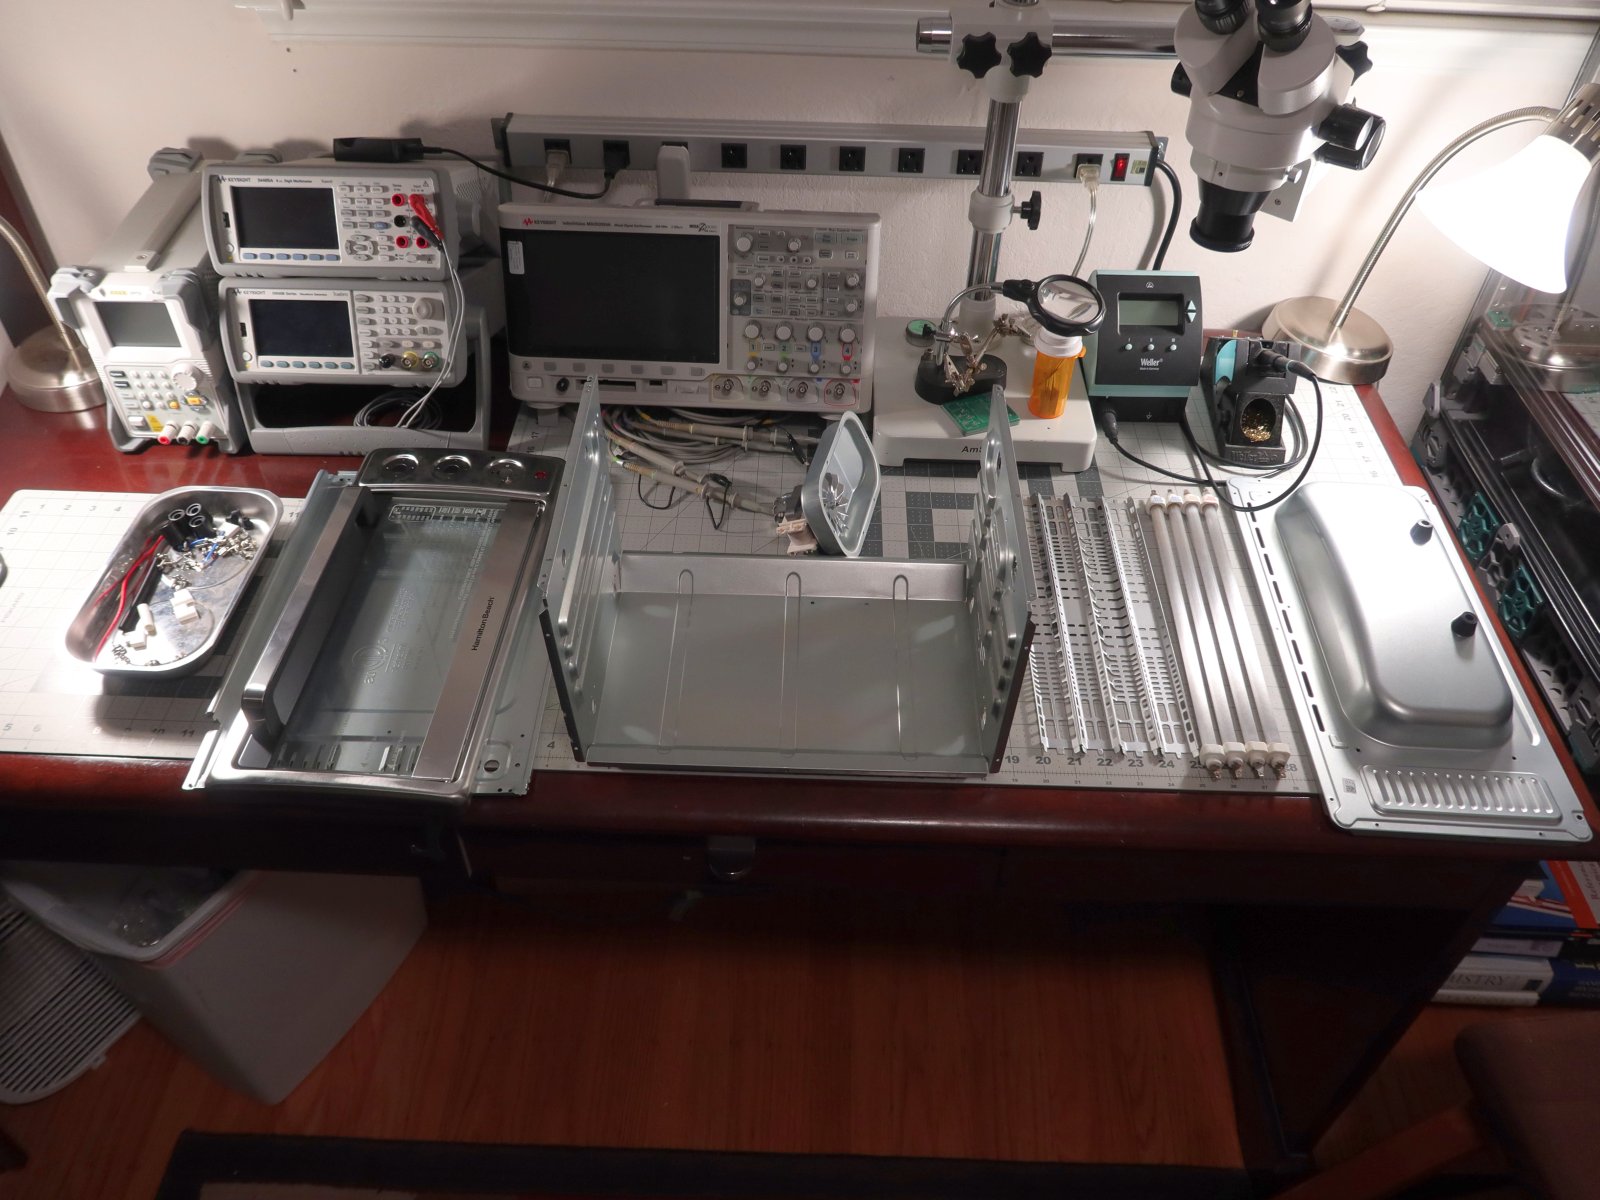
For heat shielding, I will be going with the Floor and Tunnel Shield II product that the Controleo3 kits use. Since I am using a different/larger oven, I will order it myself in the needed quantities. Similarly, I will be ordering the gold reflective tape recommended in the kit. The outside of the oven will get some fiberglass sheeting and a chopped-up welding blanket for additional insulation. The rear "pizza bulge" is going to be walled-off with a piece of metal sheet since it is just wasted space and more thermal mass to fight.

As far as the control method, I may go with a barebones Controleo3 kit (just the controller, basically). There are less expensive options out there, such as standard 1/16 DIN PID boxes, but the Controleo3 has plenty of spare outputs and seems to have had a lot of thought go into the firmware for this specific application. Having dual-zone heating control seems like it will really be beneficial since IR heating is really not the optimal way to do reflow and I will need to make the most of a sub-optimal architecture.

Questions for the good members of the forum:

- Should I keep the little perforated baffles which sit right above / below the heating elements? Presumably I want to minimize directly incident IR on the PCBs that I reflow.
- If the baffles should be kept, should I consider making new ones with no cut-outs?
- Would it be worthwhile to relocate the little convection fan into the bottom of the oven chamber? It really does not move much air, but it could help to mix things a bit. The original side location is basically useless.
- Any recommendations for controllers, if not Controleo3?


I will update this thread as I make progress on this! Comments and feedback are welcome.
« Last Edit: December 30, 2023, 05:41:44 am by bmwman91 »
Would you say that I have a plethora of piñatas?
 

Offline meshtron

  • Regular Contributor
  • *
  • Posts: 132
  • Country: us
Re: Build Thread: Reflow Toaster Oven Conversion Project
« Reply #1 on: December 30, 2023, 03:36:18 pm »
Awesome thread and excited to see how it works out for you!  Though I'm already "invested in" a T-937M cash-register type reflow oven (which has been working decently), I'm aware of its shortcomings and have been researching a DIY solution as well.

I was researching the Reflow Master Pro from Unintended Maker (Seon) for my purposes, you might check it out if you haven't already.  Good support and lots of successful projects on the Discord - it's part of why the idea of having another (better!) reflow oven never gets far off my mind.

I've seen a number of people state that they believe resistive elements are better than IR for this application but I don't have the experience to make a call nor have I seen any detailed explanation as to why that is.  I've been further told that there should "absolutely" be something between the elements and the boards you're reflowing which my oven does not have (mine only has elements on the top and they are fully exposed to the board just below).  Anyway - someone with more experience and knowledge than me will undoubtedly jump in and help here.

Good luck with the build, look forward to following along!
 

Online fourfathom

  • Super Contributor
  • ***
  • Posts: 1884
  • Country: us
Re: Build Thread: Reflow Toaster Oven Conversion Project
« Reply #2 on: December 30, 2023, 04:42:30 pm »
I was researching the Reflow Master Pro from Unintended Maker (Seon) for my purposes, you might check it out if you haven't already.  Good support and lots of successful projects on the Discord

I am using a similar toaster oven, unmodified except for a tiny hole for my thermocouple lead, and an external SSR to control the AC power (the oven controls are set to max).  I had made a controller using an arduino-style board and a thermocouple interface and was very happy with the temperature profile I was able to achieve.  The cool-down is a bit slow, but if I open the oven door when the temperature hits the max point it's close enough.  I am using Leaded solder.

Then my controller crapped out (the thermocouple interface), and rather than fixing it or building another one I got the Reflow Master from Unintended Maker.  It does the job and I am pleased with it.  My own controller had been tweaked to better match the desired "soak" profile than the UM controller, but the small difference was not worth getting excited about.

FWIW, I found that given the oven's temperature ramp (pretty slow), rather than use a PID control algorithm my own controller did better with a basic on/off control, and a combination of time and temperature setpoints.  Perhaps an oven modified with insulation (etc.) could profit from a more complicated control algorithm.
We'll search out every place a sick, twisted, solitary misfit might run to! -- I'll start with Radio Shack.
 

Offline MR

  • Regular Contributor
  • *
  • Posts: 215
  • Country: tw
Re: Build Thread: Reflow Toaster Oven Conversion Project
« Reply #3 on: December 30, 2023, 07:01:09 pm »
Awesome thread and excited to see how it works out for you!  Though I'm already "invested in" a T-937M cash-register type reflow oven (which has been working decently), I'm aware of its shortcomings and have been researching a DIY solution as well.

I was researching the Reflow Master Pro from Unintended Maker (Seon) for my purposes, you might check it out if you haven't already.  Good support and lots of successful projects on the Discord - it's part of why the idea of having another (better!) reflow oven never gets far off my mind.

I've seen a number of people state that they believe resistive elements are better than IR for this application but I don't have the experience to make a call nor have I seen any detailed explanation as to why that is.  I've been further told that there should "absolutely" be something between the elements and the boards you're reflowing which my oven does not have (mine only has elements on the top and they are fully exposed to the board just below).  Anyway - someone with more experience and knowledge than me will undoubtedly jump in and help here.

Good luck with the build, look forward to following along!

you cannot measure the real PCB temperature with K-type probes and IR elements, resistive elements heat up the entire oven more evenly. Resistive modules are also called air heaters.

The shielding for IR modules helps a little bit with this issue however resistive is still better. Our local store supplies 50% IR and 50% resistive ovens ... the price is not much different either so best is to buy a resistive oven from the beginning on.
 

Offline jmelson

  • Super Contributor
  • ***
  • Posts: 2766
  • Country: us
Re: Build Thread: Reflow Toaster Oven Conversion Project
« Reply #4 on: December 30, 2023, 08:04:46 pm »
I did this in 2007 with a GE brand toaster oven.  It has 4 heating elements that run left to right, two above and two below the slide-out rack.  I patched a solid state relay in series with the thermostat, and connected it to a ramp-and-soak thermocouple controller.  The ramp and soak feature allows you to program temparature ramps and hold times in a sequence.  I bought a roll of TINY thermocouple extension wire on eBay with FTP insulation, and fashioned junctions at the end.  I poke the junction into plated through holes in the board, so the temp profile is set to the ACTUAL board temperature.  I have reflowed over 2000 boards with this rig.
Jon
 

Offline MR

  • Regular Contributor
  • *
  • Posts: 215
  • Country: tw
Re: Build Thread: Reflow Toaster Oven Conversion Project
« Reply #5 on: December 31, 2023, 02:28:45 am »
Doing 2k boards doesn't mean that everything went fine. It very much depends which kind of boards / parts you ran.

The brand of the toaster doesn't matter much I use a Panasonic oven with resistive modules from a local manufacturer.
The last board I had in an IR oven (long time ago) was a board with heavy components and light plastic inductors, the plastic shielded (small) inductors were easy to damage when the big heavy components were not even completely soldered. This never happened with the resistive modules since everything got heated up evenly.
I have another 4K EUR oven which uses resistive modules on the sides rather than top / bottom and it has a fan integrated as well.. I would not trust IR heaters. That 4K oven doesn't care about the ambient temperature, while the IR drawer very much cares about the ambient temperature.
The 4K oven doesn't limit the temperature profile by time but by reaching the target temperature which seems to be a better approach in general.
 

Offline seon

  • Regular Contributor
  • *
  • Posts: 56
  • Country: au
Re: Build Thread: Reflow Toaster Oven Conversion Project
« Reply #6 on: December 31, 2023, 07:13:35 am »

Then my controller crapped out (the thermocouple interface), and rather than fixing it or building another one I got the Reflow Master from Unintended Maker.  It does the job and I am pleased with it.  My own controller had been tweaked to better match the desired "soak" profile than the UM controller, but the small difference was not worth getting excited about.


Glad it's working out for you :) Just curious about this comment "My own controller had been tweaked to better match the desired "soak" profile than the UM controller" and what you are finding missing or wrong with the available settings and profile editing that isn't allowing you to match your profile requirements perfectly?

If there's areas for improvement in the firmware, I'm always happy to hear about them.

Cheers :)

Seon
Unexpected Maker
 

Online fourfathom

  • Super Contributor
  • ***
  • Posts: 1884
  • Country: us
Re: Build Thread: Reflow Toaster Oven Conversion Project
« Reply #7 on: December 31, 2023, 07:57:56 pm »

Glad it's working out for you :) Just curious about this comment "My own controller had been tweaked to better match the desired "soak" profile than the UM controller" and what you are finding missing or wrong with the available settings and profile editing that isn't allowing you to match your profile requirements perfectly?

If there's areas for improvement in the firmware, I'm always happy to hear about them.

Cheers :)

Seon
Unexpected Maker

Hi Seon,

It's possible that I've not set up the UM controller as well as I should have done.  I am using just one thermocouple (attached to a scrap of PCB that sits next to the board(s) being reflowed), and selected the profile that best matched the temperature requirements of my solder paste (I'm away from the oven now, but the paste is a pretty standard tin/lead mix).

What I am seeing is that the oven temperature doesn't flatten off (much) during the soak phase.  The rate of increase is reduced to perhaps half the "preheat" rate.  After the more-or-less proper soak time, the temperature ramps up to the max setpoint and then the heat shuts off and the controller beeps to tell me to open the oven door.

The only part of this where I felt like a comment was worthwhile is the soak stage.  During soak there is quite a difference between the desired and actual profiles shown on the screen.  I found that for my oven and controller it worked best to shut off the heater at the start of soak.  Since the heaters remain hot for a good while the temperature continues to rise until it eventually almost flattens out -- and then it's time for the reflow stage.  For preheat and reflow I have the heaters turned on 100%.

But the UM controller profile is certainly doing the job for me and I am very happy with it.    If you like I can send you actual data when I get back to the shop in a few weeks.
We'll search out every place a sick, twisted, solitary misfit might run to! -- I'll start with Radio Shack.
 

Offline bmwman91Topic starter

  • Newbie
  • Posts: 9
  • Country: us
Re: Build Thread: Reflow Toaster Oven Conversion Project
« Reply #8 on: January 01, 2024, 05:49:16 am »
Thanks a lot for all of the responses, there is lots of good info here! I know that lots of people on here have various experiences with DIY reflow of various sorts, as well as professional experience.

My selection of the type of heater was largely based on some of the Controleo3 documentation. It sounded like quartz heaters (which just seem to be IR heating coils inside of some quartz tubes along with some partial shielding from the direct IR output) were considered a compromise solution since, according to the docs, resistive elements are a bit slow relative to the reflow profiles, and proper air heating solutions without directly incident IR are costly. So maybe I now have a heating solution which sucks at everything! I'd guess-timate that the coils are getting to around 1000°C based on their color when hot, and assuming reasonable black body behavior, the spectral peak is at around 2000nm. Quartz glass seems to start absorbing IR a little above that, and I would guess that around 50% of the EM radiation from the coils is being absorbed. So...around half of the heating power in the chamber is coming from photons, and the other half could be from hot quartz tubes and convection.

I did at one point start sketching out a full DIY oven where there was a separate heating chamber where air was heated to something like 400°C, and then blown into the actual reflow chamber. Two PID controls would have been involved...one to maintain 400°C air in the "hot source" and one to control the transfer fan which would blow it into the reflow chamber in order to follow a profile. Maybe someday I will do that, but cost and complexity quickly began to spiral.

I do work in the electronics industry, although I am more on the mechanical side, but I have had exposure to some of the demands of high volume commercial reflow and some of the challenges that come with it. At one point I had to instrument some boards with strain gauges to do some analysis of BGA stresses, and years ago I was dealing with cross sections of failed solder joints. A proper engineering solution has to take into account all sorts of stresses on the solder joints and components from CTE mismatch, material property changes, heating the PCB substrate's matrix material above its glass transition temperature, etc.. So, I am at least reasonably well aware that the setup I am building is not something that I would use if I was going to sell boards and feel good about it lol.

With that said, if I am running a serious risk of cooking some components, and particularly if it'll mess up the LEDs, then I am open to changing course since the cost of the additional materials involved here will be considerably more than the toaster oven.
Would you say that I have a plethora of piñatas?
 

Offline bmwman91Topic starter

  • Newbie
  • Posts: 9
  • Country: us
Re: Build Thread: Reflow Toaster Oven Conversion Project
« Reply #9 on: January 01, 2024, 05:50:30 am »
The shielding for IR modules helps a little bit with this issue however resistive is still better. Our local store supplies 50% IR and 50% resistive ovens ... the price is not much different either so best is to buy a resistive oven from the beginning on.

Got a link to an example of some of the resistive heating elements? I am curious to see what they look like and what they cost. Thanks!
Would you say that I have a plethora of piñatas?


Share me

Digg  Facebook  SlashDot  Delicious  Technorati  Twitter  Google  Yahoo
Smf