


Yep, another datalogger, like we had not enough. However in case of tools available for metrology purposes I believe the more - the better. This time it's my own xDevs.com TECKit app to see the daylight. Over last few years it was used by few EEVBlog members and myself to log various measurements and run temperature cycle graphs that many of you have seen in other threads. It is also what used in
never-ending 260+ resistors TCR study project.
Starting from now it is available as opensource
as github repository.
TECKit is my VXI/GPIB datalogger that have logic for temperature control. This is what I developed and used for last few years to perform resistor and LTZ1000 reference's thermal testing.
GitHub repository:
https://github.com/tin-/teckitI plan to post more or less detailed user's manual on my site, but for now here's short "how-to" for local enthusiasts.
Hardware requirements* Raspberry Pi or similar SoC/FPGA board running Linux OS
* I2C access for BME280 sensor support
* Agilent E5810A for VXI11-GPIB gateway support, if VXI interface is used or,
* Agilent 82357B USB-GPIB interface dongle for linux-gpib or,
* NI USB-GPIB-HS interface dongle for linux-gpib
Disclaimer and legal information
Code or any information posted here is provided AS IS. In no event shall the author or any other 3rd party, including xDevs.com project be liable for any special, direct, indirect, or consequential damages or any damages whatsoever resulting from loss of use, data or profits, whether in an action of contract, negligence or other tortuous action, arising out of or in connection with the use or performance of application, code or any relevant information published here.
While reasonable effort put into making this app useful, there are zero assurances that the software will ever work for any user or use case (even documented ones). You must agree with the above to have any right to use the software.
Keep in mind that I spend most of effort and time on doing actual measurements and testing various devices, instead of polishing python code for best possible optimization. So if you feel like this app is not written in
true python-way, this is why. Suggestions and critics is most welcome, however don't expect it to be addressed right away.
Usage and configurationMake sure your linux system is configured for linux-gpib or python-vxi. Setup guides are available for
NI USB-GPIB-HS + linux-gpib or
Agilent 82357B. There is simpler guide too with
Agilent E5810A as well. For sensitive experiments BME380 environment sensor can be important to monitor environment changes and further data analysis. Connections and setup information available
here.
Extract or clone
git repository on your Pi and configure settings file
teckit.conf using text editor (see Configuration section below).
Include desired measurement modules for instruments in main.py. It is important to keep one instance per instrument, even if instruments are same model/type. Current release for example enabled 5 instruments for measurement and 1 temperature controller.
if (cfg.get('mode', 'no_thermal', 1) == "false"):
    k2510  = imp.load_source('k2510' , 'devices/k2510.py')              # Load Keithley 2510 support
dmm1   = imp.load_source('hp3458', 'devices/hp3458.py')                 # Load Keysight 3458A support
dmm2   = imp.load_source('hp3458', 'devices/hp3458.py')                 # Load Keysight 3458A support
dmm3   = imp.load_source('k2002' , 'devices/k2002.py')                  # Load Keithley 2002 support
dmm4   = imp.load_source('k2002' , 'devices/k2002.py')                  # Load Keithley 2002 support
dmm5   = imp.load_source('hp3458', 'devices/hp3458.py')                 # Load Keysight 3458A support
Initialize and configure instrument-specific settings. To initialize link instance like dmm1 to related module class dmm_meter with parameters (GPIB Bus address, 0, "Name for error tracking")
dmm1 = dmm1.dmm_meter (2,0,"3458B")  # GPIB 2
dmm2 = dmm2.dmm_meter (3,0,"3458A")  # GPIB 3
dmm3 = dmm3.scpi_meter(4,0,"2002-4") # GPIB 4
dmm4 = dmm4.scpi_meter(6,0,"2002-6") # GPIB 6
dmm5 = dmm5.dmm_meter (10,0,"3458D") # GPIB 10
Required mode/range setting function from DMM class also called from main.py, such as set_ohmf_range to configure meter in 4-wire resistance measurement mode, and select desired range. See specific function naming/format in devices/hp3458.py to see how that translates into GPIB command sent to the actual equipment. Consult with instrument user's manual for required command syntax.
dmm1.set_ohmf_range(1e3)                                                # 3458B function/range config
dmm2.set_ohmf_range(1e3)                                                # 3458A function/range config
dmm3.set_ohmf_range(200)                                                # K2002-4 function/range config
dmm4.set_ohmf_range(2000)                                               # K2002-6 function/range config
dmm5.set_ohmf_range(1e3)                                                # 3458D function/range config
Each meter triggered and readout in main loop with measurement result is saved into meas_val[N] variable. If some variables unused, often in case when less than 6 instruments used, assign them to zero instead of removing, to preserve CSV output file formatting for future use. Code related to triggering and data collection from one meter:
dmm1.trigger()                         # Trigger DMM1
meas_val  = dmm1.read_val()[1]         # Collect measurement result
# Add results to array for stats math
sdev_arr1.extend([meas_val])           # Add new value into array for NumPy
Run application to perform the measurement sequence:
# python ./main.py
Upon completion application will exit to console automatically. It can be also aborted at any time via usual methods like Ctrl+C. All data is saved after each sample, so even if you abort or kill the TECkit process, it will not cause loss of previously collected samples.
Configuration
Flexibility of the app is managed thru configuration file
teckit.conf, located in same directory as main.py app. Some key settings:
env_sensor     = bme280         ; none for no sensor use, or bme280 for Bosch BME280 Environment sensor (I2C)
interface      = vxi            ; gpib for linux-gpib library to use with NI USB-GPIB-HS or **vxi** for python-vxi11 bidning for LAN-GPIB gateway
vxi_ip         = 192.168.1.125  ; IP address of LAN-GPIB gateway like Agilent E5810A. Not used if interface set to gpib
data_file      = tcr_res_k46_3458abd_sweep_test12_2019.csv ; This is filename to store all measurement samples.
Temperature ramp settings are available in [testset] section.
[testset]
sv_start            = 18.000  ; Chamber start temperature, in C
sv_end              = 18.000  ; Chamber end temperature, in C
peak_temp           = 50.000  ; Top soak temperature, in C
delay_start         = 0       ; Delay before any operation start, seconds
slope_pos           = 9000    ; Seconds for positive slope, seconds
slope_neg           = 9000    ; Seconds for negative slope, seconds
time_start          = 7200    ; Initial hold temperature time, before positive slope starts, seconds
time_hold           = 6000    ; Hold temperature duration time once reached peak_temp, seconds
time_end            = 3600    ; Hold temperature duration once ramp down finished, seconds
Setting delay_start to non-zero value could be useful to start TECkit experiment at later time when equipment will be available. Start and end chamber temperature configured by first two settings sv_start and sv_end. This is required to allow thermal equilibrium once DUT is placed in chamber and thermal control is turned on. The feedback loop of the thermal control is purely hardware based, depending on used controller, there is no software control in app, other than programming desired temperature set point.
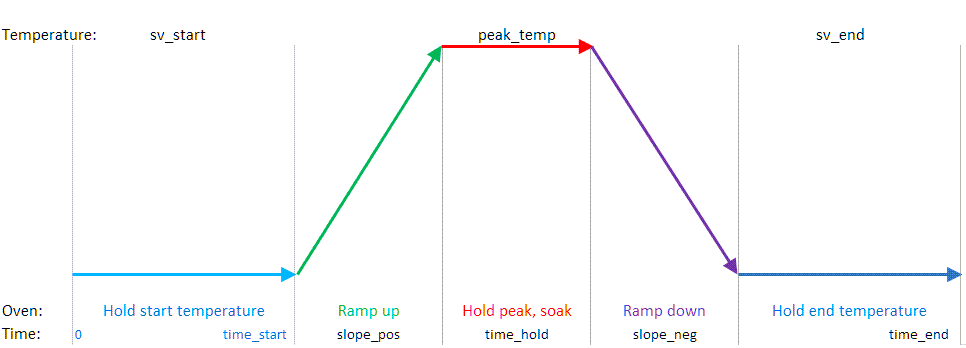
Each ramp sequence has five stages. Speed or duration of each stage configured in seconds, as shown on example listing above. It is recommended to keep hold start and peak_temp stages at least 30 minutes or more, to allow chamber reach thermal equilibrium, or the measurement data may have additional error due to unstable conditions.
Ramp up and down stages can have different duration if needed. If these settings are set to very low value, like 2-5 seconds, sequence will be transformed into step response, which can be useful for PID/thermal chamber hardware tuning.
Currently supported instrumentsMeasurement devices
* Keithley 2001 precision DMM
* Keithley 2002 precision DMM
* HP/Agilent/Keysight 3458A reference DMM
* Fluke 8508A reference DMM
* Keithley 2182/2182A Nanovoltmeter
* Keithley 182/182-M Nanovoltmeter
* Keithley 6517/6517A/6517B Electrometer
* Fluke 1590 SuperThermometer
* Fluke 1529 Chub-E4 Thermometer
* HP/Agilent/Keysight 53131A Frequency counter
Temperature controllers
* Keithley 2510 TEC SMU for temperature chamber control
* ILX 5910B TEC controller for temperature chamber control
Environment monitoring
* Adafruit BME280 temperature/humidity/pressure environment sensor
Usage examplesSimplified compact thermal chamber design can be built with affordable set of parts, such as presented on the illustration. The key components are
TEC (Peltier cooler device), precision thermistor or RTD temperature sensor and suitable metal box with thick walls to maintain the temperature stability.
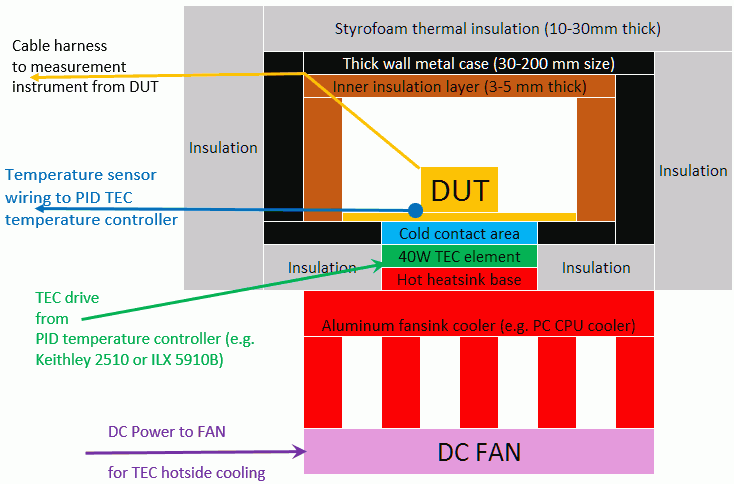
Use of TEC instead of passive power resistor serve dual purpose. If desired chamber temperature above the ambient, it will be used as a heater, and outside heatsink will be cooled. If desired temperature is below current box temperature, then controller will use TEC as cooling element and will regulate current flow to bring temperature down, heating up external radiator.
With some care in construction and good thermal insulation of all metal box surfaces from ambient air relative stability of temperature inside the chamber can be maintained at level +/-0.01C over hours long periods.
To make it even better/faster performing system small liquid cooling closed loop system can be used, like
this instead of fan-sink on external "hot" side of the TEC. It is much easier to insulate whole chamber together with pump and coldplate, instead of fiddling with fansink flow. With such liquid cooler and 40W generic TEC element (+12V 4A rating) temperature range +8C to +70C was easily achievable.
With temperature chamber controlAfter successful start, app will plot simple pseudo graphics text UI to provide means of monitoring experiment progress:
╒══════════════════════════════════════════════════════════════════════════════════════════════════╕
│  xDevs.com TEC Experiment kit        -i- Datafile ../teckit/measure_example_jan2019.csv exists   │
├──────────────────────────────────────────────────────────────────────────────────────────────────┤
│    GPIB[25] : Keithley 2510                                           Progress     : 11.96%      │
│    GPIB[10] : Keysight 3458A                                          Total points : 4806        │
│    GPIB[ 6] : Keithley 2002                                                                      │
│    GPIB[17] : Fluke 1529                                                                         │
╞══════════════════════════════════════════════════════════════════════════════════════════════════╡
│ Sample       :      575               Meter mode   : DCV              Set Temp     :  18.000 °C  │
│ Next temp    : 18.000 °C              Measured val : 1000.01778900    Process Temp :  18.000 °C  │
│ Min temp     : 18.000 °C              OCOMP/DELAY  : 1, 0 sec         TEC Current  :  -0.3706 A  │
│ Peak temp    : 50.000 °C              Fixed range  : Configure        Status       :  Hold start │
│ Remaining    :  8h 43m 14s            NPLC         :  100.0000        Gain         :  140.0000   │
│ Elapsed time :  1h 11m 05s            Terminals    :   FRONT          Integral     :    0.1000   │
│ Sample period: 7.42 sec               REL Value    :      1E-06       Derivative   :    0.9000   │
│         Median A= 1000.017674000 V              Median K= 1000.010953000 V                       │
│          Sdev A = 306.714 uV                     Sdev K = 370.634 uV                             │
│ [   572] S18.000 P18.005 I-0.368  A1.000017904e+03 B1.000010179e+03 C5.000359900e+01 C           │
│ [   573] S18.000 P17.995 I-0.367  A1.000017625e+03 B1.000011117e+03 C5.000361000e+01 C           │
│ [   574] S18.000 P18.000 I-0.371  A1.000017789e+03 B1.000011065e+03 C5.000358600e+01 C           │
│ [   559] S18.000 P17.999 I-0.369  A1.000017873e+03 B1.000010991e+03 C5.000348200e+01 C           │
│ [   560] S18.000 P17.998 I-0.368  A1.000017390e+03 B1.000010767e+03 C5.000347500e+01 C           │
╞══════════════════════════════════════════════════════════════════════════════════════════════════╡
│ Median A=    1.017674 V  B=    1.017674 V C=    1.017674 V D=    1.017674 V E=    1.017674 V     │
│ Sdev   A=    1.017674 V  B=    1.017674 V C=    1.017674 V D=    1.017674 V E=    1.017674 V     │
│ REF    A=                                                                                        │
╞══════════════════════════════════════════════════════════════════════════════════════════════════╡
│    REF :       2000              Delta :-499991.106  ppm       │ 25.153°C  66.8%RH  1016.8 hPa   │
╘══════════════════════════════════════════════════════════════════════════════════════════════════╛
Without temperature control, datalog onlyTECKit can be used as simple data logger as well, without running temperature controller part. For this edit teckit.conf configuration file with:
no_thermal = true
When
no_thermal is set
true, code related to the temperature controller hardware will not be executed, and only measurement instruments will be used for sampling.
All measurement values like instrument readings, ambient temperature data, meter temperatures and TEC chamber telemetry are stored in CSV-alike text file. This file have header to identify rows, such as:
date;hp3458a;hp3458b;k6;k4;meas5;meas6;val6;temp1;temp2;amb_temp;amb_rh;amb_pressure;box_temp;nvm_temp;
Example data, obtained from TECkit results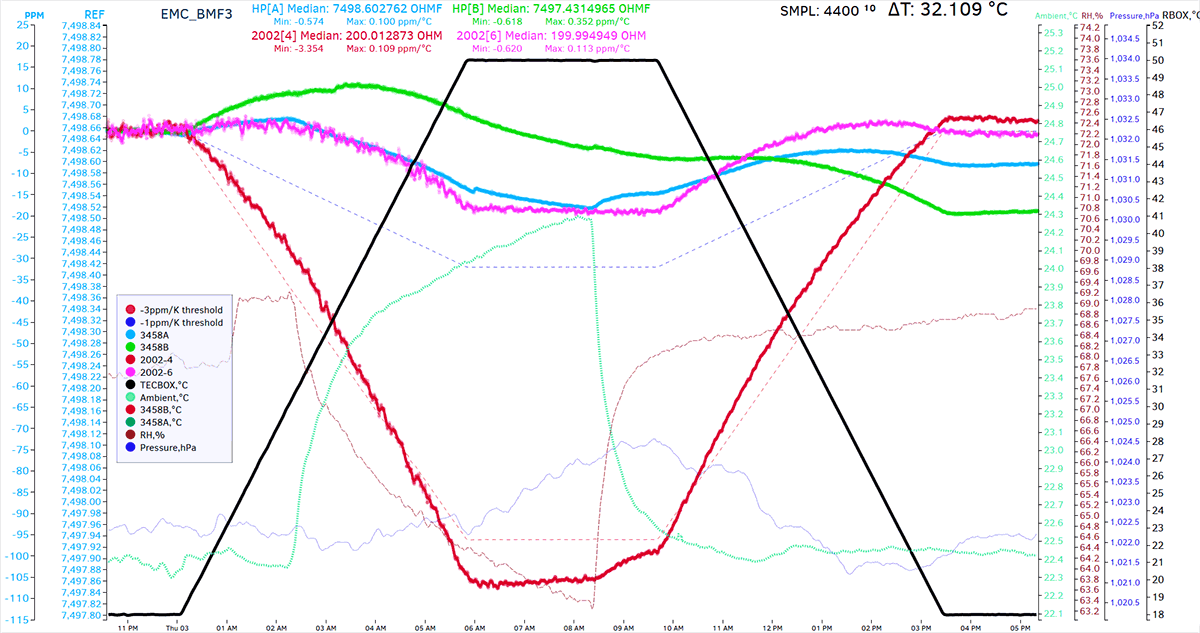 Example CSV-data file
 from this run.
Four instruments are used : HP 3458A GPIB 2 and 3, Keithley 2002 GPIB 4 and 6. Temperature control done by Keithley 2510 GPIB 25 with 40W TEC module and Honeywell HEL-705 platinum RTD sensor.
Please note, TECKit does NOT plot any graphs, it only saves result raw data into CSV-file. Colorful graph plot above is generated by d3.js library. You are free to use Excel or plotting tool of your preference for further data analysis.
Any feedback is welcome and appreciated.


