Author Topic: Different die pictures  (Read 85855 times)

0 Members and 1 Guest are viewing this topic.

Offline NoopyTopic starter

  • Super Contributor
  • ***
  • Posts: 1731
  • Country: de
    • Richis-Lab
Different die pictures
« on: July 01, 2020, 09:46:39 pm »

Hi all!


As some of you know I started some die pictures Topics here. In this topic I will post everything that doesn´t fit into the other topics.


So today let´s start with an old wafer built at the "Werk für Fernsehelektronik Berlin".


50mm and a die with a edge length of 1,2mm that still gives you over 1000 chips.  :-+


The wafer contains six test structures and some big things in the middle.


I assume the squares are some kind of etch markers.


The wafer was nearly done only the metal layer is missing. Well that gives some interesting pictures.
Unfortunately I don´t know which chip they tried to build here.


Nice!  8) :)


More pictures here:
https://richis-lab.de/wafer.htm


 :popcorn:
 
The following users thanked this post: Miyuki, Mortymore, soFPG, magic

Online magic

  • Super Contributor
  • ***
  • Posts: 6778
  • Country: pl
Re: Different die pictures
« Reply #1 on: July 01, 2020, 10:10:15 pm »
Maybe some very minimal bangap reference? But it's just 4 (5?) NPNs, it's nuts.

I think some current sources or thermal sensors might work on similar principle. No idea why it seems to be a dual.

Maybe just a random test wafer, never meant to even resemble any commercial IC product.
« Last Edit: July 01, 2020, 10:19:36 pm by magic »
 

Offline NoopyTopic starter

  • Super Contributor
  • ***
  • Posts: 1731
  • Country: de
    • Richis-Lab
Re: Different die pictures
« Reply #2 on: July 02, 2020, 03:42:07 am »
It´s a D220!  :)
=> Two 4-Input-NANDs

I also thought about a bandgap reference   ;D but the 4-emitter-transistor is used for the 4 inputs.  :-+

Online magic

  • Super Contributor
  • ***
  • Posts: 6778
  • Country: pl
Re: Different die pictures
« Reply #3 on: July 02, 2020, 04:52:30 am »
I completely forgot about those :palm:

edit
Makes perfect sense :-+
The diodes have to be input protection, the empty area is simply there because bonding pads take too much space.
« Last Edit: July 02, 2020, 05:18:01 am by magic »
 

Offline NoopyTopic starter

  • Super Contributor
  • ***
  • Posts: 1731
  • Country: de
    • Richis-Lab
Re: Different die pictures
« Reply #4 on: July 04, 2020, 08:14:08 pm »

Today I have a e-ink-display-controller for you. It came out of a watch (Crell NC-7279-919).


RE10E180D1?  :-//


I assume these structures are esd protection circuits.


I assume these structures are the output stages and some memory for every output.


Some Gatearray-Logic.


Perhaps a clock generator?  :-//


Some more pictures here:

https://richis-lab.de/E-Paper-Controller.htm

 :popcorn:
 
The following users thanked this post: Miyuki

Offline Twoflower

  • Frequent Contributor
  • **
  • Posts: 737
  • Country: de
Re: Different die pictures
« Reply #5 on: July 04, 2020, 08:27:35 pm »
Not matching the number, but could be a MCU from Renesas: RE Family
 

Online T3sl4co1l

  • Super Contributor
  • ***
  • Posts: 21673
  • Country: us
  • Expert, Analog Electronics, PCB Layout, EMC
    • Seven Transistor Labs
Re: Different die pictures
« Reply #6 on: July 04, 2020, 08:36:50 pm »
E-Paper takes a bunch of weird voltages, could be charge pumps or drive transistors?

Tim
Seven Transistor Labs, LLC
Electronic design, from concept to prototype.
Bringing a project to life?  Send me a message!
 

Offline NoopyTopic starter

  • Super Contributor
  • ***
  • Posts: 1731
  • Country: de
    • Richis-Lab
Re: Different die pictures
« Reply #7 on: July 04, 2020, 08:41:40 pm »
Not matching the number, but could be a MCU from Renesas: RE Family

That´s not very likely because there was another IC in the watch which already looks like a CPU. This one has to be the display Controller.


E-Paper takes a bunch of weird voltages, could be charge pumps or drive transistors?

Tim

The "clock generator"? Hm, very small structures for a charge pump.
Supply circuits are perhaps hiding under the area with the metal cover...

Offline Twoflower

  • Frequent Contributor
  • **
  • Posts: 737
  • Country: de
Re: Different die pictures
« Reply #8 on: July 04, 2020, 09:01:09 pm »
You'e probably right. It wouldn't make much sense. It was just a quick shot.
 

Offline NoopyTopic starter

  • Super Contributor
  • ***
  • Posts: 1731
  • Country: de
    • Richis-Lab
Re: Different die pictures
« Reply #9 on: July 04, 2020, 09:03:23 pm »
Every hint is welcome!  :popcorn:

Offline NoopyTopic starter

  • Super Contributor
  • ***
  • Posts: 1731
  • Country: de
    • Richis-Lab
Re: Different die pictures
« Reply #10 on: July 08, 2020, 08:52:27 pm »
Today I can show you the USB-Host USB2534:


 :popcorn:

Offline NoopyTopic starter

  • Super Contributor
  • ***
  • Posts: 1731
  • Country: de
    • Richis-Lab
Re: Different die pictures
« Reply #11 on: July 26, 2020, 07:02:27 pm »
Today the keypad controller TCA8418:

https://www.richis-lab.de/TCA8418.htm


Very small structures and not very good to take pictures of because of the polyimid-layer.


The structures beside the keypad bondpads seem to represent the esd protection. Quite a lot of area...
The right block contains the logic and the left block probably contains the clock generation, power on reset circuit and the I2C-interface.

 :popcorn:
 
The following users thanked this post: soFPG

Offline ratatax

  • Regular Contributor
  • *
  • Posts: 134
  • Country: fr
Re: Different die pictures
« Reply #12 on: July 26, 2020, 07:19:14 pm »
Looking at the usb chip die seems to show how complicated USB is - most of the layout doesn't repeat itself, like a lot of hardcoded logic to handle the protocol
 

Offline NoopyTopic starter

  • Super Contributor
  • ***
  • Posts: 1731
  • Country: de
    • Richis-Lab
Re: Different die pictures
« Reply #13 on: July 26, 2020, 07:23:34 pm »
Looking at the usb chip die seems to show how complicated USB is - most of the layout doesn't repeat itself, like a lot of hardcoded logic to handle the protocol

But not every part is for managing the usb, the USB2534 contains also a 8051 controller.  :-/O

Online T3sl4co1l

  • Super Contributor
  • ***
  • Posts: 21673
  • Country: us
  • Expert, Analog Electronics, PCB Layout, EMC
    • Seven Transistor Labs
Re: Different die pictures
« Reply #14 on: July 26, 2020, 08:56:23 pm »
Huh, wonder why it takes so much logic to scan some pins.  Also a bit surprising they didn't use diodes into a common ESD structure, I've seen that advertised on a few chips before.  Maybe the die is still small enough not to matter.  It's only 2kV HBM so it's not very robust for all the area they did spend on it.  Also interesting that all pins are individually zenered (or dioded to a common zener rail, but we can see from the die that that's probably not the case), i.e. the voltage limits don't depend on VCC or whatever, it's -0.5 to 4.6V across the board.

Ah, so it's not just scanning, there's a FIFO too; seems it implements quite a lot of keyboard functionality that, in the case of the IBM PC for example, was entirely up to the BIOS to perform.  Doesn't look like there's RAM or ROM to control state, so it's either a very compact MCU with ROM scattered around somehow (or hard wired in the sea-of-gates?) or actually all synthesized logic.

Not sure why the I2C side looks different.  Is that mesh pattern just top metallization, or is it transistors/interconnects?  Almost makes it look like there could be some fat transistors in there, but I don't see any reason why this should have large switching capacity or an LDO or something in it.  (Well, I guess the LDO is possible -- maybe the core logic is 1.2V or something?  Heh, it does run 1.65-3.6V, a fairly wide range; not unheard-of for logic gates, but also possible this way.)  Very low power, fractional mA at worst, a fine-pitch design in any case.

Tim
Seven Transistor Labs, LLC
Electronic design, from concept to prototype.
Bringing a project to life?  Send me a message!
 

Offline NoopyTopic starter

  • Super Contributor
  • ***
  • Posts: 1731
  • Country: de
    • Richis-Lab
Re: Different die pictures
« Reply #15 on: July 27, 2020, 05:06:06 am »
Also a bit surprising they didn't use diodes into a common ESD structure, I've seen that advertised on a few chips before.  Maybe the die is still small enough not to matter.

I assume they wanted a chip which doesn´t need a lot of external components...


Ah, so it's not just scanning, there's a FIFO too; seems it implements quite a lot of keyboard functionality that, in the case of the IBM PC for example, was entirely up to the BIOS to perform.

Probably it should work as a "simple" (in terms of the user) and easy connection between a keypad and a controller.


Not sure why the I2C side looks different.  Is that mesh pattern just top metallization, or is it transistors/interconnects?  Almost makes it look like there could be some fat transistors in there, but I don't see any reason why this should have large switching capacity or an LDO or something in it.  (Well, I guess the LDO is possible -- maybe the core logic is 1.2V or something?  Heh, it does run 1.65-3.6V, a fairly wide range; not unheard-of for logic gates, but also possible this way.)  Very low power, fractional mA at worst, a fine-pitch design in any case.

I don´t see transistors on the left side of the die but perhaps they are still there.
There should also be some clock generator, output stage for I2C and undervoltage detection. Some housekeeping...


Online T3sl4co1l

  • Super Contributor
  • ***
  • Posts: 21673
  • Country: us
  • Expert, Analog Electronics, PCB Layout, EMC
    • Seven Transistor Labs
Re: Different die pictures
« Reply #16 on: July 27, 2020, 05:14:57 pm »
Had some other thoughts -- the sea-of-gates approach seems wasteful for a one-off.  But I wonder if it's not, if it's designed as a I2C interface ASIC and they use the same 20-GPIO format across many parts?  Saves on masks.  That maybe explains the pins taking up so much space, as they're left general-purpose for any ASIC design.  Maybe if you look at other parts in the same I2C interface family, same or lower pin count, you'll find exactly this? :-//

Tim
Seven Transistor Labs, LLC
Electronic design, from concept to prototype.
Bringing a project to life?  Send me a message!
 

Offline NoopyTopic starter

  • Super Contributor
  • ***
  • Posts: 1731
  • Country: de
    • Richis-Lab
Re: Different die pictures
« Reply #17 on: July 27, 2020, 09:18:57 pm »
Had some other thoughts -- the sea-of-gates approach seems wasteful for a one-off.  But I wonder if it's not, if it's designed as a I2C interface ASIC and they use the same 20-GPIO format across many parts?  Saves on masks.  That maybe explains the pins taking up so much space, as they're left general-purpose for any ASIC design.  Maybe if you look at other parts in the same I2C interface family, same or lower pin count, you'll find exactly this? :-//

Tim


I´m not sure about that... Isn´t a gatearray a quick solution to solve problems. There might be a more efficient way to integrate the logic but probably engineering time costs more than the silicon area if you built a special chip.  :-//

In mouse sensors (https://www.richis-lab.de/mouse.htm) you often see integrated gatearrays:

 
The following users thanked this post: Miyuki

Offline NoopyTopic starter

  • Super Contributor
  • ***
  • Posts: 1731
  • Country: de
    • Richis-Lab
Re: Different die pictures
« Reply #18 on: July 31, 2020, 08:30:32 pm »
...
https://richis-lab.de/wafer.htm
...

I have added a complete D220 to the wafer pictures:

 
The following users thanked this post: ANTALIFE

Offline NoopyTopic starter

  • Super Contributor
  • ***
  • Posts: 1731
  • Country: de
    • Richis-Lab
Re: Different die pictures
« Reply #19 on: August 04, 2020, 09:48:11 pm »
Wanna see the internal of an optocoupler? I have a H11L1 for you:


The LED is placed above the receiver on a bent part of the lead frame.


If you just break out the receiver you can look onto the square routing the light and containing silicone.


In the path of light there is also some glass (0,17mm).


The LED is 0,3mm*0,3mm and owns a quite big metal contact.


The H11L1 uses a optical diode, not an optical transistor. (Nice light symbol.  :-+)


Silcon art, yeah!  ;D


More pictures here:

https://www.richis-lab.de/Opto01.htm

 
The following users thanked this post: Andreas, laneboysrc, Cervisia

Offline NoopyTopic starter

  • Super Contributor
  • ***
  • Posts: 1731
  • Country: de
    • Richis-Lab
Re: Different die pictures
« Reply #20 on: August 09, 2020, 06:17:23 pm »
For the Apple fanboys I have a 344-0022, the IOU (Input/Output-Interface).
With the MMU and a PAL the IOU manages the memory and the input/output adressing.


The packages tells us that the 344-0022 was produced by AMI in 1987 and that it was designed in 1982.


The die is 3,48mm x 3,25mm. The smallest structures are roughly 6µm.


On the die you can see five masks. The "R5" for every mask could be a hint for a fifth revision. Perhaps...
The S stands for Synertek. I assume Apple designed the features of the ASIC, Synertek designed the chip itself and AMI produced the ASIC.
The "Apple-copyright" on the packages (1982) doesn´t correspond to the "Apple-copyright" on the die (1981).

 :popcorn:
« Last Edit: August 09, 2020, 06:20:31 pm by Noopy »
 

Offline NoopyTopic starter

  • Super Contributor
  • ***
  • Posts: 1731
  • Country: de
    • Richis-Lab
Re: Different die pictures
« Reply #21 on: August 15, 2020, 09:16:11 pm »

Today I have the bulgarian clone of the 344-0022 for you, a CM632:


The die of the CM632 is quite simliar to the 344-0022 but not exactly the same.


https://www.richis-lab.de/prawez02.htm


 :popcorn:

Offline NoopyTopic starter

  • Super Contributor
  • ***
  • Posts: 1731
  • Country: de
    • Richis-Lab
Re: Different die pictures
« Reply #22 on: August 30, 2020, 04:52:30 pm »

Today I have the second Apple-2-ASIC for you, the 344-0011:


The polyimid finish is quite persistent but:


WB? Probably the developer...


It seems there is one mask more than in the 344-0022...  :-//


https://www.richis-lab.de/apple.htm


 :popcorn:

Offline NoopyTopic starter

  • Super Contributor
  • ***
  • Posts: 1731
  • Country: de
    • Richis-Lab
Re: Different die pictures
« Reply #23 on: August 31, 2020, 04:58:18 pm »

And here the 344-0011 clone built by Mikroelektronika Botevgrad, the CM631:


I found an interesting die coating. It was a sticky stuff resistant against high temperatures but I was able to rub it off the die. Some isopropyl was a help but I assume it wouldn´t have been neccesary.


As the CM632 the CM631 is quite similar to the apple original but it´s not exactly the same.


...


Test structures!  :)


https://www.richis-lab.de/prawez03.htm


 :-/O
 
The following users thanked this post: daqq

Offline brabus

  • Frequent Contributor
  • **
  • Posts: 326
  • Country: it
Re: Different die pictures
« Reply #24 on: September 01, 2020, 12:47:06 pm »
Richi,

Let me express my gratitude and congratulation for the job you are doing!

I guess you can be a very interesting guest in an episode of the Amp Hour podcast!  :-+
 
The following users thanked this post: ANTALIFE

Offline NoopyTopic starter

  • Super Contributor
  • ***
  • Posts: 1731
  • Country: de
    • Richis-Lab
Re: Different die pictures
« Reply #25 on: September 01, 2020, 03:28:09 pm »
Thank you very much!  :)

You probably don't want to hear me speaking english.  ;D

Offline NoopyTopic starter

  • Super Contributor
  • ***
  • Posts: 1731
  • Country: de
    • Richis-Lab
Re: Different die pictures
« Reply #26 on: September 02, 2020, 10:10:53 pm »
I have another 2"-wafer for your:


Four test structures to check the process quality.


Aha, a A210-audio-amplifier!  :-+ ...I wouldn´t say HIFI...  ;)


The metal layer is missing like on the D220-wafer. You can´t check the whole circuit but you can see a lot more of the active devices.  :-+


 :o It look´s like they used two test structures that where designed for smaller dies and combined them on one die of this wafer. Now the frame extends to the milling area.


That is how the A210 looks like with it´s suit on.  8)


Sorry, I damaged the die...  ::)


Revision 07... They had a lot of homework to do.


And later they added mask revisions.


Most parts can be found on the schematic. But they added two small emitter resistors and...


There is a testpad for checking the overtemperature shutoff. So they didn´t have to check the amp at high temperatures.
And there is the possibility to change the connection leading to a different resistance of R7 leading to a different overtemperature limit.


A nice big output stage transistor.


These lateral PNP-transistors are quite bad. You need a lot of die area to get good enough specifications.


They added a resistor and one or two diodes to the bias circuit of the output stage... I´m not sure why...  :-//


More pictures here:

https://www.richis-lab.de/wafer02.htm


 :-/O
 
The following users thanked this post: Miyuki

Online T3sl4co1l

  • Super Contributor
  • ***
  • Posts: 21673
  • Country: us
  • Expert, Analog Electronics, PCB Layout, EMC
    • Seven Transistor Labs
Re: Different die pictures
« Reply #27 on: September 03, 2020, 09:29:43 am »
Good old fashioned quasi-complementary... yeah, that would be a pain in the days of lateral PNP. :)

Tim
Seven Transistor Labs, LLC
Electronic design, from concept to prototype.
Bringing a project to life?  Send me a message!
 

Offline NoopyTopic starter

  • Super Contributor
  • ***
  • Posts: 1731
  • Country: de
    • Richis-Lab
Re: Different die pictures
« Reply #28 on: September 03, 2020, 07:54:10 pm »

A little bit more modern, the TDA7396:


The die is 4,71mm x 3,79mm.


I don´t like these polyimid coatings, they need very high temperatures to deteriorate...


...often the metal layer is damaged while heating it to the higher temperatures.


But I managed to get a good picture.
The TDA7396 uses two metal layers. The circuit is quite dense.


The H-bridge transistors can be identified easily.  :-+

Offline NoopyTopic starter

  • Super Contributor
  • ***
  • Posts: 1731
  • Country: de
    • Richis-Lab
Re: Different die pictures
« Reply #29 on: September 04, 2020, 09:49:41 pm »
Today I have the Mikroelektronika Botevgrad CM630, a 6502-clone:


I can identify the information in the instruction ROM!  8)

https://www.richis-lab.de/prawez04.htm

Offline NoopyTopic starter

  • Super Contributor
  • ***
  • Posts: 1731
  • Country: de
    • Richis-Lab
Re: Different die pictures
« Reply #30 on: September 12, 2020, 09:07:11 pm »


The CM633 is a 16R8-PAL built by Mikroelektronika Botevgrad and used in the prawez computers simliar to the Apple 2.


The die pictures are not perfect but it´s possible to find the functional blocks.


The structures are very small but it looks like one can see the status of the antifuses in the array.  :-/O


https://www.richis-lab.de/prawez05.htm


Offline NoopyTopic starter

  • Super Contributor
  • ***
  • Posts: 1731
  • Country: de
    • Richis-Lab
Re: Different die pictures
« Reply #31 on: September 13, 2020, 07:07:26 pm »

Update: The CM633 is a HAL not a PAL!


With more magnification you can see the vias connecting the metal layer with the active area.
(The picture in the last post is updated due to hotlinking.)


You can see that there is no simple electrical connection. Eacht metal line is equipped with a pull-up (red). Each control line (green) forms a transistor between a via and a ground line.

 :-+
 
The following users thanked this post: brabus

Offline NoopyTopic starter

  • Super Contributor
  • ***
  • Posts: 1731
  • Country: de
    • Richis-Lab
Re: Different die pictures
« Reply #32 on: September 26, 2020, 06:58:39 pm »
Let´s take a look into an old injection interface:


https://richis-lab.de/ECU01.htm

 :popcorn:

Offline NoopyTopic starter

  • Super Contributor
  • ***
  • Posts: 1731
  • Country: de
    • Richis-Lab
Re: Different die pictures
« Reply #33 on: October 02, 2020, 09:22:40 pm »
The 0127 is a strange injection interface. I don´t know very much about this asic.  :-//


https://richis-lab.de/ECU02.htm


Offline NoopyTopic starter

  • Super Contributor
  • ***
  • Posts: 1731
  • Country: de
    • Richis-Lab
Re: Different die pictures
« Reply #34 on: October 04, 2020, 08:42:02 pm »

Let´s look inside an old 2,1W-Sanyo-amplifier:


The heatsink sheet carries the die.


Between the differential amplifier (pink) and the VAS (green) there is an additional amplifier (dark grey). This amplifier is shifting the signal and unloads the input amplifier.
In the VAS there is an internal and an external feedback path.
An interesting point is the bias generation of the output stage (yellow). The bias is based on the output and causes some current to flow through the lowside Transistor. That causes current through the highside. Nothing special but at high output levels you can switch of the highside completely. That´s good because of the small supply voltages.


Nothing special, but...


...the output transistors and the transistor Q11 are built with a perforated emitter! The dark grey emitter is not put in squares but in a grid that contains holes to contact the base area underneath. That´s interesting!


Another interesting point: The LA4100 and the LA4101 are specified with lower supply voltages and less output power. But these amplifiers are no selected parts. The bias generator is connected different so that the bias in the LA4102 is less than in the LA4101/LA4100. I assume they had to do this to lower the power dissipation.
 
The following users thanked this post: Miyuki

Offline NoopyTopic starter

  • Super Contributor
  • ***
  • Posts: 1731
  • Country: de
    • Richis-Lab
Re: Different die pictures
« Reply #35 on: October 10, 2020, 01:16:48 pm »


The Interdesign 2438 is used in engine control units as a front end for inductive rotation sensors.


Well, nothing special to see...  :-/O


https://richis-lab.de/ECU03.htm


Online T3sl4co1l

  • Super Contributor
  • ***
  • Posts: 21673
  • Country: us
  • Expert, Analog Electronics, PCB Layout, EMC
    • Seven Transistor Labs
Re: Different die pictures
« Reply #36 on: October 10, 2020, 09:42:46 pm »
They sure needed a lot of resistors in that one!

Tim
Seven Transistor Labs, LLC
Electronic design, from concept to prototype.
Bringing a project to life?  Send me a message!
 

Offline NoopyTopic starter

  • Super Contributor
  • ***
  • Posts: 1731
  • Country: de
    • Richis-Lab
Re: Different die pictures
« Reply #37 on: October 12, 2020, 08:34:58 pm »
They sure needed a lot of resistors in that one!

That´s for sure!  :-+


Today I have a CM8116 for you. It´s a 16kBit-RAM manufactured by Mikroelektronika Botevgrad:


They needed 5,7mm x 3,1mm for the 16384 Bits.


But what´s that? It´s an ITT 4116!
A nice elephant!  ;D


Some more pictures here:

https://www.richis-lab.de/prawez06.htm
 
The following users thanked this post: daqq

Offline NoopyTopic starter

  • Super Contributor
  • ***
  • Posts: 1731
  • Country: de
    • Richis-Lab
Re: Different die pictures
« Reply #38 on: October 16, 2020, 05:18:40 pm »


HA12045 a Dolby B noise reduction chip.  :-/O

https://www.richis-lab.de/HA12045.htm

Offline NoopyTopic starter

  • Super Contributor
  • ***
  • Posts: 1731
  • Country: de
    • Richis-Lab
Re: Different die pictures
« Reply #39 on: October 21, 2020, 05:48:52 pm »
Today I have a part of a wafer for you:


It contains the A3520, a SECAM-decoder similar to the TDA3520.


More pictures here:

https://www.richis-lab.de/wafer03.htm

 :popcorn:

Offline NoopyTopic starter

  • Super Contributor
  • ***
  • Posts: 1731
  • Country: de
    • Richis-Lab
Re: Different die pictures
« Reply #40 on: October 31, 2020, 04:27:44 am »

I just wanted to point out that I have built a calender presenting some of the best pictures of 2020:

https://www.meinbildkalender.de/richis-lab

If you are interested...  :-+

Offline NoopyTopic starter

  • Super Contributor
  • ***
  • Posts: 1731
  • Country: de
    • Richis-Lab
Re: Different die pictures
« Reply #41 on: October 31, 2020, 12:24:54 pm »


Does anyone of you know which manufacturer hides behind this logo? It´s on an analog digital converter...  :-//

Offline NoopyTopic starter

  • Super Contributor
  • ***
  • Posts: 1731
  • Country: de
    • Richis-Lab
Re: Different die pictures
« Reply #42 on: November 07, 2020, 08:37:57 pm »
One more audio amplifier:


LM380, single supply 2,5W @8 \$\Omega\$


The input is built so you can use a input signal with ground reference without a coupling capacitor. Absolut maximum ratings ist +/-0,5V at the input. I assume that degrades the signal a little bit. With every negative mV you get more leackage current over the substrate.
In the input there is a pi-type differential amplifier. One leg is used for negative feedback.
The VAS (green) is also the predriver.


There is some additional potting on the die. Getting rid of this potting was not easy.


It took a lot of heat to get to the silicon.  :-\
1,6mm x 1,4mm


The output amplifier is built with darlington transistors.
The datasheet states an overcurrent protection. You can´t see a shunt measurement over the emitter resistors. It seems like the two circuits on the left are doing the overcurrent protection. But how does the circuit detect the overcurrent? Thats no MOSFET output stage in which you could built a current mirror current measurement.  :-//


The first transistor of the input also is built with a Darlington configuration 1a/1b and 2a/2b.


https://www.richis-lab.de/audioamp03.htm


 :-/O

Offline NoopyTopic starter

  • Super Contributor
  • ***
  • Posts: 1731
  • Country: de
    • Richis-Lab
Re: Different die pictures
« Reply #43 on: November 12, 2020, 09:48:21 pm »


SAB3012 - TV remote receiver and memory


Most of the area is occupied by the logic. I assume the three stripes are the memory for the four "analogue" outputs. In fact the outputs are digital but with a RC-network generate a analogue signal.


Although the crossing of the lines looks uniform it has to represent transistors and connections...  :-//


https://www.richis-lab.de/SAB3012.htm

 :-/O

Offline NoopyTopic starter

  • Super Contributor
  • ***
  • Posts: 1731
  • Country: de
    • Richis-Lab
Re: Different die pictures
« Reply #44 on: November 14, 2020, 12:20:22 pm »
Let´s take a look into an old hall-switch:


The B461 was built by HFO in 1983.


They used some gel potting to protect the die.


The hall-effect occurs under the metal square in the silicon. The metal square probably acts as a shield against electrical fields.


More pictures here:

https://www.richis-lab.de/hall01.htm

 :-/O
 
The following users thanked this post: doktor pyta, RoGeorge, Miyuki

Offline NoopyTopic starter

  • Super Contributor
  • ***
  • Posts: 1731
  • Country: de
    • Richis-Lab
Re: Different die pictures
« Reply #45 on: November 23, 2020, 08:45:05 pm »


The Bosch 30221 is a sixfold lowside switch used in motor control units.


Well that´s not a big heatspreader...


But the die is quite big: 7,2mm x 4,3mm. There are a lot of bondwires connecting the die to the heatspreader.


You can see the six power stages. There are six bondpads on top of the die controlling the power stages. In the middle of the die there are six times two bondpads connecting the output pin. On the lower edge there are six times two bondpads connecting to ground.


Now that´s interesting! There is a cut in the middle of the two bondpads! Perhaps Bosch wanted to use the power stage with less outputs too. I assume by not connecting the bondpad of an unused amplifier a circuit is cut open. Perhaps that was neccessary because of diagnostics...  :-//


You can spot the power transistor (yellow), the overcurrent protection (red) using a part of the metal layer as a shunt, the driver (green) and a big structure (blue/purple) containing zener diodes for clamping.
Interesting is the white part. The potential between the blue and the purple part is used to control the white part.


It looks like the white transistors are pulling the base of the power transistor hard low while the zener diodes are clamping. I assume with this circuit the blocking voltage of the power transistor is higher while clamping. The green part looks like a highside driver. Without a push-pull driver leackage current through the collector-base-junction can turn the transistor on. Pulling the base low drains the leackage current and gives you some more volts of blocking voltage.  :-+


https://www.richis-lab.de/ECU04.htm


 :-/O
 
The following users thanked this post: Miyuki

Online T3sl4co1l

  • Super Contributor
  • ***
  • Posts: 21673
  • Country: us
  • Expert, Analog Electronics, PCB Layout, EMC
    • Seven Transistor Labs
Re: Different die pictures
« Reply #46 on: November 23, 2020, 09:04:57 pm »
Yeah, clamped B-E gives you the higher Vcbo versus Vceo voltage rating.

That pullup must be pretty beefy then. Not actually Darlington?

I find the layout unusual, or I'm rather rusty on reading ICs; hard to tell what's collector and emitter.  And hard to see the diffusions under the metal layer; they're only barely visible in the tilted (perspective? and look at that metal thickness, cool) view.

Tim
Seven Transistor Labs, LLC
Electronic design, from concept to prototype.
Bringing a project to life?  Send me a message!
 

Offline RoGeorge

  • Super Contributor
  • ***
  • Posts: 6202
  • Country: ro
Re: Different die pictures
« Reply #47 on: November 23, 2020, 09:22:24 pm »
Another great one, thank you!
 :popcorn:

Offline NoopyTopic starter

  • Super Contributor
  • ***
  • Posts: 1731
  • Country: de
    • Richis-Lab
Re: Different die pictures
« Reply #48 on: November 23, 2020, 09:31:57 pm »
That pullup must be pretty beefy then. Not actually Darlington?

No, i didn´t find a darlington.


I find the layout unusual, or I'm rather rusty on reading ICs; hard to tell what's collector and emitter.  And hard to see the diffusions under the metal layer; they're only barely visible in the tilted (perspective? and look at that metal thickness, cool) view.

You are right. It took me some time but now I´m pretty sure about the schematic. In the white block you can see the greenish base area and looking very carefully you can spot a second area in the base area under the ground metal. That has to be the emitter. The base of the power transistor connects to the purpel area in which the greenish base area is placed. That has to be the collector.  :-/O :-+ :)


Another great one, thank you!
 :popcorn:

Thanks!  :)

Online magic

  • Super Contributor
  • ***
  • Posts: 6778
  • Country: pl
Re: Different die pictures
« Reply #49 on: November 23, 2020, 10:22:23 pm »
How are those clamping diodes supposed to work? They look like normal transistors with open circuit bases.
 

Offline NoopyTopic starter

  • Super Contributor
  • ***
  • Posts: 1731
  • Country: de
    • Richis-Lab
Re: Different die pictures
« Reply #50 on: November 23, 2020, 10:35:02 pm »
How are those clamping diodes supposed to work? They look like normal transistors with open circuit bases.

I assume that´s a standard transistor and the "T" connects the base (vertical) with the collector (horizontal). That would leave a base-emitter-junction which gives us a zener Diode with some volts.
Of course I´m not 100% sure about that but that´s the only function that makes sense. It´s a component connected only between the output and ground. It´s too big to be a surge suppressor but you definitly need a clamping circuit in such a lowside switch.

Online mawyatt

  • Super Contributor
  • ***
  • Posts: 3254
  • Country: us
Re: Different die pictures
« Reply #51 on: November 25, 2020, 01:34:07 pm »
Here's a Nikon Image Space site where a few older chip images we can show are available. We've done some (not on this site they are too big!) that are ~ 30,000 by 20,000 pixels utilizing special Stack & Stitch techniques and custom designed stepper motor controllers, camera/lens assemblies & equipment. You'll need to download the images to get moderate resolution, most are available in this medium resolution as full resolution is too large for most downloads and takes up too much space on this site.

http://img.gg/taIZ99M

Happy Thanksgiving,

Best,
« Last Edit: November 25, 2020, 01:37:41 pm by mawyatt »
Curiosity killed the cat, also depleted my wallet!
~Wyatt Labs by Mike~
 
The following users thanked this post: Miyuki

Offline NoopyTopic starter

  • Super Contributor
  • ***
  • Posts: 1731
  • Country: de
    • Richis-Lab
Re: Different die pictures
« Reply #52 on: November 27, 2020, 09:41:50 pm »
I have taken some pictures of a Tektronix P6461 differential comparator probe (used in a DAS9200 logic analyzer):


The probe is built on a ceramic substrate.


The supply is +/-15V. The green wires adjust the threshold. The differential output is shielded with the positive supply.


The input was shorted during production so the comparator is protected against ESD.
The resistors are tuned.


R3/R4 are input resistors.
C1/C2 are matching the resistors with the rest of the probe.
R1/R2 are supressing reflections.
With R5/R6 the unit can adjust the threshold.


M363A? I wasn´t able to find information about this chip... :-//


The white part is not used. In the rest of the circuit there are some amplifier stages and biasing. The output seems to be an ECL stage.
There are different connection to the positive and the negative supply. It looks like these are options to adjust the bias with a small change of the metal layer.


The white part is only connected to the supply lines, one input and a not used bondpad.
I assume the chip had an option to control the threshold as long as the ground potential is the same in both circuits, the DUT and the meassurement unit.
With the differential threshold adjustment in the P6461 the ground potential doesn´t have to be the same.


More pictures here:

https://www.richis-lab.de/diffprobe.htm

 :-/O
 
The following users thanked this post: doktor pyta, RoGeorge, Miyuki

Offline Renate

  • Super Contributor
  • ***
  • Posts: 1460
  • Country: us
Re: Different die pictures
« Reply #53 on: November 29, 2020, 12:04:18 am »
The input was shorted during production so the comparator is protected against ESD.
Mmm, just wondering: Isn't more likely that it's shorted so that they could get the CMRR dead on when they trimmed the resistors?
And then they could trim (i.e. chop) the short immediately after they were done.
 
The following users thanked this post: Noopy

Offline NoopyTopic starter

  • Super Contributor
  • ***
  • Posts: 1731
  • Country: de
    • Richis-Lab
Re: Different die pictures
« Reply #54 on: November 29, 2020, 05:01:06 am »
The input was shorted during production so the comparator is protected against ESD.
Mmm, just wondering: Isn't more likely that it's shorted so that they could get the CMRR dead on when they trimmed the resistors?
And then they could trim (i.e. chop) the short immediately after they were done.

Thanks for the hint! Of course the short gives also clean and CM-free 0V during tuning.  :-+

Offline NoopyTopic starter

  • Super Contributor
  • ***
  • Posts: 1731
  • Country: de
    • Richis-Lab
Re: Different die pictures
« Reply #55 on: December 10, 2020, 05:18:11 am »


The TL7705A, a supply voltage supervisor.


The die is 1,8mm x 1,8mm. The structures are quite big, so we can take a closer look.


At the sense input there are four resistors that can devide the input voltage to give you one of the voltage levels:
TL7702A: 0Ω
TL7705A: 7.8kΩ
TL7709A: 19.7kΩ
TL7712A: 32.7kΩ
TL7715A: 43.4 kΩ


With the lower testpads connected to the lower resistor of the voltage divider you can adjust the voltage threshold.
Interesting point: The TL7702A has no resistor devider and with that it can´t be adjusted. You see that looking at the accuracy:
TL7702A: +/-2,0%
TL7705A: +/-1,1%
TL7709A: +/-1,3%
TL7712A: +/-1,9%
TL7715A: +/-2,2%

These are no metal fuses. They look like zener fuses (antifuses).


The small transistors in the middle of this picture act as schmitt trigger and oring.
The green path is connected to an external capacitor for adjusting the hysteresis. The big transistor is no thyristor, like shown in the datasheet, it´s a pnp transistor. Of course you don´t want to integrate a thyristor in such a standard process. Probably the rest of the circuit makes him acting like a thyristor.


The output stage is not a pnp/npn stage like shown in the datasheet but a sziklay pnp-npn / npn stage.
The big PNP transistor controls both, highside and lowside and it seems like doing some latching. It gives correct reset signals down to 2V.


Here you can see the Brokaw bandgap reference.
There are two transistors (on the right side), one five times bigger than the other. The round structures look like PNP transistors but refering to the circuit and the colours they have to be NPN transistors.
The transistors are connected to two resistors (blue and dark blue) as usual in bandgap references. The lower resistor can be tuned with a small parallel resistance switched with the white testpads. At the purpel testpad you can meassure the basic reference voltage.
The big pnp transistor generates and supplies the pink reference voltage out of the basic reference voltage.
The other big transistor seems to be a startup circuit. It´s seems to be a kind of a jfet.


More pictures here:

https://www.richis-lab.de/TL7705.htm

 :-/O

Offline NoopyTopic starter

  • Super Contributor
  • ***
  • Posts: 1731
  • Country: de
    • Richis-Lab
Re: Different die pictures
« Reply #56 on: December 18, 2020, 09:08:20 pm »


The Bridgetek BT815 Touch-Display-Controller is quite a intelligent part.


The die is 4,1mm x 3,7mm.


Under normal light the metal layer looks quite strange. That is no artefact, there is really a kind of an edge.


I assume that are the analogue parts.


Looks like first design built 2017.


Hey, real big fuses!  ;D
But what is that big thing in the window under the second fuse? Looks like something optoelectric...  :-// :-// :-//


https://www.richis-lab.de/BT815.htm

 :-/O

Offline NoopyTopic starter

  • Super Contributor
  • ***
  • Posts: 1731
  • Country: de
    • Richis-Lab
Re: Different die pictures
« Reply #57 on: December 31, 2020, 06:03:53 am »
Let´s take a look into an old hall-switch:


The B461 was built by HFO in 1983.

...


I have added a schematic to the B461 documentation:


The voltage redulator is quite complex.
The grey circuit generates a "constant" current out of the three emitter of T15. R20 (yellow) makes the start-up possible. After that T15 supplies current to its own "voltage reference" T17/T18. T16 is the current sink that is multiplied by T15.
The grey circuit supplies current to the voltage regulator T19. The pin 3 makes is possible to activate the pink line which can sink the current normaly fed to T19. In this case the B461 is off.
T19/R21/T20/T21 (orange) does a kind of a voltage regulation. Since Vbe of T20/T21 drifts a lot with temperature the current mirror T22/T23 does some compensation by sinking some of the base current of T20/T21.
The green path generates a voltages that varies with temperature in a way that the connected current sinks draw a constant current (red/blue). T26/R26 is a reference for the other two current sinks. If it draws more current due to a higher temperature the supply current through T25 is reduced and the current through the current sinks stays constant.

The dark green differential amplifier is connected to the hall element and evaluates the hall voltage. The collector resistors determine the threshold of the hall switch.
The dark green differential amplifier has a differential input and a differential output. Since commen mode noise is not a big problem its current sink is not connected to the special "constant current voltage supply".

The blue differential amplifier has a single output. I assume because of this single output the blue amplifier needed the special supply for its current sink.
In the collector path you can find two current mirrors. One mirror equals the currents in the two legs and one mirror copies the current of the right leg. This current is the output of the whole stage.

The cyan part contains two hysteresis. With help of the transistor T4 the output of the blue amplifier affects the amplification factor of the dark green amplifier so we get a clean threshold.
T12/T13 is a schmitt trigger which generates a clean digital output.

 :-/O

https://www.richis-lab.de/hall01.htm

 :)

Offline NoopyTopic starter

  • Super Contributor
  • ***
  • Posts: 1731
  • Country: de
    • Richis-Lab
Re: Different die pictures
« Reply #58 on: January 09, 2021, 09:50:39 pm »


U821D, a pMOS calculator controller built by Funkwerk Erfurt (FWE), later renamed to Mikroelektronik Karl Marx (MME).
The U821D is similar to the U820D but consumes a little less current. The figures of the display were also optimized so the average current consumption of the display is reduced.
The U821D can drive more current to the LED segments than the U820D.


Quite a big die: 5,8mm x 5,8mm


Test structures: pMOS with field oxide on the left, pMOS with gate oxide on the right (you can see the window in the field oxide under the gate metal).


The input protection uses the field-oxide-MOSFET which conducts only at problematic high (low) voltages at the bondpad.


LED output with a big transistor and a push-pull-driver.
(5mA typ., 7mA max.)


The digit driver is a little smaller and is able to conduct 1,5mA.
The driver is a little more complex.


Let´s take a closer look at the instruction ROM. It´s a Mask-ROM.
On the right side there is the adress column with 2*6 differential adress lines. The white MOSFETs conduct the red Vss into almost every adress line of the ROM. Only one line (the selected one, blue) is LOW.
In the ROM there are a lot of transistors (black). In the adress line with the low potential (blue) the transistors are active (yellow) and are conducting the Vss potential into the corresponding control lines. Programming of the ROM is done by placing the MOSFETs (the gate oxide) wherever you want a control line to be active.
The green transistor on the right side is a pull-up-transistor.


Dunkelwind (aka bITmASTER) has built a U82xD-emulator with the help of my pictures: https://www.richis-lab.de/images/calc/U821Emu.html


More pictures here:
https://www.richis-lab.de/calc01.htm


 :-/O
 
The following users thanked this post: brabus, RoGeorge

Offline NoopyTopic starter

  • Super Contributor
  • ***
  • Posts: 1731
  • Country: de
    • Richis-Lab
Re: Different die pictures
« Reply #59 on: January 11, 2021, 03:36:14 pm »

Offline NoopyTopic starter

  • Super Contributor
  • ***
  • Posts: 1731
  • Country: de
    • Richis-Lab
Re: Different die pictures
« Reply #60 on: January 17, 2021, 12:47:31 pm »
I have a 4"-wafer for you:


The wafer contains the U3230, a circuit for an ISDN-like telephone system developed in the GDR.

The wafer has one flattening at the bottom and one on the left side which stands for a p-doped substrate with a (100)-crystal-orientation. The D220 wafer (https://www.richis-lab.de/wafer01.htm) and the A210 wafer (https://www.richis-lab.de/wafer02.htm) have only one flattening at the bottom which stands for p-doped (111)-silicon. On (111)-silicon the oxide growth rate is higher leading to a faster production. But the surface also gathers more impurities. (100)-silicon has more clean surfaces and is better for MOS-circuits like the U3230.

The U3230 is quite big (5,3mm*5,3mm) so you loose a lot of area at the edges of the wafer.

There are some test structures arranged in a vertical line. That´s interesting. Normaly the test structures are distributed over the whole area so you can detect if there is a non-uniformity in the production.


Also interesting is the free area on the bottom of the wafer. They lost quite a lot of silicon because of this marking area (?).


Here you can see how the different levels end up at the edge of the wafer.


The test area contains quite a lot and quite big test structures.


A lot of the testpads have been contacted after production.
In the not contacted testpads you can spot numbers.


The MT215 seems to be the name of the test area.
There are a lot of structures to check the alignment of the masks and the reproduction quality.


There are some "normal" teststructures but also some very special structures.


You also can find some teststructures between the dies.
These grid like connections of the red squares look quite strange. I don´t think that´s possible but to me that looks like a light emitting diode.  :-//


The U3230 is quite big. I don´t know very much about this circuit...


On the die there are a lot of small testpads and most of them have small circuits nearby. I assume these circuits act like buffers...  :-/O


Some more pictures here:

https://www.richis-lab.de/wafer04.htm

 :-/O
 
The following users thanked this post: Miyuki

Offline NoopyTopic starter

  • Super Contributor
  • ***
  • Posts: 1731
  • Country: de
    • Richis-Lab
Re: Different die pictures
« Reply #61 on: January 25, 2021, 09:37:31 pm »
For you information: I have started a new topic for logic ICs:

https://www.eevblog.com/forum/projects/logic-ics-die-pictures/new/#new

 :popcorn:

Offline lpc32

  • Frequent Contributor
  • **
  • Posts: 454
Re: Different die pictures
« Reply #62 on: January 26, 2021, 12:51:08 am »
Nice stuff!

What do you take the photos with?


Offline NoopyTopic starter

  • Super Contributor
  • ***
  • Posts: 1731
  • Country: de
    • Richis-Lab
Re: Different die pictures
« Reply #63 on: January 26, 2021, 04:29:43 am »
 
The following users thanked this post: lpc32

Offline NoopyTopic starter

  • Super Contributor
  • ***
  • Posts: 1731
  • Country: de
    • Richis-Lab
Re: Different die pictures
« Reply #64 on: February 01, 2021, 10:15:49 pm »


Burr-Brown VFC110, a voltage to frequency converter.


The edge length is 3,1mm.


CIC01498, a typical Burr-Brown naming.
And some masks revisions.


It looks like the eight squares were used to mark the tuning process...  :-/O


At some bondpads there are interesting small squares. Probably protection...


I´m not 100% sure but most functional blocks are easy to spot. Quite a lot of bias circuits.


One metal layer and a lot of supply potentials.


Now that are a lot of current sinks.


And a lot of the current sinks can be switched off with the enable pin.


For the bias circuit BB integrated a bandgap reference.
There is also an unused buried zener. Interesting... Perhaps they thought about using the zener for the bias circuit.


The reference voltage circuit.
At the top of the area is the output with overcurrent protection.
We have cross coupled transistor quads and dummy resistors.


The reference voltage output uses a sense line to compensate for the voltage drop.


And here is the buried zener.


The input resistor is extensively tuned.


The first opamp, the integrator.


The opamp has diodes at the inputs. They prevent saturation and protect the input stage which is connected to the I_in pin.


The output is connected to the V_out pin and because of that it contains a "power transistor" and an overcurrent protection like in the reference circuit.


The second opamp is quite symmetrical.


The one-shot-circuit which controls the pulse width.
Below the circuit there is the internal Cos-capacitor. You can connect an additional external capacitor.


The output transistor is quite interesting. Around the active area there is an additional isolation frame ("iso") connected to GNDd. I assume the fast switching otherwise would causes a current flowing through the substrate to -Vs at the lower edge which could cause dirstubances in the other circuits.


More pictures here:

https://www.richis-lab.de/vfc01.htm

 :-/O
 
The following users thanked this post: doktor pyta, RoGeorge

Offline NoopyTopic starter

  • Super Contributor
  • ***
  • Posts: 1731
  • Country: de
    • Richis-Lab
Re: Different die pictures
« Reply #65 on: February 03, 2021, 10:44:11 pm »
Now that´s interesting:


KA610, a PCM30 repeater built in the GDR.
It is based on a HFO IA60 Master Slice, a generic die with a lot of transistors and resistors where you just have to develop the metal layer.
A more modern version of this concept can be seen in the OPA676: https://www.richis-lab.de/Opamp13.htm
The die is 2,6mm x 3,0mm. Since there was a big dot on the die it probably was rejected.


KA601 and a telephone...  :)


vertical npn transistor
With the four collector contacts you can route signals across a metal line. There is just one metal layer to connect all the necessary components.


npn power transistor


lateral pnp transistor
Here you can use the base contacts to wire a signal across a metal line.
The two collector contacts are isolated so you can´t use them for wiring signals but you can easily build a current mirror.  :-+


vertical substrate pnp transistor
Since the active areas are bigger and the distances are smaller than in the lateral pnp transistor the vertical pnp transistor provides a higher ft and more current amplification. But you have to accept the collector is connected to the substrate.
It´s interesting there is an additional p-doped area around the top edge. I assume that is to reduce collector resistance. If you put the heavily p-doped isolation area near the transistor you get quite a low breakdown voltage.


resistors


The resistor area is connected to a high potential to isolate the resistors against each other.


And a pinch resistor.
Here a n-doped layer narrows the p-doped resistor to get more resistance.
Interesting point: Under the left contact there is an area to connect the p-doped resistor and an area to connect to the n-doped area and the pinch layer.


https://www.richis-lab.de/KA601.htm


 :-/O
 
The following users thanked this post: brabus, RoGeorge

Offline brabus

  • Frequent Contributor
  • **
  • Posts: 326
  • Country: it
Re: Different die pictures
« Reply #66 on: February 04, 2021, 01:14:52 pm »
Impressive photos and impressive analysis!

Keep the good stuff coming! I always follow this thread with great interest.
 

Offline NoopyTopic starter

  • Super Contributor
  • ***
  • Posts: 1731
  • Country: de
    • Richis-Lab
Re: Different die pictures
« Reply #67 on: February 04, 2021, 02:24:02 pm »
Thanks for the positive feedback!
It´s always nice to hear that there are interested people reading my stuff.  :-+

Offline NoopyTopic starter

  • Super Contributor
  • ***
  • Posts: 1731
  • Country: de
    • Richis-Lab
Re: Different die pictures
« Reply #68 on: February 10, 2021, 09:46:48 pm »


Philips TDA1516, a 2x12W audio amplifier ideal for car applications (back in the days...  ;D).


The TDA1516 contains an interesting soft start circuit. There are two "input amplifiers". One is the real input amplifier which is switched on later and one does some precharging of the output amplifier and the coupling capacitors (if you need them). The precharge amplifier slowly ramps up the circuit to 0,5*Vp so you don´t get the switching "plop".

The TDA1516 has two pins supplying the driver circuit of the output stage. You can connect Vp to this pins. An alternative are bootstrapping capacitors to give the output a higher voltage range. With bootstraping you get the 24W otherwise only 22W.
Interesting fact: With bootstrapping you have to connect a 100k-resistor to pin 12. That gives you a little higher auxiliary voltage. Since the voltage amplifier probably inverts the signal the output is precharged to a somewhat lower voltage. That makes sense since the integrated bootstrap diode gives you a lower quiescent output voltage.

There is also a disconnect switch in the bootstrap circuit. Perhaps that was necessary to get the low quiescent current of 100µA.


There is something like a polyimid coating on the die.


The die is 3,1mm x 2,5mm.
You can see the power stage on the right and the rest of the circuit on the left.


The internal name of the design seems to be N4712B.
And Philips used two metal layers.


You can easily spot the lowside transistor (blue) and the highside transistor (red).
The lowside driver is a npn and therefore is quite small (purple).
The highside driver is a pnp and therefore is bigger (yellow).


Here you see the output stage transistors and their contacts to the metal layer.
The bootstrap potential takes quite an interesting way through the output stage.


pnp highside driver
I assume the two round transistors in the upper left corner of the metal rectangle are the bootstrap diode.


Hey, 10 base resistors for every transistor!  :-+


Input stage seems to be quite symmetrical but too much to read.  ;)


https://www.richis-lab.de/audioamp04.htm

 :-/O

Offline NoopyTopic starter

  • Super Contributor
  • ***
  • Posts: 1731
  • Country: de
    • Richis-Lab
Re: Different die pictures
« Reply #69 on: February 24, 2021, 08:44:53 pm »


Siemens S556, the controller of the worldwide first IR remote control used in a Grundig TV.


Minimum structure size seems to be around 8µm. Because of that the die is quite big: 4,6mm x 2,9mm
There is no datasheet but a press handout in which you can read that the S556 is built with PMOSFETs and depletion loads.
Two bondpads are not connected. The S556 was sold in a DIL16 and a DIL18 package which were able to read 8x4 keypad or a 6x4 keypad.


SVD-556 built by Siemens.


Five masks:
a: p-doped areas in the n-doped substrate
b: p-doping for depletion transistors between two p-doped areas
d: via for connecting the metal layer with the lower areas
e: metal layer (forms the gate electrodes over the gap between the p-doped areas)
f: windows in the passivation layer to connect the bondpads
In my view...


Now that´s an interesting structure under the bondpad... Perhaps some protection.
After a series resistor there is something like another protection or a pull-up-structure...


Test structure, image quality is not ideal.  :-\


https://www.richis-lab.de/S556.htm

 :-/O
« Last Edit: February 24, 2021, 08:46:33 pm by Noopy »
 
The following users thanked this post: SeanB

Offline NoopyTopic starter

  • Super Contributor
  • ***
  • Posts: 1731
  • Country: de
    • Richis-Lab
Re: Different die pictures
« Reply #70 on: March 08, 2021, 04:28:29 am »


Today I have something special for you: The U1001 is a NF-Filter for telephone systems developed in the GDR. It contains a HPF and a LPF for the transceiver and a LPF for the receiver. Interesting is the working principle of these filter stages. The U1001 uses switched capacitor filters which need less area than conventional filter stages and are tighter tolerated.


A nice big die: 5,9mm x 3,4mm
You can identify every functional block.


A telephone!  :-+


Input protection diodes...
The die was glued on a ceramic plate for many years. Because of that the structures are damaged a little.


SC-Filters need classical RC-Prefilters to prevent aliasing.


There are two polysilicon layers. That´s good for the capacitors. The red polysilicon layer in the middle is one plate of the capacitor while the green polysilicon layer and the metal layer are forming two plates above and under the red layer which gives you more capacitance.


Yeah the SC-Filter!  8)


Five opamps for the SC-Filter and one working as input buffer.
Above the opamps there are the capacitor switches.


Interesting: The SC-Filter doesn´t use the analog ground but gets a copy of the analog ground generated with the power supply.


The capacitors are built with a lot of small capacitors connected with small wires.
Why not one plane? Perhaps the wires add some damping so you don´t get ringing? Some capacitors are quite long...  :-//


Some red lines are shielded with the green layer.
Some capacitors are smaller...  :-//


The different planes set up 20 capacitors.


And a smoothing filter at the output to get rid of the switching noise.


Output opamp and input opamp.


The SC-HPF uses smaller capacitor structures. I don´t know why. All in all the filters are quite similar.


A defect!  :o
Here you can see the gate oxide sqare that increases the capacitance of the capacitors.


A lot of capacitors...


They did some tuning with fuses.


The second SC-LPF.


The two output opamps to get a differential signal. Back in the days they still had transducers in the system.


The two feedback resistors are quite interesting. Their ratio has to be constant so you don´t get a dc offset. The transducers wouldn´t like that.


A lot more pictures here:

https://www.richis-lab.de/phone01.htm

 :-/O
 
The following users thanked this post: SeanB, edavid, doktor pyta, RoGeorge

Offline NoopyTopic starter

  • Super Contributor
  • ***
  • Posts: 1731
  • Country: de
    • Richis-Lab
Re: Different die pictures
« Reply #71 on: March 13, 2021, 04:43:46 am »
Let´s take a look into a GMR tooth sensor module:


Sensitec GLM712
(picture taken from the datasheet)


The GLM712 contains two wheatstone bridges
(picture taken from the datasheet).


I own a manufacturing board where the sensor is still open. Here you see two sensors.


The metal seems to form the magnetic field. There is no magnet in there. The magnet would probably come in the next steps of the production.


The die is 2,17mm x 0,67mm.
Besides the 712 you can buy sensors for different tooth pitches.


The big parts are the GMR sensors. The wiring is interesting...


I assume the long closely wired connections compensate some trouble induced by the changing magnet field.


https://www.richis-lab.de/hall02.htm

 :-/O
 
The following users thanked this post: doktor pyta, RoGeorge, capt bullshot

Offline Renate

  • Super Contributor
  • ***
  • Posts: 1460
  • Country: us
Re: Different die pictures
« Reply #72 on: March 13, 2021, 12:31:51 pm »
 

Offline NoopyTopic starter

  • Super Contributor
  • ***
  • Posts: 1731
  • Country: de
    • Richis-Lab
Re: Different die pictures
« Reply #73 on: March 13, 2021, 12:55:34 pm »
I had never heard of GMR - https://en.wikipedia.org/wiki/Giant_magnetoresistance

Really? That was one milestone that enhanced the disk space of harddrives because the GMR can sense very small magnetic fields quite well.


Here you see an old inductive head (WD Caviar 22500 https://www.richis-lab.de/HDD_WD_Caviar_22500.htm).


And here you see a GMR-head with an inductive write coil and a GMR read element behind it. (Samsung SV4003H https://www.richis-lab.de/HDD_Samsung_SV4003H.htm)


The actual working principle is quite dizzying. Quantum mechanics...  :-//
 
The following users thanked this post: edavid, RoGeorge

Offline NoopyTopic starter

  • Super Contributor
  • ***
  • Posts: 1731
  • Country: de
    • Richis-Lab
Re: Different die pictures
« Reply #74 on: March 16, 2021, 05:02:01 am »


U114, a circuit built by Halbleiterwerk Frankfurt Oder to control an analog quarz alarm-clock.


The U114 contains a lot of frequency divider, two power stages for a clock stepper motor and one output stage for the alarm.
The U114 uses a 4,194304MHz quarz. Because of that you need more dividers leading to more current consumption than would be necessary with a 32,768kHz quarz. But it´s more accurate. The datasheet states 50µA without the motor while the U113 (32,768kHz) needs only a tenth of the current.


The die is 3,0mm x 1,8mm.


U114, that´s clear.
U4M39?  :-//


some test structures; 7 masks?


Here you can test three MOSFETs.


The two push-pull power stages are obvious. In the white area there seems to be driver circuit. The yellow power transistor controls the alarm.
Left and right of the power stages there are some columns with repetitive structures, probably containing the dividers.


The power transistor in detail.


In the lower right corner there is a structure near the quarz contacts which likely contains the oscillator circuit.


https://www.richis-lab.de/U114.htm

 :-/O
 
The following users thanked this post: SeanB, RoGeorge, Miyuki

Offline SYJON

  • Newbie
  • Posts: 8
  • Country: pl
Re: Different die pictures
« Reply #75 on: March 16, 2021, 09:25:14 am »
How about 555?


Offline SYJON

  • Newbie
  • Posts: 8
  • Country: pl
Re: Different die pictures
« Reply #77 on: March 16, 2021, 09:30:58 am »
Exactly! Love that  8) ;D
 

Offline Renate

  • Super Contributor
  • ***
  • Posts: 1460
  • Country: us
Re: Different die pictures
« Reply #78 on: March 16, 2021, 04:21:28 pm »
I hope that we'll get some good shots of eInk display panels soon.
Here is a (low quality) preview of a eInk "Carta" 300 DPI display driver chip.
A flex PC comes in from the top, the screen is on the bottom.
Between those two is an IC built on the glass.
This one has some sort of hard reflective cap stuck to it. It doesn't come off with a heat gun. Or a knife.
I have another one that has some sort of white silicone on top of the IC.
 

Offline NoopyTopic starter

  • Super Contributor
  • ***
  • Posts: 1731
  • Country: de
    • Richis-Lab
Re: Different die pictures
« Reply #79 on: March 23, 2021, 04:07:48 pm »


Sensitec builds some interesting current sensors that are based on the GMR effect: CDS4000 and CFS1000 for example.
They use the compensation methode. Compensating the field of the current which you want to measure.
(pictures taken from the datasheet)


Here you see a module apparently similar to the modules used in most of the Sensitec current sensors.
The small die is the GMR sensor, the big die does the signal processing.
The black blocks are magnets that gives you an offset so you can meassure positive and negative currents.


The GMR sensor is called ADK769. With this name you find some information, for example the IEEE article "High accuracy, high bandwidth magnetoresistive current sensors for spacecraft power electronics". With the help of the IEEE article we know that the two contact on the right generate the compensation field. Us1 and Us2 is the supply of the wheatstone bridge and Uo1 and Uo2 gives you the voltage proportional to the magnetic field.


The upper dark layer conducts the compensation current. The GMR elements are under the barber pole structures.
The barber pole structures are placed directly on the GMR and conduct current quite well. That gives you an angular current flow which modifies the characteristic of the GMR element so you get a linear behaviour and more sensitivity at low fields.


Here you see the current path of the compensation current.


A wheatstone bridge is quite symmetrical and robust against noise and drifts. Nevertheless Sensitec splitted the GMR elements in four parts and mixed them together probably to get it even more robust.


On the signal processing die in the upper half there is an analog part and in the lower half is a digital part.


Hello Simon!  ;D


There are four unused bondpads and 14 (!) pads each connected to something that looks quite like a fuse.


On the right side there are the big transistors for the field compensation.
The big structures on the left side could be a voltage regulator for the wheatstone bridge.


More pictures here:

https://www.richis-lab.de/hall03.htm

 :-/O
 
The following users thanked this post: daqq, brabus, doktor pyta

Offline NoopyTopic starter

  • Super Contributor
  • ***
  • Posts: 1731
  • Country: de
    • Richis-Lab
Re: Different die pictures
« Reply #80 on: April 01, 2021, 07:39:27 pm »
One step forward in the GDR digital telephone system. We have seen the NF-Filter U1001 (https://www.richis-lab.de/phone01.htm). The next IC in the line is the U1011, a Coder/Decoder which does the digital conversion respectively the analog conversion.


The resolution of the DAC and the ADC is 13Bit. These 13Bit are compressed to 8Bit what is enough for a telephone system.


The die is 5,4mm x 3,4mm.


Looks like a revision 2...


Interesting: There are "normal" testpads and smaller testpads. I assume the smaller ones were used in development.


Nice: A Switched-Capacitor-DAC


There are three transistors, one for Ref+, one for Ref- and one vor GND.


Above the GND transistor there is a fourth small transistor connecting GND with a big metal stripe. The stripe is connected to the control circuit but most notably to a big area above the GND transistor. In the next pictures we will see that this structure somehow reduces the resistance of the transistor. I assume the additional transistor modifies the body potential.


The capacitors are the same as in the U1001.


It´s a Split-Switched-Capacitor-ADC. It is split in two halfes. The MSB-DAC contains seven segments, the LSB-DAC contains six segments. The capacitor ratio is 64:32:16:8:4:2:1 then there is a small coupling capacitor and then there is the LSB-DAC with the ratio 32:16:8:4:2:2... ...well it looks like this but I´m not perfectly sure with the ...2:2.
The transistor ratios are similar but there is a change in the ratios where the additional transistor at the GND transistor comes into play.


That looks like the output opamp.


That seems to be a bias circuit for the output opamp and the comparator of the SAR-ADC. The datasheet describes an automatic offset compensation.  :-/O


It looks like they kept an option to adjust the offset from outside the die.


With nearly the same DAC they built a SAR-ADC.


Here we have two more switches for the analog signal (because you have to switch positive and negativ potentials).


That part has to be the comparator.


Interesting: In the digital part there are some small caps integrated in the substrate. It seems like the long way to the supply bondpad had to be compensated.


The digital part is too complex to analyse every function but this looks like the 13Bit/8Bit conversion.


Digital input...


...and digital output.


Here some more pictures:

https://www.richis-lab.de/phone02.htm

 :-/O

Offline NoopyTopic starter

  • Super Contributor
  • ***
  • Posts: 1731
  • Country: de
    • Richis-Lab
Re: Different die pictures
« Reply #81 on: April 08, 2021, 12:11:31 pm »


Ruhla Kaliber 15-02, a small simple digital watch.


Yeah, the battery is leaking a little.  ;D


With the small capacitor at the bottom of the board you can tune the clock.
The quartz is missing.


Here we see the contact rubber for the lcd.
They drilled two holes between the lcd and the capacitor cutting some traces. They needed this connection to galvanise the board with gold. That also a cause for the traces leading to the edge of the board.
There are some interesting dendrites at the capacitor. Perhaps because of the electrolyte?


The LCD...


They potted the controller into the PCB.
After bonding the die they took a black lid on top of the board. The bondwires get bent but it seems that was no problem.


The die is coated (2,9mm x 2,8mm).


The service manual states the controller is a KB1004CHL5-4. Probably it´s a КБ1004ХЛ5-4. Russia had a lot of clock controllers have a 1004ХЛ in their name.


A lot of the area is occupied by some similar structures, probably the lcd drivers.


There are strange structures in the middle of the die. Perhaps that is something like a mask programmed melody generator for the alarm.


https://www.richis-lab.de/clock01.htm


 :-/O

Offline NoopyTopic starter

  • Super Contributor
  • ***
  • Posts: 1731
  • Country: de
    • Richis-Lab
Re: Different die pictures
« Reply #82 on: April 12, 2021, 08:05:50 pm »
As part of the GDR digital telephone system we have seen the filter circuit U1001 (https://www.richis-lab.de/phone01.htm) and the PCM-coder/decoder (https://www.richis-lab.de/phone02.htm). Now here we have the U1500PC050 which controls the signal flow.


The die is 5,9mm x 5,9mm.


The U1500PC050 is based on the Zeiss U1500. With the U1500 system you can built an ASIC out of standard cells.


Some structures to check the process quality.


The U1500PC050 was designed in the "Institut für Nachrichtentechnik".


The input bondpads are connected to the clamping diodes with a series resistor. The signal is buffered in a push-pull-stage and then reaches the internal circuit.
Around the bondpads there seems to be some kind of additional isolation.


A small push-pull output stage.


There are five bigger output stages. Different to the smaller output stages the highside and the lowside transistor are controlled with two lines. There is probably a tristate mode. That makes sense because there is also an input circuit connected to these output stages.


There is an exclusive supply bondpad at the big output stages.


In the logic block we find the same capacitors as in the U1011 (https://www.richis-lab.de/phone02.htm).


https://www.richis-lab.de/phone03.htm

 :-/O
 
The following users thanked this post: RoGeorge

Offline NoopyTopic starter

  • Super Contributor
  • ***
  • Posts: 1731
  • Country: de
    • Richis-Lab
Re: Different die pictures
« Reply #83 on: April 17, 2021, 07:34:19 pm »
Today I have a special Fluke analog switch for you. There was already a thread about it so I placed the pictures there:

https://www.eevblog.com/forum/testgear/replacement-for-fluke-700013-ic-(quad-spst-analog-switch)/msg3551343/#msg3551343

 :-/O

Offline NoopyTopic starter

  • Super Contributor
  • ***
  • Posts: 1731
  • Country: de
    • Richis-Lab
Re: Different die pictures
« Reply #84 on: April 23, 2021, 08:23:15 pm »


The NEC µPD7220 is the world´s first graphic processor. The µPD7220A is the second generation.
The µPD7220AD is the ceramic package. -2 stands for the fastest version. Probably they did some binning.


The die is 4,3mm x 4,3mm. The datasheet explains that a NMOS process was used.
In the 1981 IEEE International Solid-State Circuits Conference the µPD7220 was introduced. The first generation had a die size of 7mm x 7mm. They did quite some shrinking to get to the µPD7220A.


Designed 1983...


HGDC? Some enigneers?


Some test structures...


The computer system bus and the graphic memory bus IOs are equipped with their own ground rail that is connected to the package ground with two bondwires.


And three more ground wires for the rest of the logic.


The memory blocks are easy to spot. On the right side there is the FIFO buffer (16x9) and the parameter RAM (16x8). On the left side there is the instruction ROM (128x14).


Some more pictures here:

https://www.richis-lab.de/GraKa01.htm

 :-/O
 
The following users thanked this post: RoGeorge

Offline NoopyTopic starter

  • Super Contributor
  • ***
  • Posts: 1731
  • Country: de
    • Richis-Lab
Re: Different die pictures
« Reply #85 on: May 12, 2021, 06:48:25 pm »
Here we have the next part of the GDR telephone system (https://www.richis-lab.de/phone.htm), the B384 which regulates the voltage of the subscriber's extension.


The datasheet shows the B384 as a switching regulator. The output voltage depends on the control signals RU, HR, BR.
There is a small mistake in the schematic. Can you find it? (answer at the end)
There is also an overvoltage protection circuit which activates an external thyristor with 5mA independent of the actual voltage.


The die is 4,3mm x 3,4mm. The integration density is quite low...


...that´s because the circuit has to withstand 100,25V (yes, that´s the value in the datasheet  ;D). There is quite some room between the transistors. Around the transistor structure itself there is a reddish line connected to the collector. I assume that´s some kind of potential steering to get a uniform electric field.  :-//


Some parts are integrated in squares where the distances are smaller. In these squares the voltages are lower.


There are some spare parts on the die.


Now that is interesting: There are some metal lines on the die. On one side these lines are connected to the substrate. On the other side there is a bigger area which isn´t connected to anything. I don´t know what these metal lines do!  :-//


The driver for the thyristor overvoltage protection consists of six transistors but only one of them is connected. Probably they connected the number of transistors they needed to get the right driver current. Nevertheless it´s strange there is only one of six connected.
There are two diodes (only one connected) which probably protect the base emitter junction of the driver transistor.


The driver transistors are darlington transistors.


Here we see the two power transistors and the two freewheeling diodes of the switching regulator.
Under the bondpad Ucc4 is the current limiter.
Aaaaaand the mistake in the schematic is the freewheeling diode at the bondpad L1. In the schematic it has the wrong polarity. It would create a short if the Ucc4-transistor switches.


https://www.richis-lab.de/phone04.htm

 :-/O
 
The following users thanked this post: RoGeorge

Offline NoopyTopic starter

  • Super Contributor
  • ***
  • Posts: 1731
  • Country: de
    • Richis-Lab
Re: Different die pictures
« Reply #86 on: May 16, 2021, 11:10:19 am »


Intersil ICM7045, a circuit to control a digital clock (also good for building a timer or stopwatch). The supply voltage should be between 2,5V- 4,5V. The power consumption is just 0,9mW. The ICM7045 can drive up to eight 7-Segment-LED-Displays.


The die is 3,3mm x 3,4mm.
In the centre of the die there is the logic counting the seconds, minutes, hours and controlling the display. At the edges of the die there are the big transistors that conduct the current flowing through the LED display.


ICM7045T is the internal naming of the design. As we have seen on other Intersil dies T is the revision that started at Z.
6C is the revision of the metal layer mask.
Under the metal frame we can see some other mask revisions: 1A, 2A, 3A, 5XA und 7A.


Coloring the power supply traces the location of highside and lowside drivers come into view.


Datasheet states that the ICM7045 was fabricated with a metal gate CMOS process. Here we see the metal rectangles acting as gates for the output transistors. Under the metal there are the intermeshing drain and source.


The epoxy of this older ICM7045 is a little short.  :-//


The design is the same...


https://www.richis-lab.de/clock02.htm

 :-/O
 
The following users thanked this post: RoGeorge

Offline NoopyTopic starter

  • Super Contributor
  • ***
  • Posts: 1731
  • Country: de
    • Richis-Lab
Re: Different die pictures
« Reply #87 on: May 17, 2021, 12:42:50 pm »
...
Ruhla Kaliber 15-02, a small simple digital watch.
...


They potted the controller into the PCB.
After bonding the die they took a black lid on top of the board. The bondwires get bent but it seems that was no problem.
...


I found a picture showing how the board and the ic look like before "closing the hatch":


It´s not exactly the same clock but it´s quite similar.


https://www.richis-lab.de/clock01.htm

 :-/O

Offline NoopyTopic starter

  • Super Contributor
  • ***
  • Posts: 1731
  • Country: de
    • Richis-Lab
Re: Different die pictures
« Reply #88 on: May 17, 2021, 01:24:57 pm »


It´s not exactly the same clock but it´s quite similar.


Sorry, I have to correct myself: That´s an older stage of development. Here the die is on the board, not in the board. The die got potted in the next step but it´s not placed in the board.

Offline NoopyTopic starter

  • Super Contributor
  • ***
  • Posts: 1731
  • Country: de
    • Richis-Lab
Re: Different die pictures
« Reply #89 on: May 25, 2021, 02:23:53 pm »
Let´s take a look into a digital audio amplifier!


TDA8920, a well known 2x110W (+/-27V, 3Ω, 10% THD) amplifier built by Philips (today NXP).
It´s a nice SMT-package with a metal plate for top cooling.


On the heatsink we have the die with some gel potting.


The die is 5,1mm x 4,2mm. We can clearly see the two channels. It´s also no problem to spot the power transistors in the lower area.


Already NXP...


The low power part is too high integrated to analyse every part of the circuit but we can see the differential inputs left and right on the upper edge of the die. The first three bondpads leading downwards left and right are VDDA, SGND and VSSA for each channel. In the middle there must be some control circuit.


Each channel has two big capacitors and two huge resistors!  :o


Well that are clearly logic lines like in a gatearray.


I assume the smaller circuits above the power transistors contain the driver and protection. It would be a logical location and the bootstrap supply ends here.


The line between the two power stages seems to contain a small power transistor. At the end of the line you have to connect the capacitor for the internal power supply. Probably that power transistor is a linear regulator.


Each Push-Pull-Stage uses six highside blocks (red/green) and six lowside blocks (green/blue). The output and the supply each use three bondwires.
At the lower edge there is the bootstrap circuit.


The power transistor structures are too small to analyse them in detail.


For the bootstrapping there is a diode connected to BOOT and leading to a exclusive VDD bondpad. The brown rectangle probably contains a low value resistor to damp the charge process of the bootstrap capacitor.
I assume the thing between BOOT and OUT is a zener to cut overvoltages at the bootstrap capacitor that can occur due to parasitic inductance at the output.


https://www.richis-lab.de/audioamp05.htm

 :-/O
 
The following users thanked this post: brabus, RoGeorge

Offline NoopyTopic starter

  • Super Contributor
  • ***
  • Posts: 1731
  • Country: de
    • Richis-Lab
Re: Different die pictures
« Reply #90 on: June 02, 2021, 06:37:43 pm »
Here we have the next part of the GDR telephone system (https://www.richis-lab.de/phone.htm), the B385, a test circuit:


Just some switches for the telephone wires. But these are interesting switches. They integrated thyristor switches which can withstand 91V, conduct 70mA and guarantee a on resistance of 17 \$\Omega\$.


The die is 3,1mm x 4,1mm.
You can clearly see the six switches and their control circuits.


To allow bidirectional current flow there are two thyristor switches connected antiparallel.
Interesting structures...


https://www.richis-lab.de/phone05.htm

 :-/O

Offline NoopyTopic starter

  • Super Contributor
  • ***
  • Posts: 1731
  • Country: de
    • Richis-Lab
Re: Different die pictures
« Reply #91 on: June 04, 2021, 11:41:25 am »

Offline NoopyTopic starter

  • Super Contributor
  • ***
  • Posts: 1731
  • Country: de
    • Richis-Lab
Re: Different die pictures
« Reply #92 on: June 08, 2021, 03:41:37 am »


MAX232A, a RS-232 line driver/receiver with an integrated charge pump.
The MAX232A is the newer revision of the MAX232 and needs less capacitance.


The die is 2,9mm x 1,8mm.


Built 1986.


Identifying the functional blocks is no bigger problem (sorry, german  ;)).
On the right side you have the two inputs and the two outputs.
On the left side there are the charge pumps.


At the input there is a big resistor (Ro) building a voltage divider with the resistor Ru. You can spot the lowside, the highside, the driver and the feedback circuit.


The input resistors have to be isolated better because the input voltage can go up/down to +/-25V.
The metal layer makes it possible to adjust the resistance with two fuses. With two more fuses they were able to adjust the lower resistor of the voltage divider.
The numbers seem to be mask revisions.


Here we have the lower resistor of the voltage divider, the input and the feedback resistor. The feedback resistor can be adjusted by changing the metal layer.


Between the input signal and the feedback there are two clamping diodes.


Below the RS-232-input there is the RS-232-output circuit.


Here we have the first charge pump. Four transistors switch the capacitor C1 to the +5V-supply to charge it to +5V. Then the capacitor is connected "on top of the +5V supply" and you get +10V at "V+".


In the second charge pump four transistors charge the capacitor C2 to +10V and switch it reversed to GND which gives us -10V at "V-".  :-+


https://www.richis-lab.de/transceiver01.htm

 :-+
 
The following users thanked this post: edavid, RoGeorge

Offline NoopyTopic starter

  • Super Contributor
  • ***
  • Posts: 1731
  • Country: de
    • Richis-Lab
Re: Different die pictures
« Reply #93 on: June 14, 2021, 03:35:11 am »


BQ27220, a single li cell fuel gauge in a small flip-chip package (DSBGA-9 - 1,62mm × 1,58mm).


Flip-chip, the die gets the solder balls on top of it and is flipped to solder it on the board.


It looks like there is a thin coating on top of the BQ27220. Flip-chip parts often have problems with light fluctuations. Some time ago there was a flip-chip voltage regulator on a Raspberry Pi 2 that resets the processor whenever you take a picture of the board using a flashlight.  :o Perhaps this coating damps some of the light reaching the chip.


Due to the used optics it looks like the solder balls get bigger in the background. That´s not true.  ;D


You don´t see much of the circuit but the area in the upper left corner looks like logic. The area in the lower left corner looks like memory. The BQ27220 has quite some memory.


https://www.richis-lab.de/li01.htm

 :-/O
 
The following users thanked this post: doktor pyta, RoGeorge

Offline RoGeorge

  • Super Contributor
  • ***
  • Posts: 6202
  • Country: ro
Re: Different die pictures
« Reply #94 on: June 14, 2021, 02:20:00 pm »
Due to the used optics it looks like the solder balls get bigger in the background. That´s not true.  ;D

They all have about the same number of pixels in diameter, yet the brain assumes the usual 3D to 2D geometric projection, therefore brain concludes the further away ones should be bigger.   ::)

After I explained to brain what happened, brain still concludes the back ones are bigger.   :palm:
 
The following users thanked this post: Noopy

Offline NoopyTopic starter

  • Super Contributor
  • ***
  • Posts: 1731
  • Country: de
    • Richis-Lab
Re: Different die pictures
« Reply #95 on: June 20, 2021, 08:54:59 pm »


Let´s take a look into a immobilizer transponder as it is used a lot in older generations of cars. The transponder is put into the key and a coil in the car communicates with the transponder to check if the key is valid.
The transponder contains a chip and an inductance which is potted in something like silicone.


The datasheet of the EM4170 (the immobilizer chip) shows the building blocks of the chip.
There is a resonance capacitor on the die. A AC/DC converter draws energy from the antenna and charges a capacitor to 9,5V at maximum. A voltage regulator supplies the logic with 3,5V.
Clock and data are extracted from the antenna and fed to the logic.
There is an 16x16-EEPROM with a read only 96Bit secret key, a 32Bit unique ID and 94Bit User Memory. The memory is protected with a 32Bit PIN.
The crypto algorithm seems to be in a separate block.
The transponder communicates with the transceiver by damping the antenna which modulates the voltages at the antenna of the transceiver.


The datesheet gives us a small glimpse into the authentication process. The transceiver sends a random number and a encrypted variant of this number. If the transponder calculates the same numbers it gives feedback and sends another variant of the random number which authenticates the transponder.


The die is 2,3mm x 1,7mm. You contact the ferrite coil at the right two bondpads. On the left edge there are some testpads. I assume with this testpads the unique ID is written.


The design of the EM4170 dates back to the year 2000.


On the right edge there are a lot of capacitors, a lot of them probably acting as resonance capacitors.
In the upper area there are smaller structures, probably data and clock generation.
In the lower right corner there are bigger structures. Perhaps that´s the damping circuit that modulates the data into the electromagnetic field.


In the middle of the die there is some standard logic. You can see the lines with the standard cells and the interconnection between them.


Here we have the memory area.


In the lower left corner you can see 18 lines coming out of the logic area. In the upper area there are 16 lines leading towards the memory. That fits good with the 16x16 memory.
In the upper right corner there is the symmetric structure of the memory. It´s interesting that there is a very big and dense area left of the memory. I assume in this area there is most of the cryptographic algorithm.


There is another circuit with capacitors under the memory area. I assume that is the "high voltage" generator that is necessary to write into the EEPROM.


https://www.richis-lab.de/transponder01.htm

 :-/O
 
The following users thanked this post: SeanB, RoGeorge, Jo

Offline NoopyTopic starter

  • Super Contributor
  • ***
  • Posts: 1731
  • Country: de
    • Richis-Lab
Re: Different die pictures
« Reply #96 on: June 24, 2021, 04:02:56 am »
Here we have the next part of the GDR telephone system (https://www.richis-lab.de/phone.htm), the B386, a test circuit:


The B386 supplies the telephone line with the necessary voltages (supply, ringing,...).


The circuits of the B386 keep some distance between them to isolate the high voltages.
There are quite some unused circuits.


The output amplifier use the same transistors as we have seen in the B384 (https://www.richis-lab.de/phone04.htm). The output stage is quasi complementary.
There are four big capacitors. The outer capacitors are unused the inner capacitors seem to represent a bootstrap circuit.


https://www.richis-lab.de/phone06.htm

 :-/O
 
The following users thanked this post: RoGeorge

Offline NoopyTopic starter

  • Super Contributor
  • ***
  • Posts: 1731
  • Country: de
    • Richis-Lab
Re: Different die pictures
« Reply #97 on: June 28, 2021, 08:04:23 pm »
Now I have a µPD7220 completing the µPD7220 pictures. Let´s do some comparisons:


The older die is 5,3mm x 5,2mm, the newer die is 4,3mm x 4,2mm. The structures are quite similar. The most significant difference are two exclusive ground lines for the two big interfaces (see µPD7220A: https://www.eevblog.com/forum/projects/different-die-pictures/msg3555753/#msg3555753).
http://www.oguchi-rd.com/ states that the smallest feature size of the µPD7220 was 3µm. With the scaling of the dies we can estimate that the µPD7220A was fabricated with a 2,5µm process.


 :-+


"Graphics Display Controller" vs. "High Performance Graphics Display Controller" They barely changed something. ;D
But the clock frequency specification war risen: 4MHz, 5Mhz and 5,5MHz vs. 6MHz, 7Mhz and 8MHz. Probably the smaller structures did a lot of the job.


In the µPD7220 there is kind of a test circuit on the die. The circuit isn´t connected to anything but there are two rectangles which could be used for test needles. Perhaps it´s kind of an oscillator showing the fabrication quality.


The bigger structures make it easier to study the memory areas.
Here we see the control ROM. It´s not 128x14 but 65x32.  :-/O ;D


You can find some more pictures here:

µPD7220:
https://www.richis-lab.de/GraKa02.htm

µPD7220A:
https://www.richis-lab.de/GraKa01.htm


 :-/O
« Last Edit: June 28, 2021, 08:15:48 pm by Noopy »
 
The following users thanked this post: SeanB, RoGeorge

Offline NoopyTopic starter

  • Super Contributor
  • ***
  • Posts: 1731
  • Country: de
    • Richis-Lab
Re: Different die pictures
« Reply #98 on: July 02, 2021, 08:35:02 pm »


MAX7219, a 7-segment driver controlled over a serial bus with up to 10MHz.


The die is 1,2mm x 1,1mm.


In the datasheet there is a picture of the die but that looks quite different. Perhaps that is the die of the MAX7221. The MAX7221 has a lower slew rate at the outputs and switches from active to tristate not to the opposite potential. The MAX7221 also can directly work on a SPI bus.


A first revision?
LTH6868?


In the upper area you see the digit drivers making 320mA each. There are two big lowside transistors around each bondpad. You can spot a big wire connecting the bondpad to the inner supply line where the smaller highside transistors switch to a high level with 2mA.


In the lower area there are the segment drivers delivering 40mA each. In the middle you see the supply bondpad and left of it is the bondpad for LED current adjustment. At this bondpad there is a thick wire leading upwards. At the edge of the die there are small lowside transistors conducting 5mA while the segment is disabled. In the inner line there are the highside transistors acting as current sources. The highside transistors are half the size of the lowside transistors but can only conduct a little more than 1/10 of the current.


Inputs - The big structures are probably protection.


Input and output (lower bondpad).


Logic area. The big rectangular structure in the upper left corner could be the 8x8 SRAM... ...perhaps...


https://www.richis-lab.de/chipset02.htm

 :-/O
 
The following users thanked this post: RoGeorge

Offline NoopyTopic starter

  • Super Contributor
  • ***
  • Posts: 1731
  • Country: de
    • Richis-Lab
Re: Different die pictures
« Reply #99 on: July 04, 2021, 02:00:57 pm »


In the µPD7220 there is kind of a test circuit on the die. The circuit isn´t connected to anything but there are two rectangles which could be used for test needles. Perhaps it´s kind of an oscillator showing the fabrication quality.

That could be a bias circuit for the substrate: ring oscillator, capacitors and diodes
That would be perfectly fit to an NMOS and would explain why there are no further connections.
The bias circuit supplies round about -5V for a better switching behaviour of the transistors.

Everything perfect, but:
I did some measurements. The metal area on which the die is soldered on is connected to Ground! With supply on you can measure 0V. But through the substrate it should be possible to measure the -5V!  :wtf:
Perhaps I'm wrong. Perhaps that is no bias circuit.  :-//

Offline NoopyTopic starter

  • Super Contributor
  • ***
  • Posts: 1731
  • Country: de
    • Richis-Lab

Offline NoopyTopic starter

  • Super Contributor
  • ***
  • Posts: 1731
  • Country: de
    • Richis-Lab
Re: Different die pictures
« Reply #101 on: July 11, 2021, 03:50:17 am »


Doehler & Haass SDH105, a decoder asic for model railroads.


The die is 2,8mm x 2,3mm. You can spot the twelve logic lines.


Nice!  8)


Here we see eleven mask revisions.
R3 and D3 look like two metal layers with C3 as connection between them. Looks like the metal layer and the connection were modified once more than the rest. Seems reasonable.


The lower part of the die probably contains some housekeeping and signal processing.


Very small structures but that is clearly logic circuit.


That is probably the driver for the external H bridge.


Here we have three output stages. Two big transistors and one smaller transistor.


One output stage in detail. You can spot the driver circuit in the right part of the picture.


https://www.richis-lab.de/loco01.htm

 :-/O
 
The following users thanked this post: RoGeorge

Offline RoGeorge

  • Super Contributor
  • ***
  • Posts: 6202
  • Country: ro
Re: Different die pictures
« Reply #102 on: July 11, 2021, 04:57:46 am »


Seriously?!   ;D

Offline NoopyTopic starter

  • Super Contributor
  • ***
  • Posts: 1731
  • Country: de
    • Richis-Lab
Re: Different die pictures
« Reply #103 on: July 11, 2021, 05:00:45 am »


Seriously?!   ;D


If I ever design an ASIC I definitely would integrate a nice big picture!  :-+ ;D
 
The following users thanked this post: SeanB, mawyatt

Online mawyatt

  • Super Contributor
  • ***
  • Posts: 3254
  • Country: us
Re: Different die pictures
« Reply #104 on: July 11, 2021, 01:57:51 pm »
Nice logo :D

Here's a corner of an Indium Phosphide chip I designed awhile back, my favorite hobby  :)

Best,
Curiosity killed the cat, also depleted my wallet!
~Wyatt Labs by Mike~
 
The following users thanked this post: RoGeorge, Noopy

Offline NoopyTopic starter

  • Super Contributor
  • ***
  • Posts: 1731
  • Country: de
    • Richis-Lab
Re: Different die pictures
« Reply #105 on: July 15, 2021, 03:38:30 am »
Here we have the next part of the GDR telephone system (https://www.richis-lab.de/phone.htm), the B387, the so called analog processor:


It´s quite a big die.
To be honest: I don´t 100% understand all the features of the B387. The good old analog telephone system is more complex than it seems in the first place.  ;)


Some test structures.


Some spare parts.


The B387 is an analog circuit but there is a digital serial interface to configure the performance of the analog circuit. In the right lower corner of the die we can spot very different structures what is probably the digital part.


https://www.richis-lab.de/phone07.htm

 :-/O
 
The following users thanked this post: SeanB, RoGeorge

Offline NoopyTopic starter

  • Super Contributor
  • ***
  • Posts: 1731
  • Country: de
    • Richis-Lab
Re: Different die pictures
« Reply #106 on: July 17, 2021, 04:25:32 am »


Waveform generator MAX038 (0,1Hz-20MHz)


The datasheet states there are 855 transistors. I didn´t count them.  ;D
There are a lot of bondpads because important connections were done with two bondwires and there are a lot of independent GND bondpads.


Designed 1994...


They used the masks 20A, 22A, 30A, 38A, 60A, 90A, 97A, 100A, 110A, 120A
20A and 22A seem to form a buried layers.
The color of 30A is seen in some of the resistors.
It looks like 38A and 60A are just silicon oxide with different thickness. Perhaps 38A is the gate oxide while 60A gives contact from the metal layer to the transistors and resistors.
90A seems to be the first metal layer which would fit with 60A generating vias.
97A adds a red material which can be adjusted with a laser.
110A is the second metal layer.
100A makes contact from the second to the first metal layer.
120A probably forms the bonding areas.


We see such structures quite often whenever there is a laser tuning process.


Cut red wires to adjust the resistors.  :-+


In the datasheet there is a die picture which show the signals of the bondpads.
There is one small mistake in the datasheet. COSC is connected to two testpads.  ;D


In the upper left corner there are five bigger squares, probably the output driver.
I´m not sure what the purpose of the longer structure in the corner is. It seems it´s just connected to V+ and V-.
In the right area you can spot two bigger parts. That is the SYNC ouput driver. It is connected to it´s own supply at the upper edge of the die.


The construction of the capacitors is unusual.


The connection of the reference output shows that the voltage reference has to be located in the lower left corner of the die.
There are four testpads probably to adjust voltage and drift. If you track the wires you find four red fuses disconnecting the testpads after adjustment.
REF has its own ground connection. There are a lot of GND connections which are not connected internally.


This square structure is interesting. Perhaps that´s the sine shaper. Sine shaper often have repetitive structures.


https://www.richis-lab.de/gen01.htm

 :-/O
 
The following users thanked this post: doktor pyta, RoGeorge, Miyuki

Online magic

  • Super Contributor
  • ***
  • Posts: 6778
  • Country: pl
Re: Different die pictures
« Reply #107 on: July 17, 2021, 08:54:55 am »
I´m not sure what the purpose of the longer structure in the corner is. It seems it´s just connected to V+ and V-.
Probably some ESD thing. Slightly similar to the smaller ones near each I/O pin.

Is this complementary bipolar? I don't see obvious lateral PNPs and I don't think it's CMOS either.
The capacitors may be metal-metal caps because there are clearly two metal layers available.

(I gotta post some text to this thread because otherwise it's all just picture posts and each page takes forever to load). :-DD
 

Offline NoopyTopic starter

  • Super Contributor
  • ***
  • Posts: 1731
  • Country: de
    • Richis-Lab
Re: Different die pictures
« Reply #108 on: July 17, 2021, 10:46:17 am »
I´m not sure what the purpose of the longer structure in the corner is. It seems it´s just connected to V+ and V-.
Probably some ESD thing. Slightly similar to the smaller ones near each I/O pin.

But just connected to V+ and V-... Strange...  :scared:


Is this complementary bipolar? I don't see obvious lateral PNPs and I don't think it's CMOS either.

I´m not sure about that.


They used the masks 20A, 22A, 30A, 38A, 60A, 90A, 97A, 100A, 110A, 120A
20A and 22A seem to form a buried layers.
The color of 30A is seen in some of the resistors.
It looks like 38A and 60A are just silicon oxide with different thickness. Perhaps 38A is the gate oxide while 60A gives contact from the metal layer to the transistors and resistors.
90A seems to be the first metal layer which would fit with 60A generating vias.
97A adds a red material which can be adjusted with a laser.
110A is the second metal layer.
100A makes contact from the second to the first metal layer.
120A probably forms the bonding areas.

Looking at the masks my first guess would be CMOS but the transistors look more like bipolar.
The buried layers 20A and 22A would be perfect for bipolar.
Perhaps 38A is no gate oxide but a emitter doping.


The capacitors may be metal-metal caps because there are clearly two metal layers available.

I don´t think so. The smooth metal we see at the capacitors is the lower one.


(I gotta post some text to this thread because otherwise it's all just picture posts and each page takes forever to load). :-DD

Indeed that´s a problem in here. ;D

Online magic

  • Super Contributor
  • ***
  • Posts: 6778
  • Country: pl
Re: Different die pictures
« Reply #109 on: July 17, 2021, 11:10:43 am »
But just connected to V+ and V-... Strange...  :scared:
Clamping overvoltage due to current flowing from ESD diodes to the supplies and/or maybe providing a short circuit path if supplies are reversed. Lots of new TI datasheets have an overview of their internal ESD protection and they show a box between the rails labeled "ESD absorption circuit".

Similar thing here. Maybe half of the circuit is the actual opamp (schematic in the TL971 datasheet) and the rest is some big "thing" between the supply rails.

You are right about capacitors, there is a bunch of upper layer metal traces flying over them :palm:
 
The following users thanked this post: Noopy

Offline NoopyTopic starter

  • Super Contributor
  • ***
  • Posts: 1731
  • Country: de
    • Richis-Lab
Re: Different die pictures
« Reply #110 on: July 17, 2021, 01:58:28 pm »
But just connected to V+ and V-... Strange...  :scared:
Clamping overvoltage due to current flowing from ESD diodes to the supplies and/or maybe providing a short circuit path if supplies are reversed. Lots of new TI datasheets have an overview of their internal ESD protection and they show a box between the rails labeled "ESD absorption circuit".

Similar thing here. Maybe half of the circuit is the actual opamp (schematic in the TL971 datasheet) and the rest is some big "thing" between the supply rails.

Sounds reasonable!  :-+

Offline NoopyTopic starter

  • Super Contributor
  • ***
  • Posts: 1731
  • Country: de
    • Richis-Lab
Re: Different die pictures
« Reply #111 on: July 24, 2021, 04:04:06 am »
We had the SDH105:

https://www.richis-lab.de/loco01.htm


Here we have the second generation: SDH112


The die is 2,6mm x 2,1mm. Well only 2,2mm x 2,0mm are used. Perhaps more than one project was integrated on the wafer...  :-//


And again a locomotive but a little smaller than in the SDH105.


The logic area... A little smaller...


Three output stages, 300mA lowside transistors.


With these bondpads the EMK feedback of the motor is measured to get a better motor control.


H-bridge control


The bigger structure on the left is a voltage regulator.
Perhaps the two bigger rectangular structures are DACs for the ADC of the motor EMK measurement.


https://richis-lab.de/loco02.htm

 :-/O

Offline NoopyTopic starter

  • Super Contributor
  • ***
  • Posts: 1731
  • Country: de
    • Richis-Lab
Re: Different die pictures
« Reply #112 on: August 03, 2021, 08:37:18 pm »


Coolaudio V3205, a 4096 stage BBD (Bucked Brigade Device) that delays audio signals.
[spoiler] ...well, it´s a counterfeit part... [/spoiler]
While a CCD moves charges through a uniform layer a BBD uses discrete parts (transistors and capacitors).


The datasheet of the V3205 shows the working principle.
Two clocks switch alternately transistors in the line so the charge packages travel from one capacitor to the next.
Since the capacitors are connected to the gate of each transistor the capacitor goes high while the next transistor is switched on. That makes the charges to travel into the next capacitor very efficient.
Only half of the 4096 stages contain information because you have to transfer the charge from a capacitor before you can save the next charge.
Between two stages there is kind of a cascode transistor isolating the following transistor against voltage fluctuation.
At the end there are two outputs which generally are connected together to reduce sampling artefacts.
The last transistor disposes the charge into Vdd.


The die is 4,2mm x 3,8mm and most of it is occupied by the 4096 stages. The datasheet of the V3205 states a capacitance of 2,8nF for each clock intput.


Yes, it isn´t a Coolaudio V3205 but a Shanghai Belling BL3205.#
Revision 3?


The big structures in the corners of the die seem to be massive undervoltage protection diodes. They are placed at CP1, CP2 and Vgg and connected to GND.


Vgg and Input


Vdd is only used by the output circuit.


Output circuit


First capacitor is connected to GND.


The structures are surprising simple. Since the gate of the switching transistor and its capacitor both use the same clock and the signal jumps from left to right in one column the upper layer aside a clock supply line is just a big rectangle with slots. The cascode transistor is placed below the Vgg line.


And here we have the output circuit with naming.


https://www.richis-lab.de/bbd01.htm

 :-/O
 
The following users thanked this post: RoGeorge, Miyuki

Online T3sl4co1l

  • Super Contributor
  • ***
  • Posts: 21673
  • Country: us
  • Expert, Analog Electronics, PCB Layout, EMC
    • Seven Transistor Labs
Re: Different die pictures
« Reply #113 on: August 03, 2021, 08:55:49 pm »
So, what good is that?  C switched into C causes the signal to decay geometrically.  There's no regeneration (gain) between stages.  Can't it only work as a CCD (the charge is "squeezed out" from under the proceeding stage, and so on)?

Tim
Seven Transistor Labs, LLC
Electronic design, from concept to prototype.
Bringing a project to life?  Send me a message!
 

Offline NoopyTopic starter

  • Super Contributor
  • ***
  • Posts: 1731
  • Country: de
    • Richis-Lab
Re: Different die pictures
« Reply #114 on: August 03, 2021, 09:00:57 pm »
So, what good is that?  C switched into C causes the signal to decay geometrically.  There's no regeneration (gain) between stages.  Can't it only work as a CCD (the charge is "squeezed out" from under the proceeding stage, and so on)?

The C is connected to the previsous transistor gate so as soon as the next transistor is conducting the capacitor is lifted to a high level and the charges are flowing down the hill into the next C.
A CCD works similar but doesn´t consist of discrete parts.

Edit: German-English correction.  ;D
« Last Edit: August 04, 2021, 07:10:20 am by Noopy »
 

Online magic

  • Super Contributor
  • ***
  • Posts: 6778
  • Country: pl
Re: Different die pictures
« Reply #115 on: August 04, 2021, 06:37:07 am »
It woks in some weird way. The datasheet is extremely unhelpful, but those of similar devices like Philips TDA1022 tell more about intended operating conditions. In particular, Philips instructs to load the outputs (which are not buffered with source followers in their design) with 100~400µA and to bias the input near Vdd/3 for class A operation.

If you imagine that both clocks are high then the device is simply a chain of closed switches and common gate FETs (ignoring the OUT buffers) and it pulls some bias current from VDD when the input is taken below Vgg-Vgs(th). The final Vdd series resistor not included on the schematic may limit the current and make it less dependent on Vgs(th) thermal drift.

With normal clocking, the capacitors are alternately bootstrapped high and low so that charge can always flow backwards between pairs n+1→n or n→n-1, depending on phase.

Presumably, you want to set the input to such level that there is a constant average DC flowing backwards which exceeds the small variations in charge transfer due to the signal.

I think the common gate FETs prevent charge equalization between capacitors and signal attenuation. It seems that if any charge has been removed from a given capacitor in the preceding half-cycle, the subsequent common gate FET acts as source follower and pull the capacitor back up to Vgg-Vgs(th) by drawing an equal charge from the next capacitor in line. The bootstrapping makes it possible.
« Last Edit: August 04, 2021, 06:59:58 am by magic »
 

Offline NoopyTopic starter

  • Super Contributor
  • ***
  • Posts: 1731
  • Country: de
    • Richis-Lab
Re: Different die pictures
« Reply #116 on: August 04, 2021, 07:06:45 am »
I think the common gate FETs prevent charge equalization between capacitors and signal attenuation. It seems that if any charge has been removed from a given capacitor in the preceding half-cycle, the subsequent common gate FET acts as source follower and pull the capacitor back up to Vgg-Vgs(th) by drawing an equal charge from the next capacitor in line. The bootstrapping makes it possible.

It´s called Tetrode Bucket Brigade.
The Bell System Technical Journal, February 1973, A Fundamental Comparison of Incomplete Charge Transfer in Charge Transfer Devices:
Quote
The tetrode bucket brigade, first proporsed by Sangster, is shwon in Fig. 12a. It was proposed in order to reduce the drain conductance or feedback contribution to incomplete transfer, the effect known to be the dominant performance-limiting effect for bucket brigade at low frequencies.
 
The following users thanked this post: RoGeorge

Offline RoGeorge

  • Super Contributor
  • ***
  • Posts: 6202
  • Country: ro
Re: Different die pictures
« Reply #117 on: August 04, 2021, 08:05:03 am »

Online magic

  • Super Contributor
  • ***
  • Posts: 6778
  • Country: pl
Re: Different die pictures
« Reply #118 on: August 04, 2021, 08:08:09 am »
Right, it would still work without those common gate FETs. The same refilling of one capacitor from the next one would be accomplished by the switching FET.

So what exactly is the point of this "tetrode" version? Keeping Vgs constant against decreasing voltage at the next stage? Not sure if I understand their jargon :-//
 

Offline NoopyTopic starter

  • Super Contributor
  • ***
  • Posts: 1731
  • Country: de
    • Richis-Lab
Re: Different die pictures
« Reply #119 on: August 04, 2021, 08:19:37 am »
In my view the common gate FET forms kind of a cascode with the following FET so this one doesn´t see the decreasing voltage of the previous stage.
As you have written that keeps Vgs constant.

Offline TheUnnamedNewbie

  • Super Contributor
  • ***
  • Posts: 1208
  • Country: 00
  • mmwave RFIC/antenna designer
Re: Different die pictures
« Reply #120 on: August 04, 2021, 09:15:32 am »


It looks like there is a thin coating on top of the BQ27220. Flip-chip parts often have problems with light fluctuations. Some time ago there was a flip-chip voltage regulator on a Raspberry Pi 2 that resets the processor whenever you take a picture of the board using a flashlight.  :o Perhaps this coating damps some of the light reaching the chip.


I think the coating is there because you can see that they use a external RDL process to add the balls. The feature sizes of the RDL don't seem to be in line with an integrated RDL+eutectic bump technology, so I suspect a polyamide RDL technology is used - the polyamide being the layer you see :)
The best part about magic is when it stops being magic and becomes science instead

"There was no road, but the people walked on it, and the road came to be, and the people followed it, for the road took the path of least resistance"
 

Offline NoopyTopic starter

  • Super Contributor
  • ***
  • Posts: 1731
  • Country: de
    • Richis-Lab
Re: Different die pictures
« Reply #121 on: August 04, 2021, 09:57:21 am »
It looks like there is a thin coating on top of the BQ27220. Flip-chip parts often have problems with light fluctuations. Some time ago there was a flip-chip voltage regulator on a Raspberry Pi 2 that resets the processor whenever you take a picture of the board using a flashlight.  :o Perhaps this coating damps some of the light reaching the chip.
I think the coating is there because you can see that they use a external RDL process to add the balls. The feature sizes of the RDL don't seem to be in line with an integrated RDL+eutectic bump technology, so I suspect a polyamide RDL technology is used - the polyamide being the layer you see :)

I talked about the coating on the upper side of the BQ27220. That could be protection against "light problems". On the bottom of the part there is probably polyimide or polyamide or something like that.  :-+

Offline TheUnnamedNewbie

  • Super Contributor
  • ***
  • Posts: 1208
  • Country: 00
  • mmwave RFIC/antenna designer
Re: Different die pictures
« Reply #122 on: August 04, 2021, 10:14:44 am »
Ah, in that case I probably misunderstood!
The best part about magic is when it stops being magic and becomes science instead

"There was no road, but the people walked on it, and the road came to be, and the people followed it, for the road took the path of least resistance"
 

Online T3sl4co1l

  • Super Contributor
  • ***
  • Posts: 21673
  • Country: us
  • Expert, Analog Electronics, PCB Layout, EMC
    • Seven Transistor Labs
Re: Different die pictures
« Reply #123 on: August 04, 2021, 02:30:53 pm »
Ah yes, the resetting each capacitor to something Vgs(th) below Vgg or Vcp+/- would do it.

The cascode then further reduces that charge dependency on Vds, i.e. balancing against the following stage.

Tim
Seven Transistor Labs, LLC
Electronic design, from concept to prototype.
Bringing a project to life?  Send me a message!
 

Online mawyatt

  • Super Contributor
  • ***
  • Posts: 3254
  • Country: us
Re: Different die pictures
« Reply #124 on: August 04, 2021, 03:23:42 pm »
Wonder how good the charge transfer between capacitors was in the scheme? The CCDs we designed ~50 years ago had CTE better than 0.99999 per transfer and had over 10,000 stages, so the end result was (0.99999)^10,000 for a >90% overall Input to Output Transfer Gain.

Best,
Curiosity killed the cat, also depleted my wallet!
~Wyatt Labs by Mike~
 

Offline NoopyTopic starter

  • Super Contributor
  • ***
  • Posts: 1731
  • Country: de
    • Richis-Lab
Re: Different die pictures
« Reply #125 on: August 04, 2021, 07:59:51 pm »
Wonder how good the charge transfer between capacitors was in the scheme? The CCDs we designed ~50 years ago had CTE better than 0.99999 per transfer and had over 10,000 stages, so the end result was (0.99999)^10,000 for a >90% overall Input to Output Transfer Gain.

Best,

It´s "just HIFI", the CTE won´t be the best in the world.  ::)

Offline NoopyTopic starter

  • Super Contributor
  • ***
  • Posts: 1731
  • Country: de
    • Richis-Lab
Re: Different die pictures
« Reply #126 on: August 07, 2021, 03:37:58 am »


Here we have the next part of the GDR telephone system (https://www.richis-lab.de/phone.htm), the U1021, the so called "Zeitlagensteuerung".


Well just some logic...


...and two nice little (digital) phones.


...and some dirt.  :-/O


https://www.richis-lab.de/phone08.htm

 :-/O
 
The following users thanked this post: RoGeorge

Offline NoopyTopic starter

  • Super Contributor
  • ***
  • Posts: 1731
  • Country: de
    • Richis-Lab
Re: Different die pictures
« Reply #127 on: August 11, 2021, 08:41:34 pm »
We had the SDH105 and the SDH112:
https://www.richis-lab.de/loco01.htm
https://www.richis-lab.de/loco03.htm


Now the last one, the SDH119 in a QFN24 package.


The die is 2,5mm x 2,3mm.


No locomotive, no D&H, just RR...


Logic array with big supply lines left and right.


There are 12 transistor arrays. Two outputs use 4 of these each giving us 0,3A max current. The other two outputs use 2 of these each giving us 0,15A max current.
The area on the left probably is the driver and protection circuit.


H-bridge driver and motor EMF feedback.


Supply area
There is a 5V regulator to supply a PIC and a undervoltage signal.


https://www.richis-lab.de/loco03.htm

 
The following users thanked this post: RoGeorge

Offline Ranayna

  • Frequent Contributor
  • **
  • Posts: 861
  • Country: de
Re: Different die pictures
« Reply #128 on: August 12, 2021, 03:02:10 pm »
The phone ICs are absolutely fascinating.
I am administering various IP based phone systems, with barely a contact to non VoIP.
Much of is is now running virtualized on bog standard x86 servers.

It is amazing how much specialized hardware existed before VoIP took hold.
 

Offline NoopyTopic starter

  • Super Contributor
  • ***
  • Posts: 1731
  • Country: de
    • Richis-Lab
Re: Different die pictures
« Reply #129 on: August 12, 2021, 03:13:27 pm »
I totally agree with you.  :-+
Today it looks like you just need a simple ADC a simple DAC and the rest is done by a microcontroller.  ;D

Offline NoopyTopic starter

  • Super Contributor
  • ***
  • Posts: 1731
  • Country: de
    • Richis-Lab
Re: Different die pictures
« Reply #130 on: August 15, 2021, 04:04:14 am »
I have created an alphabetical overview containing all the parts I have documented:

https://www.richis-lab.de/semiconductors.htm

Quite a long list...  :o 8)
 
The following users thanked this post: SeanB

Offline Koray

  • Regular Contributor
  • *
  • Posts: 87
  • Country: tr
Re: Different die pictures
« Reply #131 on: August 16, 2021, 08:40:01 am »
Hi Richi, your website and all these work you have done is amazing. I can spend hours there, learning many new things. Thank you for your effort!
K.
 

Offline NoopyTopic starter

  • Super Contributor
  • ***
  • Posts: 1731
  • Country: de
    • Richis-Lab
Re: Different die pictures
« Reply #132 on: August 16, 2021, 08:46:25 am »
Thanks a lot!
It´s always good to hear there are people interested in my work.  :-+

Offline NoopyTopic starter

  • Super Contributor
  • ***
  • Posts: 1731
  • Country: de
    • Richis-Lab
Re: Different die pictures
« Reply #133 on: August 17, 2021, 07:08:11 pm »
We had a look into the Coolaudio V3205 / Shanghai Belling BL3205. Now let´s take a look into an old BBD built by Matsushita (Panasonic)!


The MN3208 is a NMOS BBD with 2048 stages.


Interesting: The schematic in the datasheet looks very similar to the schematic in the datasheet of the Coolaudio V3205 / Shanghai Belling BL3205! Of course there are less stages but the symbols the letters and everything looks quite similar.
Coolaudio bought a lot of knowledge, patents and people for their vintage portfolio. It looks like they went shopping at Matsushita.


The die is 3,0mm x 3,0mm. The global structure is similar to the Coolaudio V3205 / Shanghai Belling BL3205 but it´s not exactly the same.


3208  :-+
...and some test structures.


In the corners there are right angled lines that clearly show if there is a misaligned mask.
It looks like they used six masks and two of them were modified two times.


The test structure contains four transistors. All transistors share the same source potential that is connected to the substrate too. T1 and T2 share their gate potential and T3 and T4 share their gate potential.
T1 and T2 use the substrate in their active area. While T1 is equipped with a polysilicon gate T2 switches with a metal gate. In my view that is NMOS.
It looks like T3 and T4 are integrated on a purpel area. Probably that is PMOS. In the gate area of T3 there is kind of a notch. :-//


The clocks CP1 and CP2 and the bias Vgg have the same big structures at their inputs as in the Coolaudio V3205 / Shanghai Belling BL3205. Probably protection against negative voltages.


But if we take a closer look we find an additional ESD protection. Under the bondpad there is a C-shaped resistor. Under the resistor there is a metal structure which acts as a gate. Since the metal gate has a thicker oxide than the polysilicon gate the transistor is normally off. But with high voltages (ESD) the transistor is switched on and drains charge to the substrate.


We know the input structure but here we have an additional part. Qgnd? is not mentioned in the datasheet. It looks like the end of the input resistor is placed near the GND plane of the big undervoltage protection structure of Vgg. The lower plane of the protection structure (which is connected to Vgg) is extended to this area what probably produces a MOSFET. I assume that gives us a pull down resistor at the input.
Cgnd looks like it easily could be modified to get more or less input capacitance.


The BBD structure is similar to the Coolaudio V3205 / Shanghai Belling BL3205. The proportions are a little different but not very much.


Here we have the two output driver connected to the stages 2048 and 2049.
I wasn´t perfectly clear at the Coolaudio V3205 / Shanghai Belling BL3205 (perhaps a little wrong  ::)): You need these two outputs and you have to connect them because every second stage is empty due to the working principle of a BBD.
In the MN3208 the Res stage that disposes the charges to Vdd is clearly visible. It´s a cascode switch as every other switch in the BBD.
In the driver lines of the output transistors there are very small capacitors connected to Vdd which we haven´t seen in the Coolaudio V3205 / Shanghai Belling BL3205. I assume these capacitors reduces the risk of oscillations.


Some more pictures:
https://www.richis-lab.de/bbd02.htm

 :-/O
 
The following users thanked this post: SeanB, xrunner, RoGeorge

Offline NoopyTopic starter

  • Super Contributor
  • ***
  • Posts: 1731
  • Country: de
    • Richis-Lab
Re: Different die pictures
« Reply #134 on: August 27, 2021, 03:36:20 am »


Here we have the next part of the GDR telephone system (https://www.richis-lab.de/phone.htm), the U3210, the so called "PCM-Empfangsschaltung". No datasheet, no more information.  :(


That´s an interesting test structure...


Input and output...


That area probably contains memory.


https://www.richis-lab.de/phone09.htm

 :-/O
 
The following users thanked this post: SeanB

Offline NoopyTopic starter

  • Super Contributor
  • ***
  • Posts: 1731
  • Country: de
    • Richis-Lab
Re: Different die pictures
« Reply #135 on: August 27, 2021, 08:38:51 am »


That´s an interesting test structure...

Aha! That´s a ring counter, an easy way to check the process quality! The faster the better.  :-+

Offline NoopyTopic starter

  • Super Contributor
  • ***
  • Posts: 1731
  • Country: de
    • Richis-Lab
Re: Different die pictures
« Reply #136 on: August 27, 2021, 03:01:23 pm »


Does anyone know this logo?  :-//
« Last Edit: August 27, 2021, 06:04:50 pm by Noopy »
 

Offline NoopyTopic starter

  • Super Contributor
  • ***
  • Posts: 1731
  • Country: de
    • Richis-Lab
Re: Different die pictures
« Reply #137 on: August 27, 2021, 03:17:20 pm »


And one more question. Does anyone know what that is?
The structures on the die look like a switched capacitor DAC or ADC. But I´m not sure about that.
On the die there are the numbers M7082D.

 :-//
« Last Edit: August 27, 2021, 06:01:28 pm by Noopy »
 

Offline bsdphk

  • Regular Contributor
  • *
  • Posts: 198
  • Country: dk
Re: Different die pictures
« Reply #138 on: August 27, 2021, 05:56:57 pm »
"WE" is very probably Western Electric, so likely telefone related.

 
The following users thanked this post: Noopy

Offline NoopyTopic starter

  • Super Contributor
  • ***
  • Posts: 1731
  • Country: de
    • Richis-Lab
Re: Different die pictures
« Reply #139 on: August 27, 2021, 06:03:10 pm »
"WE" is very probably Western Electric, so likely telefone related.

Sounds plausible!  :-+

Switched capacitor DAC/ADC and a telephone system would match quite well.

Anyone some more information?

Offline NoopyTopic starter

  • Super Contributor
  • ***
  • Posts: 1731
  • Country: de
    • Richis-Lab
Re: Different die pictures
« Reply #140 on: August 31, 2021, 03:48:47 am »


We had a look into the Coolaudio V3205 built with a Shanghai Belling BL3205 (https://www.richis-lab.de/bbd01.htm).
Here we have a genuine V3205.


The die is 4,3mm x 3,7mm.


I don´t know what logo that is and I don´t know what WXMI 2 stands for.


I don´t know...


There are quite a lot teststructures in the cutting area.


The input is the same as in the other BBDs we have seen.
The protection circuits are the same too.


BBD structure, nothing special...


Business as usual


The output circuit is the same as in the BL3205 (https://www.richis-lab.de/bbd01.htm). There is no additional gate capacitor at the output transistors as we have found them in the MN3208 (https://www.richis-lab.de/bbd02.htm).


https://www.richis-lab.de/bbd03.htm

 :-/O
 
The following users thanked this post: RoGeorge

Offline NoopyTopic starter

  • Super Contributor
  • ***
  • Posts: 1731
  • Country: de
    • Richis-Lab
Re: Different die pictures
« Reply #141 on: September 02, 2021, 03:18:25 am »


Here we have the next part of the GDR telephone system (https://www.richis-lab.de/phone.htm), the U3220, the so called "PCM-Sendeschaltung". No datasheet, no more information.  :(

A lot of special digital stuff...


https://www.richis-lab.de/phone10.htm

 :-/O

Offline NoopyTopic starter

  • Super Contributor
  • ***
  • Posts: 1731
  • Country: de
    • Richis-Lab
Re: Different die pictures
« Reply #142 on: September 03, 2021, 03:53:20 am »


TiN gave me a Fluke 842591, a RMS converter used for example in the Fluke 5790A and the Fluke 792A.


The application note of the Fluke 792A shows what is inside the Fluke 842591. The input signal heats the left resistor. Unlike the LT1088 (https://www.richis-lab.de/LT1088.htm) the heater temperatures are monitored with two complete transistors. You build a differential amplifier with these transistors and a opamp does the heating of the second resistor so you get exactly the voltage that gives you the same amount of heat as the input signal, the RMS voltage.


The sensor is shielded on the back side.


The converter is quite small compared to the package.


The die was damaged in the upper right corner. It is placed on a small additional ceramic plate. Perhaps it´s for mechanical isolation or for better handling in the production.


The die is just 0,06mm thick to get a low thermal mass.


There are two islands with a edge length of 0,36mm each containing a resistor and a transistor. The islands are fixed just by the metal layer the rest of  the silicon is etched away.
Everything is quite symmetrical. The left element is damaged due to overheating.


Nine masks? Number 6 was remastered eleven times?  :o


The heater resistors are tuned. In the lower part we see the base area of the transistors. The whole island is the collector material. The inner side contact is the emitter. The middle contact is the base. It´s interesting that both contacts show two circles. At the emitter one of the circles is the emitter area the second is the via but why is there a second circle at the base contact? You can contact the p area directly. Perhaps it´s something special. The application note tells us it´s a special low noise transistor.
The overheating damaged the heater metal contact and the transistor metal contact. Due to the thermal isolation I assume you don´t need much power to overheat the structures.


Here you see the island flying.  ;D


The metal layer of the damaged side tried to leave the island.  ;D


A few more pictures here:

https://www.richis-lab.de/RMS01.htm

 :-/O

Offline TiN

  • Super Contributor
  • ***
  • Posts: 4543
  • Country: ua
    • xDevs.com
Re: Different die pictures
« Reply #143 on: September 03, 2021, 04:06:46 am »
Magical photos, thank you very much for all the efforts.  :-+
These sensors are also used in all 5700/5720/5730 and 5725 Flukes.  ;)
YouTube | Metrology IRC Chat room | Let's share T&M documentation? Upload! No upload limits for firmwares, photos, files.
 

Offline NoopyTopic starter

  • Super Contributor
  • ***
  • Posts: 1731
  • Country: de
    • Richis-Lab
Re: Different die pictures
« Reply #144 on: September 03, 2021, 04:07:43 am »
Thanks for the part!
It was a pleasure!  8)

Online mawyatt

  • Super Contributor
  • ***
  • Posts: 3254
  • Country: us
Re: Different die pictures
« Reply #145 on: September 03, 2021, 10:47:40 am »
Nice images :-+

Recall the earlier versions (before 85) of this Fluke RMS technique used a thinned die suspended by the wire bonds. The backside selective chemical etch similar to what BAW devices used is a better mechanical solution for low thermal mass and isolation, and of course shock and vibration sensitivity.

Best,
Curiosity killed the cat, also depleted my wallet!
~Wyatt Labs by Mike~
 

Offline NoopyTopic starter

  • Super Contributor
  • ***
  • Posts: 1731
  • Country: de
    • Richis-Lab
Re: Different die pictures
« Reply #146 on: September 03, 2021, 11:40:01 am »
Thanks!  8)

Perhaps sometime I get the older version too. I'm sure that would give us some more nice pictures.  :-+

Offline NoopyTopic starter

  • Super Contributor
  • ***
  • Posts: 1731
  • Country: de
    • Richis-Lab
Re: Different die pictures
« Reply #147 on: September 07, 2021, 03:26:53 am »


We have seen the 2048 stage bucket brigade device MN3208 https://www.richis-lab.de/bbd02.htm. Here comes the MN3207, the 1024 stages.


The die is a little smaller than the MN3208 (3,2mm x 2,8mm) but the architecture is quite similar.


3207  :-+


Now that is interesting: It looks like they used just five masks while in the MN3208 we have seen six masks.  :-//


Input, output and stage construction are the same as in the MN3208.


https://www.richis-lab.de/bbd04.htm


 :-/O
 
The following users thanked this post: RoGeorge

Offline NoopyTopic starter

  • Super Contributor
  • ***
  • Posts: 1731
  • Country: de
    • Richis-Lab
Re: Different die pictures
« Reply #148 on: September 10, 2021, 03:39:37 am »
I started a new topic for memory devices:

https://www.eevblog.com/forum/projects/memory-die-pictures/

 :-/O

Offline NoopyTopic starter

  • Super Contributor
  • ***
  • Posts: 1731
  • Country: de
    • Richis-Lab

Offline NoopyTopic starter

  • Super Contributor
  • ***
  • Posts: 1731
  • Country: de
    • Richis-Lab
Re: Different die pictures
« Reply #150 on: September 22, 2021, 07:57:25 pm »


The Mullard 438BGY is an old RF amplifier (>18W between 68 and 88MHz).
First ad for the 438BGY was found 1974.


You don´t find much information about the 438BGY but the schematic of the BGY32, BGY33, BGY35 and BGY36 fits quite well. I added the part numbers, we will need them later.
There is a preamp around the transistor T2 and a output stage around T3. At the inputs and outputs there are some LCs for filtering and impedance matching.
T1 generates a bias so T2 doesn´t switch off completely. It´s interesting that T1 is supplied from the output stage (every stage has its own supply rail). I assume that supply concept should prevent oscillations because the phase shift is "better".


Removing the lid you find a PCB potted with some silicone gel. There are THT, SMT and bare die components.
(Module turned around 180° so the signal flow is from left to right.)


It´s a normal PCB with copper on both sides. You can see the glass fibre.


Vias are connecting the ground potential to the backside of the board. The heat sink acts as low impedance ground.


The preamp is on the left side. The only difference to the schematic is the diode Dx. The inductors are built with loops of copper on the PCB. It looks like the inductance L3 is distributed around the resistor R2.


The smaller capacitors are built with silicon dies. There is a big and two small rectangles. You can adjust the capacitance by bonding the smaller areas to the main area.


T1 is a quite normal transistor since it just does the biasing.


At the base of the preamp transistor T2 there is the diode Dx. It is integrated on a die with three other diodes. The diode protects the transistor against negative base emitter voltages.


The preamp transistor T2 is placed on a BeO ceramic. The BeO dissipates heat much faster than the PCB.


The preamp transistor T2 is a RF transistor with very thin emitter areas. Between the emitters there are the base contacts. A low base impedance allows fast switching.


I don´t think they did some tuning here. In my view it looks more like some bond problems.


On the right side there is the output stage.


That looks like some tuning. The first bond connection was cut and a new bond connection was established at a different place.


L6 has a core because you need a lot of inductance at this place.


The output transistor T3 sits on a second BeO ceramic. The currents are below 1A but you need a lot of connections to get a low parasitic inductance.


T3 is an overlay transistor like we have seen it in the 2N3553 (https://www.richis-lab.de/Bipolar22.htm).
Every vertical emitter line has an emitter resistor and the whole block is connected to one single horizontal emitter resistor. That´s important to get a uniform current distribution.


https://www.richis-lab.de/rfamp01.htm

 :-/O
« Last Edit: September 23, 2021, 03:48:11 am by Noopy »
 
The following users thanked this post: SeanB, TimNJ, doktor pyta, RoGeorge, Miyuki, capt bullshot, ch_scr, iMo, Renate

Offline Renate

  • Super Contributor
  • ***
  • Posts: 1460
  • Country: us
Re: Different die pictures
« Reply #151 on: September 22, 2021, 10:18:23 pm »
Those are very nice photos.
I hope that you took EXTREME precautions with that berylium oxide???
 

Offline Cerebus

  • Super Contributor
  • ***
  • Posts: 10576
  • Country: gb
Re: Different die pictures
« Reply #152 on: September 22, 2021, 11:06:27 pm »
Those are very nice photos.
I hope that you took EXTREME precautions with that berylium oxide???

As long as you avoid breaking it, or chipping bits off it's fine. The biggest hazard is inhalation of dust. However, unlike some of the various relatively minor chemical hazards you can encounter with electronics that sometimes get rather exaggerated, BeO is something that should be treated with proper respect. But it doesn't need a huge song and dance. Careful handling of solids and a decent FFP3 dust mask is adequate. However, BeO powder is something I'd not want to personally come into contact with and would only handle, if at all, in a fume cupboard/glove box.
Anybody got a syringe I can use to squeeze the magic smoke back into this?
 

Offline NoopyTopic starter

  • Super Contributor
  • ***
  • Posts: 1731
  • Country: de
    • Richis-Lab
Re: Different die pictures
« Reply #153 on: September 23, 2021, 03:47:29 am »
Thanks!  :)

I agree with Cerebus. As long as you don´t grind the BeO it´s not that bad.

In the 438BGY the BeO is even potted. Parts like the 2N3375 are more problematic:


You have to be careful with these components.  :-/O
 
The following users thanked this post: doktor pyta

Offline RoGeorge

  • Super Contributor
  • ***
  • Posts: 6202
  • Country: ro
Re: Different die pictures
« Reply #154 on: September 23, 2021, 10:29:20 am »
I agree with Cerebus. As long as you don´t grind the BeO it´s not that bad.
...
You have to be careful with these components.  :-/O

True that.  When not grind, only mild side effect are observed, for example the exposed subjects develop an urge to eviscerate electronic parts, and an attraction to big lens and microphotography.  These side effects have no known explanation yet.   :-//

However, the community knows about the effects, so the community keep sending to the affected ones small sacrificial electronic parts.  This way the affected can eviscerate the little gifts, and thus tame their urge to turn during the nights with full moon into what it is known in mythology as an ausgeweidetelektronisch (electronicoevisceratorus in latin).  ;D
 
The following users thanked this post: ch_scr

Offline NoopyTopic starter

  • Super Contributor
  • ***
  • Posts: 1731
  • Country: de
    • Richis-Lab
Re: Different die pictures
« Reply #155 on: September 23, 2021, 01:02:29 pm »
Bravo!  :-+ ;D

Online mawyatt

  • Super Contributor
  • ***
  • Posts: 3254
  • Country: us
Re: Different die pictures
« Reply #156 on: September 23, 2021, 01:34:28 pm »
During my career I worked at Honeywell which produced navigational systems based upon an Electrostatically Suspended Gyro, or ESG. The ESG used a thin hollow Beryllium ball about the size of a golf ball electrostatically suspended inside a BeO cavity. The entire area where these were produced was inside a somewhat sealed environment (negative pressure I recall) and everyone wore gowns and masks like you see in the semiconductor areas. Never had a desire to go into the production area, but did work around some of the gyros.

https://www.ion.org/museum/item_view.cfm?cid=2&scid=4&iid=30

Also recall some of the early days where thermal paste or grease was BeO in a silicone gel.

Best,
Curiosity killed the cat, also depleted my wallet!
~Wyatt Labs by Mike~
 
The following users thanked this post: doktor pyta, RoGeorge, MegaVolt

Online mawyatt

  • Super Contributor
  • ***
  • Posts: 3254
  • Country: us
Re: Different die pictures
« Reply #157 on: September 23, 2021, 02:11:37 pm »
I agree with Cerebus. As long as you don´t grind the BeO it´s not that bad.
...
You have to be careful with these components.  :-/O

True that.  When not grind, only mild side effect are observed, for example the exposed subjects develop an urge to eviscerate electronic parts, and an attraction to big lens and microphotography.  These side effects have no known explanation yet.   :-//

However, the community knows about the effects, so the community keep sending to the affected ones small sacrificial electronic parts.  This way the affected can eviscerate the little gifts, and thus tame their urge to turn during the nights with full moon into what it is known in mythology as an ausgeweidetelektronisch (electronicoevisceratorus in latin).  ;D

Funny  :-DD

Must have got contaminated over 20 years ago, ever since been imaging chips and designing/collecting custom imaging fixtures and lens assemblies ;D

These were/are used to image the chips we designed in very high resolutions into the gigapixel region.

Honestly don't know how Noopy does this with so many excellent images, I know how difficult this is and how much time it takes to create a quality chip image, and they just keep coming.....so hat's off to Noopy :-+

Best,
Curiosity killed the cat, also depleted my wallet!
~Wyatt Labs by Mike~
 
The following users thanked this post: RoGeorge

Offline NoopyTopic starter

  • Super Contributor
  • ***
  • Posts: 1731
  • Country: de
    • Richis-Lab
Re: Different die pictures
« Reply #158 on: September 23, 2021, 05:43:00 pm »
Honestly don't know how Noopy does this with so many excellent images, I know how difficult this is and how much time it takes to create a quality chip image, and they just keep coming.....so hat's off to Noopy :-+

Thanks!  8)
I spend quite some time to extract the dies, take the pictures, process them and put them in a context that is interesting to read.  :-/O
...and beside that I lead a very normal life...  ;D
« Last Edit: September 24, 2021, 05:54:31 am by Noopy »
 
The following users thanked this post: MegaVolt

Offline NoopyTopic starter

  • Super Contributor
  • ***
  • Posts: 1731
  • Country: de
    • Richis-Lab
Re: Different die pictures
« Reply #159 on: September 28, 2021, 07:08:07 pm »


Texas Instruments BQ24040, a Li-Charger for one cell and a supply of 5V. Up to 1A of charge current is possible with an option to switch to 500mA or 100mA (USB current limit). Voltage accuracy is 1%, current accuracy is 10%. The BQ24040 doesn´t need an external shunt.
WSON package => "Very, very thin Small Outline Non-leaded"  ;D Edge length is 2mm.


Datasheet shows a block diagram too.  :-+


Now that is interesting: There is a very thick metal layer above the highly integrated circuit. This top metal layer is used to form the bondpads so you have more area for the circuit. In addition the high cross section is important to conduct the relatively high current.
The structure in the right area looks like the metal layer contacts the two power transistors. And it looks like the upper transistor is smaller than the lower one. The upper one is probably the one that stops current flowing back to the input. While the lower one does the current regulation and has to stand more power loss.
There are four unused bondpads. The die is probably used in the BQ24041 and BQ24045 too. These chargers are very similar.


Aha! It looks like the BQ24050 and BQ24052 use the same die. These chargers are watching D+/D- to draw a high current if the connected USB device can supply it.
Revision A3?


The die is 0,2mm high, the top metal layer is ~20µm.


https://www.richis-lab.de/li02.htm

 :-/O
 
The following users thanked this post: RoGeorge

Offline NoopyTopic starter

  • Super Contributor
  • ***
  • Posts: 1731
  • Country: de
    • Richis-Lab
Re: Different die pictures
« Reply #160 on: October 10, 2021, 07:57:00 am »
BQ27220, a single li cell fuel gauge in a small flip-chip package (DSBGA-9 - 1,62mm × 1,58mm).
[...]
https://www.richis-lab.de/li01.htm

Texas Instruments BQ24040, a Li-Charger for one cell and a supply of 5V. Up to 1A of charge current is possible with an option to switch to 500mA or 100mA (USB current limit). Voltage accuracy is 1%, current accuracy is 10%. The BQ24040 doesn´t need an external shunt.
WSON package => "Very, very thin Small Outline Non-leaded"  ;D Edge length is 2mm.
[...]
https://www.richis-lab.de/li02.htm


By the way: These two chips were originally built by the company Benchmarq Microelectronics which was acquired by Unitrode which was acquired by Texas Instruments.
Because of Benchmarq Microelectronics there are the letters BQ which originally were uncapitalised.
 
The following users thanked this post: MegaVolt

Offline NoopyTopic starter

  • Super Contributor
  • ***
  • Posts: 1731
  • Country: de
    • Richis-Lab
Re: Different die pictures
« Reply #161 on: October 16, 2021, 05:55:51 am »
I have put together a new picture calendar with the best pictures of 2021:

https://www.meinbildkalender.de/richis-lab

(Sorry, there is just a german speaking calendar.  ;))
 
The following users thanked this post: capt bullshot

Offline NoopyTopic starter

  • Super Contributor
  • ***
  • Posts: 1731
  • Country: de
    • Richis-Lab
Re: Different die pictures
« Reply #162 on: October 18, 2021, 06:03:17 am »
I had created a list with all "my" semiconductors sorted by name of the part:

https://www.richis-lab.de/semiconductors.htm


Now here we have a list sorted by manufacturer:

https://www.richis-lab.de/semiconductors_m.htm

 :-/O
 
The following users thanked this post: capt bullshot, MegaVolt

Offline NoopyTopic starter

  • Super Contributor
  • ***
  • Posts: 1731
  • Country: de
    • Richis-Lab
Re: Different die pictures
« Reply #163 on: October 20, 2021, 04:31:35 am »


Here we have the next part of the GDR telephone system (https://www.richis-lab.de/phone.htm), the U3230, the so called "PCM-Koppelfeld". No datasheet, no more information just like with the U3220.  :(


But one thing is interesting. I have taken pictures of a U3230 wafer (the upper one). There are more testpads and there are small circuits integrated near most of the testpads. I assume that is some kind of buffer. On the die of the U3230 they removed these circuits.


https://www.richis-lab.de/phone11.htm

 :-/O

Offline NoopyTopic starter

  • Super Contributor
  • ***
  • Posts: 1731
  • Country: de
    • Richis-Lab
Re: Different die pictures
« Reply #164 on: November 24, 2021, 09:19:17 am »

Offline NoopyTopic starter

  • Super Contributor
  • ***
  • Posts: 1731
  • Country: de
    • Richis-Lab
Re: Different die pictures
« Reply #165 on: November 26, 2021, 04:40:21 am »


Here we have the next part of the GDR telephone system (https://www.richis-lab.de/phone.htm), the U1500PC001, the so called "PCM-Sender". Again no datasheet, no more information...  :(
It seems like the size of the die was caused mainly due to the number of bondpads needed.


The U1500PC001 is based on the standard cell family U1500 designed by Carl Zeiss Jena.
They first used shorter names for U1500 circuits so here we see the U1501.


There was enough free area for a big test structure that even contains input protection structures!


Here we have two interesting circuits. In the upper left corner of the picture there is an additional input protection in a second line. The two bondpads above this circuit are outputs but it seems they wanted to use them as inputs too.
The U1500 system was designed to build big logic circuits but here there is quite a big push-pull output driver. There are even additional bondpads for the outputs.


https://www.richis-lab.de/phone12.htm

 :-/O
 
The following users thanked this post: RoGeorge

Offline NoopyTopic starter

  • Super Contributor
  • ***
  • Posts: 1731
  • Country: de
    • Richis-Lab
Re: Different die pictures
« Reply #166 on: December 01, 2021, 08:01:50 am »


We had the first graphic processor µPD7220 (https://www.richis-lab.de/GraKa02.htm) now let´s take a look into the Intel version D82720.
M82720 was the military grade.


There is one more bondwire than in the µPD7220. It connects the die with the bottom of the package through a block.


The edge length of the die is 5,6mm. It´s a little bigger than the µPD7220 but that is due to the bigger edge area. All in all the D82720 and the µPD7220 use the same design. Well no surprise since NEC and Intel worked together to develop this graphic processor.


Yes, it´s an Intel 82720...


...but it´s also a NEC 7220.  ;D
In the NEC µPD7220 there is no Intel logo.


There are no test structures in the middle of the die but Intel has integrated a lot of test structures in the cutting areas.


The bias generator looks a little different in comparison to the µPD7220. Since it it connected to the bottom of the package we can try to measure the bias voltage. => -2,6V  :-+


With just a supply connected to the D82720 I was able to meassure a very small 33MHz signal between the supply pins. Shorting the leads exactly at this point didn´t show the signal so it´s quite likely we see here the switching frequency of the bias generator.


Numbers for the bondpads as in the µPD7220. Nice!  :-+


Output pads with predriver and push-pull transistors.


Input circuit - There is a series resistor limiting the input current and a grounded gate NMOS to drain pulses.
Under the input bondpad in the outer frame there is a contact to a rectangular area. Substrate is at a negative voltage so it is no substrate contact. I assume that´s a diode so if the local substrate get´s more positive than ground current can flow into the ground structure.


Memory is a little clearer than in the µPD7220.


https://www.richis-lab.de/GraKa03.htm

 :-/O
 
The following users thanked this post: RoGeorge

Offline NoopyTopic starter

  • Super Contributor
  • ***
  • Posts: 1731
  • Country: de
    • Richis-Lab
Re: Different die pictures
« Reply #167 on: December 03, 2021, 07:08:05 am »


Here we have the next part of the GDR telephone system (https://www.richis-lab.de/phone.htm), the U1500PC002, the so called "PCM-Empfänger". Again no datasheet, no more information...  :(
Just a lot of logic in the last parts of the telephone system but I want to complete the collection.
One interesting detail is the great number of capacitors. These capacitors make the supply more stable.


In the first place the name was U1502. It seems like this design is a second revision.


Some test structures to check the alignment.


https://www.richis-lab.de/phone13.htm

 :-/O
 
The following users thanked this post: RoGeorge

Offline NoopyTopic starter

  • Super Contributor
  • ***
  • Posts: 1731
  • Country: de
    • Richis-Lab
Re: Different die pictures
« Reply #168 on: December 14, 2021, 08:56:06 am »


Here we have the last two ICs of the GDR telephone system (https://www.richis-lab.de/phone.htm), the U1500DC007 and U1500FC008. But hey, that are the same circuits!? Yes, they are!  ;D


Both circuits share the name U1503. The U1503 is an IC to transmit data by optical fiber.
There is no information about a U1500DC007 and a U1500FC008.  :-//


At the right edge of the die there are two "big" push-pull-structures.


That´s an interesting structure. Besides the supply there is just one connection.
Two big capacitors, two big transistors, perhaps an internal oscillator?


https://www.richis-lab.de/phone14.htm

 :-/O
 
The following users thanked this post: RoGeorge

Offline NoopyTopic starter

  • Super Contributor
  • ***
  • Posts: 1731
  • Country: de
    • Richis-Lab
Re: Different die pictures
« Reply #169 on: December 17, 2021, 03:44:52 pm »

Offline NoopyTopic starter

  • Super Contributor
  • ***
  • Posts: 1731
  • Country: de
    • Richis-Lab
Re: Different die pictures
« Reply #170 on: December 20, 2021, 04:49:54 am »
I have some more analog switches. I will post them here https://www.eevblog.com/forum/testgear/replacement-for-fluke-700013-ic-(quad-spst-analog-switch)/msg3884996/#msg3884996 because I started with putting them into this topic. :)
So if you are interested in more analog switches click notify in this topic.

Offline NoopyTopic starter

  • Super Contributor
  • ***
  • Posts: 1731
  • Country: de
    • Richis-Lab
Re: Different die pictures
« Reply #171 on: December 21, 2021, 02:11:03 pm »


Just a small Update: I added some package pictures to the GDR telephone system circuits.

https://www.richis-lab.de/phone.htm

Online T3sl4co1l

  • Super Contributor
  • ***
  • Posts: 21673
  • Country: us
  • Expert, Analog Electronics, PCB Layout, EMC
    • Seven Transistor Labs
Re: Different die pictures
« Reply #172 on: December 24, 2021, 11:04:01 pm »
No picture, as I don't have anywhere near good enough magnification, or even much of a specimen, but --

Cracking open a failed FQA9N90C today, I notice an iridescent blue glow.  Even in the middle of the chip (it broke more or less down the middle, some stuck to the tab, some stuck to the plastic).  I wonder if I'm seeing the trenches here, or even actual N/P pillars (the "super" in "SuperJunction" tech)?  Also, doesn't seem to be polarized (appearance doesn't change under polarizer in front of light or view).

Die is 5 x 6 mm BTW.  So the power rating seems reasonable.

Also, failure occurred in linear operation, though I suspect the problem was overheating from poor thermal grease.  It's a bit inconclusive.

So, take this as a point of interest, if you run across such a MOSFET, maybe melt / crack it open and see if there's any funny color in the die? :)

(Also, not that just a bare die shot will be all that interesting -- as examples in this thread I think likely already show?  Acid to remove surface metal/oxide should prove interesting though.)

Tim
Seven Transistor Labs, LLC
Electronic design, from concept to prototype.
Bringing a project to life?  Send me a message!
 

Online TimNJ

  • Super Contributor
  • ***
  • Posts: 1656
  • Country: us
Re: Different die pictures
« Reply #173 on: December 25, 2021, 05:27:19 am »
On the note of "SuperJunction" and "SuperTrench", are there any die shots of these types of modern MOSFETs?

Here's a 600V super-junction: IPA60R280P7XKSA1

Here's a 100V shielded gate trench / supertrench (whatever): AOT66920L

There are countless others, but if you were uhh...looking for ideas? (Seems you have plenty of ideas already  ;))
 

Offline NoopyTopic starter

  • Super Contributor
  • ***
  • Posts: 1731
  • Country: de
    • Richis-Lab
Re: Different die pictures
« Reply #174 on: December 25, 2021, 08:08:48 am »
I take the FQA9N90C on my list.  :-+
Could be interesting with some HF and some HCL.

Is the STP3NB100FP (https://www.richis-lab.de/FET15.htm) already a superjunction MOSFET? Not sure...

I definitely have to examine more Power-MOSFETs since I have started to do some delayering.
I already have a lot of parts and ideas but new suggestions are always welcome.  :-+
 
The following users thanked this post: TimNJ

Online TimNJ

  • Super Contributor
  • ***
  • Posts: 1656
  • Country: us
Re: Different die pictures
« Reply #175 on: December 25, 2021, 03:23:53 pm »

Is the STP3NB100FP (https://www.richis-lab.de/FET15.htm) already a superjunction MOSFET? Not sure...


As far as I know, ST's super-junction types are under the name MDMesh. This one is PowerMesh, so my vote is that it's not super-junction.
 

Offline NoopyTopic starter

  • Super Contributor
  • ***
  • Posts: 1731
  • Country: de
    • Richis-Lab
Re: Different die pictures
« Reply #176 on: January 10, 2022, 05:51:13 am »


The Intersil ICL8038 is a Precision Waveform Generator: 0,001Hz - 300kHz square wave, triangle and sine wave output with a duty cycle of 2%-98%. Supplied with 30V the chip can generate a signal with 28Vpp.


The datasheet contains a block diagram. There are two current sources, one charging, one discharging a external capacitor. Since the discharging part sinks twice the current of the charging source you just have to switch the sink to get +/-I. At the capacitor you get the triangle wave. A sine shaper converts the triangle into a sine wave. Two comparators and a flip-flop are managing the current switching to get the oscillation we want. At a second output of the flip-flop there is the rectangle wave.


In addition the datasheet contains a schematic (colored by me).
The current source (yellow) is a Sziklai circuit. The current sink (dark green) is based on a current source like the former one. It is transformed into a current sink with a current mirror that also doubles the current. Both current sources are based on the same reference (purple). The currents of the current sources are determined by the external resistors RextA and RextB. With these resistors and the integration capacitor Cext you can set the working frequency. The frequency can be varied through pin 8, which manipulates the reference circuit and so the current sources. Behind pin 7 there is a voltage divider. If you don´t want to adjust the frequency you just have to connect pin 7 and pin 8.

The triangle signal at the integration capacitor is tapped above the transistor Q9 which is connected as a diode. In the buffer amplifier for the triangle signal (pink) there is a Darlington circuit in the first place (Q35/Q36). It is followed by an interesting output stage whose main component is the transistor Q40. The potential at pin 3 is determined by the base-emitter junctions Q9 / Q35 / Q36 / Q40. Thanks to the transistor Q9, the potential at pin 3 is at the same level as the potential of the integration capacitor. Through Q9 / Q35 / Q36 / Q38 / Q37 the base of the transistor Q39 is slightly higher and thus provides some pull-up / bias current. According to the datasheet, the output stage can draw up to 25mA. A diagram shows that the current delivery capability is much more limited. The signal oscillates around half the supply voltage. If one uses a balanced supply, the average value settles at 0V.

To generate a sinusoidal signal. The triangle wave is fed with a relatively high impedance (R44) into a circuit that represents a voltage dependent impedance (red). As the level of the triangular wave increases, the load increases and more voltage drops across R44, reducing the rise of the voltage at pin 2. This results in the desired sinusoidal signal, more precisely an approximation. The voltage dependent impedance is generated with a large symmetrical circuit. The PNP transistors Q41, Q43, Q45 and Q47 become conductive one after the other as the voltage rises and draw different currents depending on their emitter resistances. Behind each transistor a second transistor determines the voltage the stage kicks in. These transistors are connected to a large voltage divider at the right edge. For the low level part of the signal, the same circuit is built in a complementary way in the lower part of the schematic. Here the NPN transistors Q49, Q51, Q53 and Q55 supply a current that increases as the voltage drops. With the help of pin 1 and 12 it is possible to adjust the circuit so that the distortion of the sinusoidal signal gets below 0.5%. Without the adjustment the typical distortion of the worst case ICL8038CC is 2,0%.

The two comparators are connected to the integration capacitor (light green/blue). The resistors R8, R9 and R10 determine the switching points of the comparators. The output signal of the upper comparator is inverted by transistor Q14. The Flip-Flop (grey) is built with Schottky transistors. These transistors have a Schottky diode between base and collector which prevents the transistor from being driven into saturation so it can be switched off faster. The Flip-Flop has its own small voltage regulator (Q30-Q34). The current sink (dark green) is switched off by the output of the flip-flop draining the current in the reference path of the current mirror. The buffer amplifier for the square wave signal provides an open collector output (cyan).


The die is 1,9mm x 1,8mm.


Intersil


In the lower right corner we have the mask revisions. The revision of the metal layer (6B) is moved to the part name. The B at the end of the name is probably the revision of the whole design.
This "mi" thing on the left could be a signature...  :-//


On the left edge of the die we have the voltage divider for the current source reference.
The upper part (red) should have 11k while the lower part (green/cyan) should have 39k. It looks like the lower part can be tuned.  :-/O The cyan part probably contributes a lower resistance which can be connected by some vias. The lower contact of the green resistor looks like it can be moved.


Here you can see the difference between a normal transistor (left) and a Schottky transistor (right). In both transistors you can see the edges of the base (red) and the emitter (green) areas. You can recognize the contact areas too (black). The Schottky transistor is equipped with a very big base contact which has an additional edge (cyan). That is probably a hole in the base area through which the metal makes contact with the slightly n-doped collector. At this contact you get a Schottky diode.


In comparison with the rectangular output transistor (green) the triangle output transistor (red) is quite big. That´s because it´s a PNP and it works in linear mode with a higher power dissipation than the rectangle output that just switches on and off.


The sine shaper occupies a relatively large area on the right side of the die. In the upper half there are the PNP transistors, which represent the variable impedance to ground (cyan). To the left of them you can see the emitter resistors (blue). The different sizes are easy to recognize. For the lowest resistor value (800Ω), two elements were connected in parallel. Right of the load transistors there are the transistors that determine the voltage at which the stage kicks in (green). Some of the base areas had been extended to accomplish the wiring with just one metal layer.

In the lower area, the smaller NPN transistors (yellow) with their emitter resistors (red) are located on the left as a load. The less efficient and therefore larger PNP transistors, which determine the voltage the stage kicks in, are right of the load transistors (pink).

At the right edge of the die the resistors of the large voltage divider are integrated (white). To get the smaller values some of the areas are connected in parallel.


A closer look reveals that the transistors setting the onset voltage are not connected to the ground and supply potential as shown in the datasheet. Instead the opposite stages are cross-connected. This circuit consumes less area on the die. Perhaps it gives you a nicer sine wave too.  :-// Would have to simulate the circuits...


https://www.richis-lab.de/gen02.htm

 :-/O
« Last Edit: January 10, 2022, 08:44:23 pm by Noopy »
 
The following users thanked this post: SeanB, doktor pyta, RoGeorge, bsw_m, ch_scr, Lacibácsi

Offline NoopyTopic starter

  • Super Contributor
  • ***
  • Posts: 1731
  • Country: de
    • Richis-Lab
Re: Different die pictures
« Reply #177 on: January 14, 2022, 05:19:54 am »


In the GDR the NEC µPD7220 (https://www.richis-lab.de/GraKa02.htm) respectively the Intel D82720 (https://www.richis-lab.de/GraKa03.htm) was copied and named U82720. It was built by "Mikroelektronik Karl Marx".

DC02 is the slowest version (2MHz). There was a DC03 (3MHz) and a DC04 (4MHz). With these clocks the U82720 is a little slower than the NEC and the Intel.

X3 stands for March 1989.


The die was placed on a quite massive metal carrier that probably has to spread the power dissipation.


The U82720 design is exactly the same as the µPD7220 design (and the D82720 design). There are just very few differences.

With 7mm x 6,8mm the die is noticeable bigger than the die of the µPD7220 (5,6mm x 5,6mm). On the IEEE International Solid-State Circuits Conference 1981 the µPD7220 was introduced with an edge length of 7mm. The website www.oguchi-rd.com states that the first design was built with a 4µm process and the final product was built with a 3µm process. Combining this information we can assume that the U82720 was built with a 4µm process.


There are even the free areas where the NEC and the Intel logo were placed.


It seems ground connection was a critical point. The µPD7220 had two contacts at the right edge of the die. The later µPD7220A was smaller but nevertheless had three contacts. The U82720 has three contacts on the right edge and an additional ground contact on the left edge.


The U82720 uses a different and especially bigger bias generator. Perhaps the leakage current of the U82720 was higher.


The output stages look the same as in the µPD7220.


The input stages look different in the U82720, in the µPD7220, in the D82720 and in the µPD7220A. But it looks like it´s always a grounded Gate NMOS protecting the circuit.


https://www.richis-lab.de/GraKa04.htm

 :-/O
 
The following users thanked this post: SeanB, RoGeorge

Offline NoopyTopic starter

  • Super Contributor
  • ***
  • Posts: 1731
  • Country: de
    • Richis-Lab
Re: Different die pictures
« Reply #178 on: January 29, 2022, 09:31:43 pm »
An interesting analysis would be a silicon capacitor ( https://www.mouser.sk/Passive-Components/Capacitors/Silicon-RF-Capacitors-Thin-Film/_/N-5g95 ). Some seem to have far more advanced structures on them :)

Done! :)


Murata 935174732547, a 47nF 30V silicon capacitor from the ATSC series. It is integrated in a 0505 package (1.32mm x 1.32mm) with a height of just 0.25mm. The ATSC capacitors are to be connected with bondwires but there are SMT packages too.

Compared to a conventional MLCC a silicon capacitor is much more expensive. Mouser states a 1kpc price of 4.16€ excl. VAT. But Silicon capacitors offer several advantages over conventional MLCCs:
  • One important point is the high temperature resistance. The ATSC series is approved up to 200°C. Up to 250°C is possible (XTSC series).
  • Over the operating temperature range and the operating voltage range, the properties of the capacitors hardly change. Aging effects are also negligible.
  • The special structure offers high capacitance in the smallest possible space. The largest model in the ATSC series is a 1616 package (4.07mm x 4.07mm x 0.25mm) offering 1µF 30V.
  • ESL and ESR are very low too so they are well suited for high frequency applications. The XBSC model series guarantees 100pH/300mΩ and is specified up to 100GHz.
  • The insulation resistance is in the GΩ range.

You can clearly see that the two bondpads at the top edge are connected to the top metal layer and the two bondpads at the bottom edge are connected to the lower metal layer. Most of the area is filled with the special capacitor structures.


Murata Assembly Note states that EJ05055473 is the "die name" whatever that means.


On the Murata website there is the document "Silicon Capacitors with extremely high stability and reliability ideal for high temperature applications", which describes in detail how silicon capacitors are built. The technology is similar to the deep trench MOSFETs. On the substrate there is an array of cylindrical holes that are very deep in relation to their diameter. A heavily n-doped layer applied over the entire surface is the bottom electrode (blue). It is followed by the dielectric (green) and another heavily n-doped layer that is the top electrode (red). The holes greatly increase the effective area. In combination with the small distance between the holes, this results in very high capacitance.

According to the document above you can achieve a capacitance densities of up to 550nF/mm² if you use a dielectric with a high dielectric constant (Vmax=11V). Murata states that silicon capacitors with voltage strengths up to 450V are available. The capacitance density decreases accordingly. 6nF/mm² are documented for 150V.


The Murata website illustrates that their capacitors not just work with the classic trenches, but also uses 3D structures. The enlarged surface makes it possible to further increase the capacitance density.


The area consists of 210 small areas. Apparently the upper metal layer contacts the lower electrodes of each capacitor area through short vertical strips of the lower metal layer. The lower metal layer contacts the upper electrode via a large area. The pattern in this areas is created by the trenches that increase the effective surface area.

On the left and the right side there are two big substrate contacts. There are silicon capacitors that are constructed with three electrodes, what further increases the capacity. However, it seems unlikely that this is the case here. Dividing the capacitance into 210 small areas reduces the capacity, but it also reduces ESL and ESR. It wouldn´t make sense to connect a third electrode just via two simple lateral contacts, which would again worsen ESL and ESR. Probably the lateral contact  ensures that the substrate is at a defined potential.


https://www.richis-lab.de/SiCAP01.htm

 :-/O
 
The following users thanked this post: SeanB, daqq, doktor pyta, RoGeorge, ch_scr, MegaVolt

Online daqq

  • Super Contributor
  • ***
  • Posts: 2302
  • Country: sk
    • My site
Re: Different die pictures
« Reply #179 on: January 29, 2022, 09:40:39 pm »
Thanks! Pretty fascinating structure.

One thing that came to mind: This is a pretty high capacitance per mm2. How thick is the useful structure? Assuming infinite budget and shaving the back end of the chip to nothing, how much capacitance could you theoretically pack into one mm3 ?
Believe it or not, pointy haired people do exist!
+++Divide By Cucumber Error. Please Reinstall Universe And Reboot +++
 

Offline NoopyTopic starter

  • Super Contributor
  • ***
  • Posts: 1731
  • Country: de
    • Richis-Lab
Re: Different die pictures
« Reply #180 on: January 29, 2022, 10:00:07 pm »
The ATSC capacitors are 250µm high. Murata offers capacitors with a height of 100µm.

I have heard that the maximum depth-to-diameter-factor of such trenches is round about 60. It seems like the diameter of the trenches is smaller than 1µm.
So let´s assume a height of 50µm would be possible. That would supply us with a capacitance of 11µF/mm³! Nice!  8)
« Last Edit: January 30, 2022, 05:31:26 am by Noopy »
 

Online T3sl4co1l

  • Super Contributor
  • ***
  • Posts: 21673
  • Country: us
  • Expert, Analog Electronics, PCB Layout, EMC
    • Seven Transistor Labs
Re: Different die pictures
« Reply #181 on: January 30, 2022, 02:43:33 pm »
Dielectric is just silica, right?  Or do they have other types available too (the comment about higher k seems to suggest so)?  And in that case, I wonder how they do it; atomic layer deposition or something?  If they're doing that, with like the high-K gate oxide (HfO2) they're doing on other processes, that'd be fascinating.

(And, I do see a few papers showing HfO2, etc. can be deposited in this way.  Nice.)

Tim
Seven Transistor Labs, LLC
Electronic design, from concept to prototype.
Bringing a project to life?  Send me a message!
 

Offline NoopyTopic starter

  • Super Contributor
  • ***
  • Posts: 1731
  • Country: de
    • Richis-Lab
Re: Different die pictures
« Reply #182 on: January 30, 2022, 03:22:21 pm »
The paper I mentioned states that the 550nF/mm² are achieved with high k dielectrics:

Quote
Obviously this huge capacitance density increase is achievable thanks to higher k-dielectric layers and to the ALD (atomic layer deposition ) enabling excellent step coverage of the deposited layer [2]. 

Semiconductor manufacturing was always a fancy mixture of physics and chemistry but the freaky processes of today in combination with the huge amount of elements involved that is a kind of magic.  :-/O

Online T3sl4co1l

  • Super Contributor
  • ***
  • Posts: 21673
  • Country: us
  • Expert, Analog Electronics, PCB Layout, EMC
    • Seven Transistor Labs
Re: Different die pictures
« Reply #183 on: January 30, 2022, 05:44:49 pm »
Aha, figured it would have to be. :D

Yeah, the processes, what we can do these days, is incredible!

Tim
Seven Transistor Labs, LLC
Electronic design, from concept to prototype.
Bringing a project to life?  Send me a message!
 

Offline NoopyTopic starter

  • Super Contributor
  • ***
  • Posts: 1731
  • Country: de
    • Richis-Lab
Re: Different die pictures
« Reply #184 on: March 03, 2022, 08:41:15 pm »


Let´s take a look into a NFC credit card.


Some paint stripper and the credit card dismantels into three plastic sheets. The material swells up a little.


The chip of the card is fixed in the upper sheet.

The NFC antenna is located in the middle. The three windings are located so stamping the numbers and characters doesn´t damage the wire.


The antenna winding forms two meander. In this area two small plates connect the chip with the antenna. I assume the meander are just for tolerance compensation.


Under the electrodes of the card there is the chip connected with seven bondwires. Five wires connect the electrodes and two wires contact the antenna through kind of a frame structure.


The die is 2,7mm x 1,9mm x 0,15mm. The whole area is covered with a uniform metal structure. On the left side there are four testpads and nine bondpads. In this area the structures are a little thicker. I assume there are protection structures, power supply and the transceiver.


Unfortunately the structures are a little small. It looks like 041, NXP and 2016. But I´m not sure with the last two.


A closer look reveals that the stripes of the metal layer are connected with the lower structures in a regular way. Under the metal layer you can see another layer. It consists of parallel stripes too but they are rotated by 90°.

This is a common protective feature. The uniformly structured metal layer prevents simple optical analysis of the circuit. Since the individual lines are electrically connected to the circuit, it is not possible to remove the metal layer without destroying the circuit. It is possible to create small openings and reconnect the leads around them, but this process is quite complex and time-consuming, especially if you want to contact multiple potentials.


https://www.richis-lab.de/transponder03.htm

 :-/O
 
The following users thanked this post: SeanB, RoGeorge

Online T3sl4co1l

  • Super Contributor
  • ***
  • Posts: 21673
  • Country: us
  • Expert, Analog Electronics, PCB Layout, EMC
    • Seven Transistor Labs
Re: Different die pictures
« Reply #185 on: March 03, 2022, 09:22:37 pm »
I wonder if they also get some bypass capacitance from the array of metal stripes (and probably layers too?)?  Should be handy for the self-powered NRC mode. :)

Tim
Seven Transistor Labs, LLC
Electronic design, from concept to prototype.
Bringing a project to life?  Send me a message!
 

Offline NoopyTopic starter

  • Super Contributor
  • ***
  • Posts: 1731
  • Country: de
    • Richis-Lab
Re: Different die pictures
« Reply #186 on: March 04, 2022, 04:19:02 am »
That´s definitely possible!  :-+

Offline NoopyTopic starter

  • Super Contributor
  • ***
  • Posts: 1731
  • Country: de
    • Richis-Lab
Re: Different die pictures
« Reply #187 on: March 17, 2022, 10:33:22 am »


The Sega Virtua Processor (SVP) is a DSP Sega integrated in one game cartridge of the Mega Drive system. A normal game cartridge contains just a ROM with the game data. For the game Virtua Racing Sega integrated the SVP to support the console by rendering polygons.

The SVP is marked with the SEGA logo and the numbers 315-5750. The package is a TQFP with 120 pins. Beside the SVP there is the game ROM (IC2, right side) and a 128kB RAM (IC3, left side).

You can find a lot of information about the functionality of the SVP here at Github: https://github.com/jdesiloniz/svpdev


Internet says the SVP is a rebranded Samsung SSP1601 DSP. Since the SSP1601 sits in a package with 68 pins the SVP is clearly not just a rebranded SSP1601.


The die of the SVP is 8,0mm x 7,6mm. Here you can find a higher resolution (16.312 x 15.632, 55MB): https://www.richis-lab.de/images/GraKa_S3/05x02xlarge.jpg


There is a Samsung copyright dating back to 1993.

SEGA160FS seems to be the internal naming of the chip. "160" because of the SSP1601?

It looks like this name is in two different masks, perhaps two metal layers or a metal layer and a via mask. As we will see later on it looks like the SVP is based on a standard design that can be used for different applications.


Some test structures...


The package has 4*40 pins. The die has 2*58 and 2*56 bondpads. 42, 44, 44 and 46 bondpads were contacted with bondwires. Some of the supply pins were connected with more than one bondpad.


With the help of the layout you can identify the role of most of the pins.


The supply bondpads are connected to the die more heavily than the normal I/Os. Some are connected to the frame structure conducting supply around the edges (95, 92). Some supply bondpads conduct current into the middle of the die.


There are some non-contacted bondpads. These bondpads are not connected to the rest of the circuit either. In the same way, there are also unused I/O structures. This makes me assume that the die is based on a rather universal design.

The active bondpads are connected to the frame structure with two wide lines and one narrow line. The two wide outer frames contain the output drivers. Most likely, these areas serve as protection structures for inputs too.

Further inside the chip there run additional supply lines within which two logic lines are integrated. It is noticeable that there are only two variants of these logic structures. The right variant is very simple and has only one control line. The left logic is more complex and is connected with more lines. Looking at the use of the individual I/Os one can speculate that the larger variant is kind of a latch for synchronized reading and buffering the logical state of the pin.


The RAM and ROM address lines for example are controlled by the simple outputs. The pins that have to read data lines on the other hand are equipped with the extended logic structures (white diamonds).

Apart from the supply lines, deviating structures can only be found in the area of the clock conditioning. There we have two lines connecting the circuit directly with two bondpads (green).


...
 
The following users thanked this post: SeanB, RoGeorge

Offline NoopyTopic starter

  • Super Contributor
  • ***
  • Posts: 1731
  • Country: de
    • Richis-Lab
Re: Different die pictures
« Reply #188 on: March 17, 2022, 10:34:28 am »


The different structures of the various function blocks quickly give a rough overview of the structure of the SVP. The I/Os extend over all four edges (cyan). At the upper edge there is a small circuit (green), where the device probably generates its clock.

The DSP can clearly be identified because of its different but in itself again regular structures (red). Directly connected to the DSP is a large memory with the typical regular structure (pink). As will be shown, there are two SRAM areas with 256*16Bit of memory each.

In the upper right corner of the die there is a ROM (yellow). It consists of two areas with 1kB each. In this memory there are for example basic instructions. In the upper left corner there is another SRAM with a capacity of 2kB (blue).

In the free area between the large function blocks there are gatearray structures (white). This gatearray contains the logic that connects the individual function blocks with each other, with the external components and the game console. The large area suggests that there are quite some function integrated into the gatearray.


In some areas of the gatearray you can see the standard cell structure interconnected with probably two metal layers.


The area at the top edge probably provides the clock for the SVP. It contains relatively large elements. The circuit is directly and exclusively connected to an external capacitor via two pins. A special clock feed from the game console is not visible. It is quite conceivable that this is an oscillator, via which the SVP generates its own working clock. Perhaps the DSP could even be overclocked by changing the value of the external capacitor or the surrounding components.


The ROM in the upper right corner is considerably smaller than the RAM. That´s because such a mask programmed ROM generally consists of just one Transistor while a SRAM generally needs six transistors.


The structures are very small, but you can estimate the memory size. The structure is similar to the MK37092 mask ROM (https://www.richis-lab.de/ROM02.htm) although here it seems that the line selection takes place at the side and the data is outputed at the lower edge.

Between the two memory blocks several control signals are fed from below (white). From there 4+2 control signals each lead to the left and to the right memory block (red). On the inside of each memory block 64 control signals are generated and a single line is activated (red). Each of the two memory blocks feeds eight data lines (yellow) independently of the other area. 12 control signals (green) allow to select one of 18 columns to each of the data lines. In total, this results in a 2kB memory.


The SRAM in the upper left corner of the die consumes a lot of area. At the upper edge of the memory area there is a 32Bit wide data interface (green). Four control lines connect each data line to one of eight columns of the memory area (blue/cyan). Seven control lines arrive from the right side. At this edge there is a circuit that selects one of the 64 rows. Altogether this results in a memory size of 2kB.

In the row selection, you can just make out the differently placed vias that allow addressing a single row. The individual memory cells can only be guessed.


Here you can see the DSP itself. There is also a high resolution picture (4.416 x 4.572, 4MB): https://www.richis-lab.de/images/GraKa_S3/05x23xlarge.jpg


The datasheet of the SSP1601 states that the DSP itself is 3,6mm x 2,4mm. That is exactly the size we see in the SVP.


You can´t identify every part of the DSP but there is a 32Bit-ALU and the 16*16-Mulitplier.

It looks like the SRAM has the same size as stated in the SSP1601 datasheet.

The not marked areas could contain some or all of the other circuits mentioned in the block diagram.


The ALU with 32 elements.


The 16*16 multiplier has a nice uniform square structure.


The structures of the DSP SRAM are as small as the structures of the SRAM in the upper left corner but it is still big enough to determine the size.


Each of the two SRAM blocks is divided into two areas. Between the areas is the the line selection circuit (yellow). You can see 32 similar small circuits. They probably control 64 lines. It´s very likely the memory density is the same as in the other SRAM block.  The control lines for the row selection run from the upper right corner of the memory down the right side and to the row selection circuit. Each of the four memory areas contains 32 columns (cyan). These columns are merged into four times 8 data lines (green). This results in a total of 1kB of memory.


https://www.richis-lab.de/GraKa05.htm

 :-+
« Last Edit: March 20, 2022, 08:35:04 am by Noopy »
 
The following users thanked this post: SeanB

Offline NoopyTopic starter

  • Super Contributor
  • ***
  • Posts: 1731
  • Country: de
    • Richis-Lab
Re: Different die pictures
« Reply #189 on: March 20, 2022, 05:31:29 am »
A small update:
I was wrong with counting!
The SRAM in the upper left corner of the die is 2kB. That´s interesting because with the correction this SRAM is more dense than the SRAM of the DSP. Perhaps the they used a different cell structure for the DSP.  :-//

Pictures have been updated...
« Last Edit: March 20, 2022, 07:20:50 am by Noopy »
 

Offline NoopyTopic starter

  • Super Contributor
  • ***
  • Posts: 1731
  • Country: de
    • Richis-Lab
Re: Different die pictures
« Reply #190 on: March 20, 2022, 08:08:42 am »
Second update (sorry, sometimes it´s work in progress):

Now with the bigger SRAM in the upper left corner I will state that the DSP-RAM is 1kB as written in the SSP1601 datasheet.
I´m not sure with the line selection of the DSP-RAM but it makes no sense the DSP-RAM is much less dense than the other SRAM. I thought the number of the control lines make it impossible to control more than 512B but that is wrong.  ::)


I have update the pictures and the text above. If you still see 1kB and 512B you have to hit F5 and clear your cache.  :-/O
« Last Edit: March 20, 2022, 08:38:27 am by Noopy »
 

Online T3sl4co1l

  • Super Contributor
  • ***
  • Posts: 21673
  • Country: us
  • Expert, Analog Electronics, PCB Layout, EMC
    • Seven Transistor Labs
Re: Different die pictures
« Reply #191 on: March 20, 2022, 09:32:34 am »
I wonder at what level they prefer to make modifications.  Maybe it's already synthesized as a block so why screw with it.  Would require more work, change timings, etc.?  (I wonder how slow synthesis/placement was, back in those days?)  Guess it's also possible that it's faster or something, though that should scale the other way so maybe it's just those reasons.  Oh, or conversely, if the added stuff needs to be faster to keep timing, avoiding a wait state or two kinda thing.

Tim
Seven Transistor Labs, LLC
Electronic design, from concept to prototype.
Bringing a project to life?  Send me a message!
 

Offline NoopyTopic starter

  • Super Contributor
  • ***
  • Posts: 1731
  • Country: de
    • Richis-Lab
Re: Different die pictures
« Reply #192 on: March 20, 2022, 01:08:46 pm »
I thought they perhaps would have reduced the RAM because it consumes a lot of area and it can be modified most easily.
But it's more likely that they integrated the DSP core as it was.

Offline NoopyTopic starter

  • Super Contributor
  • ***
  • Posts: 1731
  • Country: de
    • Richis-Lab
Re: Different die pictures
« Reply #193 on: March 23, 2022, 04:25:39 am »


Neutron Mikroelektronik Nµ 701.17B, another decoder asic for model railroads.


The die is 3,2mm x 1,7mm. Most of the area is covered with a logic array. Around that there are the input and output bondpads and circuits. In the left upper and in the right lower corner you can find the supply bondpads and wires.


Nµ 701.17B is built by Neutron Mikroelektronik. The internal name seems to be E70117B.


There is a teststructure where you can see the masks used. G is obviously the metal layer. There is a H in the metal square. That´s probably the mask that generates a window in the passivaton where you want to bond your wire. F could be a via. U could be the mask to form the active area like the T structure we can see here. D could be the polysilicon for the gate electrodes.


Standard logic in the middle of the die.


The functions of most I/Os are known. There is a crystal (XTAL), a data input (DATA), four inputs that make it possible to tell the chip the adress he should listen to. PWM is the output for a halbbridge or H-bridge that can drive the motor of the locomotive. There are outputs for head and tail lamps (LV/LH). EN is an enable input which tells the chip if it is used in a digital or an analog system. The digital system uses a higher supply voltage that is fed to the pin through a zener. We don´t know how pins 3 and 4 are used. One is an input, one is an output.


Here we have the oscillator.


I don´t know what that circuit is doing. It´s connected to Vcc and Vdd and there is one wire leading to the logic.
Perhaps a supply for load transistors in the logic?
Perhaps a supply for the highside output transistors (NMOS)?
 :-//


Here we have an input (3). The small circuit on the left generates a differential signal. The bigger parts are probably input protection.


The adress inputs are a little more delicate and there are more wires connecting it. Perhaps a threshold adjustment or a Pull-Up current?


Here we have a push-pull output used for the lights and the additional output. The output for the halfbridge use just a highside transistor. The external halfbridge has to use NPNs.


Between the push-pull outputs of the lights there is an additional circuit probably making it possible to read the status of the pad.


https://www.richis-lab.de/loco04.htm

 :-/O
 
The following users thanked this post: SeanB, RoGeorge

Offline NoopyTopic starter

  • Super Contributor
  • ***
  • Posts: 1731
  • Country: de
    • Richis-Lab
Re: Different die pictures
« Reply #194 on: March 30, 2022, 09:58:54 am »


A lot of people use the ATmega328 with a Arduino board. It is a 8Bit-µC with a nice set of IOs and bus interfaces.

The ATmega328P is the "Picopower" variant of the ATmega328 which consumes less power.


The die of the ATmega328P is 2,97mm x 2,95mm. There are 32 bondpads. All of these were connected with a bondwire. The two big frames around the die edges conduct the supply current.

The massive metal plate in the upper area contains memory. Left of this memory and in the lower right corner there are some bigger block, probably analog circuitry and house keeping. In the lower area you can see some logic.


The structures are quite small. But I´m still proud of the performance of my low cost equipment.


Here we have the ATmega328PB, the next generation. While the 328P was just a small improvement to the 328, the 328PB is a completely new µC. It has some more IOs and internal ressources but you can use the 328PB as a drop in replacement (of course it has a different device ID).


Although the ATmega328PB contains quite some more ressources the die is a little smaller: 2,42mm x 2,83mm

There are four unused bondpads. It looks like they are connected to the neighbouring bondpads with thick traces. Perhaps this is a possibility to connect the supply with more bondwires.


Just a small Atmel-Logo.


https://www.richis-lab.de/uC01.htm

 :-/O
 
The following users thanked this post: SeanB, RoGeorge

Online T3sl4co1l

  • Super Contributor
  • ***
  • Posts: 21673
  • Country: us
  • Expert, Analog Electronics, PCB Layout, EMC
    • Seven Transistor Labs
Re: Different die pictures
« Reply #195 on: March 30, 2022, 05:05:15 pm »
That's not combined Flash and SRAM into the same grid is it?  1k EEPROM, 2k SRAM and 32k Flash, let's see, 16 column arrays is the Flash (16-bit words), maybe the shifted area is the boot section (which can be erased separately from the rest depending on fuse settings).  Would the pink (salmon) area be enough for SRAM?  It's not hidden among the random logic stripes, is it?

Interesting that there doesn't appear to be a dedicated core area.  I wonder if they synthesize/layout these fairly flattened and just let it go wherever?

Only analog stuff I think should be: RC timer, EEPROM/Flash erase supply charge pump, ADC, comparator, and I suppose BOD, POR, and maybe the I2C pins have special input thresholds.  And crystal pins of course.  Of which, I suppose the ADC and charge pump likely take the most area, and most of the rest might not even be visible?

Haven't looked at the -PB, that's pretty crazy, is that an IO mux routed around the periphery?  Maybe using an extra metal layer or two?  Sheesh!

The AVR-DA I've been playing with lately, must be even more dense; IO routing isn't so intense, but the "event" system allows routing internal signals in quite diverse ways, between peripherals, and any input pin (but not to any output).  And many more peripherals.  They mention in passing, some kind of internal regulator; they must be using a fine-pitch / low-voltage core for a lot of that internal logic (while interfacing it to 5V IOs).  Crazy!

Tim
Seven Transistor Labs, LLC
Electronic design, from concept to prototype.
Bringing a project to life?  Send me a message!
 

Offline NoopyTopic starter

  • Super Contributor
  • ***
  • Posts: 1731
  • Country: de
    • Richis-Lab
Re: Different die pictures
« Reply #196 on: March 30, 2022, 06:39:23 pm »
That's not combined Flash and SRAM into the same grid is it?  1k EEPROM, 2k SRAM and 32k Flash, let's see, 16 column arrays is the Flash (16-bit words), maybe the shifted area is the boot section (which can be erased separately from the rest depending on fuse settings).  Would the pink (salmon) area be enough for SRAM?  It's not hidden among the random logic stripes, is it?

Here you can find a delayered picture: https://www.reddit.com/r/electronics/comments/hrweju/delayered_atmega328p_silicon_die_the_hydrofluoric/
The SRAM is hidden under in the lower left corner of the big memory area.


Interesting that there doesn't appear to be a dedicated core area.  I wonder if they synthesize/layout these fairly flattened and just let it go wherever?

Yeah, that´s puzzling.  :-//


Only analog stuff I think should be: RC timer, EEPROM/Flash erase supply charge pump, ADC, comparator, and I suppose BOD, POR, and maybe the I2C pins have special input thresholds.  And crystal pins of course.  Of which, I suppose the ADC and charge pump likely take the most area, and most of the rest might not even be visible?

I agree with you, ADC and charge pump probably consume a lot of the area.  :-+


Haven't looked at the -PB, that's pretty crazy, is that an IO mux routed around the periphery?  Maybe using an extra metal layer or two?  Sheesh!

The AVR-DA I've been playing with lately, must be even more dense; IO routing isn't so intense, but the "event" system allows routing internal signals in quite diverse ways, between peripherals, and any input pin (but not to any output).  And many more peripherals.  They mention in passing, some kind of internal regulator; they must be using a fine-pitch / low-voltage core for a lot of that internal logic (while interfacing it to 5V IOs).  Crazy!

That´s really fancy stuff!  8)

Online T3sl4co1l

  • Super Contributor
  • ***
  • Posts: 21673
  • Country: us
  • Expert, Analog Electronics, PCB Layout, EMC
    • Seven Transistor Labs
Re: Different die pictures
« Reply #197 on: March 30, 2022, 10:26:17 pm »
Ah, sweet!  Probably several metal layers then.  Then I'd guess the core is the bottom random-logic area, and the peripherals are around.

Tim
Seven Transistor Labs, LLC
Electronic design, from concept to prototype.
Bringing a project to life?  Send me a message!
 

Offline NoopyTopic starter

  • Super Contributor
  • ***
  • Posts: 1731
  • Country: de
    • Richis-Lab
Re: Different die pictures
« Reply #198 on: May 06, 2022, 03:15:04 am »


I have one more decoder ASIC for model railroads, the Neutron Mikroelektronik Nµ 701.17B.


The die is 4,7mm x 3,2mm.


Neutron Mikroelektronik 70140A  :-+


Some numbers and letters... You can find the same structures in a Siedle house intercom (Nµ 701.30C): https://www.richis-lab.de/Siedle.htm#Zeichen


Nice!  8)


A lot of potentials are connected to test squares in the upper metal layer.


The function of the different pins is mostly known. The module is supplied via Vcc and GND. The supply is the rectified track voltage (18V). Besides a Power-GND there is a Signal-GND. The data inputs DATA1 and DATA2 are directly connected to the rail.

The function of pin MP is unclear. Pins A1 to A4 are setting the address to which the device should respond. For this purpose, the pins are either connected to GND or to the internal 5V. PWM4 provides a clock signal, which probably can be used for a sound generator. With "Config" apparently different functions can be configured. MotC1, MotC2 and MotC3 allow to influence the driving behavior of the locomotive.

PWM1, PWM2 and PWM3 are the outputs that directly drive the locomotive's BLDC motor. Rotor position feedback is provided by three Hall switches that are powered by an internal 12V potential. Instead of integrating three inputs for the three Hall switches, the switches connect different resistors into a voltage divider. The voltage generated this way is then applied to the HALL pin.

Besides the three output stages for the BLDC motor, the module provides two outputs for the front and rear lighting and the four additional output stages F1, F2, F3 and F4.

On the die some circuit parts can be identified without problems, in other areas one can just guess...

...
 
The following users thanked this post: SeanB, RoGeorge

Offline NoopyTopic starter

  • Super Contributor
  • ***
  • Posts: 1731
  • Country: de
    • Richis-Lab
Re: Different die pictures
« Reply #199 on: May 06, 2022, 03:18:29 am »


At the top edge of the die, there is a structure that appears to be the 5V voltage regulator. The larger block in the middle seems to be the actual linear regulator.

The large element to the right of the voltage regulator appears to be an overcurrent protection. It is interesting to note that not only the 5V pin is monitored but also the internal circuits supplied with 5V. From the 5V bondpad, three wide lines distribute the potential throughout the chip, where it is also used by the small output stages F1-F4.


The output that supplies the Hall switches with round about 12V has a similar large structure as the 5V voltage regulator, probably that is a second voltage regulator. The additional higher voltage besides the 5V supply is probably necessary to implement the functions behind it as trouble-free as possible (Hall switch voltage divider, motor controller configuration).

On the left side of the picture you can see a typical input protection structure.


The signal ground is distributed by five wide lines.


The communication between the control unit and the locomotives is done by reversing the polarity of the track voltage. The track signals are fed into the circuit at the upper edge of the die, but the frontend of the input is located at the lower edge.

The two signals contact an area on the right and left where there is a resistor meander (cyan). In the middle the resistor is connected to the reference potential (black). The left half represents a voltage divider which reduces the voltage of one of the track potentials. Near the reference potential there are eight contacts leading to four structures (red). These are most likely comparators. From there, eight signals lead to the logic area. Probably several switching thresholds ensure here disturbances are not interpreted as a level change. Within the quite simple logic, the switching of the comparators can be monitored relatively well, whereas more complex filter functions are hard to integrate.

The second track potential leads into a similar voltage divider in the right area. From this voltage divider several lines lead into the left area. Apparently, the circuitry ensures that when the polarity on the track changes, the comparators are first driven in one direction and then in the other. This sequence should suppress disturbances very efficiently.


The left area of the dies seems to contain mainly analog circuit parts.


The input that reads the state of the Hall switches leads to two larger blocks. One structure seems to represent a kind of simple analog-to-digital converter. You can see a long, wound resistor on the left, like with the data input. Five taps lead to five identical circuits, which could be comparators. Thus, as the voltage increases, the individual comparators would switch in sequence and one can roughly determine the applied voltage. At the bottom left, five signals leave the circuit section, most likely representing the data bus.

In combination with the external voltage divider, whose lower resistance is varied by the three Hall switches, one can evaluate which Hall switch is active. Three Hall switches generate six different voltage levels, which can be sufficiently resolved with five comparators.


A second, relatively large block is connected to the Hall input. In it, among other things, there are four large transistors. These could be current sinks, which can realise a measuring range switching.


In the left area of the die there seems to be some kind of current limiting for the BLDC output stages. The potentials of six shunts are led there from the right side of the die.


The typical logic area.


On the left side of the logic area there is an additional circuit...  :-//


That looks like some test structures.


The right area of the die is occupied by the three large push-pull output stages, which act as a B6 bridge to drive the BLDC motor. To the left of the output stages are the three predrivers.


Each of the light output stages contain one lowside transistor. The block to the right seems to be a freewheeling diode. On the left between the two light output stages a circuit has been integrated, which could be a shared overcurrent shutdown according to the optical appearance.

The additional outputs are equipped with much smaller output stages. Each output stage is connected with three lines. Probably the status of the pins can be read back.


The MP pin uses a similar output stage as the other small outputs.


https://www.richis-lab.de/loco05.htm

 :-/O
 
The following users thanked this post: SeanB, RoGeorge

Offline MegaVolt

  • Frequent Contributor
  • **
  • Posts: 917
  • Country: by
Re: Different die pictures
« Reply #200 on: May 06, 2022, 09:44:36 am »
 

Online magic

  • Super Contributor
  • ***
  • Posts: 6778
  • Country: pl
Re: Different die pictures
« Reply #201 on: May 06, 2022, 10:12:09 am »
Instagram has to be the worst site on the planet for hosting such pics. Rubbish quality and constant signup nag screens :--
 

Offline NoopyTopic starter

  • Super Contributor
  • ***
  • Posts: 1731
  • Country: de
    • Richis-Lab
Re: Different die pictures
« Reply #202 on: May 20, 2022, 07:40:18 pm »


Texas Instruments PGA411, a very special IC. It´s a resolver interface but you can´t buy it any more. Ti says it´s now a custom part covered by a NDA.


In the reference design TIDA-00363 Texas Instruments shows a typical application. The rotor position sensor (resolver) is kind of a small generator that is driven by the shaft of a synchronous motor. The output signals provide the current position and speed of the rotor, which makes it easier to control the motor.

The stator of the rotor position sensor contains two coils arranged at a 90° angle. The rotor is fed with a sinusoidal signal. This can be done with slip rings or, as shown here, inductively. Especially an inductive feed results in a very robust system compared to an optical sensing of the rotor position. The output signals of the resolver are called SIN and COS. These make it possible to determine the speed and the direction of rotation of the motor.

The PGA411 supplies the resolver and interprets the output signals, which can be quite complex.


The datasheet of the PGA411 contains a block diagram that shows a bit more details of the device. In the left area is the boost converter, which generates a higher voltage for the excitation of the rotor position sensor. The excitation circuit in the lower left corner consists of two amplifiers driven by a DAC.

In the upper right area, the excitation signal as well as the SIN and COS signals are preprocessed.

In the center is the control unit which operates with a 20MHz oscillator. It supplies the signals for the exciter control and evaluates the preprocessed SIN/COS signals. Especially the evaluation and processing of the SIN/COS signals are much more complex than shown in this block diagram. Each circuit block is equipped with diagnostic functions.


The edge length of the die is 4,2mm. Very little detail is visible as the free areas of the upper metal layer are filled with a dummy structure.


In the lower left corner a small area is cut out in the upper dummy structure. It seems like there is no functional structure. It is not clear what the purpose of this opening is. It does not appear to have any particular shape. However, it can be seen that the underlying metal layer is also filled with dummy structures. Both structures are arranged with different angles.

Such dummy structures optimize fabrication because each area on the IC has approximately the same metal density and processing operations have a correspondingly uniform effect. Furthermore the dummy structures make optical analysis of the circuit more difficult and thus protect the know-how integrated in it.


Distributed over the area of the die are several testpads the size of the bondpads (top of image) but there are also relatively small squares that most likely allow additional signals to be contacted with increased effort (bottom of image).


The PGA411 at hand here was defective. Quite obvious damage is found at pin ORD9 of the parallel output interface. The small wire is partially melted and another path of destruction stretches to the frame structure.


Some elements can be seen despite the dummy structures because the top metal layer serves to pass higher currents. At the left edge of the PGA411 are the pins of the switching regulator which supplies the driver of the rotor position sensor. In this area, there are correspondingly wide lines, which certainly contact the power transistors underneath.


At the lower edge there are the outputs that lead to the rotor position sensor. Two large symmetrical structures can be found there. The power transistors in this area must have a certain size, since they output a sinusoidal signal and operate accordingly in linear mode which leads to higher losses.


https://www.richis-lab.de/RLG01.htm

 :-/O
 
The following users thanked this post: SeanB, brabus, RoGeorge

Offline brabus

  • Frequent Contributor
  • **
  • Posts: 326
  • Country: it
Re: Different die pictures
« Reply #203 on: May 21, 2022, 09:00:19 pm »
They REALLY wanted to keep their know-how protected inside this part. Noopy, hervorragend as always! :-+
 
The following users thanked this post: Noopy

Offline capt bullshot

  • Super Contributor
  • ***
  • Posts: 3033
  • Country: de
    • Mostly useless stuff, but nice to have: wunderkis.de
Re: Different die pictures
« Reply #204 on: May 22, 2022, 12:21:09 pm »
There's no big secrets in how to convert a resolver signal to digital. Here's an unsorted bunch of papers I've collected:
https://cb.wunderkis.de/wk-pub/resolver/
There's some papers within that pile that describe the more complicated "loop" method to convert a resolver to digital, and there're articles about the growth and use of synchros/resolvers in aerospace and military.

Anyway, in industrial applications (at least to my knowledge), resolvers are converted the most simple and forward way: Just measure the amplitude of the sine and cosine output and do the math (atan2() in particular) to get the position.

So I'm not sure what's the market of this PGA411, it would be too expensive for a typical industrial application.
« Last Edit: May 22, 2022, 12:23:49 pm by capt bullshot »
Safety devices hinder evolution
 

Online mawyatt

  • Super Contributor
  • ***
  • Posts: 3254
  • Country: us
Re: Different die pictures
« Reply #205 on: May 22, 2022, 12:36:03 pm »
The "fill" is a common technique in more modern CMOS processes, it helps keep the surface layer planar during processing in areas with sparse surface features.

Best,
Curiosity killed the cat, also depleted my wallet!
~Wyatt Labs by Mike~
 

Offline NoopyTopic starter

  • Super Contributor
  • ***
  • Posts: 1731
  • Country: de
    • Richis-Lab
Re: Different die pictures
« Reply #206 on: May 22, 2022, 12:57:22 pm »
There's no big secrets in how to convert a resolver signal to digital. Here's an unsorted bunch of papers I've collected:
https://cb.wunderkis.de/wk-pub/resolver/
...

Thanks for the link!  :-+

Well of course it's no rocket science but it looks like there is some complexity:
https://www.kollmorgen.com/en-us/developer-network/resolver-auswertung-uber-fpga-mit-delta-sigma-technologie/

And in the PGA411 they have integrated some circuits you otherwise would have to put on your board.

If that is/was good enough for the price... I think it depends...  :-//


The "fill" is a common technique in more modern CMOS processes, it helps keep the surface layer planar during processing in areas with sparse surface features.

Yes, planarity is a point too, thanks!  :-+
But it's also important to get an even processing while etching for example, isn't it?

Offline capt bullshot

  • Super Contributor
  • ***
  • Posts: 3033
  • Country: de
    • Mostly useless stuff, but nice to have: wunderkis.de
Re: Different die pictures
« Reply #207 on: May 22, 2022, 01:53:37 pm »

Well of course it's no rocket science but it looks like there is some complexity:
https://www.kollmorgen.com/en-us/developer-network/resolver-auswertung-uber-fpga-mit-delta-sigma-technologie/


Thanks, interesting reading too.

BTW: If you scroll it down to the end, one finds a name that made me grin "Jens Onno Krah" - most probably well known in the automation industry. My former boss handled this name with great respect, at least ;)
To me it looked more like a guy trying to introduce more and more complexity into this industry using his favourite toy: FPGA. In his papers he always used FPGA to bring some complex method into the control loop and associated elements, the audience going "wow, looks what they've done". Never seen his results been integrated into a final product of the company I worked for. Otherwise, the "Observer" from that paper indeed can be a standard element in the control loop of a servo drive.

Quote
And in the PGA411 they have integrated some circuits you otherwise would have to put on your board.

Yes, e.g. the excitation amplifier that would be an example. Anyway, I don't think the TI chip is greatly different from e.g. an AD2S210 (https://www.analog.com/en/products/ad2s1210.html) or similar. That fancy stuff from people like Prof. Krah seldom ends up in an commercial integrated circuit.

Safety devices hinder evolution
 

Offline NoopyTopic starter

  • Super Contributor
  • ***
  • Posts: 1731
  • Country: de
    • Richis-Lab
Re: Different die pictures
« Reply #208 on: May 22, 2022, 06:34:24 pm »
There are a lot of fancy ideas und inventions that aren´t really useful in real life... ...or are too expensive, what is almost the same.  ;D

Would be interesting to know why TI now sells the PGA411 just with an NDA.  :-//

Offline NoopyTopic starter

  • Super Contributor
  • ***
  • Posts: 1731
  • Country: de
    • Richis-Lab
Re: Different die pictures
« Reply #209 on: May 27, 2022, 03:15:30 am »


Here we have an old calculator-on-a-chip, a CZL-550 sold by General Instrument Microelectronics.

There was a epoxy CZL-550 too. Unfortunately I have found no datasheet.


That´s a picture from the Science Museum Group (https://collection.sciencemuseumgroup.org.uk/objects/co63204/a-sectioned-sinclair-executive-pocket-calculator-1972-electronic-calculators). Here you can see the Sinclair Executive pocket calculator used the CZL-550. Different controllers were used in this calculator.


There is a schematic in the "Elektronisches Jahrbuch 1977" were you can see a typical application. Besides voltages supply and clock generator you just needed a segment driver.


The package is quite interesting. The chip carrier and pins are embedded in a ceramic. Above that is a metal cover and another metal plate that closes the compartment where the chip is. The pins have unusual notches. Perhaps they helped bending the leadframe during production.


The die is 3,4mm x 3,3mm.

You can download these two pictures in high-res:
https://www.richis-lab.de/images/calc/02x06x.jpg (76MB)
https://www.richis-lab.de/images/calc/02x05x.jpg (84MB)


There is some interesting information on the bottom edge of the die. The design dates back to 1972. Apparently, five masks of a revision G were used. On the far right there are the letters GI, which stand for General Instrument. 76251 could be an internal project designation.

Very interesting is the name PICO1. The PICO1 was one of the first single chip pocket calculators and therefore also one of the first microcontrollers. The PICO1 was developed by Pico Electronics, a spin-off of General Instrument. The symbol on the left could represent a P and an E. General Instrument sold the PICO1 under the name GI250.

According to Wikipedia, the PICO1 was still drawn by hand with a magnification factor of 500. This corresponds to an area of 1.75m x 1.75m.


Further information about the PICO1 can be found at http://www.spingal.plus.com/micro/ (available via archive.org). There is also an image of the die. Although the resolution is very low, it is easy to see that the structures are very similar. In fact, there are no differences in this level of detail.


The annotatinos on the PICO1 are shown in a slightly higher resolution. There you can find the year 1971 and the mask revision E. The number sequence in the right area is 76250.

It seems to the CZL-550 there were just cosmetic changes compared to the PICO1.


Structures are integrated in all four corners to check the alignment of the masks and the quality of the manufacturing processes.


A test structure is integrated at the left edge of the dies. The left test pad contacts the substrate. The actual test structure seems to consist of two transistors. The substrate serves as the source contact. On the left is a normal MOSFET where the metal layer is the gate electrode. The thin gate oxide creates a depression in the metal layer.

On the right, there appears to be a MOSFET with the gate electrode resting on the thick silicon oxide layer as found on the rest of the dies. The threshold voltage of such a MOSFET is usually too high to use it in the circuit. However, this feature is desirable at the same time, since it prevents the metal layer from unintentionally shorting lines in the silicon. In addition such transistors are often used as ESD protection at the inputs.


With the schematic above you can assign the bondpads to their functions. Just two contacts remain unclear.


[...]

 
The following users thanked this post: SeanB, Gyro, RoGeorge

Offline NoopyTopic starter

  • Super Contributor
  • ***
  • Posts: 1731
  • Country: de
    • Richis-Lab
Re: Different die pictures
« Reply #210 on: May 27, 2022, 03:16:33 am »


The Uss pin contacts the chip carrier before it is connected with the Uss bonpad.


At the bondpad in the lower right corner there is a cutted wire. Whether this was done intentionally or the line was damaged during production cannot be said with certainty.


Underneath the bondpads you can spot a protective structure (red), which is contacted at the upper end of the bondpad (green). The whole structure represents a MOSFET with a thick gate oxide. When a problematic voltage pulse occurs, the structure becomes conductive, connecting the bondpad to the Uss potential and thus draining the pulse.


In the magazine "Radio Electronics" July 1974 there is a block diagram showing how a pocket calculator of this generation is constructed. The core of the microcontroller is the ALU which can perform addition, subtraction and shift operations. More complex calculations such as multiplications and divisions must be broken down to these operations.

A ROM contains the code necessary to control the system. A RAM provides the memory necessary to store the currently entered numbers, a constant, an intermediate result, and the end result.

The data is output via a BCD/7-segment decoder.


One part of the circuit that can be analyzed very well is the BCD/7-segment decoder. It consists of two blocks. The right block is differentially fed with the four BCD signals. In the matrix the distribution of the gate oxide areas ensures that one of the horizontally running lines becomes active depending on the BCD signals. Each line represents a number.

In the left block, the gate oxide areas are distributed in the horizontally running conductors in such a way that each of the numbers activates the appropriate segments of the display (A-G).

Each segment control line is connected to a pull-up structure and to a output driver. Some drivers are connected to Uss by connecting the frame structure.


In the upper right area of the die is the ROM, which contains the control logic and takes up a lot of area. It is noticeable that the memory is not a square.

The upper area contains the column selection, which activates one out of 72 columns. On the side the rows output the necessary control signals. The upper rows seem to be partially coupled back to the column selection.


The distribution of the gate oxide areas represents the programm logic.


The already mentioned magazine "Radio Electronics" July 1974 shows the typical structure of the RAM in such a calculator. According to this, there are usually four shift registers which hold the four BCD signals. Each column in these four shift registers represents one digit. In addition, there are places for additional information such as sign and overflow.

The data passes through the shift registers continuously. This is necessary because it is usually DRAM that must be updated cyclically so that the information doesn´t degrade.


The RAM memory has 11 lines. In addition to the 8 digits of the display, there are consequently 2 bits left for sign and overflow. One bit must remain free so that the information can rotate in the shift register without additional intermediate memory.

The columns probably represent 3 groups of 4, representing 3 BCD numbers. We can assume that these are the memory areas for the current input, the subtotal and the result.

On the far right, there remains just one column with 9 individual memory cells. There the optional constant must be stored.  :-// The constant can only be used for multiplications and divisions. These operations are performed differently than additions and subtractions. Probably that is why they are stored as binary numbers. In addition, the possible number range does not have to be very large.


The individual memory cells are 3T1C cells, which are constructed with three transistors and a capacitor. The capacitor is just a slightly wider line in the silicon. It controls the transistor T_cell. In contrast to a 1T1C RAM like the U2164 (https://www.richis-lab.de/RAM02.htm), a 3T1C RAM has the advantage that a read operation does not erase the memory contents.

When configured as a shift register, the 3T1C configuration has another advantage. For the function as a memory it would be sufficient to connect the transistor T_Rd to Udd. Instead, the transistor is connected to the write bitline. Since the read out signal is low impediance in contrast to a 1T1C RAM, it can be fed directly into the next cell. Thus, one cycle is sufficient to transfer information from cell to cell.


https://www.richis-lab.de/calc02.htm

 :-/O
 
The following users thanked this post: Gyro, RoGeorge, capt bullshot

Offline NoopyTopic starter

  • Super Contributor
  • ***
  • Posts: 1731
  • Country: de
    • Richis-Lab
Re: Different die pictures
« Reply #211 on: June 05, 2022, 07:38:50 am »


The FX507A is a tone sequence decoder. It is used in radio systems and makes it possible to specifically address one or more receivers. For this purpose, the module outputs a configurable sequence of five tones and can itself respond to a 5-tone sequence. Different tones are standardized in different countries. The FX507 works with the ZVEI tones. The FX407 and FX607 offer CCIR and NATEL.

The manufacturer Consumer Microcircuits was founded in 1968 in the UK. The company still exists today.


The block diagrams in the datasheet show the working principle of the device. The FX507 needs a supply voltage between 10V and 15V, generates a bias with a voltage divider and an additional auxiliary voltage with a charge pump which has to be built up partly externally. The base clock is provided by a VCO, which puts out 156kHz.

The specific 5-tone sequence is configured by connecting the "DIGIT SEQUENCE OUTPUTS" (S1-S5) to the "DIGIT SELECT INPUTS". The outputs S1 to S5 represent the five digits which can be assigned with the tones 0 to 9. R repeats a tone. G is a placeholder to be able to address groups of different sizes.


The die is 4,6mm x 4,2mm.


In the upper left corner is the Consumer Microcircuits logo and the year 1983.


The abbreviation CML and the type designation FX507 can be found in the lower right corner. Next to it are five masks numbers. If K represents the revision of the masks, the design has been revised quite often. The structures on the right edge allow to evaluate the performance of the imaging process.

The bondpad of pin 1 on the far left of the image is marked with a 1.


A test structure is integrated at the upper edge of the die. This seems to be a transistor similar to the one in the CZL-550 (https://www.richis-lab.de/calc02.htm) which works with the substrate potential and accordingly gets by with two contacts. While the right area seems to represent a normal MOSFET, the left area could be an ESD protection transistor with a thick gate oxide at the same time.


Not all function blocks can be identified easily. However, the two ROM areas can be recognized very well.


https://www.richis-lab.de/FX507.htm

 :-/O
 
The following users thanked this post: SeanB, RoGeorge

Offline NoopyTopic starter

  • Super Contributor
  • ***
  • Posts: 1731
  • Country: de
    • Richis-Lab
Re: Different die pictures
« Reply #212 on: June 18, 2022, 07:05:14 pm »


The ULN2111 is an FM detector and limiter produced by Sprague. Many manufacturers had a similar device on offer: ECG 708, Motorola MC1357, National Semiconductor LM2111N, Signetics N5111A, Signetics ULN2111A, SGS TAA661, Tesla MAA661, Texas Instruments SN76643N.


The ULN2111 datasheet shown in the 1982 Sprague Integrated Circuits Data Book shows the integrated function blocks.


The Signetics datasheet shows the function a little simpler. Signetics apparently sold the device under two designations: N5111A and ULN2111A. There was a close cooperation between Sprague and Signetics. Sometimes even components of the other company were sold. It is quite possible that Signetics switched to the Sprague component.

At the input of the ULN2111A there is an amplifier stage, which ensures that a level of 400µV is enough for full scale drive. The term limiter comes from the fact that the gain is usually high enough to overdrive the input amplifier. The relevant modulation is preserved. However the following circuits are less disturbed by fluctuating input levels because the output of the input amplifier is almost always fully driven. The demodulator consists of an analog multiplier. An externally network has to be added that generates a 90° phase-shifted signal. This signal is multiplied by the original signal. The result is an output voltage that depends on the phase shift of the two signals. The actual phase shift deviates from the set 90° due to the FM modulation. This results in the demodulated signal at the output, which just needs a lowpass filter.


The Sprague Integrated Circuits Data Book 1982 contains a detailed schematic of the ULN2111, which has been colored for a better understanding. A diode chain generates two voltages which are used to set the bias (light blue). The higher voltage is buffered by two transistors. It supplies the input amplifiers and serves as a bias for the upper part of the analog multiplier. The second voltage is the bias voltage for the input amplifiers and the lower part of the analog multiplier.

The input amplifier consists of three differential amplifier stages. The output of each stage is buffered with an emitter follower. The first amplifier stage (pink) operates with a global feedback. The inverting inputs of the second and third amplifier stages (cyan) are connected to the bias voltage. The emitter follower of the third differential amplifier represents the output stage (dark green). Different levels can be tapped through two pins. The input amplifier offers a typical gain of 53dB.

One output of the input amplifier is internally fed directly to the analog multiplier. The network to be externally added uses one of the outputs and generates a 90° phase shifted signal. The phase-shifted signal passes through another emitter follower (yellow) before being fed to the analog multiplier.

The analog multiplier (red) has a current sink with its own reference potential (dark blue). The lower differential amplifier directly processes the output signal of the input amplifier. The upper differential amplifiers receive the phase-shifted signal from the buffer amplifier. The diode chain delivers the bias.

The output signal is delivered by an emitter follower (light green). A capacitor must be connected to the base potential through pin 14 which generates a low pass filter.

The ULN2111 contains some universally applicable circuits with a lot of contacts. For this reason it is also well suited to built different circuits.


The edge length of the die is 1.6mm. There are some not contacted elements and the number 11 in the upper left corner. Probably several devices were realized with this die by changing just the mask for the metal layer. 11 could stand for ULN2111. The ULN2136 is more or less the same device, but has an additional crude 7.8V voltage regulator and thus can be supplied with up to 20V. The not included circuit parts could be sufficient to represent a simple voltage regulator.


The Sprague Integrated Circuits Data Book 1982 shows the metal layer of the ULN2111. It does not match the design of the ULN2111 we have here. One can only assume that the circuit was fundamentally revised over time. After 12 years this is quite possible.


https://www.richis-lab.de/radio01.htm

 :-/O
 
The following users thanked this post: SeanB, RoGeorge

Offline NoopyTopic starter

  • Super Contributor
  • ***
  • Posts: 1731
  • Country: de
    • Richis-Lab
Re: Different die pictures
« Reply #213 on: June 20, 2022, 03:29:15 am »
No semiconductor today, just some words about how www.richis-lab.de developed over the years and about the purpose of the website:


2001
The development of a teslacoil can be followed via the address www.teslaspule.here.de.

2008
The website is extended with various electronic projects. For the time being this section has no own domain and can only be reached via www.home.vr-web.de/kaussler/lab.

2010
The domain www.richis-lab.de is registered.

2016 / 2017
The first pictures of integrated circuits are created.

2019
The website gets a responsive design, so that it is better displayed on smartphones.

2022
Every day an average of 400 visitors call up www.richis-lab.de. There are now more than 600 pages online with more than 6.500 images. The update rate is 3 articles per week.


The website is intended to help beginners in the field of electronics to understand the structure and operation of various integrated circuits. At the same time, it should enable experts to better understand specific properties of components.
Different types of counterfeits are documented and components are analyzed, which come from different manufacturers but are supposed to represent the same functions. Documentation of defective components allows to interpret failure mechanisms. Finally, some analyses make it possible to verify or disprove historical relationships.

No profit is made with this website. The income covers just a part of the expenses. I accept donations of parts as well as requests for analyses but the queue is very long. Parts with an interesting background story can be preferred though.

The website contains just simple HTML code and should display well on most devices. No cookies are used. Incorrect links, spelling mistakes and misrepresentations are welcome to be reported.


https://www.richis-lab.de/background.htm

 :-/O
 
The following users thanked this post: SeanB, brabus

Online magic

  • Super Contributor
  • ***
  • Posts: 6778
  • Country: pl
Re: Different die pictures
« Reply #214 on: June 20, 2022, 06:21:08 am »
The input amplifier consists of three differential amplifier stages. The output of each stage is buffered with an emitter follower. The first amplifier stage (pink) operates with a global feedback.
It looks like feedback just causes the DC level at the inverting input of the first stage to follow the noninverting input and you are supposed to place 100nF to ground at I-F DECOUPLE to filter out the RF signal from there.
 
The following users thanked this post: Noopy

Offline NoopyTopic starter

  • Super Contributor
  • ***
  • Posts: 1731
  • Country: de
    • Richis-Lab
Re: Different die pictures
« Reply #215 on: June 20, 2022, 06:28:41 am »
I agree with you. It's a special kind of feedback.  :-+

Offline NoopyTopic starter

  • Super Contributor
  • ***
  • Posts: 1731
  • Country: de
    • Richis-Lab
Re: Different die pictures
« Reply #216 on: July 21, 2022, 05:58:52 pm »
I have an update for the CZL-550 calculator!


Besides some minor corrections i have a better analysis of the ROM.

The upper area of the ROM contains the column selector which activates one of the 72 columns with seven differential control signals. Each column represents a command that activates some control lines that are led out of the ROM to the left.

There are two different addresses in the top 14 lines of the ROM. One of the addresses is fed back to the column selection where it activates the next command.

Below the addresses there is a control command and a test command in each of the columns. The result of the test defines which of the two addresses of the column is used for the next step. This address is selected directly to the left of the address memory area.

The leftmost commands have just 13 control signals available in addition to the two addresses. On the far right a command can be linked to any of the total 49 control lines.


With the pictures of the C550 Dunkelwind aka bITmASTER was able to extract the firmware and create a list of the commands. From his analysis also comes the knowledge that the ROM columns also contain test commands in addition to the control commands.

You can find the pdf with the firmware here:
https://www.richis-lab.de/images/calc/C550/C550Firmware.pdf


The RAM consists of thirteen columns. Three times four columns represent the three registers A, B and C. These are the intermediate memories for input, the subtotal and the result. Four memory cells each represent a BCD number. For the 8 digits with which the calculator calculates there are correspondingly eight lines in the RAM. The guard cells signal an overflow. The uppermost two lines contain the exponent.

The smaller register DP is used for several functions. It serves as a counter for multiplications, but it also serves as a memory for the location of the decimal point.


Based on the images of the C550 Dunkelwind (aka bITmASTER) was able to program an emulator.

You can find the emulator here:
https://www.richis-lab.de/images/calc/C550/Picolator.html


https://www.richis-lab.de/calc02.htm

 :-/O
 
The following users thanked this post: SeanB, brabus, RoGeorge

Offline NoopyTopic starter

  • Super Contributor
  • ***
  • Posts: 1731
  • Country: de
    • Richis-Lab
Re: Different die pictures
« Reply #217 on: July 29, 2022, 06:12:00 pm »


The SHT21 (right) is a humidity and temperature sensor developed by Sensirion. The edge length of the DFN housing is just 3mm. The humidity is resolved with 12Bit, the temperature with 14Bit. The device outputs data via I2C. The current consumption is just 300µA (@3V).

Even at very high quantities the SHT21 costs more than 6€. At the same time plug-in boards that are supposed to contain the STH21 are offered for less money. The component on the left and in the center of the picture is desoldered from such a board. If a protective layer is glued on the component as it was the case here, the obvious difference of the sensor is not visible. The sensor attracted attention because of its relatively large measuring error.


The housing shows a Pin1 marking and the letters AEKT which, however, cannot be assigned to any sensor or manufacturer.


The cutout in the housing has a diameter of 0,9mm on the plane of the die.


With 2,1mm x 1,2mm the die of the device takes up a large part of the package. Around the round active area a solid metal layer protects the underlying circuits from ambient light. Light could lead to unwanted current flows in the silicon.

The die has some free bond pads. It is quite possible that these contacts were used for tuning during manufacturing.


According to the datasheet the SHT21 determines the humidity via a change in capacitance. Usually, the capacitance of a plate capacitor is monitored, which contains a material that absorbs the air humidity and changes its permittivity in relation.

The sensing element of the present component consists of two semicircles constructed with interlocking electrodes. The construction is rather reminiscent of a resistive humidity sensor. The principle according to which the sensor works cannot be clearly explained optically.


In the lower left corner of the die there are shown some masks.


In the other corners of the die you can just about make out some designations but they do not allow to draw a definite conclusion about the manufacturer or model.

There could be the string Silabs in the lower right corner. Silabs manufactures resistive humidity sensors. Si7010 in the upper left corner would match. It would be a typical Silabs nomenclature. On the other hand, there is no Si7010.


https://www.richis-lab.de/thd01.htm

 :-/O
 
The following users thanked this post: SeanB, RoGeorge, capt bullshot

Offline NoopyTopic starter

  • Super Contributor
  • ***
  • Posts: 1731
  • Country: de
    • Richis-Lab
Re: Different die pictures
« Reply #218 on: July 29, 2022, 06:53:18 pm »
Small Update:
The four letter marking of the package seems to be typical for SiliconLabs sensors.

Offline NoopyTopic starter

  • Super Contributor
  • ***
  • Posts: 1731
  • Country: de
    • Richis-Lab
Re: Different die pictures
« Reply #219 on: August 24, 2022, 04:26:20 am »


u-blox SARA-R410M LTE-Modem

I´m too lazy to hotlink 68 pictures.  ^-^
Please click on the link, use your favoured translater or just enjoy the pictures:

https://www.richis-lab.de/modem01.htm

 :-/O

PS: There are nearly 2.500 pictures in the background consuming 92GB.  :o
« Last Edit: August 24, 2022, 04:28:15 am by Noopy »
 
The following users thanked this post: SeanB, capt bullshot, ch_scr, MegaVolt

Offline Cerebus

  • Super Contributor
  • ***
  • Posts: 10576
  • Country: gb
Re: Different die pictures
« Reply #220 on: August 24, 2022, 01:45:15 pm »
I´m too lazy to hotlink 68 pictures.  ^-^
Please click on the link, use your favoured translater or just enjoy the pictures:

I'm not adverse to that actually. I love this thread, however I'll often put off reading it for several days after it pops up in my unread messages simply because of the time it takes a page to re-cache all the pictures and render, doing a little dance as the pictures push the page around.

I do get why you post all the stuff here, and I'm appreciative of not having to keep a separate eye on your website. Have you ever considered posting or linking just very small thumbnails here with a click to expand/open on them? It would considerably improve page opening times but the effect wouldn't really take effect until the next rollover of a forum page (20 messages for most people I think).

Just food for thought.
Anybody got a syringe I can use to squeeze the magic smoke back into this?
 

Offline NoopyTopic starter

  • Super Contributor
  • ***
  • Posts: 1731
  • Country: de
    • Richis-Lab
Re: Different die pictures
« Reply #221 on: August 24, 2022, 03:04:50 pm »
I see your point and I agree with you that often there are too much pictures on one page

The best solution would be generating an english version of every page on my website. In fact that would be the same as I post here.
Nevertheless I would not be happy with just some pages having both languages and would have to update a huge amount of pages.  :(

Generating Thumbnails with that amount of pictures would consume quite some time too.

A "teaser" tag would help, so you have to click to unfold the content but this forum doesn't support such "teaser" tags.

It would be interesting to know how much people need the whole story here. Would it be enough to post that there is some news with a teaser picture and people read my website with the translating tool they like? These tools are quite good today. I even understand some russian sites.
It would still be possible to discuss whatever we want in here.

Offline Cerebus

  • Super Contributor
  • ***
  • Posts: 10576
  • Country: gb
Re: Different die pictures
« Reply #222 on: August 24, 2022, 03:32:56 pm »
Generating Thumbnails with that amount of pictures would consume quite some time too.

That's pretty easy with command line tools. You can leave the computer to rip its way through a particular directory, or filenames that match a particular pattern, and go off and get on with your day leaving it to do its thing. Easy enough to find instructions for that on the Intardnet so i won't clutter here with a description of how to do it.
Anybody got a syringe I can use to squeeze the magic smoke back into this?
 

Offline NoopyTopic starter

  • Super Contributor
  • ***
  • Posts: 1731
  • Country: de
    • Richis-Lab
Re: Different die pictures
« Reply #223 on: August 24, 2022, 04:11:13 pm »
My text was a little mistakable.

Generating the thumbnails would be no bigger problem bit it would consume considerable more time to post them here:

Today I open the new site at richis-lab.de, copy the link of the picture, post it here in the img-Tag, copy the text, translate it with deepl, do a quick check of the text and done.

With the thumbnails I would have to change the picture link to get the thumbnail and put a link around it to the big picture.
That sound not like a huge amount of additional effort but you have to consider how much pictures I upload. That accumulates quite some time.


And I have to say I for myself don't like it when I have to click on every picture to see what is going on.
That is one thing I like at xdevs.com https://xdevs.com/article/hpak66xx/
A lot of nice high resolution pictures.  8)

Offline Amper

  • Frequent Contributor
  • **
  • Posts: 286
  • Country: 00
Re: Different die pictures
« Reply #224 on: August 26, 2022, 02:24:30 pm »
Hi!

I just took some images of a DRV8302 with the keyence microscope because i was puzzled why i could just not see anything under my sem.
Really interesting Ti seems to do this not only on high end stuff but ob sort of regular components.

The passivation under the masking layer seems to be something like 5-10um, maybe it can be polished off.
 

Online mawyatt

  • Super Contributor
  • ***
  • Posts: 3254
  • Country: us
Re: Different die pictures
« Reply #225 on: August 26, 2022, 05:02:44 pm »
Hi!

I just took some images of a DRV8302 with the keyence microscope because i was puzzled why i could just not see anything under my sem.
Really interesting Ti seems to do this not only on high end stuff but ob sort of regular components.

The passivation under the masking layer seems to be something like 5-10um, maybe it can be polished off.

These look like "Fill Patterns" common in many processes where they help keep the layers planer during fabrication by maintaining a minimum metal density across the chip.

Best,
Curiosity killed the cat, also depleted my wallet!
~Wyatt Labs by Mike~
 

Online magic

  • Super Contributor
  • ***
  • Posts: 6778
  • Country: pl
Re: Different die pictures
« Reply #226 on: August 26, 2022, 08:31:28 pm »
I just took some images of a DRV8302 with the keyence microscope
Those pics don't look bad at all :-+
What sort of scope, exactly? I see they make digital microscopes, they surely must be better than those from eBay.
 

Offline Amper

  • Frequent Contributor
  • **
  • Posts: 286
  • Country: 00
Re: Different die pictures
« Reply #227 on: August 27, 2022, 07:43:14 am »
@mawyatt: You may be right but i wonder why its used here. Usually fill patterns are used on lower layers or in chemical processes. In PVD its not really of interest and even on power devices with very thick metalizations i have never seen fill patterns before.

@magic: Its a Keyence VHX7000, not really in reach for any hobbyist i guess but we have one at work that i can use as long as i dont break anything :) Taking good looking images is VERY easy with modern microscopes.
 

Online magic

  • Super Contributor
  • ***
  • Posts: 6778
  • Country: pl
Re: Different die pictures
« Reply #228 on: August 27, 2022, 08:07:01 am »
Thanks, although they don't show specs that would permit comparison against other microscopes and I would need to register to download the datasheets, still without guarantee that there is any useful information there ::)

But it resolves 0.6µ wide traces with 0.6µ gaps fairly sharply, this is close to the limits of visible light microscopy in dry air.

BTW, if you forego all the automation, there is plenty of moderately priced metallographic scopes which can do the same if fitted with a camera and high power objectives. I think it would take some 40x0.65 at a minimum. I'm experimenting with adding reflected light illumination to a cheap biological scope, but contrast is not the same as in purpose-made optics and the objectives are annoyingly corrected for use with cover glass.
« Last Edit: August 27, 2022, 08:13:46 am by magic »
 

Offline Amper

  • Frequent Contributor
  • **
  • Posts: 286
  • Country: 00
Re: Different die pictures
« Reply #229 on: August 27, 2022, 08:16:21 am »
Yes, unless you are in the position to spend up to 150k$ on a device those companies really suck support wise...

In fact yes, it is at the limit of what optical microscopy can do while not even being built mechanically strong, there is a lot of stuff done in software for image stabilization, essentially you have to find a rough focus, hit auto focus or 3D map and the microscope will do the rest. Setting up the light is pressing a button, the microscope takes several images in several configurations and you just pick the one that looks best. Its pretty idiot proof...

At home i have my JEOL6300, which im happy with unless there is thick passivations and i actually have to go optical.
 

Offline NoopyTopic starter

  • Super Contributor
  • ***
  • Posts: 1731
  • Country: de
    • Richis-Lab
Re: Different die pictures
« Reply #230 on: September 06, 2022, 07:26:19 pm »
I have generated an area for quartz, oscillator and similar parts:

https://www.richis-lab.de/osc.htm


By the way: Now I know what the strange part under the quartz of the u-blox SARA modem is!


Thats a NTC to check the temperature! Now the laser tuning makes sense. Laser tuning a capacitor would have been quite strange.  ;D
I found a hint in the Qualcomm specification "GPS Quality, 19.2 MHz, Crystal, and TH+Xtal".

https://www.richis-lab.de/modem01.htm#GPS-OSC


The now one is a MCO1610A built by the Tele Quarz Group. The housing is called "1/2 dual-in-line". The A indicates the better variant with an accuracy of +/-50ppm. 32M most likely stands for a frequency of 32MHz.


In the case there is a quartz disk metallized on both sides. The pictures above are from two components, which is why the upper metallization is attached once on the right and once on the left.


The quartz disk is 0,15mm thick. The laterally arranged metal elements to which the quartz disk is soldered serve as fastening and as an electrical contact.


Under the quartz disk there is a ceramic carrier with a very simple circuit. Apart from a capacitor in the supply a SOT-23 component with the marking AP1 was sufficient. Further information about this component cannot be found.  :-//


The die of the AP1 is 0,97mm x 0,63mm. Some circuit parts can be identified. At the Vdd bondpad the larger structure probably serves to protect the circuit against surges. Protective structures can be seen at Y1, Y2 and Enable too.

A push-pull output stage is integrated on the left and above the clock output in the lower right corner of the die. The larger structure on the left of the Y1 bond pad could be used to excite the crystal.

Below the Y1 and Vdd bondpads are many small vertical lines, some of whose potentials were routed to this area with quite some effort. It could be that an alignment or a configuration with a laser took place at this point.


https://www.richis-lab.de/osc_02.htm

 :-/O
 
The following users thanked this post: SeanB, RoGeorge

Online magic

  • Super Contributor
  • ***
  • Posts: 6778
  • Country: pl
Re: Different die pictures
« Reply #231 on: September 06, 2022, 08:58:59 pm »
There similar chips like 74LVC1GX04, but other pinout and no enable.

I recall that NJM made some crystal drivers too, but I can't find the part numbers now. I don't even remember where I have seen those chips, could it be on Mouser? :-//

Is it sigma in those markings? :o
 

Offline NoopyTopic starter

  • Super Contributor
  • ***
  • Posts: 1731
  • Country: de
    • Richis-Lab
Re: Different die pictures
« Reply #232 on: September 06, 2022, 09:02:59 pm »
There similar chips like 74LVC1GX04, but other pinout and no enable.

I recall that NJM made some crystal drivers too, but I can't find the part numbers now. I don't even remember where I have seen those chips, could it be on Mouser? :-//

Is it sigma in those markings? :o


It´s interesting that this one we have here needs no additional capacitor besides the supply capacitor.

Yes, that´s a sigma!  ;D

Offline NoopyTopic starter

  • Super Contributor
  • ***
  • Posts: 1731
  • Country: de
    • Richis-Lab
Re: Different die pictures
« Reply #233 on: September 08, 2022, 08:30:08 pm »
Another new area is "various CPUs":

https://www.richis-lab.de/cpu.htm


The Motorola XC68060 is the last development stage of the 68000 family. The letters XC show that the device was not yet fully qualified. The fully qualified processors were later given the name MC68060. In addition to the XC68060 the XC68LC060 without FPU ("floating point unit", coprocessor) and the XC68EC060 without FPU and MMU (memory management unit) could be purchased. According to the data found in the "68K and ColdFire® - Product Portfolio - Overview - 3Q97" at least the first revisions of all three variants include both an FPU and an MMU. It is quite possible that one wanted to increase the yield with the deactivation of FPU and MMU.

Another advantage of the functionally reduced variants is the reduced power dissipation. The maximum clock for the XC68060 is generally documented as 66MHz in the "68K and ColdFire® - Product Portfolio - Overview - 3Q97". However, the XC68060 and XC68LC060 are only available with a clock  of 50MHz. Only the XC68EC060 can be purchased as a 66MHz version. The maximum possible clock is found behind the RC abbreviation, here RC50. Later variants officially allowed 66MHz for the 68080 and 75MHz for the 68EC080 and 68LC060.


The label in the upper right corner of the package contains the datecode 9706. The string 01G65V reveals the revision of the chip. In the document "68K and ColdFire® - Product Portfolio - Overview - 3Q97" Motorola just lists the first three revisions. The first revision is from 1993, and the XC qualification was done in 1995. www.amigawiki.org sorts this revision G65V behind revision 1F43G (https://www.amigawiki.org/doku.php?id=de:parts:68060_mask). The 01 before the G65V suggests with regard to the 0F43G and 1F43G revisions that the original G65V mask set had to be adjusted once.


The PCN 4460-68060 mentions the revision G65V. The PCN (Product Change Notification) informs that as of June 4, 1999 the G65V mask set will be replaced by the E41J mask set and thus the designation will also be changed from XC to MC. Consequently 4 years have passed until the fully qualified MC68060 emerged from the XC prerelease.


The PGA package offers 206 pins.


According to the "68K and ColdFire® - Product Portfolio - Overview - 3Q97" the size of the die is "582 x 579". Assuming that the unit is mil this is 14.78mm x 14.71mm. There are 2,530,000 transistors integrated on the die.

The two-stage contact frame has a surprisingly complex structure and offers 206 contacts connected with 209 bondpads.


The functions of the individual areas can no longer be easily assigned. One can just infer the function blocks on the basis of the shapes and structures.


The designation 68060 can be found on the die as well as the mask revision G65V. The design dates back to 1994.


The details are too small to resolve them with the available equipment.


https://www.richis-lab.de/cpu01.htm

 :-/O
 
The following users thanked this post: SeanB, RoGeorge

Offline NoopyTopic starter

  • Super Contributor
  • ***
  • Posts: 1731
  • Country: de
    • Richis-Lab
Re: Different die pictures
« Reply #234 on: September 27, 2022, 06:51:42 am »
There is a new segment: bus transceivers
https://www.richis-lab.de/transceiver.htm

Up to now there is just a RS232 transceiver and a LIN transceiver, but I assume there will be more in near future.
Nevertheless I think we don´t need a new thread for these.


Now let´s take a look into the ATA6663, a LIN transceiver developed by Atmel.

The datasheet contains a block diagram showing what the transceiver does.


The dimensions of the die are 1,65mm x 1,24mm.


The lower part of the die shows the designations LINIPSMASTER and ATA6663. The remaining characters could document revisions.

The documentation of 13 masks can be guessed at the lower edge. At least two probably even three metal layers were used.


In the upper right corner, there are more strings that could represent an internal project designation.

Below the large structure, there is a strip with some symbols that are probably used to evaluate the quality of the manufacturing process.


The pins of the device can be assigned to the bondpads reasonably well. Bondpad 1 (RXD) is clearly marked. The die offers one more bondpad than there are pins in the package. This bondpad has been bonded too. Maybe it is an optional input, which was connected to ground in this case. Additionally, two testpads can be found on the die.


The supply VS (bottom) is connected to the LIN bondpad (top) via massive structures of the top metal layer. At the top left there is a massive connection to the frame which distributes GND.


The structures at the INH (bottom) and RXD (top) pins are very massive too.


The TXD pin (left) leads to a wide structure connected to the ground potential. According to the datasheet the pull-down resistor at this pin is typically 250kΩ. Such a large structure should not be necessary to represent this resistance. So it seems more likely that here you can see the transistor which connects the TXD pin to the ground potential.


Here you can see the larger of the two logic areas, which certainly contains the control logic of the device. The tangled thin wires connect the logic cells that lie below in such a way that they represent the desired behavior.


https://www.richis-lab.de/transceiver02.htm

 :-/O
 
The following users thanked this post: SeanB, RoGeorge

Offline NoopyTopic starter

  • Super Contributor
  • ***
  • Posts: 1731
  • Country: de
    • Richis-Lab
Re: Different die pictures
« Reply #235 on: October 15, 2022, 06:57:17 am »


Texas Instruments PGA411, a very special IC. It´s a resolver interface but you can´t buy it any more. Ti says it´s now a custom part covered by a NDA.


I have stripped down the PGA411 a little more!  >:D


First dissolving the silicon oxide layer with armour etch (hydrofluoric acid). The copper is not attacked. However, with increasing exposure time, the hydrofluoric acid infiltrates the top metal layer. Some of the squares with which the free areas are filled are already lost.


Etching copper? Let´s use some FeCl3. That works quite well as you can see at the bondpads but some of the copper still seems to be protected by silicon oxide.  :(


F**k it! With a lot of HF and time you can strip everything down to the silicon.  >:D

Delayering layer by layer would be interesting but would require a more stable process.

All that remains is the silicon, which also has contours that allow conclusions to be drawn about the functional blocks. The contours are a result of the processing steps during manufacturing. Here you can see the standardized circuitry at the bondpads.


Not all of the various structures can be assigned to their function.


The power transistors, which could already be assigned via the structure of the metal layer, are clearly visible.


No excessive damage is found in the lowest layer of the damaged bond pad.


The finer and seemingly more chaotically structured area probably contained the control logic.


https://www.richis-lab.de/RLG01.htm#FeCl3

 :-/O
 
The following users thanked this post: SeanB, RoGeorge, magic

Online magic

  • Super Contributor
  • ***
  • Posts: 6778
  • Country: pl
Re: Different die pictures
« Reply #236 on: October 15, 2022, 08:27:26 am »
 :-+

Not sure if it's copper or just aluminium?
It always often looks yellow like that, but then you heat up the die to 660°C and it melts and creeps out and it's definitely silver in color.
 

Offline NoopyTopic starter

  • Super Contributor
  • ***
  • Posts: 1731
  • Country: de
    • Richis-Lab
Re: Different die pictures
« Reply #237 on: October 15, 2022, 08:37:00 am »
I'm not 100% sure, it was just the look that made me think of copper. After all FeCl did a good job at the bondpads.  :-//

Online magic

  • Super Contributor
  • ***
  • Posts: 6778
  • Country: pl
Re: Different die pictures
« Reply #238 on: October 15, 2022, 08:55:54 am »
Well, I have never tried it, but let's see if anyone else did.
https://www.daqq.eu/?p=301

Maybe you didn't need to buy that HCl ;)
 

Offline NoopyTopic starter

  • Super Contributor
  • ***
  • Posts: 1731
  • Country: de
    • Richis-Lab
Re: Different die pictures
« Reply #239 on: October 15, 2022, 09:28:36 am »
I know FeCl does etch aluminium too but I thought it is a lot slower.
I should have tested HCl first to check whether it is aluminium or copper.

..but the colour looks like copper. You are right, sometimes the aluminium looks a little strange but here we have a very uniform colour.

Online T3sl4co1l

  • Super Contributor
  • ***
  • Posts: 21673
  • Country: us
  • Expert, Analog Electronics, PCB Layout, EMC
    • Seven Transistor Labs
Re: Different die pictures
« Reply #240 on: October 15, 2022, 01:51:26 pm »
You'll need nitric, or sulfuric with an oxidizer, to attack copper without aluminum.

Not sure offhand if persulfuric attacks aluminum?

Tim
Seven Transistor Labs, LLC
Electronic design, from concept to prototype.
Bringing a project to life?  Send me a message!
 

Offline NoopyTopic starter

  • Super Contributor
  • ***
  • Posts: 1731
  • Country: de
    • Richis-Lab
Re: Different die pictures
« Reply #241 on: October 17, 2022, 06:33:08 pm »
I have done a calendar for 2023!


This time we have a german version:
https://www.meinbildkalender.de/richis-lab//?&katid=6260

and an english version:
https://www.meinbildkalender.de/richis-lab//?&katid=6261

 
The following users thanked this post: eliocor, SeanB, Vgkid, capt bullshot

Offline NoopyTopic starter

  • Super Contributor
  • ***
  • Posts: 1731
  • Country: de
    • Richis-Lab
Re: Different die pictures
« Reply #242 on: October 19, 2022, 06:44:58 pm »


The Motorola MC68HC05P18 is a microcontroller out of the MC68HC05 family. This one here was used as a watchdog in the control unit of a Selespeed gearbox. The labeling on the package is customer specific. The microcontroller was developed by Motorola. Meanwhile Freescale produces it, which explains the Freescale logo.


The MC68HC05 family consists of extremely many variants with different specifications. The MC68HC05P18 is described in more detail in the Freescale document "HC05 MC68HC05P MC68HC805P Advance Information". The blockdiagram shown there illustrates the difference between the MC68HC05P18 and the MC68HC805P18. In addition to 192 bytes of SRAM and 128 bytes of EEPROM, the MC68HC805P18 contains 8064 bytes of EEPROM as program memory, which in the MC68HC05P18 is a ROM.


The dimensions of the dies are 2,30mm x 1,85mm. Here you can already guess some areas. The two large parts in the upper right area most likely represent the ROM of the microcontroller. The square larger area to the left of it is probably the SRAM. The structures that appear larger in the overview could be caused by the memory cells, which in an SRAM consist of several transistors. The structures in the lower left corner would fit well to the 128 byte EEPROM.


A thick polyimid layer...  :(


The designation MC68HC05P18 is found above the copyright notice from 1996. CSIC stands for "Customer Specific Integrated Circuit". On the far right, a character string is shown in a lower layer, which could be an internal project designation. The meaning of the characters K05Y remains open.


The structures of the circuit can be seen to some extent through the polyimide layer. Some irregularities can be seen in the ROM area. It looks like that could be the memory content. This is supported by the fact that the upper area is rather irregular, while the structures at the lower edge are very even. It could be that this area was completely filled with 0 or 1.


As usual, the polyimide layer can be decomposed with elevated temperatures but that didn't do a good job here. The image quality is poor.  :-[


The picture improves when you start to remove the passivation layer (HF). Longitudinal and transverse lines become visible.


If the layers above the silicon are removed completely, just the structure of the silicon that is formed during the production of the various layers remains.


Almost all of the lettering is also shown below the metal layer in at least one mask, which created structures in the silicon. Just "CSIC Microcontrollers" and the triangle underneath have disappeared. Now even the smaller lettering can be read without problems: P01-00-157 SC509157.


The ROM contains squares with an edge length of about 3µm. Between them, some irregular structures can be seen. It could be that these structures represent the programming. But they could also be remnants of the overlying layers, which have nothing to do with the programming.  :-// The polyimide layer was too persistent and the structures are too small to understand the function of the memory without more detailed background knowledge. The analysis of the mask programmed MK37092 ROM from Mostek (https://www.richis-lab.de/ROM02.htm) showed that the programming does not always have to be directly visible.


https://www.richis-lab.de/cpu02.htm

 :-/O
 
The following users thanked this post: SeanB, RoGeorge

Offline NoopyTopic starter

  • Super Contributor
  • ***
  • Posts: 1731
  • Country: de
    • Richis-Lab
Re: Different die pictures
« Reply #243 on: October 22, 2022, 04:21:58 am »
I just added Creative Commons license CC BY-NC 4.0 to my website.
Now everybody is allowed to reuse my pictures and texts as long as it is non-commercial and there is a link to my website:

https://creativecommons.org/licenses/by-nc/4.0/
 
The following users thanked this post: chuckb, RoGeorge, MegaVolt

Offline NoopyTopic starter

  • Super Contributor
  • ***
  • Posts: 1731
  • Country: de
    • Richis-Lab
Re: Different die pictures
« Reply #244 on: November 04, 2022, 07:50:26 pm »


The MC68000 is already a 32Bit processor, but still works internally with 16Bits. The successor, the MC68020, on the other hand is already a real 32Bit microprocessor.

RC16 stands for a clock frequency of 16,67MHz. In the ceramic case, there are variants with a clock of 20MHz, 25MHz and 33,33MHz. The tempco of the plastic housing is worse than the ceramic housing and because of that in the plastic package you get not more than 25MHz.


The datasheet contains a blockdiagram showing the architecture of the MC68020.

The MC68EC020 shown here separately is a variant whose address bus is just 24Bit wide.


A two-stage contact frame allows the many potentials of the die to be connected to the housing.


The dimensions of the die are 9,6mm x 8,8mm. In the IEEE publication "The Motorola MC68020", the function blocks are assigned to the various structures on the die. The large, evenly structured area in the lower half contains the Execution Unit. Because of the bus width of 32Bit these Unit needs a lot of area. The irregular area above the Execution Unit contains the control logic. The evenly structured areas on the left and on the upper edge contain the ROM, which converts the control commands into the control signals.


Designed 1984...


The mask revision is A70N. Online you can find MC68020 pictures with the mask revisions JP2, B47K and C10H.


A wide test structure is integrated on the upper edge. Among other things, various transistors, resistor strips and a string of several vias can be meassured.


Some more test structures. But the complex circuits have no contact pads!?  :-//


The structures of the ROM are big enough so you can see the instructions set.


Turned by 90°, the programming becomes even clearer. The top metal layer has a small area above each memory cell that may or may not contain a via, depending on the content of the cell.


At the bottom edge of the die, a surprisingly large area is reserved for clock conditioning. The MC68020 cannot generate its own clock. It must be supplied with an external clock. The circuit shown here probably generates different clock variants from the basic clock.


https://www.richis-lab.de/cpu03.htm

 :-/O
 
The following users thanked this post: SeanB, RoGeorge

Offline NoopyTopic starter

  • Super Contributor
  • ***
  • Posts: 1731
  • Country: de
    • Richis-Lab
Re: Different die pictures
« Reply #245 on: November 09, 2022, 08:30:10 pm »


This collection can be found in the Thuringian Museum of Electrical Engineering (https://www.elektromuseum.de/). It shows the various processing steps in the manufacture of the U809M.


The U809M is a special circuit and you don´t find very much information about it. In the component comparison list of the Kombinat Mikroelektronik it is listed under the designation "Vermittlungs IS" for telephone systems. The above two pictures are taken from the paper "Materialökonomische Effekte beim Einsatz der IS U809M". This paper was shown in 1983 at the "Halbleiterbauelemente-Symposium", which was regularly organized by the "Halbleiterwerk Frankfurt Oder".

The paper explains that the U809M is a customized circuit developed for the ATZ 65 automatic telephone exchange. The U809M replaces electromechanical assemblies. Using 10.000 of the integrated circuits could save 44kg of precious metal, 7t of nickel silver, 12t of copper and 19t of magnetic switch iron. The U809M was developed at Funkwerk Erfurt in cooperation with the Fernmeldewerk Anrstadt.


In the collection of the Thuringian Museum of Electrical Engineering there is a 3" wafer as a starting point. The flattening at the lower edge shows that it is a p-doped substrate with a (111) crystal structure. There are a relatively large number of test structures between the circuits. The wafer contains estimated 181 complete U809M circuits. The size of the U809M (5,5mm x 3,4mm) significantly reduces the yield. On a smaller 2" wafer, in contrast, it was possible to integrate 1128 of the comparatively much smaller D220 (edge length 1,2mm, https://www.richis-lab.de/wafer01.htm).


The test structure has the designation MT7. MT seems to have been a standard designation for test structures. On the 4" wafer with the U3230 (https://www.richis-lab.de/wafer04.htm), the test structures bear the designation MT21S.

The largest part of the area is taken up by a folded structure. Various small elements are integrated around the perimeter.


The folded test structure is quite complex. The part connected at the lower edge represents a large transistor. The rest seems to contain special forms of transistors or transistor-like structures.


At the right edge one can measure a series of vias. At the lower edge, a metal gate and a polysilicon gate MOSFET can be seen.


According to the Semiconductor Symposium paper the circuit measures 5,5mm x 3,4mm, contains 3191 transistors and is based on p-channel silicongate technology.


At the bottom of the die there are the letters FMA, which could be a clue to the developers.


On the left edge of the die you can see the masks used and their revisions: A1, B1, C1, D1, E1 and F1. Mask A1 opens the field oxide (FOX), which initially protects the wafer and thus defines the active areas. B1 then structures the polysilicon. The polysilicon appears red on the FOX, while it appears yellowish in the active area.

After the polysilicon a full-surface n-dopant is applied, which penetrates into the open active regions. These areas are then isolated from the p-doped substrate. Where the polysilicon is located above the active areas, the n-doping is shielded so that the PMOS transistors form underneath. This simultaneously ensures that the polysilicon gate is directly above the p-channel ("self-aligned gate").

D1 is the metal layer, so C1 must be the mask for the vias. After everything has been covered with a protective oxide layer, mask E1 opens the bond areas. What remains is mask F1, which can hardly be seen. The purpose remains unclear. If the arrangement agrees with the chronological sequence, it could be that with this last process the bonding surfaces were additionally coated in some way.  :-//

The cross with the squares makes it possible to evaluate the alignment of the masks against each other.


At the upper edge there are two test structures. A PMOS transistor is shown on the right. On the left, there is an interruption in the active area under the polysilicon, so that the polysilicon rests on the thick FOX. At this point, the polysilicon should have no influence, otherwise parasitic transistors may be created in the circuit.

The minimum structure widths are in the range of round about 10µm.


The circuit parts can be easily recognized due to the large structures.


The Semiconductor Symposium document explains that the U809M has a total of 30 open-drain outputs with a common source connection. The implementation of these output stages is very unusual. One has built the transistor directly around the bondpad. The green appearing gate electrode separates the potential of the bondpad from the frame which carries the common source potential. Integrated above the output stages are the elongated transistors connected as pull-down resistors. Between the pull-down structures and the output stages, somewhat hidden, are the driver transistors that can pull the gate of the output stage transistors to a high level.

In addition to the outputs, the U809M has 13 inputs, two of which can be seen here on the left edge. A long thin line leads from the bondpad to a protection structure. The line serves as a current limiting resistor in case the protection structure becomes conductive. A slightly larger transistor serves as protection against positive voltages. Finally, it is a PMOS logic which is supplied with 0V (bulk) and -13V (Vdd). If the voltage at an input rises to positive values, the protection structure becomes conductive and limits the voltage. It could be that the structure is also protective at negative voltage peaks and thus is the complementary equivalent to the so-called "Grounded Gate NMOS".


On the right edge there is a circuit whose structures clearly deviate from the rest of the logic structures. This is the RC oscillator (bottom), which outputs two complementary clock signals via two bondpads (top).


[...]

 
The following users thanked this post: SeanB, RoGeorge

Offline NoopyTopic starter

  • Super Contributor
  • ***
  • Posts: 1731
  • Country: de
    • Richis-Lab
Re: Different die pictures
« Reply #246 on: November 09, 2022, 08:31:19 pm »


The Thüringer Industriearchiv (http://www.archive-in-thueringen.de/de/archiv/view/id/238) contains an illustration of the structures. The structures are shown mirrored.


The basis for the U809M is a metal grid.


The surface in the center of the metal grid is apparently gold-plated. It can be assumed that the surface plating was necessary in order to be able to display robust bond joints.


The individual dies are cut out of the wafer with a special diamond saw and soldered onto the metal grid. The die here is marked with a varnish dot. The circuits are tested on the wafer. Defective elements are equipped with a varnish dot and normally not processed further.

After the die is soldered on the metal grid, the bond connections are created between the circuit and the metal grid.


The dark potting compound usually consists of an epoxy and various fillers. It protects the IC from environmental influences and also from light incidence. The compound must initially be very thin so that the bondwires are not damaged. It must also be ensured that the starting materials and the substances that may be produced during curing do not have any negative effects on the chip, the bondwires or the metal grid. The potting compound must be as thermally, mechanically and chemically stable as possible after curing. In addition, the coefficient of expansion should be as similar as possible to the other materials so that no cracks occur during temperature changes.


After the components are cut out of the metal grid, the pins are bent and coated with a layer of tin.

The package is called Quad In-line Package (QUIP).


Finally, the lettering is applied, in this case with the logo of the Funkwerk Erfurt.


Here you can see a later series version of the U809M. Although some of the lettering has already dissolved, you still can see the letters VD, which indicate a production in December 1987.

Instead of the Funkwerk Erfurt logo the letters MME for VEB Mikroelektronik "Karl Marx" Erfurt can already be seen here.


There are no differences to the upper U809M. Just the letters FMA have been removed.


The mask revisions show that the design has been completely overhauled once.


https://www.richis-lab.de/wafer05.htm

 :-/O
 
The following users thanked this post: SeanB, doktor pyta, RoGeorge

Offline NoopyTopic starter

  • Super Contributor
  • ***
  • Posts: 1731
  • Country: de
    • Richis-Lab
Re: Different die pictures
« Reply #247 on: November 10, 2022, 05:08:48 am »
For those who read the text on my website on a smartphone:
I had a small bug in the html-code. Now the pictures should look fine... :-/O

Offline RoGeorge

  • Super Contributor
  • ***
  • Posts: 6202
  • Country: ro
Re: Different die pictures
« Reply #248 on: November 13, 2022, 08:04:38 am »
TSP #216 - Detailed RFIC Analysis of the Analog Devices GaAs 81-86GHz I/Q Direct Down-Converter MMIC
The Signal Path


The following users thanked this post: MegaVolt

Offline NoopyTopic starter

  • Super Contributor
  • ***
  • Posts: 1731
  • Country: de
    • Richis-Lab
Re: Different die pictures
« Reply #249 on: November 23, 2022, 07:46:07 pm »


Tele Quarz Group CCO 200, a TCXO. Does anybody own a datasheet for this part?

A TCXO is a temperature compensated oscillator. It compensates the frequency drift electrically. It´s not a OCXO, which heats the quartz to a constant temperature.


In the TCXO a voltage proportional to the temperature is generated (red). The temperature-dependent voltage modulates the capacitance of a varactor (yellow), which is connected to the quartz resonator (grey). The change in capacitance shifts the resonant frequency and thus compensates for the temperature drift. With one pin the capacitance and thus the frequency of the quartz resonator can additionally be modified externally. An oscillator (purple) generates the clock signal, which is output via an output stage (blue).


The case consists of a base plate and a lid that is soldered to it. There are five pins: power supply, ground, reference voltage output, tuning input and clock output.


In the lid there is a kapton foil, which ensures insulation of the circuit against the lid. The housing has a very solid design with a wall thickness of 1mm. The large mass guarantees some inertia of the temperature inside compared to the ambient temperature. This ensures that even rapid temperature fluctuations can be compensated.


The circuit of the TCXO is implemented on a two-layer board without solder resist. Vias were not galvanized, but realized with wires. The quality of the board doesn´t look very good.  :o


The bottom plate of the case is insulated with a Kapton foil too. The ground pin at the bottom left was soldered directly to the case.


On the top of the board, in the upper right corner, the TL431 (https://www.richis-lab.de/REF27.htm) shunt regulator generates the supply and reference voltage of the circuit (green). Judging by the resistors, the output voltage is 3,6V. A 15V zener protects the shunt regulator from too high input voltages.

The left area of the board contains the temperature measurement (red). The black bead is the temperature sensor. A TL062 opamp (https://www.richis-lab.de/Opamp60.htm) uses this sensor to generate a control voltage proportional to temperature. Mounting options allow for gain and frequency response adjustments. The choice of the TL062 is surprising since, according to the datasheet, this opamp is specified for a supply voltage of at least +/-5V. The 3,6V single supply of the TL431 is much too low in comparison. We have talked about the real minimum supply voltage of the TL062 but 3,6V seems to be way too low.  :-//

The control voltage of the temperature measurement is fed into the lower right corner, where the resonant frequency of the quartz resonator is shifted via the capacitance diode BBY40 (https://www.richis-lab.de/Diode09.htm). The external voltage for adjusting the clock frequency is brought in in the lower right corner. While the internal control voltage is connected between the capacitance diode and the quartz resonator, the external tuning voltage contacts the node between the capacitance diode and the capacitor, which leads to GND.


On the bottom side of the PCB you can see most of the distribution of the supply and reference voltage. While the oscillator and the first buffer stage are supplied directly from the TL431, there is a second path which is decoupled with a RC network. This path supplies the temperature measurement, the output stage and is output via the REF pin. Although no datasheet is available, it can be assumed that the REF pin is intended to supply a potentiometer, which is then used to generate the control voltage for the frequency adjustment.

In the lower part of the board is the oscillator (purple), which generates the desired clock frequency with the help of the quartz resonator and a BFS17 high frequency transistor (https://www.richis-lab.de/BipolarA13.htm).

This is followed by a buffer amplifier with a BFS17 (cyan), which drives the output stage with another BFS17 (blue). The placement options in this area probably serve to be able to set different output levels.


The quartz resonator has no labeling, not even on the bottom.


In the housing of the quartz resonator there is a round quartz crystal.


A metal layer was applied to both sides of the quartz crystal and soldered to the sides of the contact elements.


It is noticeable that the crystal is cloudy towards the edge.


Here you can see the surface in detail.


Apart from the soldered areas, the contact plates fix the quartz disc just relatively loosely.


The thickness of the quartz disc is 0,12mm.


https://www.richis-lab.de/osc_03.htm

 :-/O
 
The following users thanked this post: SeanB, RoGeorge

Offline NoopyTopic starter

  • Super Contributor
  • ***
  • Posts: 1731
  • Country: de
    • Richis-Lab
Re: Different die pictures
« Reply #250 on: November 24, 2022, 04:47:56 am »
Someone has sent me a datasheet for the CCO 200!  :)

The CCO 200 is supplied with 5V and should put out HCMOS with Uhigh>4V so the TL431 has to put out a little more than 3,6V.  :-//
Nevertheless the voltage is too low to supply the TL062 properly.
« Last Edit: November 24, 2022, 04:54:37 am by Noopy »
 

Online magic

  • Super Contributor
  • ***
  • Posts: 6778
  • Country: pl
Re: Different die pictures
« Reply #251 on: November 24, 2022, 08:43:46 am »
To be fair, old TI datasheets didn't have that "recommended operating conditions" section.
http://www.elenota.pl/datasheet-pdf/49444/Texas-Instruments/TL062

The chip must have worked good enough for this TCXO at 4V, but I suspect that input range is quite limited - 1V or so below the top rail. Particularly, the inputs may not work accurately (or at all) near ground on symmetric ±2V supplies.

There is something dodgy about TI's ±5V ratings on jellybean chips. NE5532 is another one which didn't have "recommended operating conditions" in old datasheets and later got ±5V, even though the front page used to advertise "wide supply range - ±3V to ±20V". The 2001 revision of the datasheet has both ±3V on the front page and ±5V later, and recommended maximum ±15V and then some specifications at ±18V ::) I see that they resolved these inconsistencies in modern revisions by deleting the "wide supply range" claim and removing 18V specs.
 
The following users thanked this post: Noopy

Offline iMo

  • Super Contributor
  • ***
  • Posts: 4780
  • Country: pm
  • It's important to try new things..
Re: Different die pictures
« Reply #252 on: November 24, 2022, 08:53:19 am »
The regulation range of that TL062 in that TCXO is perhaps several mV, thus it could be the smallish Vcc was "just enough" and they were lucky..
PS: while looking at the soldering quality I would say the manufacturer was something like "a garage one man show startup"  :D
« Last Edit: November 24, 2022, 08:57:40 am by imo »
 

Offline NoopyTopic starter

  • Super Contributor
  • ***
  • Posts: 1731
  • Country: de
    • Richis-Lab
Re: Different die pictures
« Reply #253 on: November 24, 2022, 12:43:59 pm »
To be fair, old TI datasheets didn't have that "recommended operating conditions" section.
http://www.elenota.pl/datasheet-pdf/49444/Texas-Instruments/TL062

[...]

There is something dodgy about TI's ±5V ratings on jellybean chips. NE5532 is another one which didn't have "recommended operating conditions" in old datasheets and later got ±5V, even though the front page used to advertise "wide supply range - ±3V to ±20V". The 2001 revision of the datasheet has both ±3V on the front page and ±5V later, and recommended maximum ±15V and then some specifications at ±18V ::) I see that they resolved these inconsistencies in modern revisions by deleting the "wide supply range" claim and removing 18V specs.

Very interesting!  :-+


The regulation range of that TL062 in that TCXO is perhaps several mV, thus it could be the smallish Vcc was "just enough" and they were lucky..
PS: while looking at the soldering quality I would say the manufacturer was something like "a garage one man show startup"  :D

The small regulation range helps here definitely.
The quality is really strange, not to say shocking. In the end that´s a high precision clock generator.  :o

Offline NoopyTopic starter

  • Super Contributor
  • ***
  • Posts: 1731
  • Country: de
    • Richis-Lab
Re: Different die pictures
« Reply #254 on: December 16, 2022, 04:05:39 am »


The KCO-010Y is a crystal oscillator built by the Japanese company KOYO. I found no datasheet, but the inscription shows that the clock frequency is 16MHz. The numbers 87-49 could be a datecode.


In contrast to the RASCO (https://www.richis-lab.de/osc_01.htm) and MCO1610A (https://www.richis-lab.de/osc_02.htm), the oscillator/driver is located as a die on the ceramic substrate. Besides that, just a backup capacitor for the supply voltage was necessary.

The quartz resonator itself is round. Especially a flattening in the upper area catches the eye.

1051R is most likely a designation for the layout on the ceramic carrier. The Vcc line at the upper edge approaches the contacting of the quartz resonator at one point. Apparently, an additional resistor or capacitor could be populated here.


A transparent, silicone-like potting protects the die. The chips that were produced while opening the case adhere well to this potting.

You can already see that two bondpads on the right edge of the die have not been contacted. The Vcc area where the die is located has been extended to the right...


The potting cannot be completely removed from the 1,2mm x 1,1mm die. The design dates back to 1985 and there are auxiliary structures in all four corners that allow the manufacturing quality to be monitored. Also, the designations and revisions of six masks can be seen.

The quartz resonator is attached to the left edge. Several large capacitors are also integrated there.

In the upper right corner is the output of the oscillator. At the upper edge the corresponding push-pull output stage is integrated. To the left of the two large transistors are the somewhat smaller driver transistors. Wide lines lead from the Vcc potential (top left) and from the GND potential (bottom center) to this output stage.

The function of the bondpads on the right edge cannot be clarified with absolute certainty. Often oscillators provide additional outputs with different levels, but no additional output stage can be seen. Since the ceramic carrier offers a large Vcc bonding area in this area, it could be that the free bondpads represent a configuration interface. Perhaps connecting the pads to the Vcc potential results in doubling or halving the clock frequency.


The string LSI4801 in the lower left corner could be an internal designation. The characters M-R 05 01 02 cannot be assigned.


https://www.richis-lab.de/osc_04.htm

 :-/O
 
The following users thanked this post: SeanB, RoGeorge

Offline NoopyTopic starter

  • Super Contributor
  • ***
  • Posts: 1731
  • Country: de
    • Richis-Lab
Re: Different die pictures
« Reply #255 on: December 26, 2022, 04:56:12 am »
For those who haven´t "clicked the bell" on the other topic, I have posted a DG444, another analog switch here:

https://www.eevblog.com/forum/testgear/replacement-for-fluke-700013-ic-(quad-spst-analog-switch)/msg4602076/#msg4602076

https://www.richis-lab.de/aswitch08.htm

 :-/O

Offline NoopyTopic starter

  • Super Contributor
  • ***
  • Posts: 1731
  • Country: de
    • Richis-Lab
Re: Different die pictures
« Reply #256 on: January 02, 2023, 05:17:27 am »


Besides the widely used microprocessor Z80 Zilog also produced the microcontroller Z8. In the GDR, the U88xx series had been developed, which functioned like the Z8. The U88xx was still based on an n-channel silicon gate process. From this, the U840 was developed in the Funkwerk Erfurt, which was based on a CMOS process and thus had a significantly reduced power consumption. The document above comes from the Thuringian Museum of Electrical Engineering (https://www.elektromuseum.de/) and shows the basic specifications of the U840.


The U840 was presented at the Semiconductor Components Symposium of the Frankfurt Oder Semiconductor Plant in 1989. Among other things, the above block diagram can be found in the associated documents.


The container shown here also comes from the collection of the Thuringian Museum of Electrical Engineering. This container can be used to transport up to 25 wafers. The black knob allows the lid to be pressed onto the housing sealing it.

On a piece of tape are the numbers 3937, which is most likely the number of the batch. The numbers 1-25 are probably the numbers of the 25 wafers that were originally in this container.


Eight wafers remained in the container.


Most of the circuits on the wafers are marked as rejects with a coloured dot. In addition to the actual circuits, there are 10 test areas on the wafer. With an edge length of 7,5mm x 7,4mm, the U840 is extremely large for a 3" wafer. Just 56 complete circuits can be displayed on it. The U809 (5,5mm x 3,4mm https://www.richis-lab.de/wafer05.htm), on the other hand, can be put 181 times on a 3" wafer. All this is no comparison to the D220 (edge length 1,2mm https://www.richis-lab.de/wafer01.htm). Even on a 2" wafer, it can be imaged 1128 times.


The number 3937 is carved on the back of the wafer, which is most likely the batch number as described. The 6 probably stands for the sixth wafer of the batch.

The rainbow colours, which repeat irregularly in a circle towards the centre, are interesting. Apparently, the thickness of the passivation layer changes here. Depending on the thickness, there are different resonances for the incident light and thus constructive or destructive interference occur. This is how the different colours are created. The colour sequences indicate a steadily decreasing or increasing thickness of the layer.


The edges of the wafer appear to have been bevelled. They appear somewhat irregular.


Two different large test structures are integrated on the die, which in turn consist of several blocks. The picture above shows one of the test structures.


One of the test blocks is called CM11 and contains some smaller function blocks.


A second block bears the designation CM10, below which the date 18 JAN 87 and the letters KH are found. Compared to CM11, somewhat more complex test structures are integrated here.


Simpler structures are shown in this block. On the left and bottom edges are transistors with different length/width ratios. The test structures on the upper edge apparently allow different vias to be measured. On the right edge, different resistors seem to have been integrated. In the middle there are three capacitor surfaces.


In this block, in addition to two large transistor areas, there are several geometries of the different dopants, but also small diodes and transistors.


Among the blocks of the test structure are also two HTC04, two sixfold inverters.


The letters SC are missing on the second sixfold inverter. It seems that the structures could be reduced in size in the SC variant.


The second test structure contains significantly larger elements, but also structures that were already present in the first test structure.


Many of the larger elements appear to be test structures for various vias.


The same different transistors as already seen in the pictures above are found in this test area. In the middle, however, two very large transistor areas are integrated.


In this block, different capacitor areas can be measured. The strip at the top left could be a ring oscillator with which the quality of the transistors can be evaluated.


The block seen here is very similar to a block in the first test structure.


In these two very large structures, long lines of the metal layer run over many lower strips. No vias are visible. Perhaps the influence of the metal layer on deeper layers can be determined here. Within the structures there are some signs in old German script.


In the block shown here, various different test structures are integrated once again.


The U840PC is 7,5mm x 7,4mm. This image is also available in a higher resolution (https://www.richis-lab.de/images/wafer/05x41.png 193MB). Some geometries can be assigned to their function, such as the two large regular structures in the upper right area.


The Thuringian Museum of Electrical Engineering has a photo of the structures of the U840. Superficially, there is no difference to the structures on the wafer. However, it must be a different revision, as the copyright sign is shown differently.


The reference to the copyright of the MME (VEB Mikroelektronik "Karl Marx") can be found under the designation U840.


Here you can see the U840 in the PLCC housing. The datecode XD stands for a production in December 1989.


https://www.richis-lab.de/wafer06.htm

 :-/O

"Sorry", a lot of pictures.  ;)
With my equipment it´s hard to take good pictures of complete wafers that is why some pictures are not as good as we would like to have them.
« Last Edit: January 02, 2023, 11:50:08 am by Noopy »
 
The following users thanked this post: SeanB, RoGeorge, capt bullshot

Offline RoGeorge

  • Super Contributor
  • ***
  • Posts: 6202
  • Country: ro
Re: Different die pictures
« Reply #257 on: January 02, 2023, 08:43:55 am »


Most of the circuits on the wafers are marked as rejects with a coloured dot.

Why the few incomplete dies near the wafer edge are of both types, some with the marking dot and some without the dot?
Why bother testing and marking them, and how come they are not all marked as bad?

Offline NoopyTopic starter

  • Super Contributor
  • ***
  • Posts: 1731
  • Country: de
    • Richis-Lab
Re: Different die pictures
« Reply #258 on: January 02, 2023, 11:53:04 am »
That's a good question. I assume they had some areas where they were sure that the parts are scrap and so didn't even test and ink them. But I'm not sure about that...  :-//

Offline NoopyTopic starter

  • Super Contributor
  • ***
  • Posts: 1731
  • Country: de
    • Richis-Lab
Re: Different die pictures
« Reply #259 on: January 24, 2023, 10:31:04 am »
I have created a new sub category on my website:
Analog Multipliers
https://www.richis-lab.de/amult.htm
More coming soon...


The Burr-Brown MPY100 is a analog multiplier that can be used up to 500kHz. However, above 1kHz the non-linearity increases strongly. The A grade offers the worst specifications. M stands for the TO-100 package. Alternatively, the MPY100 is available in the DIL14 package. Texas Instruments still produces this analog multiplier today, but it is no longer recommended for new designs.


The block diagram in the datasheet shows the typical structure of an analog multiplier. The voltages at the inputs X and Y are converted into currents, multiplied and fed to an output amplifier, whose reference potential is the voltage at input Z. With this setup, complex calculations can be performed in analog.


The datasheet includes a picture of the metal layer of the die, which measures 2,72mm x 2,36mm.


The real die looks very similar to the picture in the datasheet.


In circuits that are aligned with a laser, Burr-Brown always integrates squares marked with letters at the edges of the die, which are partially marked with the laser during the alignment. What exactly is documented with this squares remains unclear.


As usual with integrated circuits that undergo an alignment with a laser, a testpad with a square structure is also found here. In the MPY100, a second testpad was even integrated to measure a wide resistor structure. The somewhat unclean cross that was burned into the test structure with the laser is noticeable too.


In the case of the resistor elements, it is easy to see that the laser is set a little outside the resistor areas and then moves in the direction of the resistor. You can also see that the alignment was not a continuous process, but was done point by point.

On the bottom edge there is a typical Burr-Brown designation: CIC01382. There are ten masks shown, some of which have been revised once.


As with the ICL8013 (https://www.richis-lab.de/ICL8013.htm), the circuit has a consequent symmetry so that disturbances such as thermal gradients are compensated as far as possible. The core is the multiplier circuit (blue), which was doubled and surrounds the diodes in the X-differential amplifier (pink). The diodes are NPN transistors whose base-emitter path is used as diodes. Two current sinks, not drawn in the block diagram, provide some minimum quiescent current through the diodes in parallel with the current flow through the X amplifier.

The X, Y and Z differential amplifiers (green, red, yellow) are somewhat more complex than shown in the block diagram. There are protection diodes between the base and emitter of the transistors and small capacitors are integrated between the two branches of the differential amplifiers. In addition, there is not one but two current sources in the emitter path, which are connected with a cross resistor ("pi-degeneration").

The output amplifier (cyan) is placed at the right edge of the die in such a way that its heat dissipation affects X and Y amplifiers very similarly.

The MPY100 contains a bandgap reference, which can be seen by the typical transistor arrangement (white). This reference voltage is used to control the various current sinks.


https://www.richis-lab.de/amult01.htm

 :-/O
 
The following users thanked this post: SeanB, RoGeorge, BrianHG, ch_scr, magic

Offline NoopyTopic starter

  • Super Contributor
  • ***
  • Posts: 1731
  • Country: de
    • Richis-Lab
Re: Different die pictures
« Reply #260 on: January 28, 2023, 04:03:52 am »


Here we had a U809 wafer. The chief engineer of the U809 now has provided me some background information.


Now I know what the mask F does. After generating the active areas with the mask A, the mask F generates vias to the active areas. Through this vias the polysilicon can contact the active area. Since that was an improvement of the process the mask got the next free letter F.

Without the "F contact" you have to jump from the polysilicon to the metal layer and from there back to the active areas. You need more area and you disturb the routing in the metal layer.


Here you can see "F contacts" (yellow).
(If not you have an old picture in your cache. >:D)


The scrapped dies (with the dot) were used to adjust the bonding tools and the packaging machines.


In series production the pins of the package were optimized. The outer pins were made a little wider to make them stronger.


In the first shot of the U809 there was an error. There was one gate contact missing. Because of that they changed the mask C1 to C2. In series production every mask was updated. It´s uncertain why this was done.


https://www.richis-lab.de/wafer05.htm

 :-/O
 
The following users thanked this post: SeanB, RoGeorge, iMo

Offline NoopyTopic starter

  • Super Contributor
  • ***
  • Posts: 1731
  • Country: de
    • Richis-Lab
Re: Different die pictures
« Reply #261 on: January 29, 2023, 04:26:55 am »


A small update to the U840:

- It is definitely an independent development not a copy of a "model".

- Even though the U840 was described as a "customised special processor", in my opinion it is nevertheless a microcontroller that can be used quite universally. The intended use was in programmable logic controller in communications engineering.

- The U840 was first manufactured on 3", later on 4" wafers. This makes sense, of course, with the large dies.

- The size of the dies is interesting: Two documents give an edge length of 6,5mm. But I measure 7,5mm and I'm pretty sure about that. You can attribute 0,1-0,2mm to measuring errors and the interpretation of the milling lines, but I'll never get to 6,5mm. Perhaps first the circuit was displayed on these 3" wafers in a larger size ratio and then later changed to the target structure size.  :-//


https://www.richis-lab.de/wafer06.htm

 :-/O
 
The following users thanked this post: SeanB

Offline NoopyTopic starter

  • Super Contributor
  • ***
  • Posts: 1731
  • Country: de
    • Richis-Lab
Re: Different die pictures
« Reply #262 on: January 30, 2023, 07:57:58 pm »


A minor correction:
The reference circuit for the bias looks like a bandgap with these two transistors with the special area ratio and a current mirror... But a closer look reveals that this is not a (classical) bandgap reference. It´s "something else"...  :-//


https://www.richis-lab.de/amult01.htm

 :-/O

Online magic

  • Super Contributor
  • ***
  • Posts: 6778
  • Country: pl
Re: Different die pictures
« Reply #263 on: January 30, 2023, 08:33:11 pm »
Looks like the LM285-style bandgap reference with 6:1 raito differential pair. Similar thing was used in LT3750.

Right to left:
NPN emitter follower which drives the bandgap voltage.
Reference diode in series with the feedback divider.
Current mirror biasing the diff pair.
Ratioed diff pair connected to taps in the feedback divider.
PNP mirror load.

Above:
Feedback resistors.
Dual PNP emitter folower which bootstrapts the mirror and drives a chain of NPN/PNP followers on the left edge of the die and then the rightmost NPN in the reference cell.
 
The following users thanked this post: Noopy

Offline NoopyTopic starter

  • Super Contributor
  • ***
  • Posts: 1731
  • Country: de
    • Richis-Lab
Re: Different die pictures
« Reply #264 on: January 31, 2023, 07:58:46 am »
That´s an interesting hint, thanks!  :-+
Have to think about that...

Offline mister_rf

  • Contributor
  • Posts: 33
  • Country: ro
Re: Different die pictures
« Reply #265 on: February 01, 2023, 10:26:55 pm »
I have  various  die pics who I think can be posted  here also.  :)
Pictures has been taken at 1x – 5x, without any microscope, using only camera lenses.
First, some unusual sensor.

FUGA 18 IBIDEM Retina: a foveated vision sensor CMOS chip designed by the IMEC (Interuniversitair Micro-Electronica Centrum VZW.) and IBIDEM consortium. This was a project funded by the European Union under the Technology Initiative for Disabled and Eldely (TIDE). (1995)
This has been used as a vision sensor in “Machine learning” and “Robot perception”. The main features of the sensor are:
Technology: CMOS
Total Number of pixels: 8013
Pixel arrangement (periphery): 128x56
Pixel arrangement (fovea): 20 rings with variable pixel's number
Minimum Pixel Size: 14 microns
Size of the chip: 8.3mm
Logarithmic response to illumination


« Last Edit: February 02, 2023, 08:13:53 am by mister_rf »
 
The following users thanked this post: TiN, doktor pyta, TurboTom, RoGeorge, BrianHG

Offline TurboTom

  • Super Contributor
  • ***
  • Posts: 1389
  • Country: de
Re: Different die pictures
« Reply #266 on: February 01, 2023, 10:54:15 pm »
Now that's a peculiar one! Thanks for sharing.
 

Offline quadtech

  • Regular Contributor
  • *
  • Posts: 58
  • Country: in
Re: Different die pictures
« Reply #267 on: February 12, 2023, 01:11:06 pm »
Some cool die pics are there in Marco Reps video on his build of an ADR1000 based voltage ref


Offline NoopyTopic starter

  • Super Contributor
  • ***
  • Posts: 1731
  • Country: de
    • Richis-Lab
Re: Different die pictures
« Reply #268 on: February 12, 2023, 09:53:25 pm »
Some cool die pics are there in Marco Reps video on his build of an ADR1000 based voltage ref


I think I know who took these pictures...  ;D

Offline NoopyTopic starter

  • Super Contributor
  • ***
  • Posts: 1731
  • Country: de
    • Richis-Lab
Re: Different die pictures
« Reply #269 on: February 22, 2023, 02:50:25 pm »


The board shown here with the designation KA630 is a CPU module of the MicroVAX II. The MicroVAX computer systems were developed by DEC (Digital Equipment Corporation) and are successors of the VAX-11 model series. The MicroVAX I was the first generation, followed by the MicroVAX II.

The "Digital Technical Journal" published by DEC in March 1986 explains many details of the MicroVAX II. According to this, the focus of the development was to integrate as many CPU functions as possible, which were previously distributed over many integrated circuits, into one microprocessor. This development was necessary to remain competitive.

The first mask set of the 78032 was developed in 20 months, according to Digital Technical Journal. It took 6 months to establish the requirements and basic design. The development of the actual circuit required 14 months. The goal was to mass produce the IC after two and a half years at the latest.


The Digital Technical Journal contains the above illustration of the KA630 board. The core of the board is the 78032 CPU and the 78132 FPU, with two gate arrays above them. The lower gate array is tightly coupled to the CPU. The upper gate array is the interface to the Q22 bus, which connects the CPU board to the other modules. A full integration of the VAX architecture would have required 1,25 million transistors. However, the technology at the time only allowed one tenth of this to be integrated into the microprocessor. Therefore, compromises had to be made in the degree of integration.

On the left, 36 256kBit DRAM devices are populated, providing a total of 1MB of RAM. The Digital Technical Journal reports a shortage of 256kBit devices at the time of development, so an alternative assembly with 64kBit memory was planned. You can expand the working memory up to 16MB with expansion cards.


The "KA630-AA CPU Module User's Guide" contains a block diagram that shows the architecture of the CPU board in more detail.


The 78032 CPU and 78132 FPU are placed in a TQFP-68 package with a round heat sink.


The 78032 was just used by DEC itself. Therefore it is not surprising that no datasheet exists. The above block diagram from the Digital Technical Journal is the most detailed representation that can be found.


The integrated function blocks are presented in great detail in the Digital Technical Journal.


The heatsink is glued onto the ceramic package. The CPU operates with 5V and a clock frequency of 20MHz. This typically results in 3W of power dissipation.


The inscription can be found on the underside of the case. The numbers 8536 in the lower right corner probably represent the datecode. The string 333M refers to the internal designation DC333.


The die is fixed in the upper half of the case. This allows the heat to be efficiently dissipated through the top of the package.


In the overview, it is noticeable that special attention was paid to an interference-free supply of the individual function blocks. The outer areas of he upper half of the die contains the wide data and address interface. These drivers have their own wide supply lines, which are routed to four pins in each of the two corners with two bondwires. The supply pins in the middle of the left and right side supply the actual CPU via two bondwires each. The interfaces in the lower half partly have their own bondwires again, but they are not as exclusively supplied as the upper interfaces.

A small cuboid in the lower right corner puts the potential of the carrier and thus also of the substrate to a pin, which in turn is connected to a bondpad.


The die measures 9,1mm x 9,0mm. The Digital Technical Journal gives a size of 8,7mm x 8,6mm, which is the size without the remainings of the frame structure. The Digital Technical Journal further describes that 125.000 transistors were integrated. A 3µm NMOS process with two metal layers was used, which DEC called ZMOS.

The picture shown here is also available in higher resolution (102MB): https://www.richis-lab.de/images/cpu/04x10XL.jpg


The Digital Technical Journal shows the distribution of the function blocks on the die. Obvious is the very large ROM in the lower area that converts the commands into the necessary control signals. The core of the CPU, here called I-Box, E-Box and M-Box, is very large due to the 32Bit wide structures and including the control circuits takes up more than half of the area.


On the upper edge there is a copyright from 1984 and the internal designation DC333. The letters in the left area are certainly abbreviations of the developers. The Digital Technical Journal reports 18 developers who worked on the 78032.


Eight masks are directly visible. As far as the letters indicate revisions, the design was revised nine times. In contrast, the Digital Technical Journal praises "very very few bugs", in detail it would have been "less than 20 bugs" until it was possible to boot the operating system.

The two metal layers 8 and 10 are nicely visible here. The mask 7 creates contacts to the silicon. The upper metal layer can only contact the lower metal layer, for which mask 9 is used. Mask 11 then creates openings in the passivation layer where the bondpads are located.

In addition to the masks of the metal layers, just three visible masks remain. It can be assumed that other masks were used between 1 and 5. The Digital Technical Journal describes four transistor types that were available in this process: N, E (light enhancement), L (light depletion) and D.


In the frame structure the designation and the revisions of the mask set are mapped one more time. 2U CDS could be a process designation.

A label is just visible in the upper left corner, apparently referring to the technology node. The lines start with ZMOS.ULTRAL and end with a date from 1983.


A test structure at the bottom edge contains several elements. The long stripes on the left seem to be resistors. The remaining structures represent different transistors.


A very wide test structure is integrated at the right edge. It remains unclear which function is shown here, but it seems there are a lot of identical elements connected in series. Perhaps several gates were connected in series to check their quality with a test signal.


In the lower right corner (rotated here) is a bias generator, like the ones found in the µPD7220 (https://www.richis-lab.de/GraKa02.htm#bias) and the D82720 (https://www.richis-lab.de/GraKa03.htm#bias). It is a charge pump that generates a negative potential. Directly visible is the relatively large capacitor, which is contacted with many vertical leads. The negative potential is transferred via the cuboid next to the die to the carrier and thus to the substrate. The negative body potential improves the switching behavior of the transistors.


In the lower left corner of the die the clock processing is located, which takes up a relatively large area (rotated here). A 40MHz clock must be supplied from the outside. The Digital Technical Journal explains that eight phase-shifted clocks are generated from this clock. The drivers have to be partly very powerful, because they have to drive up to 250pF.


The layout of the large ROM is given by the Digital Technical Journal as 1600 x 39Bit.


As already described, the reduction of transistor and area consumption was a critical requirement. The optimized arrangement of the control commands in the control ROM brought relief. The Digital Technical Journal additionally highlights the X-shaped memory cells with their reduced area consumption.


I can´t resolve the relatively complex structures of the memory.


https://www.richis-lab.de/cpu04.htm

 :-/O
 
The following users thanked this post: RoGeorge

Offline NoopyTopic starter

  • Super Contributor
  • ***
  • Posts: 1731
  • Country: de
    • Richis-Lab
Re: Different die pictures
« Reply #270 on: February 24, 2023, 08:30:34 pm »


The DEC 78132 is an FPU that resides on the MicroVAX II CPU board. Like the 78032 CPU, the 78132 FPU is housed in a TQFP-68 ceramic package with a bonded heat sink. Like the CPU, the FPU operates at 5V and 20MHz. The power dissipation remains below 2W.


In the Digital Technical Journal, DEC shows the function blocks integrated into the 78132.


The inscription can be found on the bottom of the package. The numbers 8538 in the lower right corner probably represent the datecode. The string 337C refers to the internal designation DC337.


While opening the case, some pins broke out. But you can still see that not all pins were used.


The solder with which the die is attached in the case was applied very generously. At the upper edge it is partially on the top of the die.


The die is 8,5mm x 6,8mm in size. The Digital Technical Journal states a size of 8,4mm x 6,6mm. The same 3µm NMOS process was used as for the 78032.

The image shown here is also available in higher resolution (132MB): https://www.richis-lab.de/images/cpu/05x05XL.jpg


The Digital Technical Journal shows the distribution of the functions on the die.


On the top edge of the die there is a copyright from 1984. In Hudson Massachusetts DEC operated a fab.


In the middle of the die is another copyright notice.


The DC337 designation is also shown inside the die, as well as the note that it is an FPU.


The mask revisions and the process-typical structures show that the 78132 and the 78032 were manufactured with the same process.

The internal designation DC337 is also shown here. The upper metal layer shows a revision C, so it was revised twice. On the package, the designation 337C can be found. Apparently, the letter at the end stands for the revision of the design. The package of the 78032 is labeled 333M. There, a revision L is visible. However, it may well be that a mask that is not directly visible was revised once more.


At the upper edge there are various teststructures. The left corner shows a whole row of transistors with different gate electrodes.


Another transistor has one large contact on the bottom side and very many adjacent contacts on the upper side.


Three large blocks contain long, folded rows of different vias that allow to meassure the quality of these contacts. Most likely, the vias on the left are from the upper to the lower metal layer. In the middle there are vias from the lower metal layer to the polysilicon layer and on the right there are vias from the polysilicon to the active layer.


There is also a somewhat more complex test circuit on the upper edge. A somewhat larger power stage is shown on the right. You can also the the testpads that supply the circuit.


In the upper right corner there are six testpads with large output transistors. The testpads were obviously contacted during production. The six lines leading to the testpads appear to be connected to six control lines in the "Exponent Datapath" area.


Like the 78032, the 78132 has a bias generator, but it can be seen a little better here.


The clock conditioning takes up a large area in the upper left corner. There are several large driver transistors connected to the rest of the circuit via eight wide lines.


The microsequencer converts commands into control signals. The Digital Technical Journal states that a command is 35 bits wide. In total there are 200 commands, which are accommodated in a large matrix. The matrix is divided into two parts, it consists of an AND and an OR matrix.

30 of the potentials, which the OR matrix outputs, lead to the function blocks. These are not yet directly control signals, they activate local decoder matrices. This reduces the number of control lines. Five potentials of the OR matrix are fed back to the AND matrix and influence the selection of the next address.


The division into two parts is clearly visible. The lower area contains the OR matrix, the output of the 35 control signals is on the left. The 200 lines are controlled by the upper AND matrix, which contains 26 lines. The associated 13 address lines can be seen on the far left.


https://www.richis-lab.de/cpu05.htm

 :-/O
 
The following users thanked this post: RoGeorge, iMo

Online IanB

  • Super Contributor
  • ***
  • Posts: 11880
  • Country: us
Re: Different die pictures
« Reply #271 on: February 25, 2023, 06:41:08 am »
The board shown here with the designation KA630 is a CPU module of the MicroVAX II. The MicroVAX computer systems were developed by DEC (Digital Equipment Corporation) and are successors of the VAX-11 model series. The MicroVAX I was the first generation, followed by the MicroVAX II.

I was an active user of the MicroVAX II. We used them as workstations for real-time simulation software. At the time the price/performance ratio was very competitive for an industrial strength application. Also the OpenVMS operating system had features and capabilities that you would recognize today in Windows (and some features like real-time task scheduling that you might not).

It is funny seeing a system I spent so much time using as industrial archeology today.
 
The following users thanked this post: MK14

Offline iMo

  • Super Contributor
  • ***
  • Posts: 4780
  • Country: pm
  • It's important to try new things..
Re: Different die pictures
« Reply #272 on: February 25, 2023, 07:06:13 am »
DEC - my first IT company I worked at, the best one.. :-+
 

Offline NoopyTopic starter

  • Super Contributor
  • ***
  • Posts: 1731
  • Country: de
    • Richis-Lab
Re: Different die pictures
« Reply #273 on: February 25, 2023, 09:48:34 am »
It is funny seeing a system I spent so much time using as industrial archeology today.

Time is running... ...somtimes very fast...  ^-^

Offline Gyro

  • Super Contributor
  • ***
  • Posts: 9499
  • Country: gb
Re: Different die pictures
« Reply #274 on: February 25, 2023, 10:47:37 am »
Another ex-DEC employee here. I remember graduating from VT100 to VT220, MicroVAX workstation (monochrome) and ultimately MicroVAX II workstation. It felt like we'd reached the peak of technology. We still used Runoff for document preparation though - non of that wysiwyg rubbish!

We developed a T1 router with a MicroVAX II chip in too (DEMSA-AA and -AB Microserver).


P.S. We were probably the first to do home working, with home terminal and modem.

EDIT: I just found an old Microserver proto board in the garage (a bit dusty)!  ;D
« Last Edit: February 25, 2023, 11:09:26 am by Gyro »
Best Regards, Chris
 
The following users thanked this post: MK14, iMo

Offline iMo

  • Super Contributor
  • ***
  • Posts: 4780
  • Country: pm
  • It's important to try new things..
Re: Different die pictures
« Reply #275 on: February 25, 2023, 11:15:13 am »
One of my first projects at DEC was a DEC AlphaServer 8000 installation (afaik w/ six Alpha 21164 processors) at a local electricity distributor..
Hopefully Noopy gets the Alpha chips in his hands too..
 

Offline Gyro

  • Super Contributor
  • ***
  • Posts: 9499
  • Country: gb
Re: Different die pictures
« Reply #276 on: February 25, 2023, 01:34:22 pm »
I used to have a very small portion of a DEC Alpha wafer (about 2 1/2 dies) from a complete wafer that got smashed on its luggage trip from the US. Unfortunately I dropped it on the carpet in my den fairly recently and accidentally rolled my chair over it!  :(

Does anyone else remember Alpha launch day? They swapped all of the plastic cups in the vending machines for commemorative Alpha printed ones. I think I kept one somewhere, thinking it might be worth money one day!
« Last Edit: February 25, 2023, 02:22:15 pm by Gyro »
Best Regards, Chris
 

Offline NoopyTopic starter

  • Super Contributor
  • ***
  • Posts: 1731
  • Country: de
    • Richis-Lab
Re: Different die pictures
« Reply #277 on: February 25, 2023, 07:46:41 pm »


I nearly missed the dog... ...well, you have to know that it is a dog...  ::)


https://www.richis-lab.de/cpu04.htm#dog

 :-/O
 
The following users thanked this post: RoGeorge

Offline iMo

  • Super Contributor
  • ***
  • Posts: 4780
  • Country: pm
  • It's important to try new things..
Re: Different die pictures
« Reply #278 on: February 26, 2023, 09:18:44 pm »
Besides the widely used microprocessor Z80 Zilog also produced the microcontroller Z8. In the GDR, the U88xx series had been developed, which functioned like the Z8. The U88xx was still based on an n-channel silicon gate process. From this, the U840 was developed in the Funkwerk Erfurt, which was based on a CMOS process and thus had a significantly reduced power consumption. The document above comes from the Thuringian Museum of Electrical Engineering (https://www.elektromuseum.de/) and shows the basic specifications of the U840..
A video about the GDR microelectronics troubles..

 
The following users thanked this post: Gyro, Noopy

Offline NoopyTopic starter

  • Super Contributor
  • ***
  • Posts: 1731
  • Country: de
    • Richis-Lab
Re: Different die pictures
« Reply #279 on: February 26, 2023, 09:28:53 pm »


The MicroVAX II computer system was rebuilt in the GDR. For this purpose, the MME (Mikroelektronik Karl Marx) analyzed the CPU DEC 78032 and rebuilt it under the designation U80701. However, the design was never put into serial production.

Here you can see a U80701 in one of the then common plastic carriers. Four clamps are locking the outer pins. The pins are not yet bent into shape.


Like the 78032, the U80701 was put into a ceramic package with 68 pins.


In contrast to the 78032, a very short datasheet exists for the U80701. It bears the note "In development". This probably explains why the pin assignment is not 100% correct. Here, the substrate potential Ubb is located in the lower left corner. In fact, however, it is connected in the lower right corner, just like in the 78032.


While opening the case, some pins broke out. Basically, the U80701 is constructed in the same way as the 78032. The substrate potential is connected directly from the corresponding pin to the carrier. An additional contact cuboid has been omitted here.


The dimensions of the die are 8,9mm x 8,8mm. It is about the same size as the die of the 78032. Just the remaining edge area of the U80701 is narrower. The image shown here is available in higher resolution (96MB): https://www.richis-lab.de/images/cpu/06x06XL.jpg

Superficially, the only difference to the 78032 is a slightly different arrangement of the bondpads. But only the distances were chosen differently, the sequence of the signals did not change.


There is some dirt or corrosion on the die. That may be due to the fact that these are relatively old prototype parts.


As in 78032, there is a structure looking like a dog.


Apart from the arrangement of the bondpads, there is just one difference between the U80701 and the 78032. In the left area of the die, approximately in the middle, there is a wide bus, which contains significantly fewer lines in the U80701. The structure to the left of this, probably a decoder matrix, is also simpler in design. This is the area that DEC in the Digital Technical Journal calls the M-Box.


https://www.richis-lab.de/cpu06.htm

 :-/O
 
The following users thanked this post: Gyro, RoGeorge, iMo

Offline Gyro

  • Super Contributor
  • ***
  • Posts: 9499
  • Country: gb
Re: Different die pictures
« Reply #280 on: February 26, 2023, 10:17:10 pm »
Internal folklore had it that one of the DEC dies has a little 'Joker' playing card on the corner with 'Only copy the best' in cyrillic text underneath. I had a feeling that it was MicroVAX [1?] but it could well have been one of the MicroPDPs or indeed Alpha, but I think it pre-dated that.


EDIT: Ah, it was CVAX, but I nearly got the quote right - I don't see the Joker though, maybe there was more than one...  https://commons.wikimedia.org/wiki/File:CVAX_When_You_Care_Enough_To_Steal_The_Very_Best.svg
« Last Edit: February 26, 2023, 10:24:46 pm by Gyro »
Best Regards, Chris
 

Offline NoopyTopic starter

  • Super Contributor
  • ***
  • Posts: 1731
  • Country: de
    • Richis-Lab
Re: Different die pictures
« Reply #281 on: February 26, 2023, 10:29:20 pm »
Internal folklore had it that one of the DEC dies has a little 'Joker' playing card on the corner with 'Only copy the best' in cyrillic text underneath. I had a feeling that it was MicroVAX [1?] but it could well have been one of the MicroPDPs or indeed Alpha, but I think it pre-dated that.

It´s a successor, the MicroVAX3300 with the CPU "CVAX".
Coming soon...  ;D
 
The following users thanked this post: Gyro

Offline quadtech

  • Regular Contributor
  • *
  • Posts: 58
  • Country: in
Re: Different die pictures
« Reply #282 on: February 27, 2023, 09:39:13 am »
Noopy, I want to convey my thanks for the fantastic contributions from you on this and other die shot threads.
It is a compendium of electronics history and a terrific corpus of work for future reference.

Looking at your pictures, it is so amazing that human creativity and ingenuity can come up with so
many variations on say a 2N2222 or a 2N3055, while still achieving parity with all specs.
It is like a Gaudi architecture vs the Pyramids, both being buildings (and beautiful at that), but with such different approaches,
or the creations of Jonathan Ive vs Dieter Rams, separated in time and place, just like Soviet or East German transistor clones of 2N3055, say.

I spent 35 years of life in a totally unrelated field , but I find there is something "beautiful" about these die shots, even if I don't understand a lot of it.
Many/most people cannot appreciate engineering design as art and achievements of human creativity, be it a bridge or a chip, but I feel
it is only a reflection on their aesthetic sense / the eye of the beholder.
« Last Edit: February 27, 2023, 09:46:47 am by quadtech »
 
The following users thanked this post: Noopy

Offline NoopyTopic starter

  • Super Contributor
  • ***
  • Posts: 1731
  • Country: de
    • Richis-Lab
Re: Different die pictures
« Reply #283 on: February 27, 2023, 11:11:41 am »
Thank you quadtech!
I still have a lot of fun taking the pictures.  8)

I also like the quantity going up. My website develops to some kind of encyclopedia hopefully helping a lot of people interested in the internals of the semiconductors.

It´s definitely art.  :-+
 
The following users thanked this post: MegaVolt

Offline NoopyTopic starter

  • Super Contributor
  • ***
  • Posts: 1731
  • Country: de
    • Richis-Lab
Re: Different die pictures
« Reply #284 on: March 01, 2023, 04:11:08 am »
A developer involved in the U80701 was able to provide some explanations and background information on the U80701:

The U80701 is a 1:1 replica of the 78032. The manufacturing process available in the GDR was sufficiently in almost all points. Only contacts between the polysilicon layer and the active areas required a 1µm larger distance. This circumstance required some minor adjustments.

Another difference between the 78032 and the U80701 was that the layout ERC (Electrical Rule Check) found fault with long stubs. During production, such stubs can trap charges. Plasma etching, which naturally generates a lot free charges, is particularly critical in this respect. Depending on the design of the structures, this can result in damage to the gate structures. In the GDR they shortened some lines that wasn´t necessary.

The first design of the U80701 did not work properly. It turned out that people in Voronezh (Russia) were also working on a replica of the 78032. In the collaboration, it turned out that the U80701 had a connection between the two metal layers that was not present in the original. Without this contact, however, the ERC delivered an error (transistor finger not connected). Eventually, the connection was cut and the CPU worked as desired. Since DEC sometimes even have put cyrillic messages on their integrated circuits, perhaps that was a little trap.  >:D


https://www.richis-lab.de/cpu06.htm#background

 :-/O
 
The following users thanked this post: RoGeorge

Offline NoopyTopic starter

  • Super Contributor
  • ***
  • Posts: 1731
  • Country: de
    • Richis-Lab
Re: Different die pictures
« Reply #285 on: March 02, 2023, 12:04:26 pm »


The U80703 is a replica of the DEC 78132, which was developed in the MME (Mikroelektronik Karl Marx). Like the CPU U80701 the U80703 never went into series production.

The U80703 here is in one of the plastic carriers that were common at the time. It is obviously a development model. Judging by the surfaces, the device was never sealed. The pins are not coated except for the bond areas. The surface is partially corroded. The backside shows that it is a defective part. The number in the upper area could stand for the batch out of which this chip was taken.


Some of the bondwires are badly damaged. This could have been caused by the unprotected storage. However, the bond process may also not have been set appropriately for this component.


The dimensions of the die are 8,3mm x 6,5mm. It is about the same size as the die of the 78132. The remaining edge areas of the U80703 are narrower. The image shown here is also available in higher resolution (125MB): https://www.richis-lab.de/images/cpu/07x04XL.jpg


Due to the open storage, the die is quite dirty and slightly damaged. Cleaning was dispensed with in order not to further damage the bondwires.


In the upper right corner, where the copyright is displayed on the 78132, the U80703 has a small silicon art that appears profound. On the left, one has integrated a clock that shows 7 minutes to 12. To the right, a stick figure holds the house of a snail. What the element above the snail's shell means remains unclear. It could be a crane.  :-//


At the bottom edge of the die there are two large transistors, each connected to a bondpad. In the 78132 just the right contact is connected to a pin of the package. In the U80703 both potentials are connected to the outside. Since the functions of most of the pins are unknown, it is impossible to say what advantage the availability of this additional potential had.


As between 78032 and U80701, there are minor differences in the structures between 78132 and U78132 too. The reason for this is, as described in U80701, minimally differences in the design rules.


https://www.richis-lab.de/cpu07.htm

 :-/O
 
The following users thanked this post: mister_rf, RoGeorge

Offline NoopyTopic starter

  • Super Contributor
  • ***
  • Posts: 1731
  • Country: de
    • Richis-Lab
Re: Different die pictures
« Reply #286 on: April 11, 2023, 07:47:41 pm »


At events such as marathons, athletes' lap times are often determined using RFID transponders ("RFID tags"). The transponders come in various forms. For example, they can be threaded into shoelaces as a small plastic element. Here at the Leipzig Triathlon, the RFID transponder is attached to the start number.


The imprint on the transponder reveals that it is a system from the company Race Result.


With the above picture Race Result explains the structure of the system on the company website. The transponder of the active system has its own power supply and thus offers a bit more functionality. The passive system is cheaper and is based on RFID transponders that work with a radio frequency of 866MHz.


If you remove the plastic element from the start number, the antenna structure on the back of the transponder becomes visible. The purpose of the numbers and markings remains unclear.


The integrated circuit is located in the center of the element above the four small squares. The different trace widths in the immediate vicinity of the circuit represent an impedance match.


The integrated circuit, which is located behind the traces, can only be seen at high magnification.


The circuit is embedded in a fiber material. After removing the fiber material the IC with its edge length of 0,48mm becomes visible. It is a flip chip, which makes direct contact between its active side and the metal traces. A transparent potting stabilizes the circuit on the circuit carrier.


If one tries to thermally decompose the carrier structure, remnants of the conductive traces remain attached to the circuit. The conductive tracks are most likely made of aluminum, as they dissolve quickly in hydrochloric acid. What remains is the circuit, to which a considerable amount of coating still adheres.


After treatment with elevated temperatures, even the remains of the protective layer can be removed. You can clearly see that the two connections of the antenna are contacted by one large and one small metal surface each.


A large structure is integrated between the two contacts on the left. Probably the radiated energy is absorbed via these contacts and converted into a usable supply. The special rectifiers for this application partly form such structures. It could be that the antenna is also attenuated via the large contacts, allowing information to be transmitted back to the transmitter.

The smaller contacts could represent a receiver input isolated from the power section. For many RFID transponders, it is sufficient if they transmit an ID when stimulated, i.e. supplied with power. However, the transponder here can also be programmed, which means that it must be able to receive data.

A logic structure can be clearly seen in the upper right area.


https://www.richis-lab.de/transponder04.htm

 :-/O
 
The following users thanked this post: RoGeorge

Offline RoGeorge

  • Super Contributor
  • ***
  • Posts: 6202
  • Country: ro
Re: Different die pictures
« Reply #287 on: April 12, 2023, 09:51:00 am »
What distance resolution would that have?  Sometimes the athletes arrive at the finish line at a distance of only centimeters apart, what trick can give such a high positioning resolution to an RFID tag?

Online eliocor

  • Supporter
  • ****
  • Posts: 519
  • Country: it
    • rhodiatoce
Re: Different die pictures
« Reply #288 on: April 12, 2023, 02:29:26 pm »
With UWB, from 10 to 30cm
 

Offline NoopyTopic starter

  • Super Contributor
  • ***
  • Posts: 1731
  • Country: de
    • Richis-Lab
Re: Different die pictures
« Reply #289 on: April 12, 2023, 03:08:31 pm »
That´s an interesting question!

For the passive system I found these specifications:
Detection range is 4m and the system takes the point of maximum signal strength.
Timing accuracy is 200ms.
So if you are running with 10km/h. The timing accuracy alone gives you a distance accuracy of 56cm! That´s a lot!  :scared:

The active system gives you a timing accuracy of 10ms up to 150km/h. That is a distance accuracy of 2,8cm (running at 10km/h).
 
The following users thanked this post: RoGeorge

Offline NoopyTopic starter

  • Super Contributor
  • ***
  • Posts: 1731
  • Country: de
    • Richis-Lab
Re: Different die pictures
« Reply #290 on: May 03, 2023, 06:08:27 pm »


The PA243 is an audio amplifier built by General Electric. The date code refers to the year 1968. The most striking feature is the housing, which is based on a DIP-14 but has far fewer pins. Similar to Sanyo's LA4102 (https://www.richis-lab.de/audioamp02.htm) a relatively wide metal strip improves heat dissipation from the interior.


There is no datasheet for the PA243. In the "Audio Amplifiers Databook" at least an example circuit is shown and comparison types are mentioned: ECG717, GEIC-209, GEL1234 and PA234.


For the ECG717 a datasheet can be found. According to this, the supply voltage must be between 9V and 25V. The quiescent current is between 1mA and 15mA. The load impedance must not drop below 8Ω and is specified up to 22Ω, where 22Ω is the typical value. The output impedance is specified as 2Ω. The bandwidth is 30Hz - 100kHz (at 0,5W output power).

At 22V, the datasheet guarantees a minimum output power of 1W (3% THD typical, 10% THD maximum). Due to the low efficiency of 46% (22V, 22Ω, 1W) one has to pay attention to sufficient heat dissipation. If the heat sink of the component is kept at 50°C, up to 1,4W of power loss can be dissipated. Without this heatsink, just 0,8W is permissible even at 25°C.

The datasheet shows an example circuit too. Due to the simple supply, coupling capacitors are necessary at the input as well as at the output. The output signal is fed back via the voltage divider R2/R3. The value of the resistor R1 varies the amplification factor (2,4 - 47). The capacitor directly at the output provides the necessary high-frequency stability. The datasheet points out that this rather simple measure significantly increases the current consumption of the amplifier for signals above 15kHz.

The integrated circuit has two transistors at the input, which are an unusual Darlington pair. The collector connection of the first transistor is not directly connected to the collector of the second transistor. Between the two collectors are the three diodes, which create a certain voltage drop and thus a bias current through the output stage.

The input amplifier is immediately followed by the quasi-complementary output stage. The highside transistor consists of a Darlington circuit. On the lowside there is a Sziklay circuit, which also contains a Darlington pair inside. The PNP transistor just provides the necessary phase inversion, the current amplification is realised by the two NPN transistors.


If one removes the housing material, it becomes apparent that a gold-plated element is applied to the cooling fin, on which the die is located. From a thermal resistance point of view, the additional element is not optimal. Perhaps this design facilitated the manufacture or the different coefficients of thermal expansion made the additional element necessary.


The dimensions of the die are 1,3 x 1,2mm. It is covered with a transparent but not completely clear protective layer.


The protective layer remains stable even after a longer dwell time in a paint stripper. Only a longer dwell time in a silicone remover ultimately leads to the coating being able to be rubbed off. The structures are hardly damaged in the process. However, it turns out that the metal layer is not protected by a passivation layer. The removal of the coating resulted in scratches and minor damage in several places.


There are some irregularly distributed triangular contours on the surface of the die. These could be an artefact of an etching process.


The individual elements can easily be identified. A NPN transistor, which has not been contacted, is integrated in the input area. It is located in a common n-doped collector area with the input transistor. A buried collector is not visible. Either the conductivity of the n-doping is sufficient or the buried collector do not stand out visually. The n-doped surfaces are surrounded by heavily p-doped insulation frames. A p-doped base area with two contacts is inserted into the collector surface. This base area in turn contains the heavily n-doped emitter area with the corresponding via.

A PNP transistor is integrated to the left of the NPN transistor. This is the classic, lateral construction. The p-doping, which is otherwise used as base doping, represents the collector and emitter here. The n-doping, which is otherwise used as a collector, represents the base area here. The relatively large distances lead to the clearly worse values of a PNP transistor compared to the values of an NPN transistor.

On the left is an unused resistor. It is a pinch resistor where the base doping (p) represents the resistance, which is narrowed by a superimposed emitter doping (n+) so that the resistance value increases. On the far left, the resistor is connected to the insulation frame and thus to GND. These are three resistors connected in series, which could be contacted through three vias.


The two Darlington output stages are located in the lower area of the die. The driver transistor is integrated with the power transistor in the same collector area. The collector connection of the power transistor is massive over the whole circumference. This suggests that the collector connection is relatively inefficient. As already described, no contours of a buried collector can be seen. The base areas of the driver transistors are used to undercut the collector contacts.

The low-impedance resistors at the output consist of the heavily n-doped emitter material, which is located in base surfaces for insulation.

Several squares are integrated at the lower edge, allowing the alignment of the masks to be checked. One square is clearly visible in the right area, three more squares are located under the metal layer at the left bondpad.


If we analyse the circuit, we see that it is broadly similar to the circuit shown in the datasheet of the ECG717. In the PA243 there is an unused bondpad connected to the two transistors Q2/Q3 at the input. This seems to be a disable circuit of the input.

The unused transistor in the collector area of the input transistor Q1 could be a hold-off to add a third transistor to the Darlington pair Q1/Q8 to further increase the gain.

The diodes for setting the bias current are represented by four transistors of different sizes (Q4-Q7). This way, you can adjust the voltage drop and thus the bias current with a variation of the metal layer.


https://www.richis-lab.de/audioamp06.htm

 :-/O
 
The following users thanked this post: doktor pyta, RoGeorge, jbeng

Offline NoopyTopic starter

  • Super Contributor
  • ***
  • Posts: 1731
  • Country: de
    • Richis-Lab
Re: Different die pictures
« Reply #291 on: May 23, 2023, 06:44:03 pm »


Everybody knows this IR thermometer, which is labeled for a lot of different "manufacturer". Most of the time it is called DT8380. It measures temperatures between -50°C and 380°C with an accuracy of +/-2°C. There is a 9V block battery in the handle.


There are two openings on the front of the thermometer. A laser shines through the small opening and marks the spot where the temperature is meassured. The large opening forms the optical path through which the infrared radiation is guided into the interior of the thermometer.


The assembly for determining the infrared light intensity is relatively long. The cylinder ensures that lateral stray light disturbs the measurement as little as possible. Lenses for infrared radiation are often made of germanium or silicon (see for example Flir Lepton 2.5: https://www.richis-lab.de/Opto04.htm). In the case of the thermometer here, a less expensive plastic lens was sufficient. The Fresnel structure is clearly visible.


A small circuit board is screwed onto the back of the module, from which three wires lead away.


The board contains the IR sensor element in a TO package.


Apart from the aiming laser and temperature sensor, all electronic components of the thermometer are integrated on one circuit board. On one side, the board carries the LCD and three buttons for configuring the thermometer. To the left, the plastic of the LCD frame covers two LEDs that are the backlight of the display. On the other side of the board is the button that triggers the measurement.


The microcontroller, which controls the thermometer, was bonded directly to the pcb and protected from environmental influences with a black potting compound. Underneath, a T24C02A EEPROM provides 4kBit of memory. Above the microcontroller, there are conspicuously many capacitors. One can assume that the controller uses them to build up charge pumps to be able to generate the different voltages for the LCD. The controller also activates the marking laser via a transistor. Apart from some resistors and capacitors, the IR sensor is read directly without any further signal conditioning.

The unpopulated elements at the upper edge of the pcb and the corresponding labeling suggest that the board was prepared to drive a buzzer, which is powered directly from the battery. The backlight is switched by two transistors in the center of the pcb.

A Holtek HT7530-1 voltage regulator generates a stable 3V supply from the 9V battery. To detect a low battery level anyway, the battery voltage is fed to the microcontroller via a small circuit of two transistors. The transistors are marked with the strings 2A and J6. J6 stands for the NPN transistor S9014 from BL Galaxy Electrical, which was used more often on the pcb. 2A is the SMD code for the PNP transistor MMBT3906, which is produced by several manufacturers. It seems quite likely that this transistor is also built by BL Galaxy Electrical.

Several vias are placed on the left edge and in the lower left corner. Vss and Vdd obviously power the circuit. Vpp usually refers to a higher supply voltage needed to program a device. The T24C02A does not require an elevated programming voltage. It is likely that this voltage can be used to program the microcontroller. RST is obviously the reset input of the controller. The potential PT20 leads to the on/off button and thus enables switching on with a control signal.

It is quite possible that after the thermometer is produced, software is loaded or a test is performed via this interface. A data interface cannot be recognized directly. However, it is possible that certain potentials, such as PT20, have a dual function and are used for data transmission.

The labeling of the contacts on the left edge shows that a calibration can be carried out over it. This area of the board can be reached through the battery compartment in the handle. The potential leads directly to the microcontroller.


The microcontroller is integrated on a die with an edge length of 2,4mm. I can´t tell what kind of component or manufacturer it is. Apart from the usual functions, this microcontroller also needs the charge pumps to supply the LCD and the appropriate outputs to control the LCD. Perhaps the controller was manufactured especially for this application.


The only designations found on the die are the character pairs 21 and A5 in the upper right corner and seven mask revisions in the lower right corner. Judging by the colors and textures, these are three metal layers and their contacting areas.


Despite the high integration density, you can clearly see the irregular structure of a large logic block in the upper area on the left. On the right is a large memory area.


In detail, you can see the regular horizontal supply lines in the logic area, which are fed from both sides. A large number of signal lines lead downwards.


The memory area contains a large regular area flanked on two sides by relatively wide, structurally divergent circuits. This is probably an EEPROM. Usually, conspicuous charge pumps are needed to write to an EEPROM (see for example the 24xx04: https://www.richis-lab.de/ROM05.htm). Here there are no charge pumps to be seen. This fits with the fact that the interface on the board offers a connection for a programming voltage Vpp.


In the lower half of the die, some different function blocks are integrated. The dense, regular structures in the right part could represent memory areas. The different structures contain at least the drivers for the charge pumps to supply the LCD, an ADC to read the sensor and the auxiliary circuits required by the microcontroller to operate.


In the left corners, two structures are placed surprisingly far out. The upper element could be an oscillator.


More pictures coming soon...  ;)


https://www.richis-lab.de/DT8380.htm

 :-/O
 
The following users thanked this post: TurboTom, RoGeorge

Online T3sl4co1l

  • Super Contributor
  • ***
  • Posts: 21673
  • Country: us
  • Expert, Analog Electronics, PCB Layout, EMC
    • Seven Transistor Labs
Re: Different die pictures
« Reply #292 on: May 24, 2023, 09:11:49 am »
Hmm, charge pump might not be needed if there's VPP (high voltage programming) available?

Also EEPROM vs. Flash, what's the difference?  EEPROM would be weird given the onboard part, but code storage can be just whatever.

Tim
Seven Transistor Labs, LLC
Electronic design, from concept to prototype.
Bringing a project to life?  Send me a message!
 

Offline NoopyTopic starter

  • Super Contributor
  • ***
  • Posts: 1731
  • Country: de
    • Richis-Lab
Re: Different die pictures
« Reply #293 on: May 24, 2023, 09:21:52 am »
Hmm, charge pump might not be needed if there's VPP (high voltage programming) available?

Exactly. That would fit perfectly: No charge pump but a Vpp connection to program the microcontroller.


Also EEPROM vs. Flash, what's the difference?  EEPROM would be weird given the onboard part, but code storage can be just whatever.

Probably the missing "memory charge pump" made it necessary to integrate some external memory. If you want to do a calibration you need a possibility to save some numbers without Vpp available.

Offline Georgy.Moshkin

  • Regular Contributor
  • *
  • Posts: 146
  • Country: hk
  • R&D Engineer
    • Electronic projects, modules and courses on Arduino and STM32
Re: Different die pictures
« Reply #294 on: May 24, 2023, 09:55:12 am »
In the upper right corner, where the copyright is displayed on the 78132, the U80703 has a small silicon art that appears profound. On the left, one has integrated a clock that shows 7 minutes to 12. To the right, a stick figure holds the house of a snail. What the element above the snail's shell means remains unclear. It could be a crane.  :-//
My first impression was that a person pushes a snail to make calculations faster, but it does not help much. Element above snail's shell may be a single bit of information. Snail transports ones and zeroes, and currently it is "1".

Offline NoopyTopic starter

  • Super Contributor
  • ***
  • Posts: 1731
  • Country: de
    • Richis-Lab
Re: Different die pictures
« Reply #295 on: May 24, 2023, 04:10:32 pm »
In the upper right corner, where the copyright is displayed on the 78132, the U80703 has a small silicon art that appears profound. On the left, one has integrated a clock that shows 7 minutes to 12. To the right, a stick figure holds the house of a snail. What the element above the snail's shell means remains unclear. It could be a crane.  :-//
My first impression was that a person pushes a snail to make calculations faster, but it does not help much. Element above snail's shell may be a single bit of information. Snail transports ones and zeroes, and currently it is "1".

That's an interesting interpretation.
Some friends of mine are still trying to investigate the people that were involved in the development to ask them about this picture. Unfortunately it's unclear if they are lucky enough to find an answer.

Offline TurboTom

  • Super Contributor
  • ***
  • Posts: 1389
  • Country: de
Re: Different die pictures
« Reply #296 on: May 24, 2023, 11:27:06 pm »
Seems like this once useful instument also suffered the ubiquitious "planned obsolescense" problem in form of a rubberized coating of the casing that after a few years turns into a sticky sludge... Over the years I fell victim to this trap several times with (not only) alleged bargain purchases (even premium brand cars use this rubbish on internal plastic parts, albeit there they tend to last somewhat longer, but still not long enough...). This made me quite "allergic" to this kind of surface treatment -- unfortunately, when buying online, it's difficult to tell about the surface treatment used. Too bad our "western" economy apparently needs such shams.

Noopy, thanks for the enjoyable microphotographs and the corresponding explanations! I really appreciate your effort a lot.  :-+
 

Offline NoopyTopic starter

  • Super Contributor
  • ***
  • Posts: 1731
  • Country: de
    • Richis-Lab
Re: Different die pictures
« Reply #297 on: May 25, 2023, 03:04:30 am »
Seems like this once useful instument also suffered the ubiquitious "planned obsolescense" problem in form of a rubberized coating of the casing that after a few years turns into a sticky sludge...

Absolutely right...


Noopy, thanks for the enjoyable microphotographs and the corresponding explanations! I really appreciate your effort a lot.  :-+

Thanks for the positive feedback!  :)


I think I found the controller of this device (to be honest someone gave me a hint). It seems like it is a SD8709 or at least it is very similar. I have attached the datasheet.  :-/O

Online magic

  • Super Contributor
  • ***
  • Posts: 6778
  • Country: pl
Re: Different die pictures
« Reply #298 on: May 25, 2023, 08:28:55 am »
Seems like this once useful instument also suffered the ubiquitious "planned obsolescense" problem in form of a rubberized coating of the casing that after a few years turns into a sticky sludge...

Absolutely right...
I had a "gaming" mouse with this problem and I found that the sticky crap can be removed chemically.
I'm 99% sure it was acetone, or maybe IPA which is likely the first thing I would try and which probably wouldn't work very well.
Beware that acetone damages some plastics (ABS notably, to my surprise also some PVC).
 

Offline NoopyTopic starter

  • Super Contributor
  • ***
  • Posts: 1731
  • Country: de
    • Richis-Lab
Re: Different die pictures
« Reply #299 on: June 26, 2023, 09:44:51 am »


The plastic box shown here contains an mask for the production of the A231 integrated circuit. As the labeling shows, the mask comes from the semiconductor plant Frankfurt Oder, more precisely from Markendorf. There is the year 1979 and two characters that cannot be assigned. On the back of the box, a sticker celebrates 20 years of HFO.


https://www.richis-lab.de/images/masken/01x03.jpg

The mask rests with its edges on staircase-shaped structures. A foam fixes the mask in the housing.


The glass has an edge length of 6,3cm and is 1,65cm thick. The structures occupy an area with an edge length of 5,3cm. On the upper edge, one has inscribed the mask with the characters A231-D-0.

As usual at that time, there is a kind of arrow in the center, which contains the designation of the device and indicates the orientation of the mask on the wafer. Two times three squares are arranged in a square around the center structure and stand out visually. These contain test structures that make it possible to check the quality of individual elements without them being influenced by surrounding circuit parts.


As will be shown later, the structures on the mask are mapped 1:1, i.e. they are the same size as the structures on the integrated circuit. A size comparison with the A210 wafer (https://www.richis-lab.de/wafer02.htm) shows that this is an exposure mask for 2" wafers. The wafer is completely exposed in one step. More modern exposure processes often use so-called steppers, in which a smaller mask exposes the wafer piece by piece. In this case there is an optical system between the wafer and the mask, so that the structures on the masks can be larger than the structures on the integrated circuit.


In the upper left corner, in a black rectangle, you can see the designation 2z112A231-D. It will be seen that the A231 shown here is a second revision. The designation A231 is clearly recognizable in the character string, the meaning of the other characters remain unclear.


In the above images, the coating is on the top of the glass plate. The handwritten markings on the upper edge are legible. The characters on the lower edge, however, are mirror-inverted.

During exposure, the coated side faces the wafer. If the glass plate were between the contours and the wafer, it would be impossible to image such small structures sharply. If something is to be imaged correctly on the wafer, then it must be applied mirror-inverted in the coating.


If the coating is photographed through the glass plate, the structures are displayed correctly. In this image, you can clearly see the relationship between the height of the glass plate and the size of the structures to be imaged.

At the bottom edge there is the string 2z112A231D-09169, which is similar to the inscription in the corner of the mask: 2z112A231-D.


The numbers 9 and 69 were painted on the non-coated side. It does not appear to be a datecode, as the oldest discoverable mentions of the A231 date back to 1978.


The coating of the mask is somewhat scratched and dirty. The smallest elements are about 8µm in size. For manufacturing such masks often chrome was used.


Here you can see the structure in the center of the mask. The string shows that this is a second revision of the A231.

In order to achieve the best possible image quality, the detailed images of the structures are taken from the coated side (left). To ensure that the structures on the mask can still be matched to those on the integrated circuit, all of the following images are mirrored (right).


The individual areas are 2,2mm x 1,7mm in size. With some background knowledge (e.g. from the A109 https://www.richis-lab.de/Opamp72.htm), the structures reveal that this is most likely the third mask of the process. It defines where the p-doping is introduced, which represents the base areas for the NPN transistors, generates the collector and emitter areas of the PNP transistors and with which resistors are generated.


The structures within the six test areas already allow conclusions to be drawn about the elements that will be integrated there.


The same test structures are integrated on the A210 wafer (https://www.richis-lab.de/wafer02.htm#test). A more detailed description of the elements can also be found there. On this wafer, the test structures are almost completed. Just the metal layer is missing.


[...]

 :-/O
 
The following users thanked this post: RoGeorge

Offline NoopyTopic starter

  • Super Contributor
  • ***
  • Posts: 1731
  • Country: de
    • Richis-Lab
Re: Different die pictures
« Reply #300 on: June 26, 2023, 09:45:55 am »


Here you can see a finished A231. The letters MD are ambiguous. They can stand for October 1963 or December 1980. In this case, it is certainly December 1980.


The datasheet contains just a block diagram of the A231. As an RGB matrix, the A231 generates the three color signals in analog color televisions from the luminance signal and the two color difference signals. The block diagram also includes a reference voltage source and a dark keying circuit.


A detailed circuit diagram of the A231 is shown in Radio Fernsehen Elektronik 5/1978.


The die in the A231 housing is exactly the same size as the individual elements on the mask (2,2mm x 1,7mm) within the tolerances. The characters 02A231 are shown on the upper edge. Consequently, this is the same revision that is also shown on the mask.


There is also a die that has been sorted out. In the center, you can still see the remains of the colored dot that marks the die as a reject. This is also the second revision and there are no other special features.


With the real circuit, one can now also take a closer look at the structures of the mask. Here, the areas that are p-doped as part of this process step are colored.


You can also invert the mask to mark the areas that will be left out by the p-doping.


On the left and on the upper edge there are two points each (yellow), which are used to place the individual masks exactly on top of each other. In the lower left corner, further structures show how well the masks are aligned against each other (orange).

No p-doping is introduced under the bondpads. Only in the upper left corner the mask defines a p-doping (green). The reference potential of the A231 is supplied via this bondpad. The p-doping connects the reference potential to the substrate and ensures that the individual wells of the device remain isolated from each other.

The resistors are represented by strips of p-doping (pink). Thin strips have larger contact areas at the ends. Thick strips can be contacted without special geometries.

The NPN transistors (blue) are of different sizes. They have a strip of p-doping as a base area. Partly there is an additional narrow strip in the corresponding wells, which can be used as a resistor or for crossing lines.

In the left area there are two PNP transistors (red).


The two NPN transistors T24 and T25 are shown here as examples. As described, the p-doping forms the base areas of these transistors, into which the emitter areas are then introduced. The additional stripe in the upper transistor represents the resistor R29.


The outputs of the A231 are equipped with large NPN transistors. The large collector contact can be seen on the left under the metal layer. In the large base area there are three emitter areas, in the spaces between which the base potential is supplied.

In the lower area a square can be seen, which represents a driver transistor. The emitter area can be seen a little better in other pictures. Together the two transistors represent a Darlington pair.


The double structure in the left area of the die generates the two PNP transistors T31 and T32. Usually the smaller p-doped area in the center of such a structure is the emitter, here the collectors are located there. The large p-doped rectangle forms the common emitter. The n-doped well represents the base area.

From the emitter rectangle a stripe leads to the transistor T52, which seems to be overlaid by the strong n-doping of the NPN emitters. As a pinch resistor, this structure provides a relatively high resistance value. The resistor is not mentioned in the schematic.


https://www.richis-lab.de/maske01.htm

 :-/O
 
The following users thanked this post: xrunner, RoGeorge, ch_scr

Offline NoopyTopic starter

  • Super Contributor
  • ***
  • Posts: 1731
  • Country: de
    • Richis-Lab
Re: Different die pictures
« Reply #301 on: July 06, 2023, 10:57:47 am »


The XR2206 is a function generator from Exar that covers a frequency range from 0,01Hz to 1MHz. The device can generate a sine, a square wave, a triangle signal and a ramp. Amplitude, frequency and duty cycle can be modulated. The supply voltage may range between 10V and 26V.


In the datasheet a block diagram shows the integrated function blocks. The base is a VCO, a voltage controlled oscillator. The clock frequency is defined by an external capacitor at pins 5 and 6 and external resistors at pins 7, 8 and 9. With a fixed capacitance value a frequency range of 2000:1 can be swept. Via inputs 7, 8 and 9

The square wave signal is output directly. The VCO also feeds a sine converter. The connection is not shown. Depending on the position of switch S1, the function block supplies a triangle or a sine signal. Pins 15 and 16 can be used to adjust the symmetry of the signal. R3 influences the level of the triangle or sine signal.


The datasheet also contains a complete circuit diagram of the XR2206.


The dimensions of the die are 2,6mm x 2,2mm. The metal layer shows the designation 2206. The numbers 05 in the upper right corner cannot be assigned directly, perhaps it is a revision counter. In the silicon, there is the string M5145. Maybe the basic design is used for another device. This theory is supported by the fact that quite some elements are not connected in the XR2206.


The non used elements and the large structures give us a very clear picture of the structures of the different components.


https://www.richis-lab.de/gen03.htm

 :-/O
 
The following users thanked this post: RoGeorge, ch_scr, MegaVolt, iMo

Offline NoopyTopic starter

  • Super Contributor
  • ***
  • Posts: 1731
  • Country: de
    • Richis-Lab
Re: Different die pictures
« Reply #302 on: July 20, 2023, 08:40:23 pm »


Motorola developed the Optobus, a system that should make it possible to use the large bandwidth of optical fibre connections without the usually high investment. The IEEE paper "A Low-Cost High-Performance Optical Interconnect" states a target of $300/GBit. In Motorola's application note AN1572, there is even a figure of $100/GBit for a high volume production run. Motorola had a website for the Optobus system which contains the specifications of the Optobus module. A transmission rate of 4GBit/s over 300m is specified. Strictly speaking, it is 10Bit transmitted in parallel at 400MBit/s.

The Optobus system was apparently never produced in a larger quantities. In the magazine Electronic News Vol. 40 (November 1994) you can read that series production was supposed to start in the third quarter of 1995. The transceiver shown here must still be a sample. It was produced in June 1994. As will be shown later, the construction does not yet correspond to the series production. There are many IEEE articles on the Optobus system, some of which contain different specifications. They apparently reflect the development of the transceivers.

 The Motorola website also contains information on the successor Optobus II, which was supposed to enable a transmission rate of 8GBit/s over 200m. The IEEE paper "OPTOBUS I: Performance of a 4Gb/s Optical Interconnect" (1996) mentions that the Optobus II modules should be available at the end of 1996, only shortly after the Optobus I system.


Application Note AN1572 shows for which bandwidths and distances the Optobus system is suitable and for which areas it should be developed further.


The IEEE article "OPTOBUS I: Performance of a 4Gb/s Optical Interconnect" shows a rough block diagram of the device. It is a transparent interface. The input signal controls a laser diode, whose signal is evaluated by a photodetector and output again. The switching threshold is fixed.


Application Note AN1572 shows the function blocks in more detail. These are two 10Bit wide interfaces. One interface is used for sending, the other for receiving data. Only one transmission direction is shown here.

The transmitting side contains special laser drivers. The receiving side has four stages. The first stage is a transimpedance amplifier that converts the current of the photodiode into a voltage. The second stage amplifies the signal, which is evaluated in a third stage. Special output drivers finally output the transmitted data differentially.


The dimensions of the Optobus module are 3,7cm x 3,9cm. It is a pin grid array (PGA-196) with 96 pins on the underside. 40 pins carry 10 differential input signals and 10 differential output signals. The other 56 pins are connected to the supply and reference potentials and ensure that the high frequencies remain controllable. In addition, the many pins improve the heat dissipation of the module. Motorola's Optobus website assigns 101 pins to the module. Apparently, five more pins have been added to the series version.

As you can clearly see, this is a used module that was already soldered into a circuit board. When the module was removed from the board, some of the pins were torn out of the pin grid array.


In the upper left area, the placement print represents some strings that can only be partially assigned. MCM-L stands for "laminated multichip module". Formation B could indicate a second revision. 9351 probably represents a datecode.


The board has an edge length of 3,56 cm. There is no solder resist on the top side, so that you can partly see the traces in the second layer. The copyright in the upper right corner refers to the year 1993, which matches the datecode in the assembly print on the back.

On the upper edge, the two components that represent the optical interfaces stand out. They are made of a translucent polymer. A more detailed analysis of these elements will follow. The right-hand component was soldered off the board and then reattached with hot glue. Probably one wanted to keep the optical appearance to some extent.

Motorola attached the integrated circuits as bare die to the board and connected them electrically with bondwires. Most of the bondwires are already bent and torn off.


In order to be able to present a transceiver module that is as cost-effective as possible, a common FR4 board material was used. The layer structure is described very differently in the various IEEE articles. Presumably they reflect the further development of the module:
"Parallel Optical Interconnects Using VCSELs" (August 1995): 7 layers, 4 of them with 70µm.
"Characteristics of VCSEL Arrays for Parallel Optical Interconnects" (May 1996): 4 layers, 2 of them with 70µm
"A Low-Cost High-Performance Optical Interconnect" (August 1996): 8 layers, 4 of them with 70µm

The many layers were necessary to guarantee sufficient signal integrity. The high copper content has a positive effect on heat dissipation too. There are also different specifications for the power dissipation of the module:
"Parallel Optical Interconnects Using VCSELs" (August 1995): 1,7W.
"Characteristics of VCSEL Arrays for Parallel Optical Interconnects" (May 1996): 1,5W
"A Low-Cost High-Performance Optical Interconnect" (August 1996): 1,6W
Optobus website of Motorola: 1,35W

In detail, you can see the glass fibre mats embedded in the epoxy, which consist of longitudinal and transverse interwoven bundles. In the upper and lower areas, the bundles are thinner and are correspondingly closer together. At these levels, the parasitic properties are more homogeneous, which is advantageous for very fast signals. Whether this fact was relevant here or whether the layers simply resulted that way remains open. A layer structure cannot be clearly recognised in these images.


If one grinds the board at the lower left and right corners up to the first vias, these pictures emerge. Seven layers are visible. This is unusual, as boards are usually built symmetrically. The thicknesses of the copper layers are also asymmetrical here. In the upper area there are two 35µm copper layers, while most of the other layers have a thickness of 70µm. The bottom layer is a little thicker at 105µm.


This transceiver is obviously a development model. The IEEE articles describe that it was planned to encapsulate the circuit carrier. The shape of the housing was obviously also adapted in this context.

(Left: "Handbook of fibre optic data communication" Middle: IEEE "OPTOBUST: A Parallel Interconnect Solution" Right: Motorola Optobus website)


The IEEE article "A Low-Cost High-Performance Optical Interconnect" describes the construction of the series module in more detail. According to this, a dam is placed in the outer area of the board, which makes it easier to encapsulate the electronics completely.

In the picture on the left from the "Handbook of fibre optic data communication" the dam is clearly visible. The layout of the transceiver is slightly different from the module documented here. In the right picture from "Optobus I: Performance of a 4Gb/s Optical Interconnect" again a slightly different revision can be seen. There, the optical modules seem to be constructed differently too.


The two optical components each contain 10 channels. The receiver is integrated in the left half. After the optical signals have been converted into electrical signals, they are first evaluated in the input amplifier (red). Its output signals pass through two output drivers (yellow).

The transmitter of the Otpobus module is located in the right half. A laser driver (green) receives the input signals and controls the laser diodes. A reference voltage source is integrated on the right edge (purple).


[...]

 :-/O
 
The following users thanked this post: T3sl4co1l, doktor pyta, RoGeorge, ch_scr, MegaVolt, D Straney

Offline NoopyTopic starter

  • Super Contributor
  • ***
  • Posts: 1731
  • Country: de
    • Richis-Lab
Re: Different die pictures
« Reply #303 on: July 20, 2023, 08:41:32 pm »


Application Note AN1572 shows the circuitry at the outputs of the Optobus module in more detail. A so-called Current Mode Logic (CML) is used. This is a differential amplifier from which the differential output signal can be tapped. With a total current of 5mA and 50Ω pull-up resistors, the voltage between the outputs is 0.25V. This setup allows rise and fall times of 500ps. According to the IEEE articles, the receiver side of the Optobus module draws a current of between 160mA and 200mA at 5V.


The IEEE article "Parallel Optical Interconnects Using VCSELs" (August 1995) describes that especially the design of the receiver component was challenging. The input capacitance was not allowed to exceed 5pF. The inductance had to remain below 7nH. The receiver can evaluate currents from 20µA. Consequently, signals from 40µW can be detected on the optical side. A little later, the value is reduced to 29µW ("Characteristics of VCSEL Arrays for Parallel Optical Interconnects", May 1996). The IEEE article "OPTOBUS I: A Production Parallel Fiber Optical Interconnect" (May 1997) states that the bandwidth of the front end is 750MHz, which allows for a safe datarate of 400MBit/s. Up to 600MBit/s has already been shown.

The signals are supplied from the top and output at the bottom edge. The die is supplied from the left and right. You can just about see that in the lower area three signals lead to the left and two signals to the right. The other five signals must be in a lower position. This probably explains part of the board's construction, where layers 2 and 4 have a thickness of 35µm, while all other layers are thicker. Layers 2 and 4 were apparently used as signal layers.


To the left and right of the receiver are three capacitor blocks each. Each capacitor offers a capacity of 1nF.


Special resistors are soldered on the right and left side of the receiver. The right resistor has been calibrated.


Despite the solid metal layer you can clearly see the ten amplifier sections. The signal inputs and outputs are in a second row. Towards the outside, 12 ground bondpads have been placed on both sides. Obviously, the component is supplied from the side edges. The different amplifier stages seem to have two separate supplies.

The IEEE article "A Low-Cost High-Performance Optical Interconnect" states that the switching threshold of the device can be adjusted with metallisation and bonding variants. Neither is evident here. However, it could well be that the switching threshold was set with the adjustable resistors.


The IEEE article "Parallel Optical Interconnects Using VCSELs" (August 1995) describes that Motorola's MOSAIC III process was used here. A bipolar 2µm process with a cut-off frequency of 16GHz. The IEEE article "OPTOBUS I: A Production Parallel Fiber Optical Interconnect" (May 1997) reports a 1,5µm process. Motorola's Optobus website specifies a cut-off frequency of 12GHz.

Motorola's document "ECLinPS Data" contains the above picture. It shows the simplified structure of a transistor from the MOSAIC III process. According to this, it is a process with two polysilicon layers, which makes it possible to build very small structures with very small parasitic capacitances, which has a correspondingly positive effect on the cut-off frequency.


The MCA10000ECL gate array datasheet shows a more realistic cross-section of a MOSAIC III transistor.


The design dates from 1993 and the internal designation appears to be E14HZA1.


At least two layers of metal were used. The large surfaces on the side edges could be capacitors that stabilise the supply voltage.


Underneath the receiver component are two output drivers that are very similar to the input amplifier. They each receive five signals and output them differentially.

It is easy to see that there are areas for placing several capacitors.


The similarity between the two output drivers and the input amplifier is clearly visible.


The designations of the input amplifier (top) and output driver (bottom) are just as similar as their structures. Most likely, the same basic design was used for both circuits and only the metal layer was varied.


Also in detail, the structures are very similar to those of the input amplifier. At the same time, the differences can be seen under the upper metal layer. Here, one channel occupies two of the vertical columns.


Both output amplifiers show severe damage. It could be an electrical overload. However, it could also be that the non-optimal handling over a long period of time has promoted corrosion effects.


Even on the surface, the laser driver looks very different. However, the signal routing is very similar. The ten differential signals arrive from below and are output upwards as control signals for the laser diodes.

The IEEE article "Parallel Optical Interconnects Using VCSELs" contains some details about the laser driver. According to this, it consumes up to 120mA when driving the ten outputs with 5mA each. With the worst possible laser diodes, transmission frequencies of 250MHz would still be possible. Speeds of up to 500MHz have been tested.


Application Note AN1572 shows the structure of the laser driver: A current source provides a certain quiescent current through the laser diode. The current threshold at which the laser effect begins can thus be reached more quickly. Depending on the input signal, a differential amplifier passes an additional current through the laser diode and thus modulates the laser beam.


To the right of the laser driver is a balanced resistor. Compared to the resistors of the input amplifier, the construction only allows for a much less precise adjustment. Most likely, the power of the laser diodes is adjusted with this resistor. In order to achieve a high transmission rate, the power should be as high as possible. At the same time, the optical power of the individual laser diodes must remain below 1mW. Higher powers would force increased protective measures.

It can be assumed that the stable voltage of the voltage reference is also used to adjust the light output. Thus, the light output is much less dependent on the input voltage and the operating temperature.


Motorola's Optobus website states that the driver was manufactured using a 1µm CMOS process. In the IEEE articles, the structure width is documented as follows:
"Parallel Optical Interconnects Using VCSELs" (August 1995): 1µm.
"A Low-Cost High-Performance Optical Interconnect" (August 1996): 0,8µm
"Characteristics of VCSEL Arrays for Parallel Optical Interconnects" (May 1996) 1µm

The division of the die into ten areas for the ten laser diodes is clearly visible. Wide supply lines run between the areas, alternately carrying the two potentials.

The IEEE article "Parallel Optical Interconnects Using VCSELs" mentions that there is a total of 3nF of capacitance on the die to stabilise the supply voltage. This makes it clear that the twice four long horizontal strips represent capacitors. Consequently, the laser drivers only occupy the small part of the area in the middle of the die.

In each column you can see two signal lines coming from the bottom and two signal lines going up. As is well known, the input signal is supplied differentially. The two lines leading upwards carry the output potentials of the differential amplifier. The branch that only diverts the control current to earth is also led to the upper edge of the die and connected to the reference potential outside. This measure guarantees operation with as little interference as possible.


Here you can see the wide supply lines of the circuit. The frame structure has its own supply potentials. The large capacitors do not have any special structures.


The driver itself consists of several elements. In the lower area, the input signal is processed (yellow). A little further away is the differential amplifier that controls the laser diode (green). Above this, three current sources are integrated. Two current sources jointly supply the differential amplifier (red). One current source generates the constant quiescent current through the laser diode (blue).


The IEEE article "Parallel Optical Interconnects Using VCSELs" mentions that one can adjust both the quiescent current and the modulation current via bond connections in 0,5mA steps. The structures confirm this. There are 12 wires running through each of the three current sources. On the left side of the die a circuit controls the 24 lines of the current sources of the differential amplifier. On the right side a similar circuit controls the 12 lines of the current sources for the quiescent current setting. In detail, these are probably individual current sources that can be switched on or off. Fittingly, five leads on the left and four leads on the right lead to the side bondpads.

The additional circuitry in the lower area on the right side of the die certainly represents a common bias setting for the input amplifiers.


https://www.richis-lab.de/transceiver03.htm

 :-/O
 
The following users thanked this post: T3sl4co1l, RoGeorge, ch_scr, D Straney

Offline NoopyTopic starter

  • Super Contributor
  • ***
  • Posts: 1731
  • Country: de
    • Richis-Lab
Re: Different die pictures
« Reply #304 on: July 29, 2023, 08:30:39 pm »
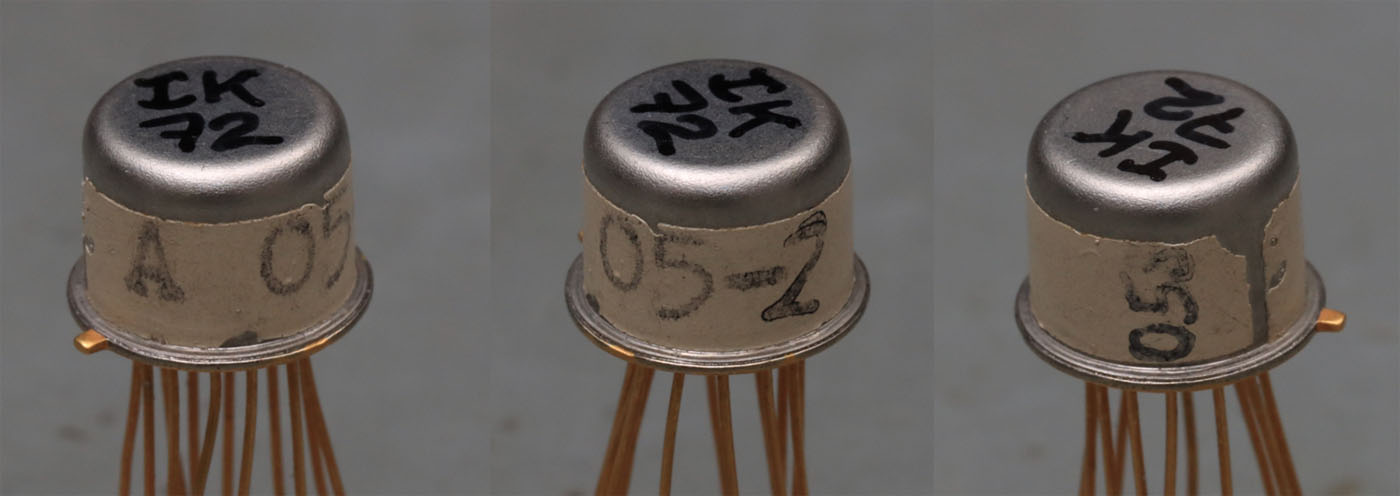
It seems I have postet the IK72 before I startet to post the parts here in the EEVblog-Forum. Now that I have a second (different) IK72 lets talk about both.


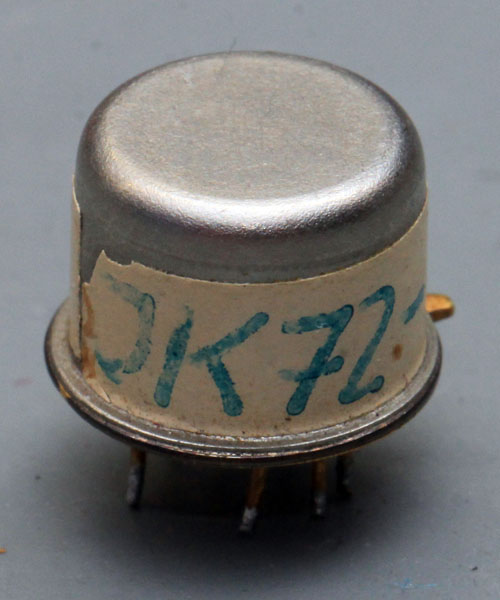
The IK72 is the first monolithic integrated analogue circuit developed in the GDR. The development took place in the R&D department of the Halbleiterwerk Frankfurt Oder (HFO) in Stahnsdorf. The first components were available in 1972. The IK72 represents a differential amplifier including a current sink that can be used for various circuits. Compared to a discrete differential amplifier, an integrated differential amplifier has the great advantage that the transistors have very similar characteristics and also operate at relatively the same temperature levels.

Very little is known about the IK72. The information available online so far was limited to a circuit example from an RFE magazine (1974/18). According to this, the IK72 contains a differential amplifier consisting of two transistors with a third, common transistor at the emitters. However, the article also points out in this circuit diagram that "only the wired parts are shown".

The model seen here is marked with a paper banderole and comes from a developer who should develop a PLL circuit in 1975. It is therefore almost certainly a real IK72.


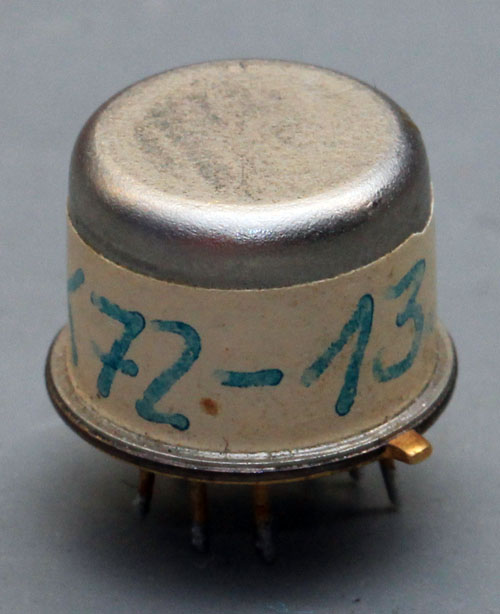
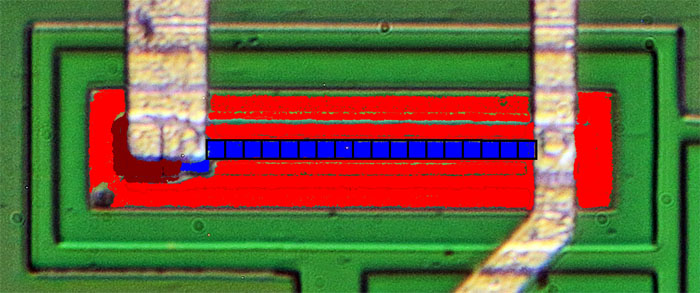
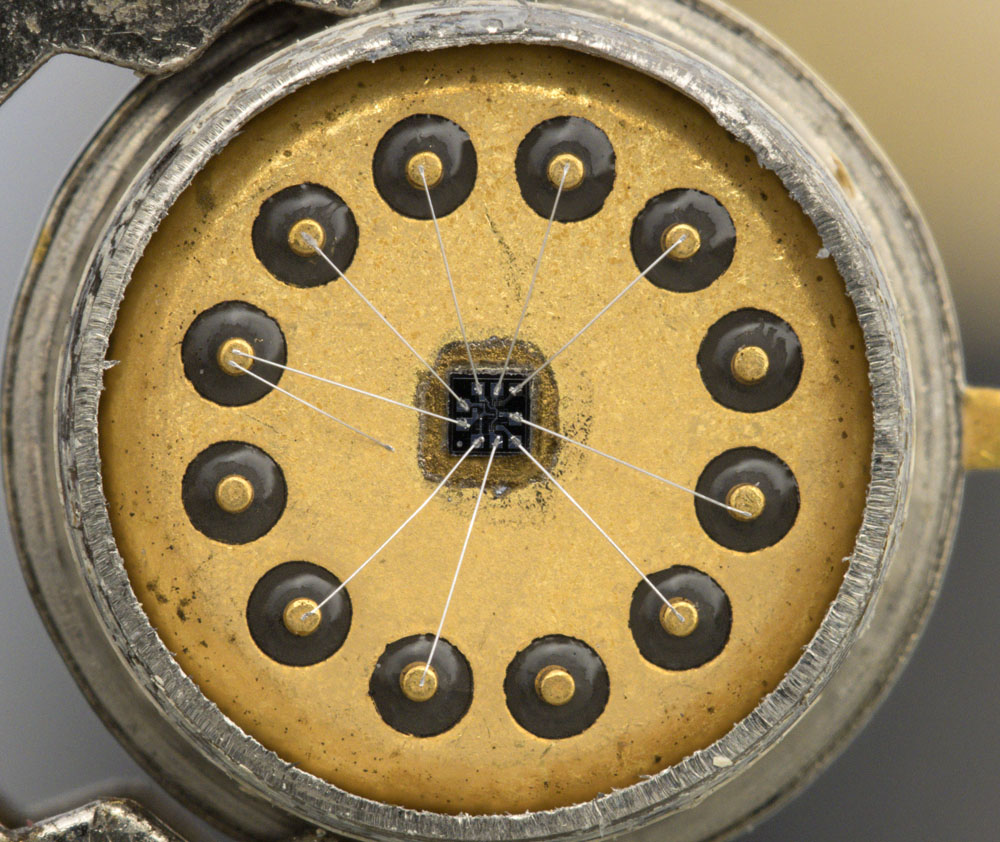
The full designation is IK72-13 0109.


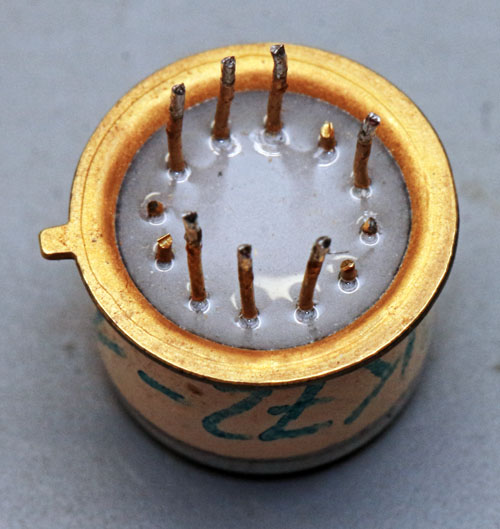
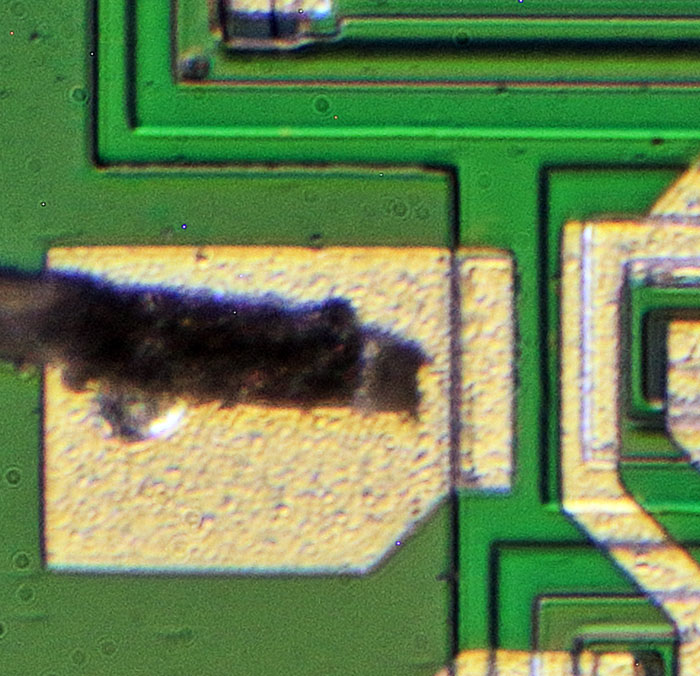
The package has 12 pins. Some of them were cut very short on this component.


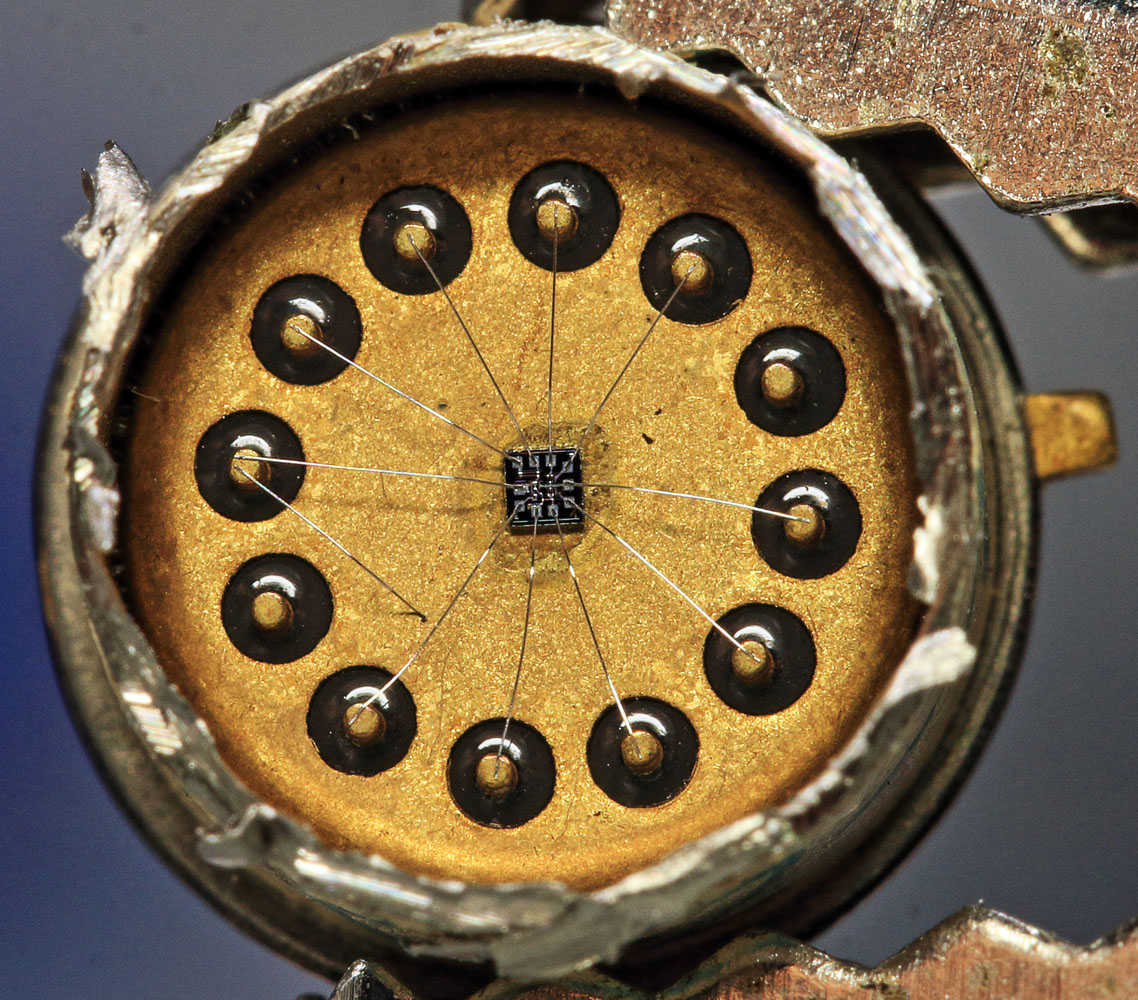
Inside, it shows that 10 of the 12 pins have been connected to the die. One pin additionally defines the housing potential.


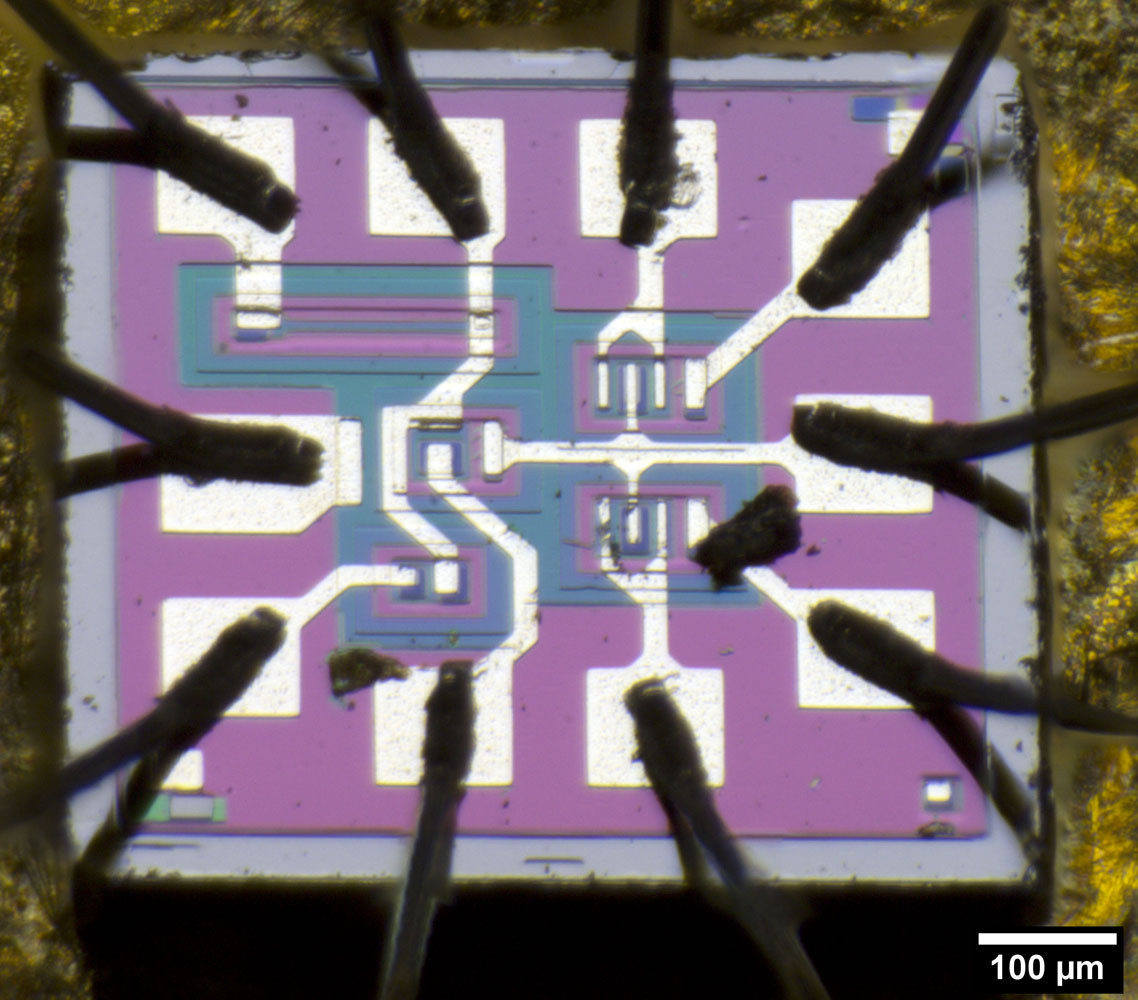
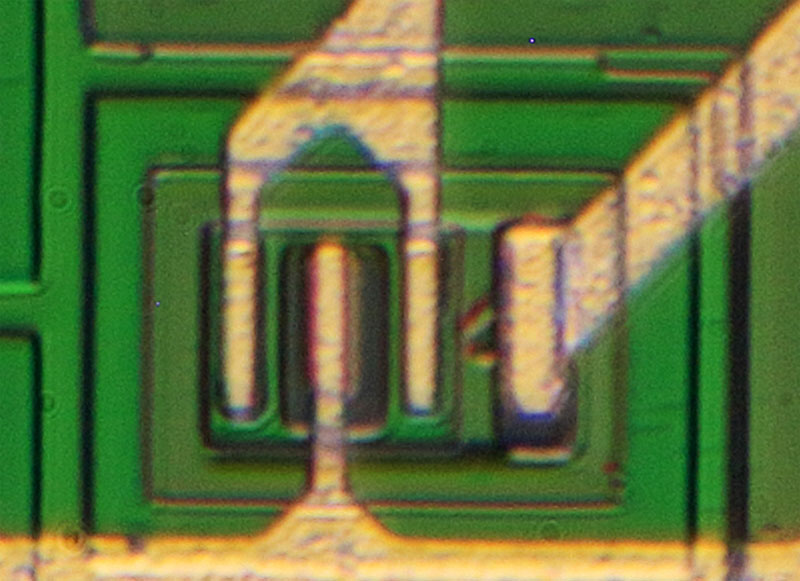
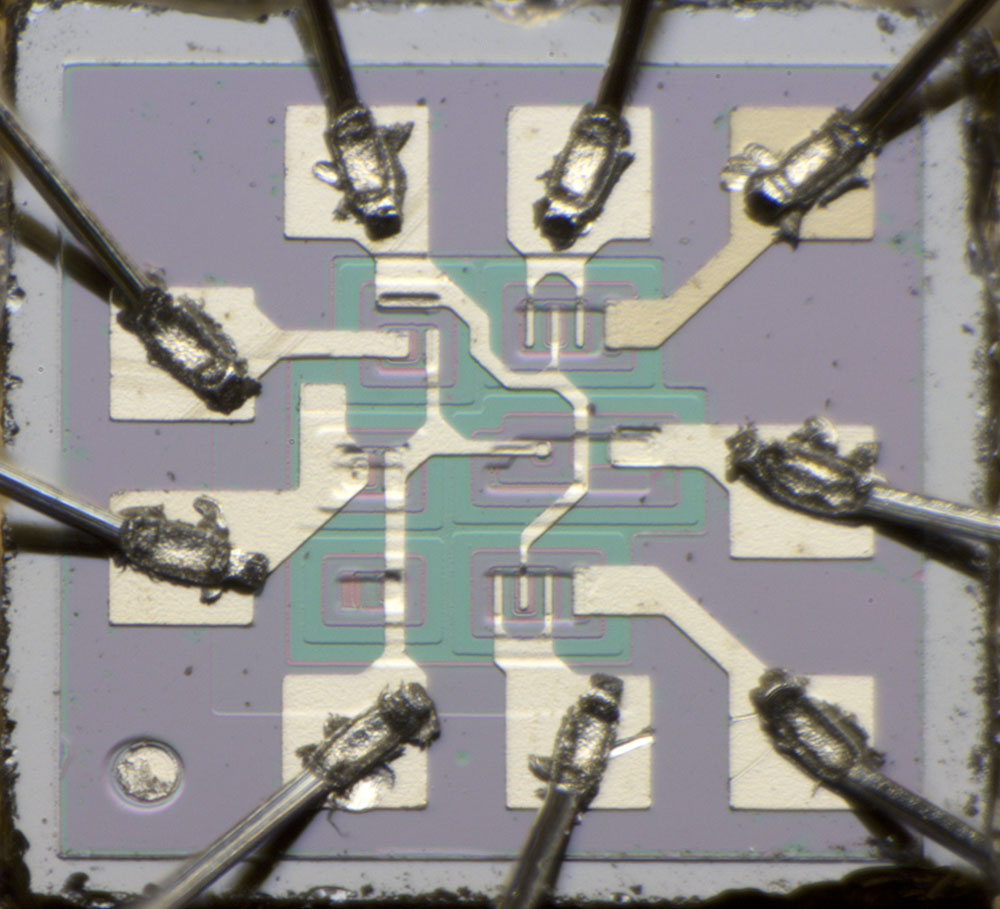
The dimensions of the die are approximately 0,7mm x 0,6mm. There are two particles on the die that cannot be removed with compressed air or by rinsing with isopropanol. Mechanical cleaning could damage the bondwires and should therefore be avoided for the time being.


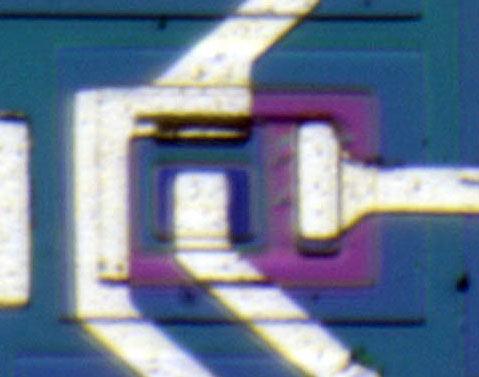
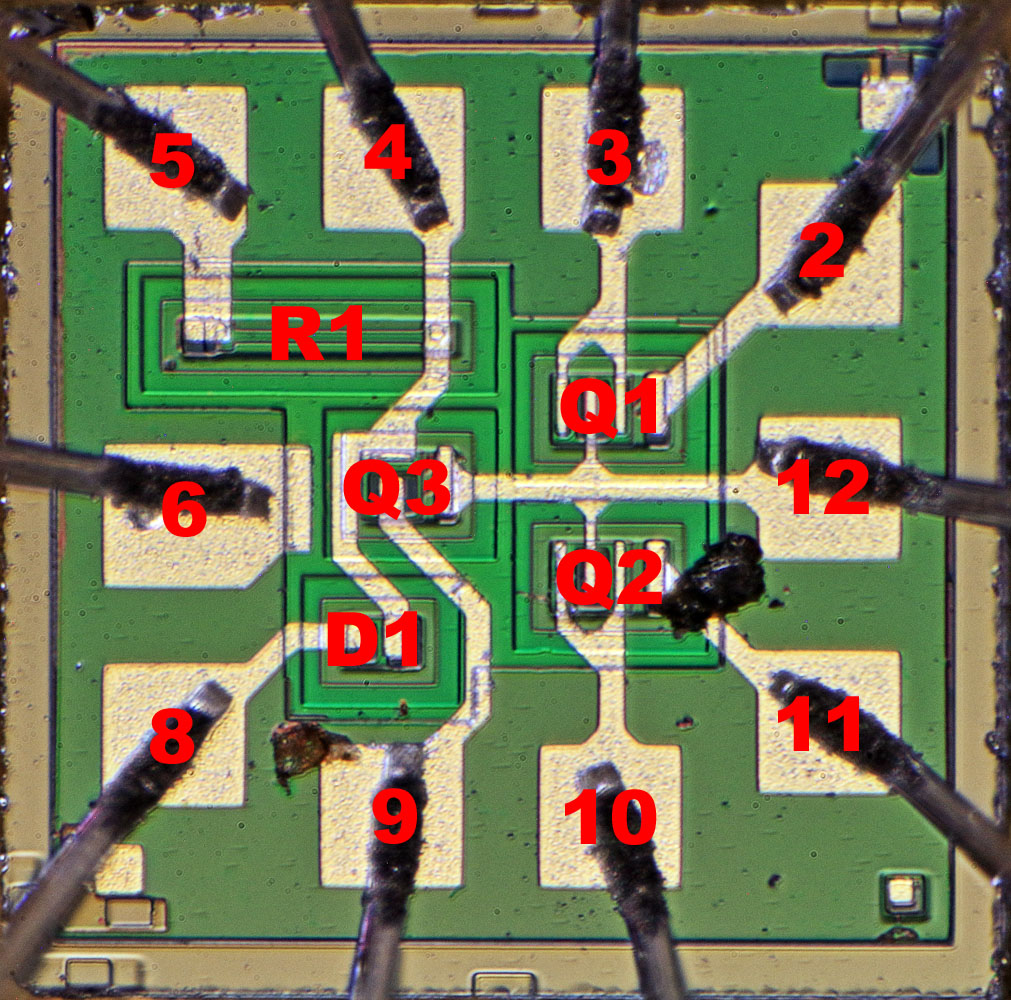
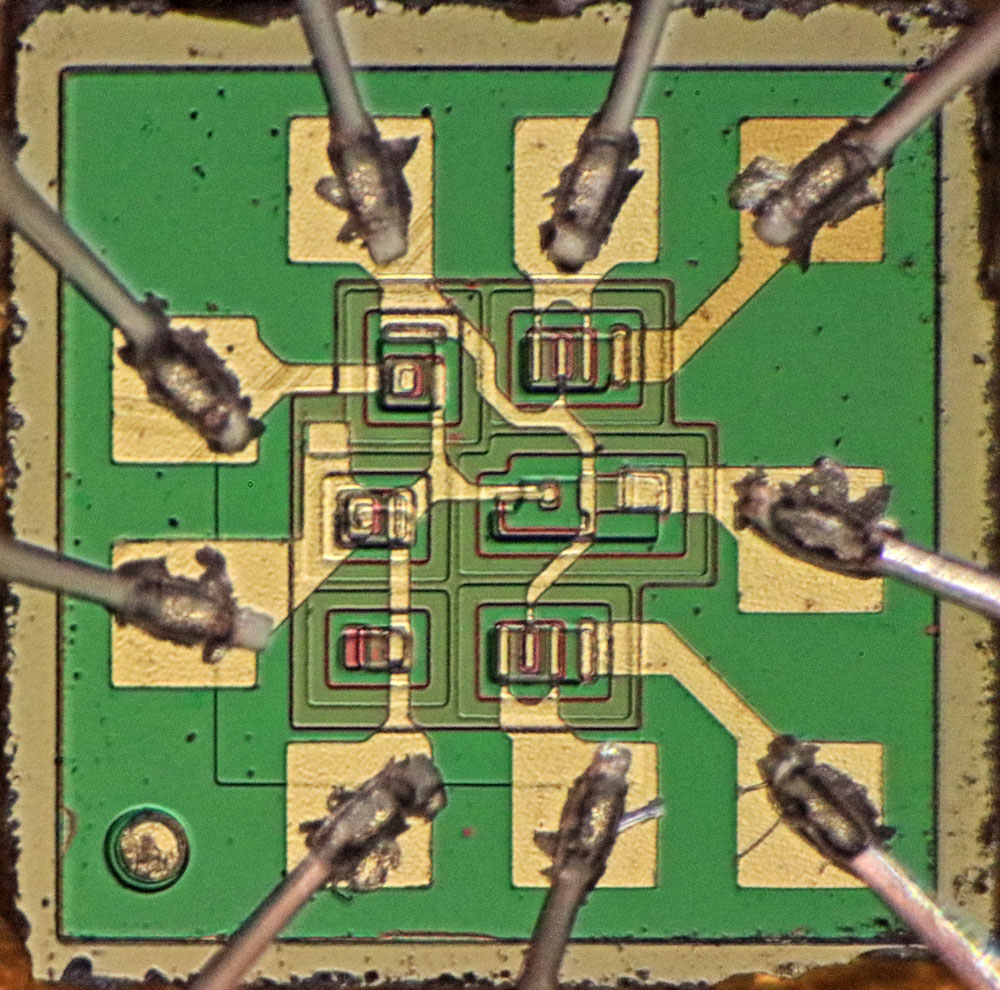
The die houses five elements. On the right are two symmetrical transistors which, with connected emitters, constitute a differential amplifier. To the left is another transistor that can be used as a current sink, for example. In the lower left corner, another transistor is connected as a diode. In the upper left corner there is a resistor.

Geometric shapes are placed in the corners of the dies, which probably facilitate the positioning of the masks and enable a check of the manufacturing process.


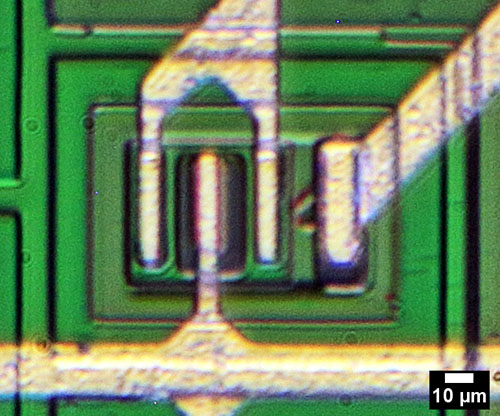
The minimum structure width is in the range of 5µm.


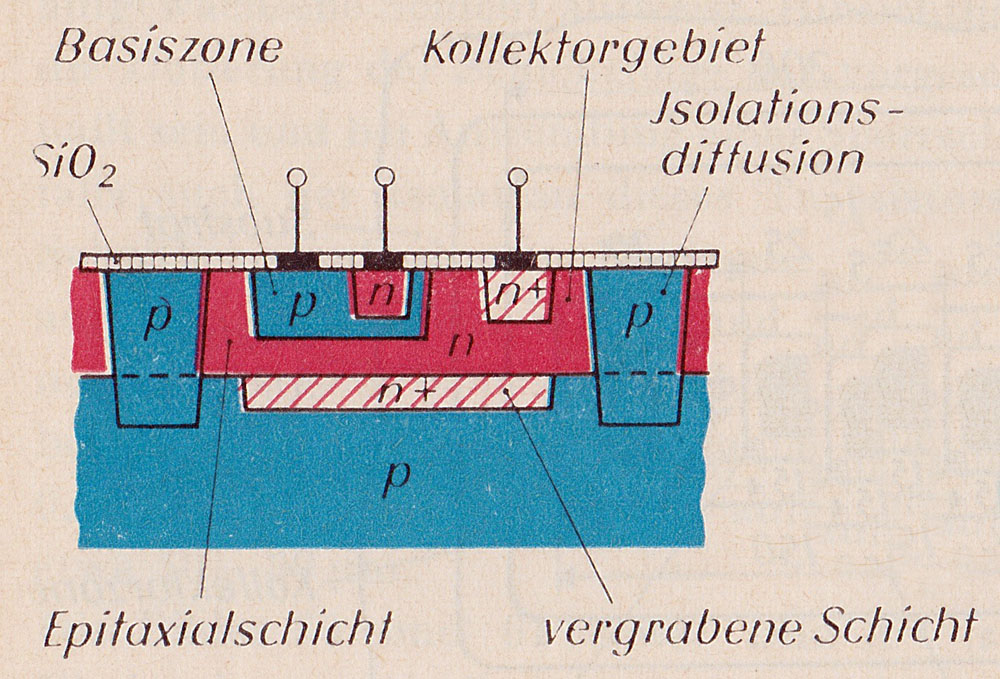
The book Mikroelektronik by W. Glaser and G. Kohl (1970, Naumburg) shows how NPN transistors were usually constructed at that time. The construction of today's bipolar transistors is not fundamentally different.

The basis is a p-doped substrate (blue). A heavily n-doped layer is created where the transistor is to be created later (red/white below). This layer later ensures that the collector potential is transferred from the collector connection to the active area with as low an impedance as possible. A uniform n-doped layer is then applied to the substrate (red), which represents the actual collector. To isolate different transistors and other elements from each other, deep, p-doped frame structures are built up. The resulting pn junctions prevent unwanted current flows across the die. Next, a p-doped base well can be placed in the delimited, n-doped collector area. Finally, the n-doped emitter area is placed inside this base well.

Between the steps described, many intermediate steps take place, which make it possible to form the individual areas as they are shown here. These include, for example, the application, exposure, partial and complete removal of photosensitive layers, the generation and removal of silicon oxide layers and various other process steps.


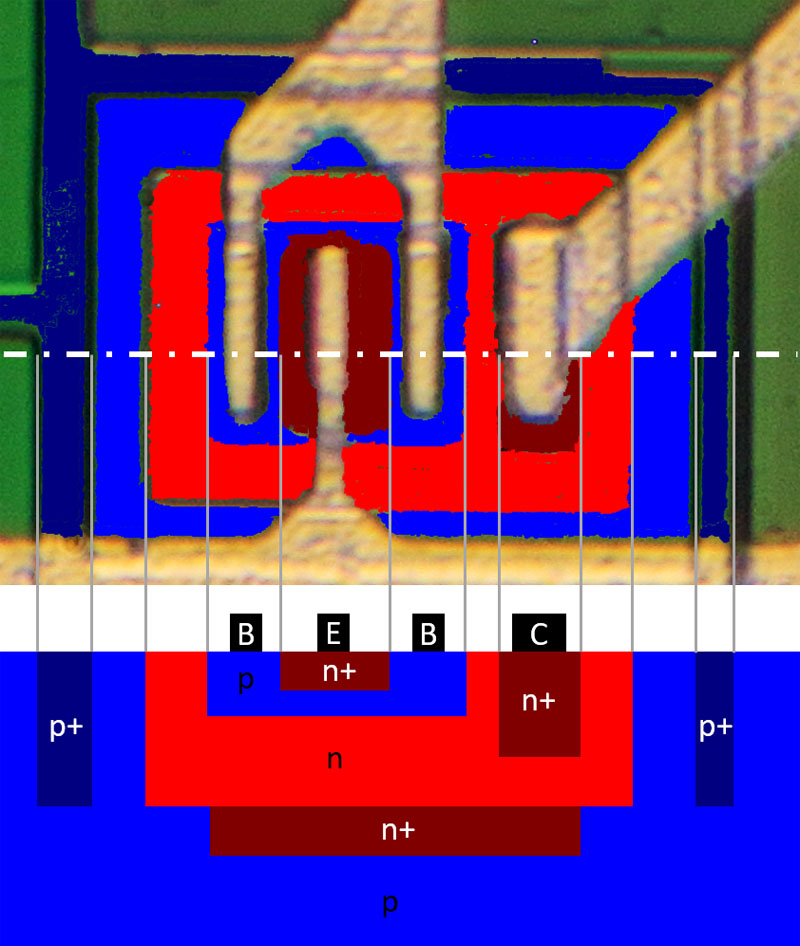
Based on the usual manufacturing process, one can try to assign the visible structures of the IK72 transistors to their functions. A coherent frame can be seen around all active elements, which certainly represents the heavily p-doped insulation. Between the n-doped collector and the isolation frame there is one more area than shown in the schematic above. Often there is still a p-doped zone around the active elements, this must also be the case here. Inside is the n-doped collector area. Below the collector connection, the stronger n-doping can be seen in the connection area. The deeper, stronger n-doping can only be guessed by outlines. To the left of the collector connection is the p-doped base area. This surface is contacted twice. This design reduces the resistance of the base contacting and thus increases the maximum possible switching speed. The n-doped emitter area is then integrated within the base area.


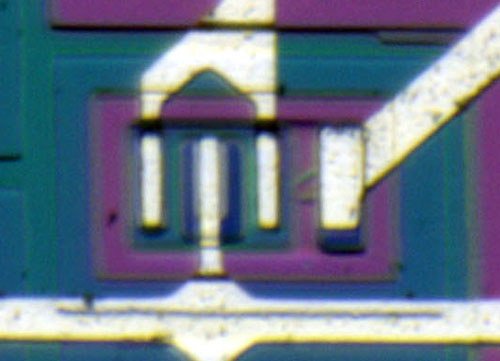
The third transistor, which can be used to realise a current sink, for example, has a slightly different structure than the transistors of the differential amplifier. The basic sequence of the differently doped layers is the same, but there is only one base connection (at the top) and the structure is more square, which means it takes up less surface area. Most likely, this design has a lower cut-off frequency.

In its simplest function, the transistor only controls a constant current, where slightly worse properties are hardly relevant. However, if two of the differential amplifiers are used in an analogue multiplier, the demands on the lower transistor can be as high as on the upper transistors.


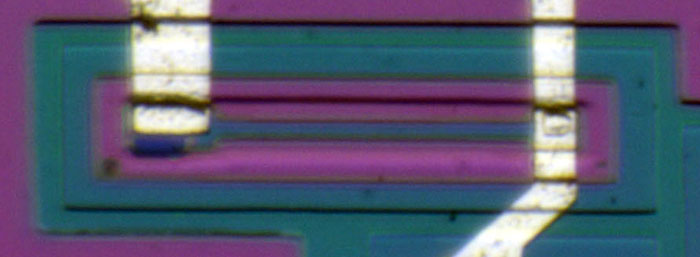
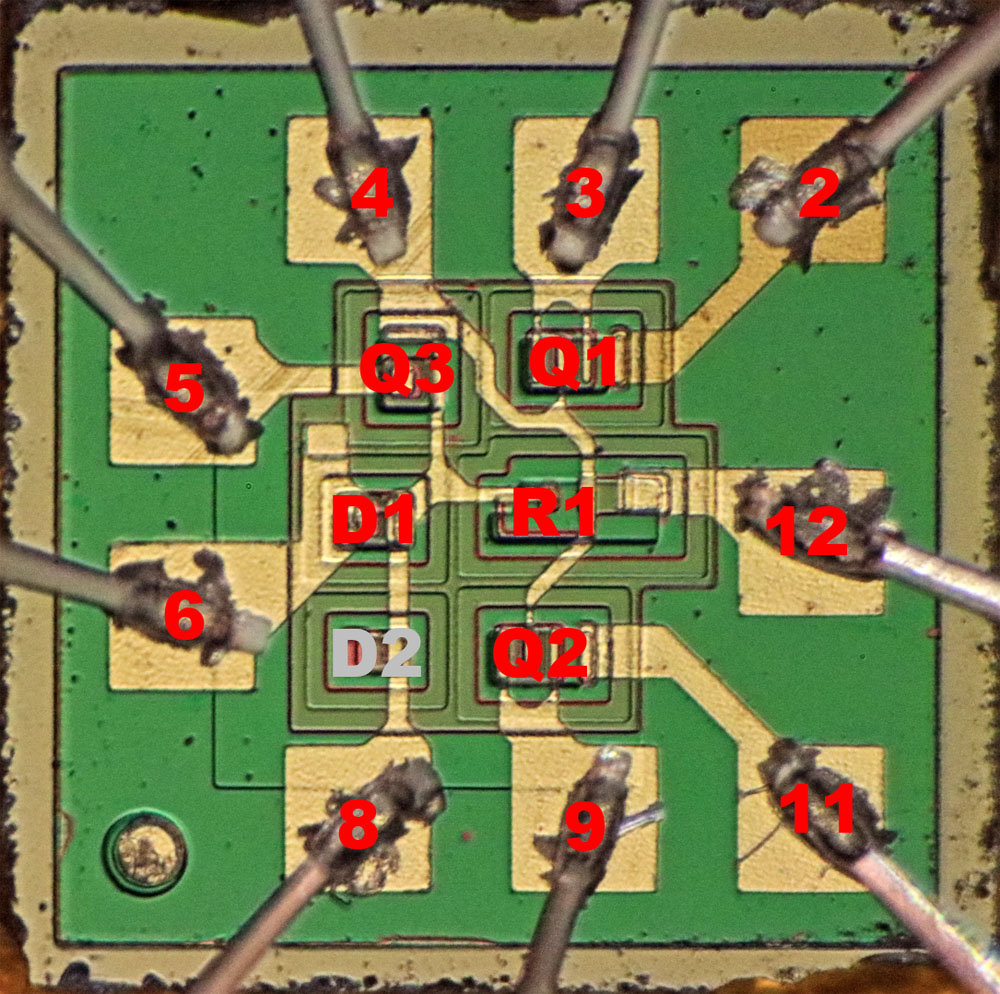
In the upper left corner of the die, a resistor was integrated.


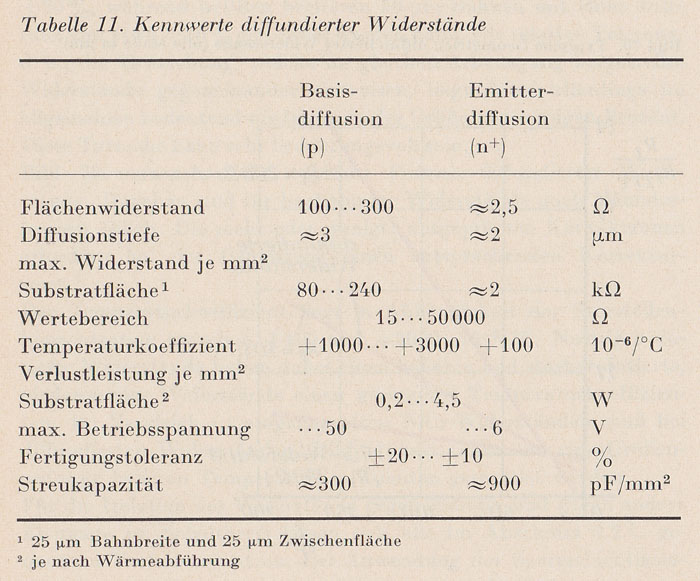
The aforementioned book Microelectronics also presents typical specifications of integrated resistors.

Resistors can be realised with the help of the p-doped base material or with the help of the n-doped emitter material. The two materials cover different resistance ranges. In the BA222 (https://www.richis-lab.de/555_25.htm), the different types of resistors can be seen in real life.


The left feed of the metal layer contacts not only the strip of base material (blue) but also a presumably strongly n-doped area (dark red). Via this path, the n-doped well (red), in which the resistor is located, is connected to a defined potential.

The interconnection on the die makes it possible to measure the resistor from the outside, whereby a value of 2,08kΩ can be determined. There is room for 18 squares in the area of the resistor. With the 2,08kΩ, this results in a specific resistance of 116Ω/sq, which fits quite well with the above characteristic values for a basie diffusion.

The dimensions of the resistor can even be used to estimate the load capacity. With a length of 140µm and a width of 9µm, this results in an area of 0,00012mm². According to the table above, you can expect a power handling of 0,25mW to 5,7mW. What sounds like a very low value can be quite sufficient at the base of a transistor.


At the base of the lower transistor there is a transistor connected as a diode.


The substrate is contacted by its own pin. The exclusive connection enables the substrate to be connected to a lower potential than is available in the IC itself. As a result, the pn interfaces that isolate the transistors from each other widen, less leakage current flows and parasitic capacitances are reduced.


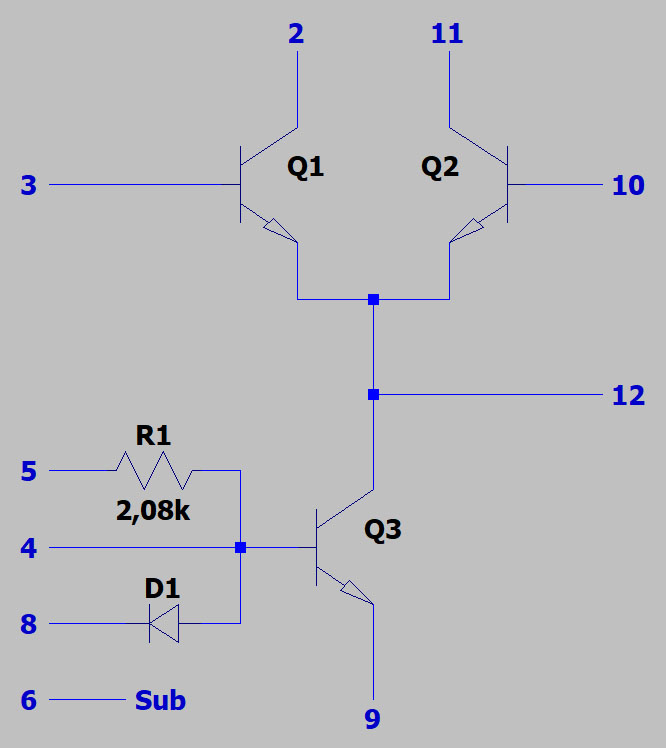
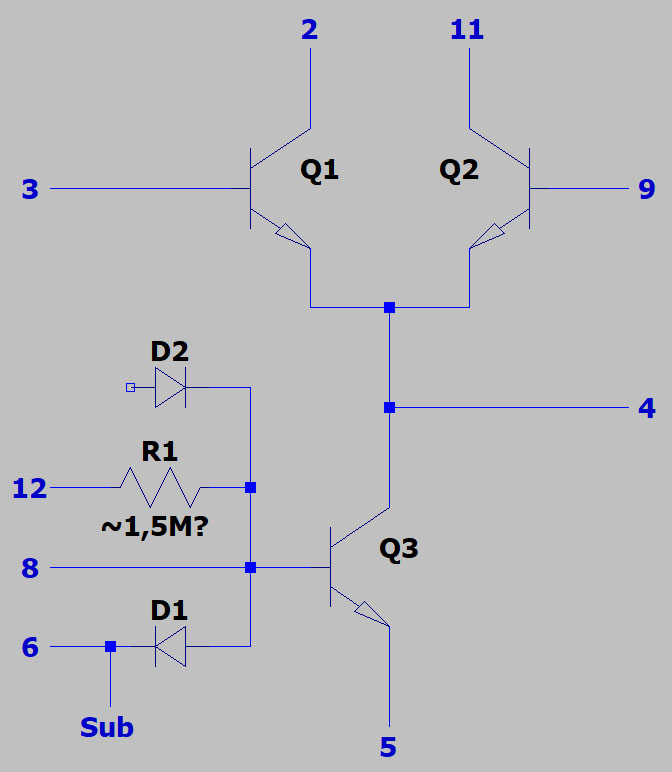
In summary, this results in the circuit shown. The IK72 represents a differential amplifier with a transistor in the emitter path. Transistor Q3 can be used as a current sink or a signal can be applied to it and an analogue multiplier can be built with a second IK72.

The base of transistor Q3 has multiple connections. Pin 4 allows a direct, low-impedance feed-through to the base. Alternatively, resistor R1 can be used as a base resistor. The diode D1, connected in parallel to the base resistor, could make it possible to accelerate the switchoff of the transistor. With this parallel connection, more current can flow from the base, the free charge carriers are discharged more quickly and the transistor switches off faster. However, it is more likely that the resistor and diode in the circuit were used as a current sink to make the current value less dependent on temperature. The temperature drift of the diode then reduces the reference voltage at the base at increased temperature and thus compensates for the drop in the base-emitter voltage of transistor Q3.


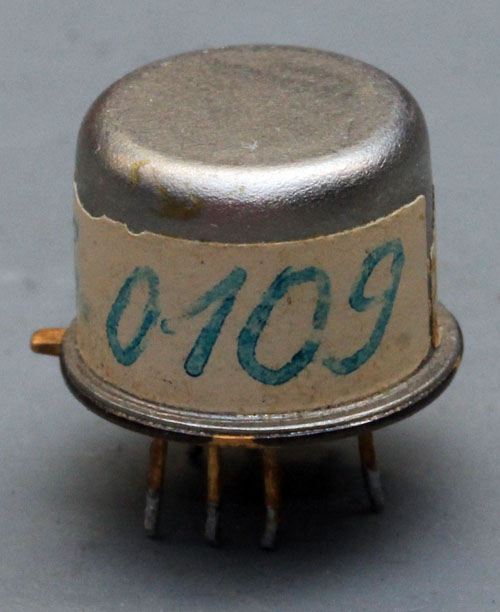
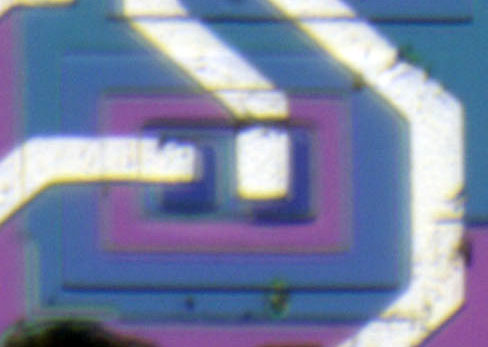
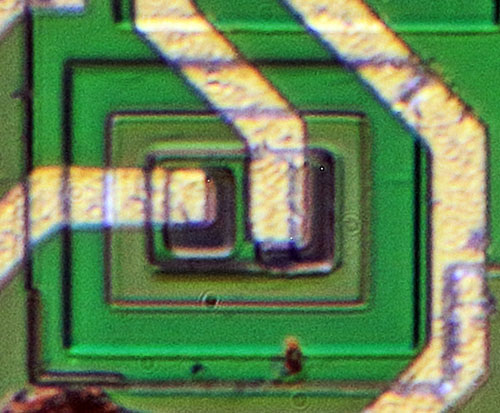
This part should be an IK72 too. The casing matches the casing of the IK72 above. Only the characters "A 05-2" are printed on the paper band. The sequence of characters shown on edge cannot be identified with certainty. It could be the numbers 055.


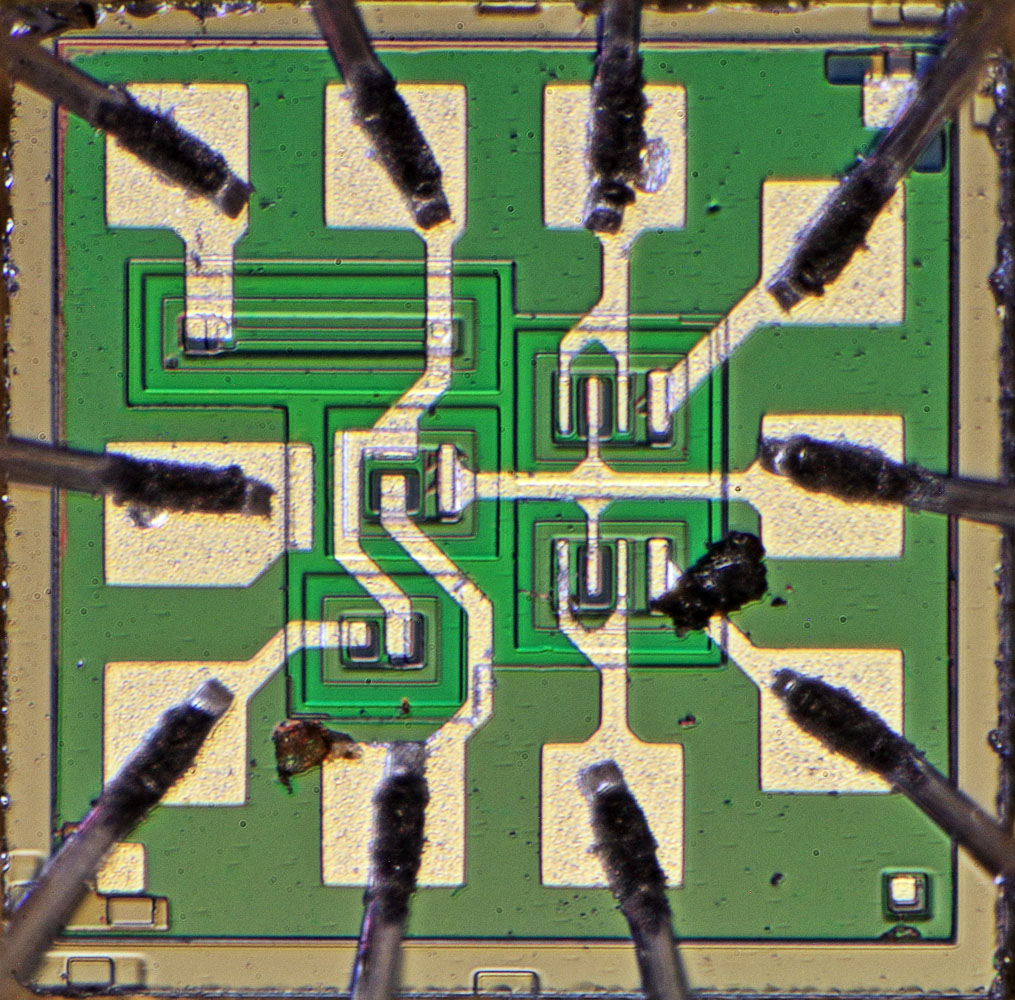
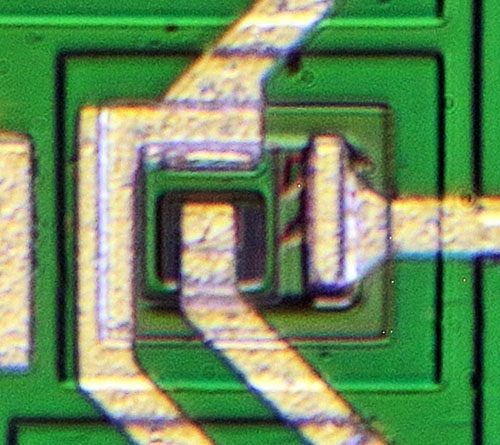
Superficially, the internal structure is the same as that of the IK72 above. However, pin 10 is not connected to the die.


The edge length of the die is 0,8mm. The construction of the circuit is similar to the IK72 above. In detail, however, there are clear differences.


Unlike the IK72 above, here pin 10 is not connected to the die.


The circuit is basically the same. It is a differential amplifier with some options at the base of the common current sink Q3. The construction and placement of the input transistors Q1/Q2 is the same as the IK72 above. The pinning in this area is similar. However, the remaining pins are pinned significantly differently.

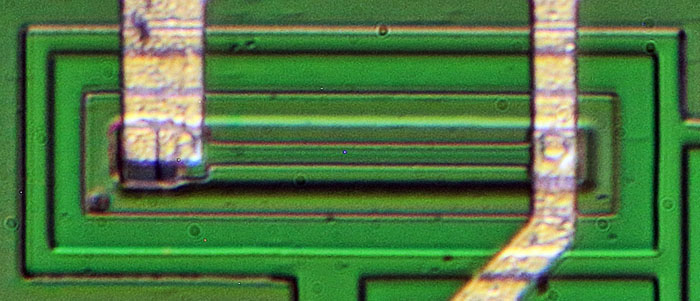
The resistor R1 at the base of transistor Q3 seems to have a surprisingly high resistance value of 1,5MΩ. Perhaps such a high value was not desired. At that time, the integration of resistors was not yet mature.

In this component, there is no separate substrate connection. Instead, pin 6, which contacts diode D1, is additionally connected to the substrate. The die provides an additional diode (D2), but it is not integrated into the circuit.

Perhaps this component is an earlier version of the IK72 or a further development.


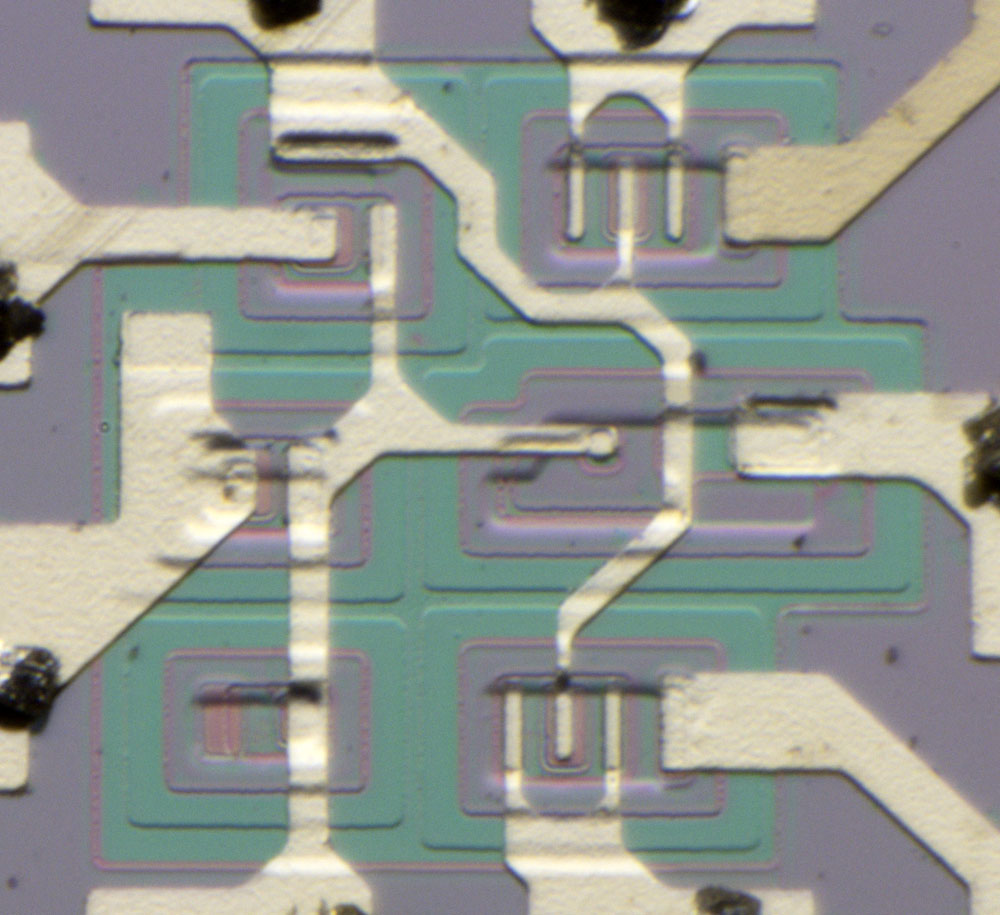
The structures of the transistors are clearly visible in detail. The diode D2 seems to have been integrated as a diode only. A collector connection for using the structure as a transistor is not visible. The resistor R1 appears very thin. This would fit the high resistance value.


https://www.richis-lab.de/IK72.htm

 :-/O
 
The following users thanked this post: RoGeorge, ch_scr, iMo

Offline NoopyTopic starter

  • Super Contributor
  • ***
  • Posts: 1731
  • Country: de
    • Richis-Lab
Re: Different die pictures
« Reply #305 on: September 02, 2023, 07:53:39 pm »


Here you can see an RFID sticker as used, among other things, for product identification and as an anti-theft device in retail. The first anti-theft devices consisted just of simple oscillating circuits. In the meantime, however, the cost of RFID chips has become so low that they can be used economically even for low-priced goods. In addition to anti-theft protection, the RFID tags also offer the possibility of storing data and reading it out via radio communication.

The antenna and the RFID chip are located on the back of the label. SML is the manufacturer. The exact designation of the RFID tag can also be found out via the characters "U8" and the shape of the antenna. It is called GB4U8. The datasheet reveals that the RFID chip UCODE 8 from NXP is used here.


The RFID tag's range of up to 12,5m is quite remarkable, but also highly dependent of the direction.


The edge length of the chip can be determined with 0,48mm. According to the datasheet, the UCODE 8 can be obtained as a sawn 8" and 12" wafer. Almost 300.000 RFID chips can thus be obtained from a 12" wafer.


The type of attachment cannot be definitively clarified. The partially transparent material could be a protective lacquer that protects a conductive adhesive or solder connection. However, today there are so-called anisotropic adhesives, which can be applied over a large area and then generates an electrically connection just between the contacts of the chip and the antenna.


The large contacts have a curved contour on the inside. This shape allows a slightly twisted placement on the contacts of the antenna. The smaller pads are electrically isolated, according to the datasheet they only serve to better match the transceiver to the impedance of the antenna.

Between the integrated circuit and the contacts is a 10µm thick polyimide layer, which can be decomposed with increased temperatures.


The UCODE 8 is manufactured with a 140nm CMOS process. The structures are too small to analyze them more precisely. However, it is noticeable that the structure is the same as that of the RFID tag from Race Result (https://www.richis-lab.de/transponder04.htm). Apparently, the UCODE 8 was also used there.


A block diagram is shown in the UCODE 8 datasheet. It shows three basic functional blocks. The front end generates a supply from the received electromagnetic energy, demodulates signals from the transmitter and modulates data to be transmitted to the antenna. The UCODE 8 contains control logic with a relatively large amount of functionality and ultimately an EEPROM as permanent data storage.


https://www.richis-lab.de/transponder05.htm

 :-/O
 
The following users thanked this post: TurboTom, RoGeorge, ch_scr, iMo

Offline NoopyTopic starter

  • Super Contributor
  • ***
  • Posts: 1731
  • Country: de
    • Richis-Lab
Re: Different die pictures
« Reply #306 on: September 11, 2023, 08:51:50 pm »


Two R65C02P4 processors can be seen here. These are the CMOS variant of the widely used 6502 and were produced by Rockwell. P4 stands for the bin, which allows a clock frequency of up to 4MHz. The two devices were purchased from a Chinese distributor. The packages have some peculiarities that give them a suspicious look.

Both chips have exactly the same marking, but the package shape and the package surface differ in some places. For example, only the lower R65C02P4 has two indentations in the upper side and the indentations on the underside are much more pronounced. The upper chip comes from a backend in Thailand. The lower case was made in Taiwan.

The inscription on the lower R65C02P4 is also unclear. Furthermore, it is noticeable that the pin 1 dot is very small and flat. Such conspicuities occur when the surface is abraded. This would also explain why the two large indentations on the upper side are flatter than the one on the bottom.

Both cases show a lot of small damages on closer inspection, especially on the edges. On the upper R65C02P4, the underside appears downright dirty, which does not match the very clean upper side at all. The surface of the pins is irregular. This results from re-tinning, which is often necessary when the surface is oxidized or the components have been desoldered. In addition, some pins are somewhat bent.


The Rockwell R65C02 contains the typical blocks of a 6502 processor.


This die is from the first R65C02. This image is also available in a higher resolution (18MB): https://www.richis-lab.de/images/cpu/08x02XL.jpg. Superficially, the structures fit a 65C02.


The label shows the abbreviation CMD, which stands for California Micro Devices. CMD sold the 65C02 under the designation G65SC02. This designation is partly found here again.

There is a WDC logo too. Behind the abbreviation stands the company Western Design Center, which developed the 65C02 and sells the design to other companies.


Two test structures are integrated on the die, apparently representing an n-channel and a p-channel transistor.


The lower left area shows the revisions of six masks.


The die shown here is from the second R65C02. This image is also available in a higher resolution (22MB): https://www.richis-lab.de/images/cpu/09x01XL.jpg. Superficially, the structures are the same as on the first R65C02. But there are a few small differences.


This processor shows a GTE logo. The company GTE also had a G65SC02 in its program and was taken over by CMD. Consequently, this is the predecessor of the CMD variant.


On this die the revisions of four masks can be seen and also here the WDC logo can be found.


A small difference between the two processors can be found at the data interface on the right edge in the lower area. In the newer device (the upper one), a barrier has been inserted between the controller and the output stages, which is connected to ground.


In the newer processor at the upper left edge the supply was led from the frame structure to the integrated circuit. In this area the output stage for the SYNC signal is integrated.

The highside and the lowside transistor extend a bit to the right. In the newer processor the lowside transistor has been joined by a block, which is connected to the positive supply.


On the right edge is the output stage for the R/W signal. Here, as with the SYNC output stage in the outer area, a block was integrated that carries the positive supply.


Apparently, here two different G65SC02 processors have been refurbished and sold as Rockwell R65C02P4. Thus, they are clearly counterfeits. The three types are basically very similar, since according to Wikipedia Rockwell also took the design from WDC. The processors were functional, consequently had no defect before the refurbishment and had survived the refurbishment itself. However, it is questionable whether their quality was sufficient for the fastest grade "P4". In addition, the previous history and refurbishment reduces the expected remaining life. The effort for the counterfeit is profitable, because this way it seems that there is a larger amount of NOS components and they can be sold more expensive.


https://www.richis-lab.de/cpu08.htm

 :-/O
 
The following users thanked this post: RoGeorge, iMo

Offline NoopyTopic starter

  • Super Contributor
  • ***
  • Posts: 1731
  • Country: de
    • Richis-Lab
Re: Different die pictures
« Reply #307 on: October 10, 2023, 05:18:23 pm »
 
The following users thanked this post: eliocor, PartialDischarge, ch_scr

Offline NoopyTopic starter

  • Super Contributor
  • ***
  • Posts: 1731
  • Country: de
    • Richis-Lab
Re: Different die pictures
« Reply #308 on: October 15, 2023, 03:54:08 am »


With the 1813-0002, Hewlett Packard developed a logarithmic amplifier that was used in the 3575A. The 3575A is a so-called gain-phase meter. It can be used to determine the amplitude and phase of a signal in the frequency range from 1Hz to 13MHz. The inputs offer a dynamic range of 80dB (0,2mV-20V), which can be extended to 120dB with an integrated attenuator.

The module is based on a 25mm x 33mm ceramic carrier with a glued-on metal cover. The ceramic carrier has pins on the side, similar to a DIL housing. For heat dissipation, the assembly is glued onto a metal bracket that offers several screw-on points.


The service manual of the 3575A contains a block diagram showing how to use the logarithmic amplifier. At the input of the meter there is a block with an attenuator and an amplifier. This is already followed by the logarithmic amplifier IC1, which receives the input signal directly and additionally via a level limiter. The IC2 forms a configurable feeback path.

The logarithmic amplifier offers two outputs. The logarithmic output ("LOG") is subsequently fed to a voltage measurement and thus enables a level display in decibels. In parallel, the amplifier offers a second output called "LIMITED". This output is used to determine the phase position between the signal processed here and a second signal.


The service manual also contains a detailed schematic. The logarithmic amplifier is supplied with 2V, ground and -6V. The 2V supply is generated by a separate linear regulator.

The level limiter on the left of the logarithmic amplifier consists of a diode bridge that limits the amplitude to 0,8Vpp. Below this is the unlimited input signal feed and the feedback path, whose frequency response can be influenced via two control lines.

Compared to the block diagram, the outputs are rotated on the right side. The logarithmic signal, which is used for level measurement, is connected to three pins at the bottom. It passes through a relatively complex amplifier. Oscillograms 1, 6 and 7 show the development of the waveform.

In the upper area is the "limited output", which is used to determine the phase position. The control lines that influence the frequency response of the feedback path also adjust the frequency response here. Together, they determine the frequency band to be evaluated, which can be set on the outside of the unit.


The HIGH SPEED DESIGN SEMINAR from Analog Devices shows how a logarithmic amplifier can be constructed. It is a series connection of several amplifiers. The signals of each output are summed and then represent the logarithmic value of the signal.


The functioning of the logarithmic amplifier is based on the fact that the outputs of the individual amplifier stages reach full scale with increasing input level and from then on no longer contribute to the amplification. In the diagram above, Analog Devices shows the behaviour that occurs.

Initially, each stage amplifies the input signal, resulting in a gain factor of N*A. Above a certain input level, the output level of the chain is so high that the last amplifier can no longer set a higher level. From this level on, the chain's amplification factor is reduced to (N-1)*A, since the last amplifier can no longer contribute. As the input level continues to rise, further amplifier stages reach their maximum level and the total gain is reduced to 0. The characteristic curve that sets in thus approaches a logarithmic curve.


The individual parts of the transfer curve are linear, which means that, compared to an ideal logarithmic curve, an error builds up and decreases cyclically.


On the ceramic carrier there is a heart with the hp logo, which was often depicted on Hewlett Packard circuits. The string 1340C could be an internal designation of the design.

In addition to five SMD capacitors and three integrated circuits, there are many extensively adjustable resistors on the ceramic carrier. Test points allow the resistors to be calibrated within the circuit.


It quickly becomes apparent that the hybrid circuit consists of three relatively similar circuits.


To adjust the resistors, some resistor areas were cut and some metal lines were cut. Due to the heat, some of the surrounding elements have become clearly discoloured.


The edge length of the integrated circuits is 0,75mm. There are three identical circuits. Each circuit contains six transistors that are contacted via two metal layers. The string 0302 and a B are found on the right edge. The B represented by the metal layer suggests that different metal layers could be used to represent different configurations of the transistor array.

The transistors have two base contacts, which reduces the base resistance and correspondingly increases the maximum possible switching speed. The transistors are in connected isolation frames In the lower area, a contact can be seen over which one could connect these isolation frames to a negative potential. Here this was less necessary because the substrate is connected to the -6V potential and all potentials in the circuit have a higher potential.


If we analyse the potentials to which the ceramic carrier is connected, we see that the -6V potential is supplied from below and the 2V potential from above. The ceramic capacitors buffer these supplies. In the first block on the far right, the capacitor at the -6V has been omitted.

The non-limited input signal "Input" passes through the right amplifier block 1 and is output in the upper right corner. We will see soon that there are three amplifiers in each block. The input signal that has passed through the level limiter is fed into amplifier block 2, whose output is located at the top edge of the ceramic carrier in the centre. The output signal of amplifier block 2 also serves as the input signal for amplifier block 3. Amplifier block 3 feeds the third output at the upper edge and is simultaneously connected to the "Limited Output" output. The feedback path to the input of amplifier block 2 also closes from this output.


Here the circuit in amplifier blocks 2 and 3 is shown. Each amplifier block contains three amplifiers, which are constructed as simple differential amplifiers with two transistors. The branches with the input transistors drive the outputs, which are combined into a common output signal for each amplifier block individually with resistors.

The second differential amplifier branch of each amplifier contains a voltage divider that generates the input signal for the next amplifier stage. The circuit corresponds to the concept of a logarithmic amplifier described above.

The so-called "limited output" is the output signal of the last amplifier stage. Consequently, it always passes through the maximum amplification. This makes sense because it determines the phase position and in this case only the range of the zero crossing is important. The further you amplify this area, the better the phase position can be determined.

The feedback loop extends from the output of the last amplifier stage to the inverting input of the first amplifier stage.


Amplifier block 1, whose input signal is not limited, also feeds into the "Log Output" node. The first and third amplifier stages are configured and wired like the amplifier stages of amplifier blocks 2 and 3. The configuration of the middle amplifier stage, however, is unusual. It uses the input signal directly, with a voltage divider to adjust the level.

Presumably, these additional amplifier stages serve to correct the errors in the characteristic curve of the logarithmic amplifier.


https://www.richis-lab.de/logamp01.htm

 :-/O
 
The following users thanked this post: doktor pyta, RoGeorge, PartialDischarge, ch_scr

Offline NoopyTopic starter

  • Super Contributor
  • ***
  • Posts: 1731
  • Country: de
    • Richis-Lab
Re: Different die pictures
« Reply #309 on: October 21, 2023, 03:12:29 am »


The component shown here is a 12MHz oscillator built by Siemens. Q95212 seems to be the model designation, but there is no further information about this component. Production took place at the end of 1981.


At the very top of the case is a round quartz crystal.


Metal surfaces are applied as electrodes on both sides of the quartz resonator.


Removing the quartz resonator reveals the oscillator circuit on the bottom of the case. The two strips of sheet metal that held the quartz disc are relatively long so that they provide the necessary freedom for the mechanical oscillation of the resonator.


The Siemens logo shows that the design of the oscillator comes from Siemens itself. A closer look reveals three test structures. In the right-hand area, some elements were not contacted. It is likely that they used these parts to configure the output signal by varying the metal layer.


https://www.richis-lab.de/osc_05.htm

 :-/O
 
The following users thanked this post: RoGeorge, ch_scr

Offline RoGeorge

  • Super Contributor
  • ***
  • Posts: 6202
  • Country: ro
Re: Different die pictures
« Reply #310 on: October 21, 2023, 05:53:11 am »
I didn't know there were quartz oscillators packaged in a round metal can, like opapmp.  ???

Are those tin whiskers, at the bottom, downwards from the metal tab?  (in the second picture they are no longer there)

« Last Edit: October 21, 2023, 06:50:26 am by RoGeorge »
 

Online magic

  • Super Contributor
  • ***
  • Posts: 6778
  • Country: pl
Re: Different die pictures
« Reply #311 on: October 21, 2023, 06:14:42 am »
Is this what it is?


You rotated the die 90° so electrons are falling out ;D
Bottom left is pin 1, bias control or shutdown active low, internal pullup enables the chip.
Pins 2 and 6 are the crystal, and it seems you are supposed to provide external load capacitance here.
Pins 3 and 5 are a differential output, the amplifier uses resistors and current mirrors so it may be linear sinewave.
Pin 4 is ground, pin 8 positive supply. 7 is NC.
 
The following users thanked this post: Noopy

Offline NoopyTopic starter

  • Super Contributor
  • ***
  • Posts: 1731
  • Country: de
    • Richis-Lab
Re: Different die pictures
« Reply #312 on: October 21, 2023, 06:23:51 am »
I didn't know there were quartz oscillators packaged in a round metal can, like opapmp.  ???

Yeah, that´s an old one. There were some in round metal cans.


Are those tin whiskers, at the bottom, downwards from the metal tab?  (in the second picture they are no longer there)

That is one of the packages I opened with the... ... ...I don´t know how you call it in english, such a small metal grinder. Here the company selling them is Dremel or Proxxon. You know what I´m trying to say. And these tools produce some metal flakes...


Is this what it is?
(Attachment Link)

You rotated the die 90° so electrons are falling out ;D
Bottom left is pin 1, bias control or shutdown active low, internal pullup enables the chip.
Pins 2 and 6 are the crystal, and it seems you are supposed to provide external load capacitance here.
Pins 3 and 5 are a differential output, the amplifier uses resistors and current mirrors so it may be linear sinewave.
Pin 4 is ground, pin 8 positive supply. 7 is NC.

Oh no! Perhaps the flakes at the bottom are electron accumulations...  :scared:

Mhm, your circuit and your explanation looks / sounds plausible.  :-+
 
The following users thanked this post: RoGeorge

Online T3sl4co1l

  • Super Contributor
  • ***
  • Posts: 21673
  • Country: us
  • Expert, Analog Electronics, PCB Layout, EMC
    • Seven Transistor Labs
Re: Different die pictures
« Reply #313 on: October 21, 2023, 02:31:29 pm »
"Rotary tool" is the more generic term, though "Dremel" is often used as a genericized trademark(!).

Tim
Seven Transistor Labs, LLC
Electronic design, from concept to prototype.
Bringing a project to life?  Send me a message!
 
The following users thanked this post: Noopy

Offline NoopyTopic starter

  • Super Contributor
  • ***
  • Posts: 1731
  • Country: de
    • Richis-Lab
Re: Different die pictures
« Reply #314 on: November 08, 2023, 07:54:42 pm »


Here you can see the remainings of two 4" wafers. Before a wafer is cut into individual dies, it is placed on a plastic tape, which is still clamped in a holder at this stage. The film has a certain adhesive effect and ensures that the individual dies remain in place during sawing. After sawing, the film can be pulled apart slightly, which increases the distance between the dies and prevents them from bumping into each other when they are removed. The adhesive effect can sometimes be weakened by UV light or heat, which makes it easier to remove the dies.

The tape has been cut out of the holder. The unusable elements, which were marked with a dot during the production of the wafer, were left behind on the foil. These are mainly geometrically incomplete parts and areas to which no structures were applied, as well as a test area. These scrap parts are process-related and cannot be easily optimized. The complete elements that were also provided with structures but were still not usable, on the other hand, reduce the yield and must therefore be optimized to a minimum. Here, the scrap is mainly located in the edge area, where some process steps probably have a more inhomogeneous effect.

The edge length of a die is 5,5 mm. It would be possible to integrate 216 of these chips on one wafer. On the left, 179 elements were usable, on the right 178, which corresponds to a yield of 83% and 82% respectively.


The separation of the integrated circuits has left dark marks on the blue tape.


The edges of the dies are very smooth. This suggests that the wafer was cut completely in one step. There are several alternatives. It is possible to cut the wafer only on the surface and break the lower area by moving the foil upwards. In some cases, the upper area was cut with a thicker blade and the lower area with a thinner blade. This procedure reduces the risk of damage to the edges. More modern processes use lasers to cut the wafers.


The shape of the test area is somewhat surprising. Although the area of the test structures would have fitted easily into the geometry of one die, two elements have been used for it. The right-hand part is empty.


The test area contains many different structures that can be measured electrically. The structures are summarized in 12 groups.


In group B, there are several lines in different planes that cross each other. They are probably used to measure the extent to which signals influence each other at such crossings.

Four transistors can be seen in group D.

Group F contains several elements that appear to be very massive. It is quite possible that these are protective structures for inputs.


Groups H and J contain transistors with different length/width ratios.

The potentials of group L are led downwards. This clearly shows that the same needle adapter was used for all test structures. There are always two rows, each with eight testpads at the same distance. The only exception is the two times three testpads on the right edge, which, however, only contact three longer lines of the metal layer.

The imaging performance of four masks can be evaluated in the upper right area. It is interesting to note that the test structures have been arranged at a 90° angle to each other in order to make any dependencies on the alignment visible.


The testpads of group L contact very large areas. The individual surfaces are connected to just one single line. This indicates that in this area leakage currents to the substrate are determined.


Group A shows three squares in different planes. Four testpads each contact a corner. Perhaps this is a way of determining the homogeneity of the surfaces.

The lowest element in group C contains only one contact. The upper elements could therefore also be different contacts. However, the structures are too small to be resolved.

In the upper area of group E, no elements can be recognized under the contacts of the metal layer. It could be that the properties of the substrate have been determined by this structure. The function of the elements in the lower area remains unclear.


Groups G and I contain further transistor variants.

Group K contains chains of different vias in the lower area, which make it possible to determine the resistances of these vias. A more complex structure reminiscent of a ring oscillator is integrated in the upper area. Ring oscillators are used to evaluate the maximum switching speed of the integrated transistors.


The packaging shows that the wafer was processed at Rood Technology, now RoodMicrotec. RoodMicrotec is a service provider in the semiconductor supply chain. The type designation SCC68692 indicates that it is a DUART transmitter from Signetics. The character string in the bottom line could represent a date code. The wafers would then be from the year 1998.

The date code could be an indication why the SCC68692 was processed by Rood Technology, while the device was still available directly from NXP until the end of 2015. The datasheet was updated in 1998. Although only the omission of a ceramic package is stated as a significant change, there may nevertheless have been changes that made it necessary to store wafers and process them further via a service provider.


With its two UART interfaces, the SCC68692 has a certain degree of complexity.


The handling of the wafers has damaged some of the edges of the dies. The remains of other test structures can still be seen in the saw line. With a little more effort, the properties of the individual elements in the respective area of the wafer can be determined. This is important if you have to deal with increased failure rates that occur always in the same places.


The edge length of the die is 5,5mm. This image is also available in a higher resolution (https://www.richis-lab.de/images/wafer/06x19.jpg 123MB). The lower left corner shows that the Signetics design dates back to 1988. The internal designation appears to be XSC5530A. A bifurcation with a high degree of symmetry is clearly visible.


https://www.richis-lab.de/wafer07.htm

 :-/O
 
The following users thanked this post: RoGeorge, ch_scr

Online AnalogTodd

  • Regular Contributor
  • *
  • Posts: 88
  • Country: us
Re: Different die pictures
« Reply #315 on: November 08, 2023, 11:13:26 pm »
Here you can see the remainings of two 4" wafers. Before a wafer is cut into individual dies, it is placed on a plastic tape, which is still clamped in a holder at this stage. The film has a certain adhesive effect and ensures that the individual dies remain in place during sawing. After sawing, the film can be pulled apart slightly, which increases the distance between the dies and prevents them from bumping into each other when they are removed. The adhesive effect can sometimes be weakened by UV light or heat, which makes it easier to remove the dies.

The tape has been cut out of the holder. The unusable elements, which were marked with a dot during the production of the wafer, were left behind on the foil. These are mainly geometrically incomplete parts and areas to which no structures were applied, as well as a test area. These scrap parts are process-related and cannot be easily optimized. The complete elements that were also provided with structures but were still not usable, on the other hand, reduce the yield and must therefore be optimized to a minimum. Here, the scrap is mainly located in the edge area, where some process steps probably have a more inhomogeneous effect.
Often, the ones in the center are devices that failed at wafer probe. This is usually due to defects in the parts, whether due to masking issues or silicon defects is usually not reviewed unless yields drop below a nominal threshold.
Quote
The edge length of a die is 5,5 mm. It would be possible to integrate 216 of these chips on one wafer. On the left, 179 elements were usable, on the right 178, which corresponds to a yield of 83% and 82% respectively.

The separation of the integrated circuits has left dark marks on the blue tape.

The edges of the dies are very smooth. This suggests that the wafer was cut completely in one step. There are several alternatives. It is possible to cut the wafer only on the surface and break the lower area by moving the foil upwards. In some cases, the upper area was cut with a thicker blade and the lower area with a thinner blade. This procedure reduces the risk of damage to the edges. More modern processes use lasers to cut the wafers.
The saw is usually done in a single step, and the blade thickness is determined by the thickness of the die. The thicker the cut that needs made, the thicker the blade to avoid warping of the blade during saw.
Quote


The shape of the test area is somewhat surprising. Although the area of the test structures would have fitted easily into the geometry of one die, two elements have been used for it. The right-hand part is empty.
Actually, though it looks empty it may not be. It appears to be a large '+' structure, which was used for mask alignment with stepper tools. With as fine as this process geometry is, you would not be able to get the masks aligned reliably with old optical alignment (via operator checking mask alignment under a microscope).
Quote


In group B, there are several lines in different planes that cross each other. They are probably used to measure the extent to which signals influence each other at such crossings.

Four transistors can be seen in group D.

Group F contains several elements that appear to be very massive. It is quite possible that these are protective structures for inputs.
Actually, group B appears to be structures for measuring metal resistances and via or contact resistances of the process. These are usually very low values so a Kelvin connection needs made to get reasonable results. You can see structures that have sense and force for measuring the resistance of the layer (pads 1,5, 12, 13 and 1, 7, 8, 9) and others bring in force and sense for vertical connections (pads 1, 2, 15, 16 and 1, 3, 4, 14).
Quote


Groups H and J contain transistors with different length/width ratios.

The potentials of group L are led downwards. This clearly shows that the same needle adapter was used for all test structures. There are always two rows, each with eight testpads at the same distance. The only exception is the two times three testpads on the right edge, which, however, only contact three longer lines of the metal layer.

The imaging performance of four masks can be evaluated in the upper right area. It is interesting to note that the test structures have been arranged at a 90° angle to each other in order to make any dependencies on the alignment visible.


The testpads of group L contact very large areas. The individual surfaces are connected to just one single line. This indicates that in this area leakage currents to the substrate are determined.
In group L I think you don't have a high enough power microscope to resolve some of the connections. These structures appear to be coverage checkers, where  metal lines were run over different structures (poly for gates, other metal, etc.) to ensure that there was always good coverage. These crossing connections may be shifted from one row to the next to give maximum variation in coverage. Additionally, there may be some of these that are used to measure capacitance between layers.

You are correct about the structures in the upper right area--this is for the fab to evaluate CDs (critical dimensions).
Quote


Group A shows three squares in different planes. Four testpads each contact a corner. Perhaps this is a way of determining the homogeneity of the surfaces.

The lowest element in group C contains only one contact. The upper elements could therefore also be different contacts. However, the structures are too small to be resolved.

In the upper area of group E, no elements can be recognized under the contacts of the metal layer. It could be that the properties of the substrate have been determined by this structure. The function of the elements in the lower area remains unclear.
Group A is structures that measure different diffusion sheet rho (resistance per unit area). Group C is definitely contact resistance down to silicon. Within group E you may have structures that would only show up on a slightly different process variation and the necessary layers were just left out of this wafer batch since they didn't need them. This means that there is one test pattern used with multiple process variations, less work to maintain and track.
Quote


Groups G and I contain further transistor variants.

Group K contains chains of different vias in the lower area, which make it possible to determine the resistances of these vias. A more complex structure reminiscent of a ring oscillator is integrated in the upper area. Ring oscillators are used to evaluate the maximum switching speed of the integrated transistors.
Actually, the chains of contacts or vias used here is to ensure proper contact/via etching. Under-etching could leave some of these either unopened or only partially opened. While the structure up in group B may give a clue about under-etching, you may get lucky on a single via/contact and have it open just fine but others are not open all the way. Having long strings of the connections increases the odds of finding a bad one.
« Last Edit: November 08, 2023, 11:15:03 pm by AnalogTodd »
Lived in the home of the gurus for many years.
 
The following users thanked this post: RoGeorge, Noopy

Offline NoopyTopic starter

  • Super Contributor
  • ***
  • Posts: 1731
  • Country: de
    • Richis-Lab
Re: Different die pictures
« Reply #316 on: November 09, 2023, 04:26:47 am »
It´s always good to have an expert in the audience. Thank you for your additional information/corrections.  :-+ Please see my questions/replies below:


Quote
The edges of the dies are very smooth. This suggests that the wafer was cut completely in one step. There are several alternatives. It is possible to cut the wafer only on the surface and break the lower area by moving the foil upwards. In some cases, the upper area was cut with a thicker blade and the lower area with a thinner blade. This procedure reduces the risk of damage to the edges. More modern processes use lasers to cut the wafers.
The saw is usually done in a single step, and the blade thickness is determined by the thickness of the die. The thicker the cut that needs made, the thicker the blade to avoid warping of the blade during saw.

But there are/were techniques where you do the dicing in two steps, first with a thick blade then with a thinner blade? I have seen that somewhere...


Quote


In group B, there are several lines in different planes that cross each other. They are probably used to measure the extent to which signals influence each other at such crossings.

Four transistors can be seen in group D.

Group F contains several elements that appear to be very massive. It is quite possible that these are protective structures for inputs.
Actually, group B appears to be structures for measuring metal resistances and via or contact resistances of the process. These are usually very low values so a Kelvin connection needs made to get reasonable results. You can see structures that have sense and force for measuring the resistance of the layer (pads 1,5, 12, 13 and 1, 7, 8, 9) and others bring in force and sense for vertical connections (pads 1, 2, 15, 16 and 1, 3, 4, 14).

Ah, now I see the Kelvin connection!  :-+


Quote


Groups H and J contain transistors with different length/width ratios.

The potentials of group L are led downwards. This clearly shows that the same needle adapter was used for all test structures. There are always two rows, each with eight testpads at the same distance. The only exception is the two times three testpads on the right edge, which, however, only contact three longer lines of the metal layer.


The testpads of group L contact very large areas. The individual surfaces are connected to just one single line. This indicates that in this area leakage currents to the substrate are determined.
In group L I think you don't have a high enough power microscope to resolve some of the connections. These structures appear to be coverage checkers, where  metal lines were run over different structures (poly for gates, other metal, etc.) to ensure that there was always good coverage. These crossing connections may be shifted from one row to the next to give maximum variation in coverage. Additionally, there may be some of these that are used to measure capacitance between layers.

Measuring capacitances sounds plausible. I just see one connection to the big areas. Please see the attached picture (01).


Quote


Group A shows three squares in different planes. Four testpads each contact a corner. Perhaps this is a way of determining the homogeneity of the surfaces.

The lowest element in group C contains only one contact. The upper elements could therefore also be different contacts. However, the structures are too small to be resolved.

In the upper area of group E, no elements can be recognized under the contacts of the metal layer. It could be that the properties of the substrate have been determined by this structure. The function of the elements in the lower area remains unclear.

Group C is definitely contact resistance down to silicon.

I have attached a bigger picture of the C elements (02). There seems to be a crossing of two lines.  :-//


Online AnalogTodd

  • Regular Contributor
  • *
  • Posts: 88
  • Country: us
Re: Different die pictures
« Reply #317 on: November 09, 2023, 08:41:14 pm »
It´s always good to have an expert in the audience. Thank you for your additional information/corrections.  :-+ Please see my questions/replies below:
Nearly 30 years in the semiconductor industry here, I cut my teeth on big bipolar processes and am now working on submicron Bipolar/CMOS/DMOS processes. Not doing anything down much smaller than that right now because I do analog power design. I've been around long enough to have seen rubies for making masks (never cut them myself) and learned just how sensitive the trigger on an old Tek 547 can be compared to modern scopes.
Quote
But there are/were techniques where you do the dicing in two steps, first with a thick blade then with a thinner blade? I have seen that somewhere...
I've not been anywhere that I have seen a multi-step saw process like this. That may be something done with very thick wafers used for individual discrete devices where the breakdown voltage is needed just from a distance perspective, but I haven't personally worked with such processes.
Quote
Measuring capacitances sounds plausible. I just see one connection to the big areas. Please see the attached picture (01).
Could be capacitance to substrate. That or measuring the junction breakdown voltage to substrate.
Quote
Quote
Quote
The lowest element in group C contains only one contact. The upper elements could therefore also be different contacts. However, the structures are too small to be resolved.

In the upper area of group E, no elements can be recognized under the contacts of the metal layer. It could be that the properties of the substrate have been determined by this structure. The function of the elements in the lower area remains unclear.

Group C is definitely contact resistance down to silicon.

I have attached a bigger picture of the C elements (02). There seems to be a crossing of two lines.  :-//
Yes, the contact to silicon is done with Kelvin connections and is often done for each of the different diffusions as the contact resistance of each can be different. The bigger picture you show has lines going out top and bottom (force and sense) and lines out the sides (force and sense) so that you only measure the contact resistance. One set of lines goes down to the diffusion layer via the different metals, and the other set goes down to first layer metal with a single minimum contact from first layer metal to the diffusion in the center. It's called a cross bridge Kelvin resistor when I look it up on Google.
Lived in the home of the gurus for many years.
 
The following users thanked this post: brabus, Noopy

Offline NoopyTopic starter

  • Super Contributor
  • ***
  • Posts: 1731
  • Country: de
    • Richis-Lab
Re: Different die pictures
« Reply #318 on: November 10, 2023, 04:09:59 am »
Nearly 30 years in the semiconductor industry here, I cut my teeth on big bipolar processes and am now working on submicron Bipolar/CMOS/DMOS processes. Not doing anything down much smaller than that right now because I do analog power design. I've been around long enough to have seen rubies for making masks (never cut them myself) and learned just how sensitive the trigger on an old Tek 547 can be compared to modern scopes.

If you still can do (good) analog circuits the process is a good one. Pure digital nm stuff is good for my CPU but not very interesting (in my view). It´s much more physics than electronics.  ;D


Quote
But there are/were techniques where you do the dicing in two steps, first with a thick blade then with a thinner blade? I have seen that somewhere...
I've not been anywhere that I have seen a multi-step saw process like this. That may be something done with very thick wafers used for individual discrete devices where the breakdown voltage is needed just from a distance perspective, but I haven't personally worked with such processes.

I have found the name: "step cut dicing" or "two step dicing":
https://www.researchgate.net/figure/Schematic-of-two-step-blade-dicing-process-a-Step-1-dicing-partially-into-the-wafer_fig9_276530395
https://www.dicing-grinding.com/services/dicing/
https://www.nichiwak.co.jp/english/technology/


Quote
Measuring capacitances sounds plausible. I just see one connection to the big areas. Please see the attached picture (01).
Could be capacitance to substrate. That or measuring the junction breakdown voltage to substrate.

Capacitance meassurement is possible. Breakdown voltage of course too but I´m not sure if you would use such big structures...

Quote
I have attached a bigger picture of the C elements (02). There seems to be a crossing of two lines.  :-//
Yes, the contact to silicon is done with Kelvin connections and is often done for each of the different diffusions as the contact resistance of each can be different. The bigger picture you show has lines going out top and bottom (force and sense) and lines out the sides (force and sense) so that you only measure the contact resistance. One set of lines goes down to the diffusion layer via the different metals, and the other set goes down to first layer metal with a single minimum contact from first layer metal to the diffusion in the center. It's called a cross bridge Kelvin resistor when I look it up on Google.

 :-+
 
The following users thanked this post: brabus, MegaVolt

Offline NoopyTopic starter

  • Super Contributor
  • ***
  • Posts: 1731
  • Country: de
    • Richis-Lab
Re: Different die pictures
« Reply #319 on: November 14, 2023, 08:07:05 pm »


The Honeywell SS526DT is a magnetic position sensor. The housing contains two Hall sensors at a distance of 1,4 mm. These sensors generate two signals. One signal indicates the speed at which the polarity of the magnetic field changes and the second signal indicates the direction of movement. A supply voltage between 3,4V and 24V is allowed.


The dimensions of the die are 2,23mm x 1,14mm. The Honeywell copyright is shown in the bottom right-hand corner. The component has two metal layers.

The two outputs of the SS526DT are located in the upper corners. This can be clearly seen from the larger transistors under the bondpads. The supply is fed in via the bondpads on the bottom edge. The left-hand reference potential is distributed in a star shape. For maximum symmetry, the line to the left Hall element is laid in loops. The testpads on the right and left edges enable a total of four fuses to be triggered. Measurements can be carried out via the two testpads on the top edge.

The two Hall elements are easy to recognize due to their special geometry. Two Hall elements are arranged one above the other on each side. The distance of 1,4mm specified in the datasheet is confirmed here. There appears to be a circuit in the middle of the die that ensures a constant current through the Hall elements. The typical structures of a bandgap reference voltage source can be recognized. The Hall voltages are measured on the inside edges of the Hall elements. A logic area is integrated at the upper edge between the testpads, which does the evaluation of the processed signals.


In detail, it can be seen that the two Hall elements are arranged at 90° to each other. The elements are connected in parallel with regard to both the operating current and the Hall voltage. This arrangement reduces the influence of mechanical stresses in the silicon, which can always occur via the housing.

On the right you can see an evaluation circuit as found in the inputs of many opamps. There are certainly four transistors, which are connected crosswise in pairs so that thermal gradients have as little effect as possible on the signal processing.


https://www.richis-lab.de/hall04.htm

 :-/O
 
The following users thanked this post: doktor pyta, RoGeorge, ch_scr

Offline NoopyTopic starter

  • Super Contributor
  • ***
  • Posts: 1731
  • Country: de
    • Richis-Lab
Re: Different die pictures
« Reply #320 on: January 29, 2024, 07:49:48 pm »


The FX335 from Consumer Microcircuits is a CTCSS encoder/decoder. CTCSS stands for Continuous Tone Coded Subaudio Squelch. A tone is transmitted via a channel, usually a radio link, and makes it possible to select one of up to 38 device groups.


The datasheet contains a block diagramm. The input signal contains the audio signal and the CTCSS audio signal. The audio signal is separated and output via a high-pass filter. This output can be activated via an external control signal or via an internal opamp. The opamp is usually connected so that it works as an integrator and only passes on the audio signal once the configured CTCSS audio signal has been received long enough.

In order to be able to evaluate the CTCSS audio signal, the input signal is first filtered with a low-pass filter and then with a band-pass filter. The digital interface configures both filters so that they only pass the desired audio signal. The filtered signal is evaluated and activates the "Detector Output". This output controls the integrator, which releases the audio signal.

The FX335 can also generate a CTCSS audio signal for transmit mode. A quartz oscillator generates a square wave for this purpose. The digital interface configures the frequency of this signal. To convert the square wave into a sinusoidal signal, it is passed through the low-pass filter and the band-pass filter, which were also used to evaluate the input signal.


The dimensions of the die are 5,0mm x 4,4mm. The various function blocks are clearly visible.


The character string L532P could be an internal project designation.


The FX335 was apparently developed in 1984.


The revisions of several masks are shown in one corner of the die. However, the formatting is unclear.


Two test structures have been integrated at the edge of the die. One contains PMOS transistors, the other NMOS transistors. These are each two MOSFETs whose gate electrodes have different width/length ratios. The structures on the far right of the two groups have no gate oxide. The metal layer there is located above a thick oxide layer. The influence of metal lines on underlying structures can be evaluated with this part of the test circuit.


Two very similar structures have been integrated in the upper part of the die. They are surrounded by capacitors consisting of individual small elements. These are the active filters that work with switched capacitors. These "switched capacitor filters" are described in more detail in the U1001 (https://www.richis-lab.de/phone01.htm).


A smaller switched capacitor filter is integrated at the lower edge of the die. This is probably the high-pass filter in the audio path. In contrast to the two filters for the CTCSS audio signal, the filter in the audio path does not require complex configuration and is correspondingly smaller.


There is a mask ROM in the bottom left-hand corner of the screen, which is shown here rotated by 90°. One of 38 lines is selected on the right edge. This corresponds to the 38 configurable sound frequencies. Five bits are inverted so that the complementary signal is also available for selecting the lines. As five bits are not quite enough to address 38 lines, there is a sixth bit that only intervenes in the control of the lowest six lines (cyan).

The ROM generates nine control signals, which are routed downwards and then to the left. Each of these nine control signals is connected to two areas within the ROM. There is a pull-up resistor on the left of each line. Line selection is done by the circuit on the far right by connecting a line directly to the negative supply. The narrower right area of the ROM contains PMOS transistors that can switch the positive supply to the control lines. The distribution of the gate oxide sections represents the programming. It defines where a transistor is formed. In a selected line, the negative potential activates all existing PMOS transistors.

The negative supply is fed from above in the left-hand area. It is connected to the wide vertical strips, which are contacted by the control lines at the bottom edge. The wide strips represent a series connection of NMOS transistors. If the lines are inactive they are on a high level, the transistors are conductive and the control lines are on a low level. The NMOS in the left area are distributed in the same way as the PMOS in the right area. If a line is selected, i.e. on a low level, and a control line is linked to this line, the wide NMOS switches off and the small PMOS becomes active. The control line then carries a high level.


https://www.richis-lab.de/FX335.htm

 :-/O
 
The following users thanked this post: RoGeorge, ch_scr

Offline NoopyTopic starter

  • Super Contributor
  • ***
  • Posts: 1731
  • Country: de
    • Richis-Lab
Re: Different die pictures
« Reply #321 on: February 09, 2024, 04:18:30 am »


The D5061-3001 is a 16-bit processor that Hewlett Packard used in calculators, for example in the HP9845B and HP9845C models. The D5061-3001 is a late variant of a model series that was continuously revised until the mid-1980s. The first model of these 16-bit processors came onto the market in 1973 and was very innovative at the time.

Hewlett Packard published a lot of information about the calculators and processors. However, there is no datasheet. Two websites have collected some background information, which will be referred to several times in the following documentation:
www.cpushack.com https://www.cpushack.com/2014/03/18/the-forgotten-ones-hp-d5061-30xx-processors/
www.hp9845.net https://www.hp9845.net/9845/hardware/processors/

The maximum clock frequency of the processor is given as 10MHz by www.cpushack.com. In contrast, the website www.cpushack.com documents a clock frequency of 5,7MHz. The maximum power dissipation is allegedly 6W.


The block diagram shown here is from the Hewlett Packard Journal April 1978. The D5061-3001 was used twice in the HP9845 calculator, as an LPU (Language Processor Unit) and as a PPU (Peripheral Processing Unit). The LPU executes the program, while the PPU controls the peripherals.


Patent US4180854 describes the A variant of the HP9845 calculator in great detail. The design and connection technology is shown there. The processor is located on a ceramic carrier and is protected by a sheet metal cover. A large heat sink improves heat dissipation and stabilizes the ceramic. The processor module is screwed to the circuit board, which has a recess for the metal cover. A special frame insulates the two elements and at the same time ensures a stable electrical connection of the individual contacts in the contact area.


A small amount of heat-conducting paste has been applied to the back of the ceramic carrier. There are also some character strings. The website www.cpushack.com explains that this is a documentation of the tests at the end of the manufacturing process.


The ceramic carrier has 107 contacts. 40-7011C could be the name of the layout.


If you remove the metal cover, the structure of the processor becomes visible.


CPD stands for the Calculator Products Division of Hewlett Packard, which was located in Loveland Colorado. The mountains are most likely intended to evoke the local landscape.


The integrated circuits of the processor were manufactured at Hewlett Packard using the so-called NMOS II process with a minimum structure width of 5µm. The manufacturing steps are roughly outlined in the article "An NMOS Process for High-Performance LSI Circuits" published in the Hewlett-Packard Journal in November 1977.


In the article above you will find a picture of an older version of the D5061-3001. This processor has significantly fewer contacts and contains one less integrated circuit.


The aforementioned patent US4180854 contains a block diagram that shows how the processor works. The main components are the Input Output Controller (IOC), the Extended Math Chip (EMC) and the Binary Processor Chip (BPC). All three circuits are connected to a common, 16-bit wide, internal address and data bus. This bus is led out of the housing at two points. Two bidirectional interface buffers (BIB) control the data flow at both interfaces.

The patent describes the HP9845A desktop calculator. The D5061-3001, which was used in the HP9845B, was additionally equipped with an Address Extension Chip (AEC), which greatly extended the address range of the processor. The website www.hp9845.net states that 24.000 transistors were integrated into the D5061-3001, excluding the bus transceiver.


The patent also contains a more detailed circuit diagram. However, the pin numbers do not match the D5061-3001.


The processor receives various supply potentials. The bidirectional transceivers are supplied with +7V. Each transceiver receives its own +7V potential for this purpose. GND is supplied via two contacts. The lines are split directly at the contacts. One line serves as a reference potential for the transceivers, the other leads to the remaining components. This ensures that the parts influence each other as little as possible.

The core elements of the processor are supplied with -5V, GND, +5V, +7V and +12V. Each of the elements receives the -5V potential and the +12V potential via its own contact. In addition to the GND supplied from above, the components receive a further GND from the left. The BPC chip also has an exclusive GND contact.


The names of the potentials were taken from the website www.hp9845.net. On the surface, they seem to correspond well with the circuit.


On the die of the BIB (Bidirectional Interface Buffer) you can clearly see the eight columns of the eight channels. In contrast to the other components, the BIBs are based on a bipolar process.


Some masks are shown in the bottom left corner of the die. The hp logo with the heart can often be seen in special circuits from Hewlett Packard. The character sequence D 218 cannot be assigned.


The Binary Processor Chip (BPC) has a surprisingly colourless surface, which also appears somewhat coarsely structured.

This image is available in full resolution (93MB): https://www.richis-lab.de/images/cpu/10x16XL.jpg


In the bottom left-hand corner is a string of characters that cannot be identified. You can just make out the Calculator Products Division logo under a bondwire.


The binary processor chip has the most comprehensive power supply. The -5V potential is only connected to the substrate. The 16-bit wide interface at the top edge uses its own reference potential and is supplied with +5V. Clock conditioning is located in the bottom right-hand corner. This part of the circuit has two ground potentials. One potential is connected to the circuit around the CLK input. The second potential serves the drivers at outputs O1 and O2. The rest of the circuit has three further bondwires that lead to GND. In addition, there is the +7V potential and the +12V potential connected via two bondwires.


The Address Extension Chip (AEC) extends the address range to 4GB according to www.hp9845.net.

This image is available in full resolution (37MB): https://www.richis-lab.de/images/cpu/10x19XL.jpg


The logo of the Calculator Products Division can also be found on this die alongside some auxiliary structures and designations.


At one point on the die there is an artefact whose geometry appears too clean to be contamination. On the other hand, it is unclear what kind of modification this shoul dbe. You still can recognise the lines underneath.


The Extended Math Chip (EMC) does the calculation of floating point numbers.

This image is available in full resolution (92MB): https://www.richis-lab.de/images/cpu/10x20XL.jpg


This die shows the hp heart instead of the Calculator Products Division logo.


The Input Output Controller (IOC) is the only circuit that appears as colourful as most integrated circuits.

This image is available in full resolution (105MB): https://www.richis-lab.de/images/cpu/10x24XL.jpg


The Calculator Products Division logo is also missing here.


There is contamination or damage on or in the passivation layer at one point. However, the relevant structures appear to be intact.


https://www.richis-lab.de/cpu09.htm

 :-/O
 
The following users thanked this post: Vgkid, RoGeorge, ch_scr, MegaVolt, iMo

Offline NoopyTopic starter

  • Super Contributor
  • ***
  • Posts: 1731
  • Country: de
    • Richis-Lab
Re: Different die pictures
« Reply #322 on: February 21, 2024, 06:36:43 pm »


The Renesas µPD78F1814 is a 16Bit microcontroller from the 78K0R family. The A2 indicate that the device is approved for the extended temperature range of -40°C to 125°C.


The datasheet contains a table with the different variants of the 78K0R. The µPD78F1814 offers 48kB ROM for code, 16kB ROM for data and 3KB RAM in a package with 48 pins. This configuration is alternatively available in two smaller and one larger package. The clock frequency is up to 24MHz.


The datasheet also contains a block diagram showing the integrated function groups. However, the µPD78F1814 does not offer a CAN interface.


Here you can see two different components whose package has been opened chemically. Residues have remained on the surface.


The package offers 48 pins, all of which are used according to the datasheet. There are 50 bondwires in the package. The reference potential is probably connected several times. However, it could also be that different functions can be activated via different bond variants. There are 22 free bondpads on the die. It can be assumed that these bondpads are used in the µPD78F1819, whose package has 64 pins.


The dimensions of the die are 2,9mm x 2,7mm. The image is available in full resolution: https://www.richis-lab.de/images/uC/03x07XL.jpg (28MB)


The numbers 1820 are shown in the metal layer on the left edge. This shows that the µPD78F1820 and the associated package variants are most likely also based on this die.

The copyright symbol, NEC Electronics Corp. and 2009 can just be recognised above the numbers. NEC has been part of Renesas since 2010.


https://www.richis-lab.de/uC02.htm

 :-/O
 
The following users thanked this post: RoGeorge, iMo

Offline NoopyTopic starter

  • Super Contributor
  • ***
  • Posts: 1731
  • Country: de
    • Richis-Lab
Re: Different die pictures
« Reply #323 on: March 04, 2024, 10:15:37 pm »


The NXP SL2S5002 is an RFID transponder from the SLIX family. The component is housed in a SOT1122 package, the dimensions of which are just 1,00mm x 1,45mm x 0,50mm. The two contacts on the right are the connections for the antenna. The left contact is not used.


There are two copper elements on the side of the housing. The datasheet states that these elements may be visible depending on the process. No interposer can be seen on the underside of the housing. A punching grid is probably used, which is visible here.


The datasheet contains a block diagram showing the structure of the ICODE SLIX-L. The analog front end is located on the left. This is where the antenna tuning, the processing of the supplied energy, the generation of a stable supply voltage and a clock signal take place. At the same time, the data is extracted from the received signal. To transmit data, the load on the antenna is modulated. In the background there is an EEPROM and logic that controls reading and writing as well as safety functions.


The die is 0,54mm x 0,50mm in size. According to the datasheet, the device is based on a 140nm CMOS process. The structures are too small and too complex to be analyzed in detail. However, some things can be guessed. Of the four bondpads, only the bottom two have been contacted. There are wide conductive tracks between the bondpads. A copyright is shown above these tracks, which is unfortunately partially obscured by residues. It seems there is the year 2008. The control logic is located in the top right-hand area. The function block in the top left-hand corner is finely structured. This is presumably a memory area.


As the SL2S5002 can also be purchased as a wafer, the die is described in detail in the datasheet. This also shows the purpose of the two unused bondpads. One bondpad is ground. The other bondpad is obviously a test interface. Production takes place on 200mm wafers.


https://www.richis-lab.de/transponder06.htm

 :-/O

Offline NoopyTopic starter

  • Super Contributor
  • ***
  • Posts: 1731
  • Country: de
    • Richis-Lab
Re: Different die pictures
« Reply #324 on: March 10, 2024, 04:25:52 am »
I have started a new topic for unknown parts:

https://www.eevblog.com/forum/projects/different-die-pictures/

 8)

Online T3sl4co1l

  • Super Contributor
  • ***
  • Posts: 21673
  • Country: us
  • Expert, Analog Electronics, PCB Layout, EMC
    • Seven Transistor Labs
Seven Transistor Labs, LLC
Electronic design, from concept to prototype.
Bringing a project to life?  Send me a message!
 
The following users thanked this post: RoGeorge, Noopy

Offline NoopyTopic starter

  • Super Contributor
  • ***
  • Posts: 1731
  • Country: de
    • Richis-Lab
Re: Different die pictures
« Reply #326 on: March 10, 2024, 06:12:40 am »
 :palm:

Thank you very much!  :-+

Offline NoopyTopic starter

  • Super Contributor
  • ***
  • Posts: 1731
  • Country: de
    • Richis-Lab
Re: Different die pictures
« Reply #327 on: March 19, 2024, 05:00:37 am »


The Intersil ICM7226A is a fully integrated frequency counter that can determine frequencies up to 10MHz. The component with index A is designed to drive 7-segment displays with a common cathode. The ICM7226B, on the other hand, drives 7-segment displays with a common anode.


The test circuit in the datasheet shows how efficiently the ICM7226 is constructed. The module contains an oscillator and directly drives eight 7-segment displays. The outputs, which multiplex the individual digits, are used simultaneously to read in the function selection and the counting range.


The ICM7226 datasheet contains a detailed block diagram showing how the chip does the counting.


The dimensions of the die are 4,3mm x 4,1mm. The image is available in original size: https://www.richis-lab.de/images/counter/01x03XL.jpg (29MB) It can be seen that the design would provide two additional bondpads. However, these bondpads are not metallised, so they can only be used when a different metal layer is used.

The lowside transistors, which control the segments of the active 7-segment display, are located at the top edge. The highside transistors, each of which activates one of the 7-segment displays, are located in the bottom left-hand corner. Repeating structures can be recognised in the core of the ICM7226. The majority of these areas are likely to contain frequency dividers, of which a large number is required.


Test structures are integrated in the top right-hand corner. Next to them are character strings that could be the initials of the developers, among other things.


The revisions of six masks can be seen in the bottom right-hand corner. The designation ICM7226 is shown underneath. Y appears to be the revision of the design. The Y appears several times on the die. If we assume that we are counting backwards from Z, then this is a second revision.

A closer look reveals that a 1 is depicted in a lower position in place of the second 2. This indicates that the design could be used for both the ICM7226 and the ICM7216. All you have to do is change the metal layer.


The ICM7216 offers slightly fewer interfaces due to its smaller housing, in particular the BCD output is missing. Otherwise it is the same module. It therefore makes sense to operate the ICM7216 and the ICM7226 with the same circuit.


https://www.richis-lab.de/counter01.htm

 :-/O
 
The following users thanked this post: RoGeorge


Share me

Digg  Facebook  SlashDot  Delicious  Technorati  Twitter  Google  Yahoo
Smf