Author Topic: tektronix 184 restoration  (Read 3361 times)

0 Members and 1 Guest are viewing this topic.

Offline worsthorseTopic starter

  • Super Contributor
  • ***
  • Posts: 1237
  • Country: us
  • aina varma, usein väärin
tektronix 184 restoration
« on: December 10, 2019, 10:50:13 pm »


A couple of months ago I picked up a Tektronix 184 to go with the other Tek oscilloscope calibration gear I've been rehabbing. I gave it a quick go over and was happy to find that it mostly worked. The biggest problem I noticed was on the trigger outputs.  When the marker was set to 0.1us or 0.5us, it was showing up on the trigger line; it appeared to be crosstalk. There also seemed to be a problem with the 0.5us marker output. The following shows both:


I was well on my way to tracking both issues down when I did something stupid and connected the 130V rail through the output buffer amp and part of the countdown board. That, believe it or not, turned out to be good news as it caused me to take another look at a part of the countdown board that had some rework done to it. Poorly done. As it turns out, really poorly done. The rework turned out to be a mod that removed RF chokes from the delay lines, changed the places where they connected to the countdown board, and probably introduced some of the crosstalk I am seeing. Here's the part of the circuit that matters:


I need to repair the damage done here but I have a problem: I don't know what sort of ferrite or winding was used for the chokes and I am not quite sure how the delay line inputs and outputs were routed to the countdown board.  Here's the ask: 

If you have a 184 and would be willing to take a couple of photographs of the delay line and countdown board (which means disconnecting the power from the board and undoing six screws), please post something here or send me a PM. Thanks!

If I can't find an example I will make guess on the ferrites and see if I can rebuild it. 

After I fix this (which includes cleaning up the rework mess on the top and bottom of the PCB), I will finish figuring out which transistors I popped with 130V and get back to troubleshooting the cross talk and 0.5us marker issues.
specialization is for insects.
 

Offline worsthorseTopic starter

  • Super Contributor
  • ***
  • Posts: 1237
  • Country: us
  • aina varma, usein väärin
Re: tektronix 184 restoration
« Reply #1 on: December 10, 2019, 11:02:09 pm »
Here's what the part of the board that was reworked looks like, top and bottom:


For reasons I don't understand, someone drilled holes in the board, and soldered the delay line inputs and outputs to the top of the board. They also separated the pairs of line, removed the ferrites on the input and output, twisted all the "ground" wires together, and soldered them to another part of the board on the top. Tektronix put big pads on the bottom of the board for this, all as near as possible to their destination.  :palm:


This is the bottom of the board. The delay line pairs were removed from these insulating cover and twisted together under the board.  :palm:

There are other places where there were parts replaced, also badly done, and some of the replacements were poor substitutes. I am going to pull the damaged parts, clean up the solder work (top and bottom) and try to return the board to what I imagine is closer to its original state.

Usually someone makes a mod like this because they are trying to fix some problem. If it does and doesn't break anything - at least in terms of how the equipment is being used at the time - that's what matters. I imagine something like that happened here.  But man, it is a bit of a mess!
specialization is for insects.
 

Offline jdragoset

  • Regular Contributor
  • *
  • Posts: 242
  • Country: us
Re: tektronix 184 restoration
« Reply #2 on: December 11, 2019, 12:53:23 am »
I have a 184, but presently is involved in calibrating another Tek 2215.
When done I will be happy to get pix of the delay line, which is embedded underneath the first count down board.
I had an initial problem with a broken tuning slug for L-18, but replaced it with the slug from this from Ebay:
https://www.ebay.com/itm/NOS-Tektronix-114-0194-00-Variable-Inductor/272805760143
Let me tune 0.1 us and 0.5 us per manual.
I have not yet gotten the 10 MHz GPS standard (https://www.ebay.com/itm/Trimble-GPS-Receiver-GPSDO-10MHz-1PPS-GPS-Disciplined-Clock-antenna-power-supply/293366429125?hash=item444e0075c5:g:N0MAAOSw-SBatYb1 for final oscillator calibration
 

Offline worsthorseTopic starter

  • Super Contributor
  • ***
  • Posts: 1237
  • Country: us
  • aina varma, usein väärin
Re: tektronix 184 restoration
« Reply #3 on: December 11, 2019, 01:31:08 am »
I have a 184, but presently is involved in calibrating another Tek 2215.
When done I will be happy to get pix of the delay line, which is embedded underneath the first count down board.
I had an initial problem with a broken tuning slug for L-18, but replaced it with the slug from this from Ebay:
https://www.ebay.com/itm/NOS-Tektronix-114-0194-00-Variable-Inductor/272805760143
Let me tune 0.1 us and 0.5 us per manual.
I have not yet gotten the 10 MHz GPS standard (https://www.ebay.com/itm/Trimble-GPS-Receiver-GPSDO-10MHz-1PPS-GPS-Disciplined-Clock-antenna-power-supply/293366429125?hash=item444e0075c5:g:N0MAAOSw-SBatYb1 for final oscillator calibration

Thanks, I appreciate the help.
specialization is for insects.
 

Offline rf+tech

  • Frequent Contributor
  • **
  • Posts: 319
  • Country: us
  • Real radios are olive drab
Re: tektronix 184 restoration
« Reply #4 on: December 11, 2019, 01:44:40 am »
Although I no longer own a 184, I recall the holes and under-board mounting of the delay lines to be factory correct. Top-side solder pads can be seen in the manual photo, with your photo inset for perspective. The wreckmanship and altercations are another matter.


As for the ferrite beads, probably type 43. The objective is to elevate the HF impedance of the DC grounded conductors.

RF+ tech
RT-1133 AN/PRC-70  *  RT-794 AN/PRC-74  *  RT-841 AN/PRC-77  *  RT-524 AN/VRC-12  *  RT-834 AN/GRC-106  *  RT-F100
 

Offline worsthorseTopic starter

  • Super Contributor
  • ***
  • Posts: 1237
  • Country: us
  • aina varma, usein väärin
Re: tektronix 184 restoration
« Reply #5 on: December 11, 2019, 02:56:55 am »
Although I no longer own a 184, I recall the holes and under-board mounting of the delay lines to be factory correct. Top-side solder pads can be seen in the manual photo, with your photo inset for perspective. The wreckmanship and altercations are another matter.

(Attachment Link)

As for the ferrite beads, probably type 43. The objective is to elevate the HF impedance of the DC grounded conductors.

RF+ tech

Thanks. I looked at the photos in the manual and saw the pads, which are actually thru hole (I cleaned them out to reinstall the delay line properly, but didn't see wires coming up through the board, so I assumed that the delay lines were soldered from beneath. 

My default is type 43 in all things ferrite.  ;D   Now trying to figure out if there was just one bead on each line or something more complicated. I may be reading too much into the schematics and thinking something else:

887840-0

See what I mean? Called out as a single ferrite, for example, not two.

specialization is for insects.
 

Offline rf+tech

  • Frequent Contributor
  • **
  • Posts: 319
  • Country: us
  • Real radios are olive drab
Re: tektronix 184 restoration
« Reply #6 on: December 11, 2019, 03:50:17 pm »
My interpretation would be one bead threaded over the wire pair, at each end of each delay line.

The next question becomes "how many turns?". One pass leaves the beads free to move about, two passes secures them in place. Scoping the trigger and marker outputs against one another would show the efficacy.

RF+ Tech
RT-1133 AN/PRC-70  *  RT-794 AN/PRC-74  *  RT-841 AN/PRC-77  *  RT-524 AN/VRC-12  *  RT-834 AN/GRC-106  *  RT-F100
 
The following users thanked this post: worsthorse

Offline worsthorseTopic starter

  • Super Contributor
  • ***
  • Posts: 1237
  • Country: us
  • aina varma, usein väärin
Re: tektronix 184 restoration
« Reply #7 on: December 11, 2019, 04:32:46 pm »
That's my guess, too. I found the same part number is called out in another piece of Tek gear and listed as having 0.6uH inductance. I have a stash of 43-101 ferrite beads and a single wire through gives one 0.6uH, which makes it a reasonable choice. So, barring finding any other information before I start repairing, that's what I will use.  Thanks for the help; more photos to follow as I go.
specialization is for insects.
 

Offline jdragoset

  • Regular Contributor
  • *
  • Posts: 242
  • Country: us
Re: tektronix 184 restoration
« Reply #8 on: December 11, 2019, 05:08:28 pm »
Here is a top view and two bottom views.
 
The following users thanked this post: worsthorse

Offline worsthorseTopic starter

  • Super Contributor
  • ***
  • Posts: 1237
  • Country: us
  • aina varma, usein väärin
Re: tektronix 184 restoration
« Reply #9 on: December 11, 2019, 07:33:30 pm »
Here is a top view and two bottom views.

Thank you! I can see the ferrite placement and your delay line comes through the board, too. That answers my big questions and I appreciate the help.
specialization is for insects.
 

Offline worsthorseTopic starter

  • Super Contributor
  • ***
  • Posts: 1237
  • Country: us
  • aina varma, usein väärin
Re: tektronix 184 restoration
« Reply #10 on: December 20, 2019, 06:15:10 pm »
I have been waiting for components to continue the 184 repair. They arrived a couple of days ago and I've rebuilt the delay line, with the ferrites and repaired the poorly done rework in this part of the board (there's more in other places but they seem to be working, so I am leaving them alone. It turned out that the insulation was mostly off of the delay line leads, so I shrink wrapped them individually.

Here's the delay line before:


Here's the delay after (you can see the ferrite beads):


Here's the delay line being reconnected:


I re-installed the delay line and countdown board and checked to be sure I didn't introduce any short or open during the install. The physical design here is questionable: the delay line attachments are just randomly pressed against the board. If the connections had been done with coax or shielded wire, there would be less opportunity to pick up noise.

Next up, replace the blown transistors, check (again) to be sure I didn't do anything dumb in the rework, then power it up and see what happens...

Thanks again for to those that helped me with photos and other info!


specialization is for insects.
 

Offline worsthorseTopic starter

  • Super Contributor
  • ***
  • Posts: 1237
  • Country: us
  • aina varma, usein väärin
Re: tektronix 184 restoration
« Reply #11 on: December 23, 2019, 05:46:45 pm »
Back to where I was before mis-applying 130V to the 12V rail.  Here's the list of symptoms I am seeing, so far:

1. An attenuated version of the the marker signal appears on the trigger output. It is most apparent at marker rates of 0.1, 0.5, and 1us and seems to be the 10MHz oscillator signal.

2. The .5us marker has a .6us period and doesn't change when adjusted according to the manual procedure.

3. The markers above 10us are not stable.

I am focused on first countdown board, where most of these signals are generated and comparing the signals and voltages I see with those on the schematic. Here's the first obvious issue, in the generation of the .5us marker:


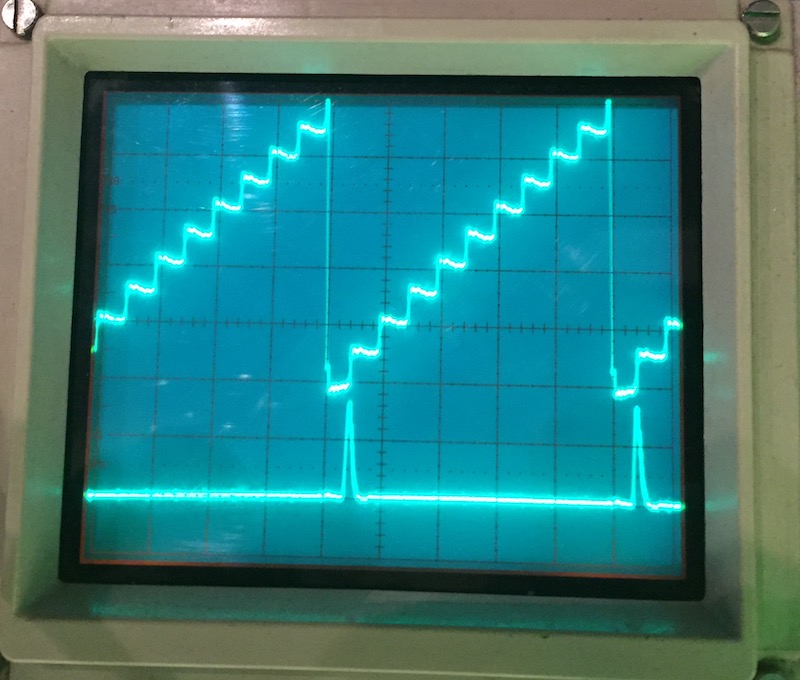
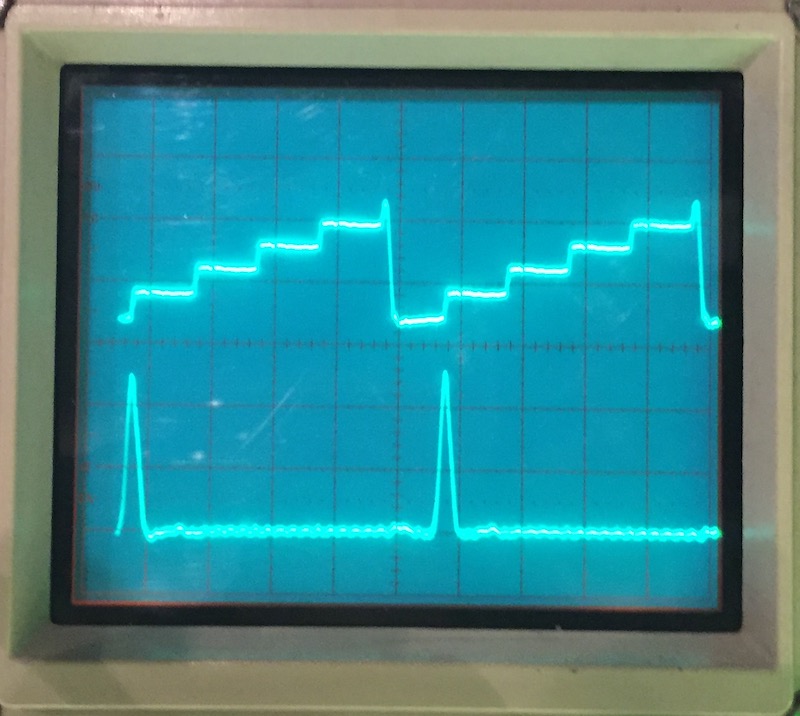
That's the ramp that creates the 0.5us pulse from five cycles of the 0.1us pulse.  It should look like this:


Here's the circuit involved:


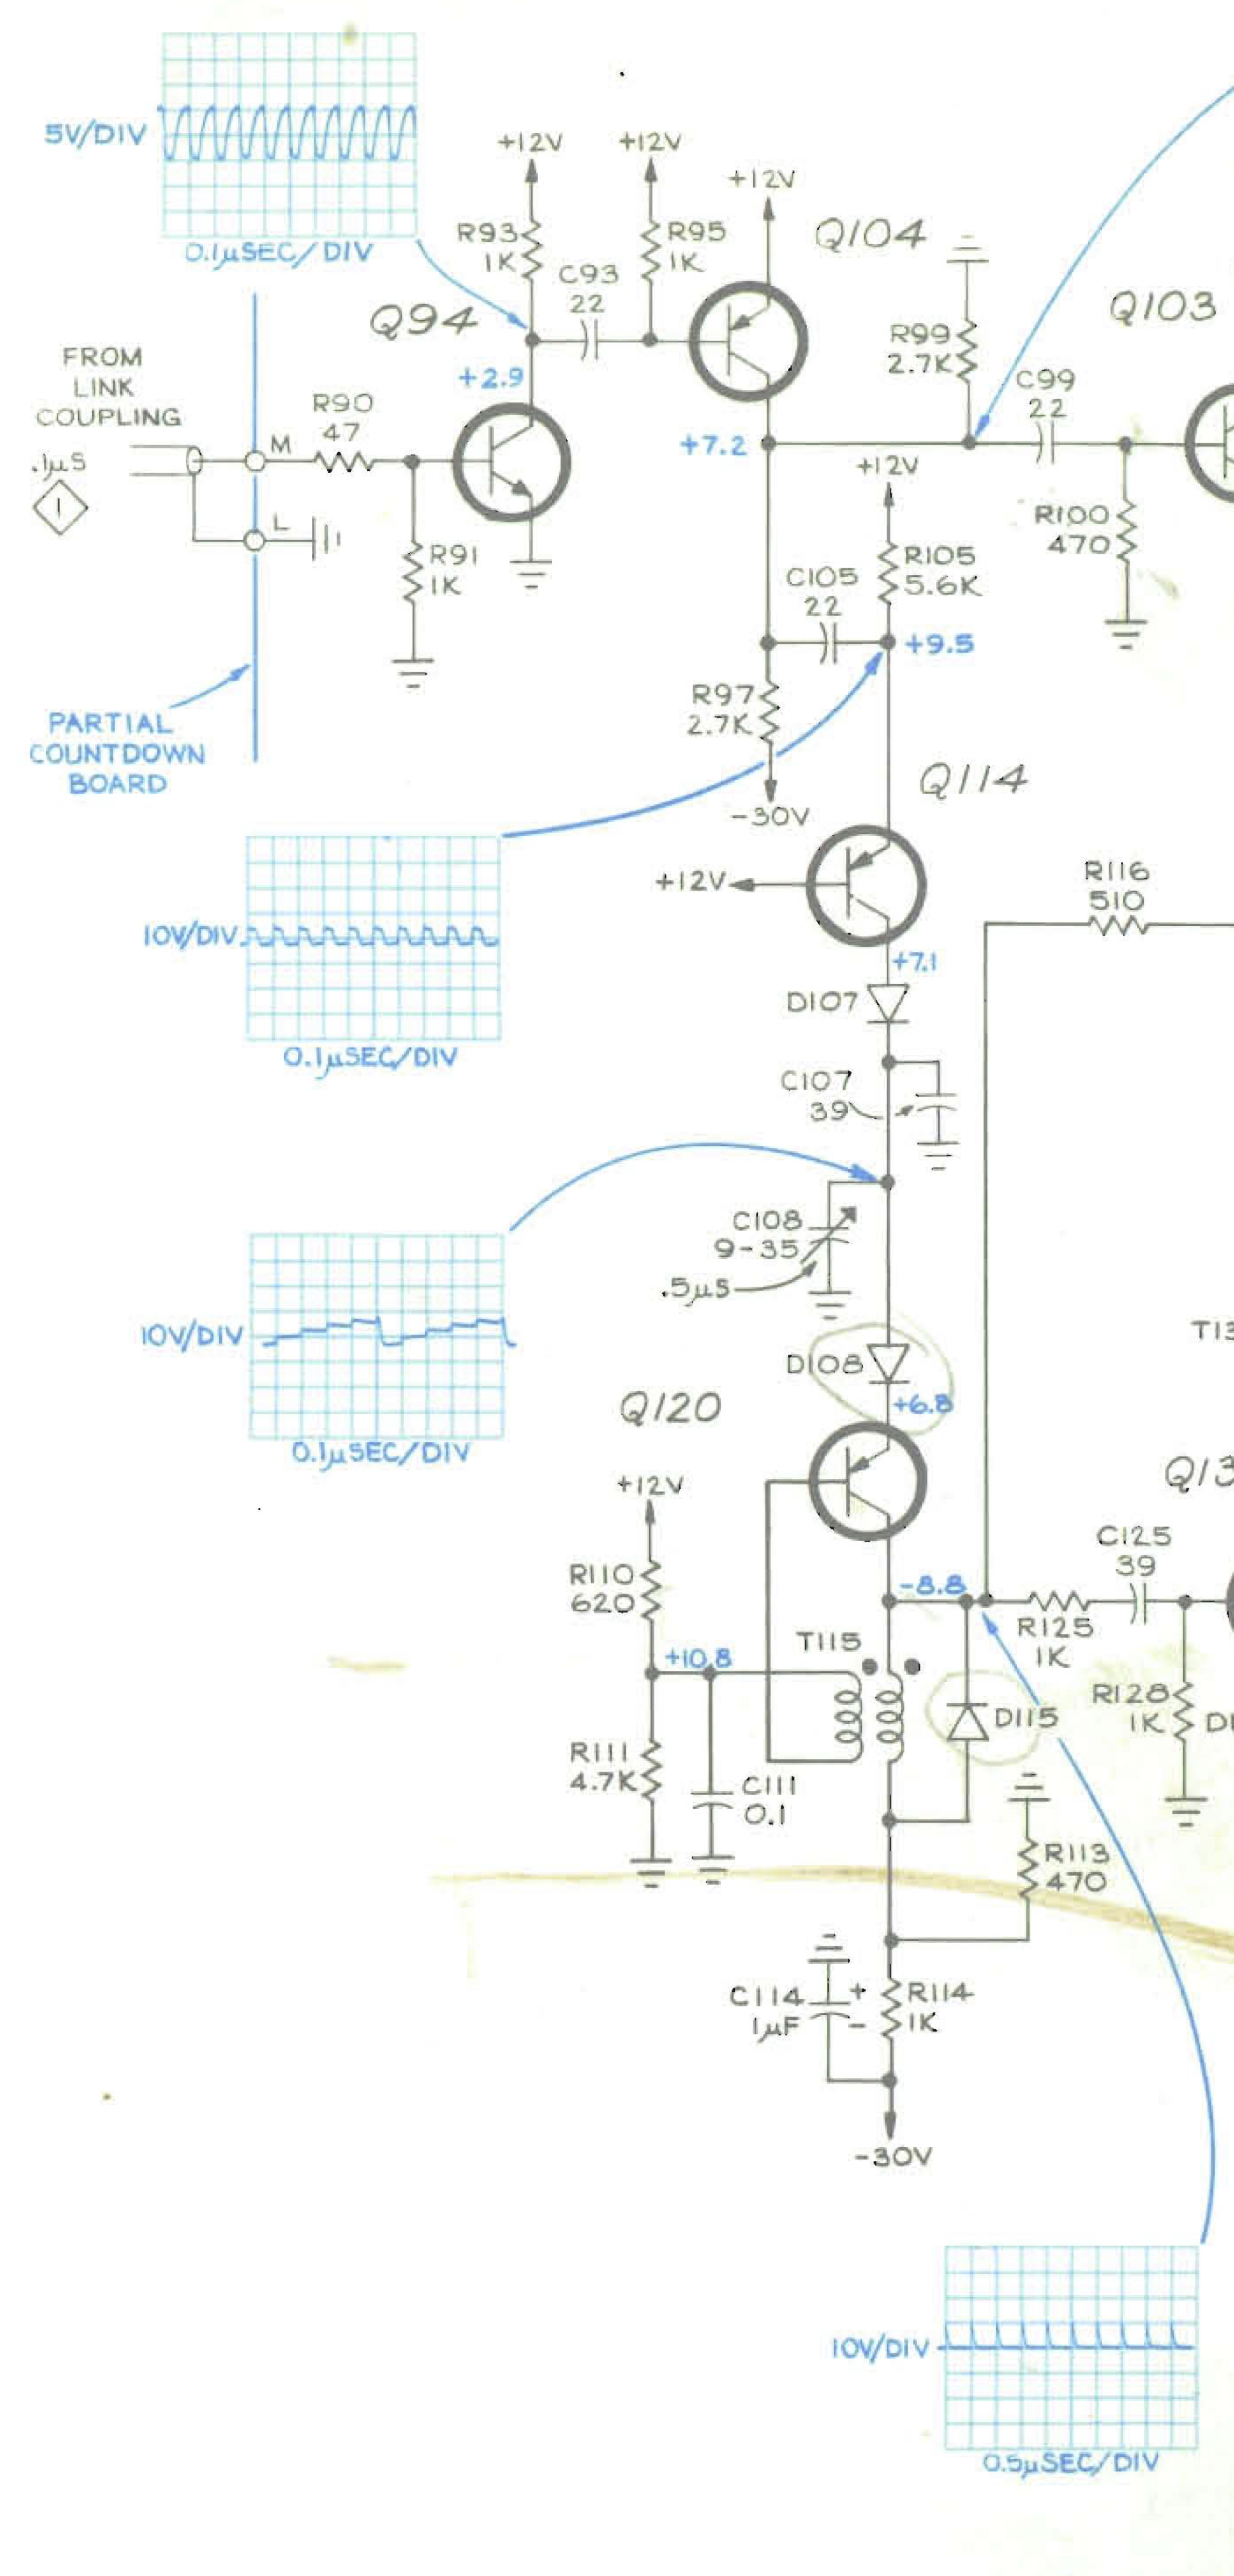
What appeared to be happening: Q114 wasn't dumping enough charge into C107 and C108 on each cycle, and so it took nine cycles to charge the capacitors up enough to trigger Q120.  As I found in most other places on this board, the bias voltages were mostly out of spec. To increase current through Q114, I slowly lowered the resistance of R105.  That brought the difference voltage across C105 back to specifcation and fixed the ramp (that's the first trace on second scope image above). The 0.5us pulse is now in spec (the second trace).

On to the next issue...


specialization is for insects.
 

Offline jdragoset

  • Regular Contributor
  • *
  • Posts: 242
  • Country: us
Re: tektronix 184 restoration
« Reply #12 on: December 23, 2019, 06:13:11 pm »
See page 6-7 for adjustments of 0.1 us and 0.5 us
 

Offline worsthorseTopic starter

  • Super Contributor
  • ***
  • Posts: 1237
  • Country: us
  • aina varma, usein väärin
Re: tektronix 184 restoration
« Reply #13 on: December 23, 2019, 07:13:33 pm »
i went through the whole calibration procedure, which is how i discovered the problems i am addressing in this thread... now looking at the signals in that section of the board because the adjustment wasn't working... the C107 and C108 "bucket" wasn't getting enough charge in each cycle to top 10V in five cycles.
specialization is for insects.
 

Offline jdragoset

  • Regular Contributor
  • *
  • Posts: 242
  • Country: us
Re: tektronix 184 restoration
« Reply #14 on: December 23, 2019, 09:28:26 pm »
Try adjusting L 18 and L 19
 

Offline jdragoset

  • Regular Contributor
  • *
  • Posts: 242
  • Country: us
Re: tektronix 184 restoration
« Reply #15 on: December 23, 2019, 09:31:19 pm »
See my previous post with the ebay link for a Tek inductor with the same size slugs as L 18 and L 19  if either are broken
 
The following users thanked this post: worsthorse

Offline worsthorseTopic starter

  • Super Contributor
  • ***
  • Posts: 1237
  • Country: us
  • aina varma, usein väärin
Re: tektronix 184 restoration
« Reply #16 on: December 28, 2019, 10:17:26 pm »
Try adjusting L 18 and L 19

Thanks but not a problem with L18 or L19; adjustments there do not make a difference.  It appears that there is not enough current flowing through Q114 to charge the capacitor "bucket" up in five cycles. At some point someone had replaced the resistor (R105) with a diode in an attempt to fix the problem.  I replaced the resistor, found the problem, and managed it by lowering the resistance at R105 to about half of the schematic value.

specialization is for insects.
 

Offline worsthorseTopic starter

  • Super Contributor
  • ***
  • Posts: 1237
  • Country: us
  • aina varma, usein väärin
Re: tektronix 184 restoration
« Reply #17 on: December 28, 2019, 10:27:39 pm »
After fixing the delay line and replacing a couple of transistors and capacitors. I have clean 0.1us and 0.5us signals coming out of the first stage of the countdown board (the section from Q94 to Q130) and a clean 1.0us signal at the input to Q134.  Here things start to fall apart.  Whenever I start the unit up I have a clean signals up to 1us at the output of the generator but no signals above 1us.  This is the part of the circuit I am working on:


The problem seems to be in the Q134, Q133 circuit so I have to take a closer look there. One complication. At some point (a heat problem?) the 1us signal disappears, too. As I noted, this part of the board has been reworked, so I am guessing this isn't a new problem. Next step is to look at the waveforms and DC bias from the input of Q134 through Q153. I am also going to set up an offboard version of this circuit to be sure I understand how it is supposed to work.

specialization is for insects.
 

Offline worsthorseTopic starter

  • Super Contributor
  • ***
  • Posts: 1237
  • Country: us
  • aina varma, usein väärin
Re: tektronix 184 restoration
« Reply #18 on: January 13, 2020, 04:25:11 am »
Haven't been at my bench for almost two weeks. Worked on the 184 for a couple of hours.  And I am flummoxed.  The unit generates good output from 10ns to 0.5us. The circuit seems to be working as far as the input (base) of Q133 and Q145 and then, suddenly the 0.5us output stops.  This is a repeat of the last session when the 1.0us output failed while I was testing it (in each case, the output disappeared after I cycled the power).

It is possible that I damaged most of the transistors in this section when I inadvertently applied 130V to the 12V rail in this section of the board (see the story at the beginning of the thread).

Tomorrow, will move back in the chain and see if 0.5us output has really failed now, too.
specialization is for insects.
 

Offline jdragoset

  • Regular Contributor
  • *
  • Posts: 242
  • Country: us
Re: tektronix 184 restoration
« Reply #19 on: January 14, 2020, 07:45:30 pm »
Sometimes the transistor sockets cause intermittent problems
push each transistor to and fro with a pencil eraser while watching the output.
Also try canned air, where even the gas stream will spot-cool, but a dot of liquid will really cool.
 

Offline worsthorseTopic starter

  • Super Contributor
  • ***
  • Posts: 1237
  • Country: us
  • aina varma, usein väärin
Re: tektronix 184 restoration
« Reply #20 on: January 14, 2020, 11:48:30 pm »
Will get out the can of liquid cold today. Already tried the transistor socket trick. Unfortunately no change and when I checked with a meter, connections were all good.  That said, I am going to try it again because the failure mode makes no sense to me otherwise (and they are all transistors I have mucked with.  Thanks!
specialization is for insects.
 

Offline worsthorseTopic starter

  • Super Contributor
  • ***
  • Posts: 1237
  • Country: us
  • aina varma, usein väärin
Re: tektronix 184 restoration
« Reply #21 on: January 18, 2020, 06:01:00 pm »
I've put another three or four hours of trying to isolate the problem on the countdown board. I still haven't found an obvious fault, so I tried isolating portions of the circuit chain and injecting a signal into the system. There are at least three or four transistors, (including a 2N964 Ge BJT that is "tektronix selected" and unobtanium) that where the signal stops (good at the input, no output).

The transistors in question all test good and substitutions doesn't change the situation, so I am guessing there is either a biasing or signal level problem at several points in the chain or the transistors are marginal. At some point in the past, the countdown board had been heavily reworked in this area, so this is probably not a new problem.  At this point, I have to admit that I don't understand the circuit well enough to figure out what's wrong, come up with a diagnostic strategy, or fix it.

I am going to just admit I've failed on this one and set it aside.


specialization is for insects.


Share me

Digg  Facebook  SlashDot  Delicious  Technorati  Twitter  Google  Yahoo
Smf