Author Topic: Fun With Low Leakage/Bias Current: Femtompere, Electrometer, Keithley 617  (Read 81640 times)

0 Members and 2 Guests are viewing this topic.

Offline Alex Nikitin

  • Super Contributor
  • ***
  • Posts: 1162
  • Country: gb
  • Femtoampnut and Tapehead.
    • A.N.T. Audio
I think you also want to check leakage from the reed contact pins to the solenoid connections also.

Obviously, it is in progress right now. These measurements take time... .

Update: With both contacts connected together , shield to ground and 100V to one of the coil connections, measured resistance is about 1000T (after an hour). Tomorrow I'll try to clean it and re-measure, as I did make four solder connections now to this small package.

Cheers

Alex

P.S. - in the morning the leakage dropped to ~20fA at 100V, about 5000T measured.
« Last Edit: October 12, 2017, 01:58:31 pm by Alex Nikitin »
 

Offline Alex Nikitin

  • Super Contributor
  • ***
  • Posts: 1162
  • Country: gb
  • Femtoampnut and Tapehead.
    • A.N.T. Audio
Did some more measurements on this REMtech relay, below are the results. Time scale is 10 sec per point, vertical scale 20fA per division. The leakage measured between the coil and both contacts together, the screen is connected to the screening box ground, voltages applied are 0V, +100V, 0V, -100V, 0V and +50V. The measured resistance after ~30 min is over 1000 Tohm for either 100V or 50V.

Cheers

Alex
« Last Edit: October 12, 2017, 02:30:50 pm by Alex Nikitin »
 
The following users thanked this post: 3roomlab, rastro

Online Kleinstein

  • Super Contributor
  • ***
  • Posts: 14156
  • Country: de
Much of the shown "leakage" current seems to be due to dielectric absorption and not true leakage: Especially the curve at 0 V is pointing toward DA, as the transients look similar for the -100V to 0 step and the 0 to 100V step. While this is not true leakage, dielectric loss can be still a problem in an instrument.

It might be interesting to also have a step like 100 V to 50 V in the sequence, as here the initial DA current and leakage would be opposite sign.
 

Offline Alex Nikitin

  • Super Contributor
  • ***
  • Posts: 1162
  • Country: gb
  • Femtoampnut and Tapehead.
    • A.N.T. Audio
Much of the shown "leakage" current seems to be due to dielectric absorption and not true leakage: Especially the curve at 0 V is pointing toward DA, as the transients look similar for the -100V to 0 step and the 0 to 100V step. While this is not true leakage, dielectric loss can be still a problem in an instrument.

It might be interesting to also have a step like 100 V to 50 V in the sequence, as here the initial DA current and leakage would be opposite sign.

Yes, it is mostly DA, as my overnight data also confirm. Unfortunately, DA is always present at these current levels, especially if voltages are reasonably high. I may try to do some more measurements tomorrow. I've tried 0 to 5V step and the leakage settled to <3fA step in less than 5min. 

Cheers

Alex
« Last Edit: October 12, 2017, 03:38:53 pm by Alex Nikitin »
 

Offline math_indy

  • Newbie
  • Posts: 3
  • Country: us
I got my unit working very nicely.  Here is a part 2 video that shows what I had to do to complete the repair and calibration.  Somebody mentioned that methanol maybe not a good idea but it seemed to work well and methanol is what the Keithley service manual calls for.  I sprayed it from a air-brush gun then gently dried the board with warm air.

https://youtu.be/-68-65swAag
« Last Edit: October 17, 2017, 05:12:37 pm by math_indy »
 
The following users thanked this post: rastro

Online Kleinstein

  • Super Contributor
  • ***
  • Posts: 14156
  • Country: de
I won't expect to much trouble from the vacuum leaking out  :-DD , even with air inside this would necessarily high leakage.
I am not even sure they have vacuum. Low pressure gas could be a problem at high voltages though. Fancy HV switches might use SF6 gas under pressure. I remember using an electron microscope that had some of the HV stuff under pressure with SF6.

The problem is more likely with the surface. This could be inside the reed contacts if they were exposed to too much voltage and did deposit some metal. It could also be on the outer surface from some kind of contamination or just the plastic cover getting old. Also some glass might take up humidity, not much but it can happen and make an effect. There is a slight chance that a simple bake out of the relays could make them isolate better again.
 

Offline rastroTopic starter

  • Frequent Contributor
  • **
  • Posts: 388
  • Country: 00
I got my unit working very nicely.  Here is a part 2 video that shows what I had to do to complete the repair and calibration.  Somebody mentioned that methanol maybe not a good idea but it seemed to work well and methanol is what the Keithley service manual calls for.  I sprayed it from a air-brush gun then gently dried the board with warm air.

Thanks for taking the time to video/document this.  What do you think is the before/after performance on the LM662A modification?  Also could you post a few pictures of the electrometer PCB to see how the new parts fit mechanically.

-rastro
 

Offline cat87

  • Regular Contributor
  • *
  • Posts: 230
  • Country: nl
Funny thing... just the other day I was scouring the net for some info on what would be some figures for leakage of these kinds of Reed relays. From independent users, not from manufacturers. Of course, I didn't find anything.

And lo and behold, today I just stumble upon this thread and voila. Some useful data. Thank you  :-+

Offline math_indy

  • Newbie
  • Posts: 3
  • Country: us
PART 3 video showing the stability of the lowest current range:

https://youtu.be/NxTJ4Y7jZsY
 

Offline razberik

  • Frequent Contributor
  • **
  • Posts: 265
  • Country: cz
I'm not sure what the picture is supposed to convey.  At this point I'll just assume that 'sensitivity' is the current (VA?) required to activate the reed switch.
-rastro
Sorry for not being explanatory. I attached picture of relay which has mu-metal shielding and it should avoid "cross-talk" of excitation current when there are more relays crowded closely together. And yes, it decreases excitation current. http://pickeringrelay.com/pdfs/reed_relaymate_web-1.pdf page 6.
But this shield doesn't help in transient characteristic.

Since I have built new version of Gyro's picoammeter with some test jigs I made similar measurement to Alex.

I have a small test chamber with feedthrough BNCs. It is basically inserted between picoammeter and test current source (1.5V battery + 1TOhm resistor). Thats the orange background in graphs.

1) I attached non-modified Meder HI12-1A79 with shorted contact to feedthrough line and turned the coil ON and OFF.
Experiment was repated with my modified relay with shielding foil connected to box enclosure potential.

2) Similar experiment like Alex did. Shorted coil and put on voltage. I tried only 30V, but results can be seen.
Non shielded and shielded.

Shielding helps a LOT. It doesn't really matter in DC region since modern relay has excellent insulation materials. But I don't believe that repaired K617 would meet it's nominal transient characteristics and settling times.
 
The following users thanked this post: 3roomlab

Offline branadic

  • Super Contributor
  • ***
  • Posts: 2390
  • Country: de
  • Sounds like noise
Re: Fun With Low Leakage/Bias Current: Femtompere, Electrometer, Keithley 617
« Reply #60 on: November 09, 2018, 07:31:05 pm »
Just curios, has someone tried Standex Electronics reed relay as a direct replacement: https://standexelectronics.com/products/hi-series-reed-relay/
They claim Insulation Resistance (IR) >10^14 Ω which looks quite good.
Two version are available HI05-1A66 and HI12-1A85 with a coil voltage of 5V or 12V.

-branadic-
Computers exist to solve problems that we wouldn't have without them. AI exists to answer questions, we wouldn't ask without it.
 
The following users thanked this post: rastro

Offline branadic

  • Super Contributor
  • ***
  • Posts: 2390
  • Country: de
  • Sounds like noise
Re: Fun With Low Leakage/Bias Current: Femtompere, Electrometer, Keithley 617
« Reply #61 on: November 09, 2018, 09:56:41 pm »
Those spikes in the measurements, could they be the result of popcorn noise?

You may call it popcorn noise if you wish  ;) . At these current level it is almost unavoidable to have some of these. Before I've closed the top cover on the 617 even some air movement may cause a spike. And even with a closed cover a small tap on the bench could cause a spike like one of those on the graph.

Cheers

Alex

Looks more like what they call "Ionizing Radiation" in:
https://www.edn.com/design/analog/4375459/5/Design-femtoampere-circuits-with-low-leakage---Part-2--Component-selection

"...
Home> Analog Design Center > How To Article   
Design femtoampere circuits with low leakage - Part 2: Component selection
Paul Grohe, Texas Instruments Precision Systems Group -June 15, 2012

6 Comments
Power line noise
Powerline noise can manifest itself through many different ways. The obvious ways are the aforementioned ground loops, electrostatic and electromagnetic coupling, but there are some other avenues where line noise can infiltrate a high-impedance circuit.

For op-amps, instrumentation amps, CMOS switches and muxes, A/D's and other active devices with high impedance inputs, the input pins most likely have ESD protection or clamping structures on their input pins (as previously discussed). These structures have a direct connection to the power line, and also have inherent device capacitance across them. This small capacitance can couple noise directly into the high impedance input signal, bypassing any of the native Power Supply Rejection Ratio (PSRR) of the device. A few millivolts of "hum" or digital "hash" on the supply line can make its way through the protection diode capacitance and embed itself in the input signal.

Figure 12. Supply Noise coupled through ESD diode capacitance

Another entry point is power supply derived bias voltages, which are usually obtained through a resistive divider. The typical Vs/2 divider has only 6dB of power supply rejection without any filtering. Adding a bypass capacitor to the tap may boost this up to 20-30dB or more at high frequencies, but at low frequencies, the capacitance may not be enough to completely eliminate power line frequencies (and their harmonics). If this bias line is used to provide a bias voltages for the sensor (before the gain stage), then the noise can "modulate" the sensor signal and be amplified along with the sensor signal.

Obviously, the rule here is to keep the supplies and bias voltages as clean as possible. Very sensitive stages should be supplied from a separate supply. In most cases, a simple R-C-L filter on the supply lines will suffice.

A word of warning: When bench testing, digitally controlled power supplies can have a combination of hum, switching noise and digital "hash" on them. Also, many DMMs have a lot of digital sampling transients on their inputs. The DMMs, when connected to an analog supply to monitor the voltage, can inject digital noise into the supply lines. If you see noise on your signal that correlates with the DMM's display update rate, then turn the DMM off and see if the noise goes away.

Ionizing Radiation
One interesting phenomenon that occurs down at the femtoamp levels is the detection of naturally occurring ionizing radiation3. The most common effect is a sudden "pop" or step change in a measurement. As the particles fly by at the speed of light, they ionize the air in their wake. If the input conductors happen to be near by, they will accumulate some of this charge.

The radiation sources are both terrestrial, and extraterrestrial, and are all around us. The largest contributor is extraterrestrial. Energetic particles are generated from the sun, solar flares, exploding supernovae and other galactic sources. Those particles have come a long way to disturb your measurement! Terrestrial sources of radiation can include common materials such as ceramic, stone and granite. Radon can accumulate in enclosed underground areas.

Alpha and beta particles can be stopped with a few millimeters of aluminum, but the more energetic gamma and "X" rays (which can create the alpha and beta particles) are stopped by much more dense materials (centimeters of lead).

This phenomenon may occur once a week, or several times in one day, maybe once a year. The strikes are random in both time and amplitude, and frequency depends on circuit layout, sensitivity, altitude and construction materials.

With an integrator, this sudden accumulation of charge will look like a sharp step, but the slope of the line generally does not change. A transimpedance amplifier will show a sharp rising edge followed by an exponential decay.

The only way to minimize these events is to minimize the amount of air between the measurement nodes and the guard, as well as keeping the surface area of the input conductors to a minimum. Do not inadvertently create your own small-scale ion chamber!..."

-branadic-
Computers exist to solve problems that we wouldn't have without them. AI exists to answer questions, we wouldn't ask without it.
 
The following users thanked this post: egonotto, rastro, bsw_m

Offline MiDi

  • Frequent Contributor
  • **
  • Posts: 600
  • Country: ua
Keithley 617 incl. Fireworks
« Reply #62 on: June 13, 2019, 10:43:26 pm »
Got this interesting unit four weeks ago - including fireworks :popcorn:

Video from previous owner:


The eagle eye will catch instantly two obvious damages:


The first are two 35 year old spacers near primary tranformer that did not withstand careful handling by parcel service and dissolved to nearly dust, second one is a puff daddy.
Any suggestions for replacement of spacers?

Selection of pictures from attachement from unit as received


Strange black pcb cancer on electrometer board...

The fireworks section is located at the Diodes of HV supply for bootstrap amp with sharp edges meeting creepage distance of <1mm @>500V  :wtf:


Problem solved with piece of kapton tape and diodes as High Rider:


Next obvious site is the incontinent cap C316 (1000µF 105°C Nichicon, already replaced in ~91)


After that the unit was first fired up and first check revealed another problem.
When disabling zero check it went fast to overload.
Check of HV supply revealed unstable voltages, maybe only bad caps?

After a timeout all caps were replaced, another two of them decided to give high resistance - one was from the HV supply.
HV supply was now stable, but error still persisted - this seems to become a serious repair.

Check of supply rails showed ~0V for -5V bootstrap rail.
After desoldering LM337L (U307) it showed a bit of melted case on pins - this poor little sucker was toasted.
Guess what - the error still persisted after replacement.

Finally only Q308 remained to be the cause - this unobtainium matched dual input JFET.
Thanks to Alex the journey to femtoamps could continue by replacing it with LMC662.


Quick check: It's alive!  :-DMM

After several local cleanigs, the electrometer board was fully cleaned twice from both sides with special pcb cleaner "Kontakt LR" followed by blowing it with pressurized air from a can and repeat this with pure IPA.
After drying it at 50°C for about 2h it went back into its case, but drift and noise were horrible - even after several hours.

The next days noise did improve, now after 5 days it finally went down to ~1.2fA noise - this looks promising.
The offset could be adjusted to 0 only after shorting a resistor for balancing - in this unit this is done by changing the resistor values between Q308-1 and R335 (2 parallel resistors, one was cut from factory) and Q308-5 and R336 (pot + 2 parallel resistors - one was cut from factory)

The input bias current could not be cancelled out fully - Alex reported this.
Documentation of modification to dual rails for this early units appreciated.

Interesting that this unit seems to have some changes to that from Alex, maybe this has first revision of electrometer board.
Some parts have datecode of '91, so there was apparantly a repair/upgrade.

Big thanks to all contributors for repair documentation on 617, especially Alex for the JFET replacement!


--- to be continued ---
« Last Edit: June 14, 2019, 12:19:30 am by MiDi »
 
The following users thanked this post: TiN, rastro, alm

Offline rastroTopic starter

  • Frequent Contributor
  • **
  • Posts: 388
  • Country: 00
Midi thanks for posting your work/findings - keep adding to the collective 617 knowledge.

That was a bizarre and entertaining video.  At first I couldn't understand why it went dark  :-DD

rastro
 

Offline MiDi

  • Frequent Contributor
  • **
  • Posts: 600
  • Country: ua
Midi thanks for posting your work/findings - keep adding to the collective 617 knowledge.

That was a bizarre and entertaining video.  At first I couldn't understand why it went dark  :-DD

rastro
I will try my best to keep adding to the knowledge, stay tuned  :popcorn:

I couldn't understand it either, after watching it several times I recognized it was a cut and not "bsssst - Strasse dunkel" (ziiip - street dark)   :-DD
Sorry, only for german speakers:


PS:
My unit has rev E printed on both boards, anyone can undercut this for Electrometer Board?

MiDi: E
r6502: F
Alex: G
Smith: G
MadTux: L, G
Dave: J
math_indy: L
baltersice (Marco Reps): L
« Last Edit: August 13, 2021, 05:22:30 pm by MiDi »
 
The following users thanked this post: guenthert

Offline MiDi

  • Frequent Contributor
  • **
  • Posts: 600
  • Country: ua
One sleepless night with the statement of Kleinstein in mind an idea came up...
There was an unused ADA4530-1 sitting on the shelf for some time - would it be possible to replace the whole input amplifier with it?
In a nutshell the input amplifier formed by Q308 and U309 is just a difference amplifier.

As Q308 was already replaced and the performance was not what could be expected (I will come back to this later), there was almost nothing to lose.
First attempt looked promising in the amps ranges, but suffered from crazy offset and random jumps in volt ranges - smells like instability.
Nice thing is the direct access to preamplifier on rear panel, so no deal to quickly hook up the oscilloscope - it's ringing like a bell, journey just ends here?

The ADA4530-1 is a remarkable device considering nearly all of its properties, for example the GBW and open loop gain are higher than that of LT1012 (U309).
The 617 manual mentions that the 10nF C319 in the FB of U309 is needed for stability - maybe just a bit of isolation at the output needed to calm it down?
I throwed a 220k trimpot in and the issues disappeared, no instability in any ranges anymore.
To get the edge value for stability the trimpot was adjusted and the value measured was ~700 Ohms.
For a bit of margin a 2k2 resistor was chosen and replaced the trimpot.

This ended in the following configuration:


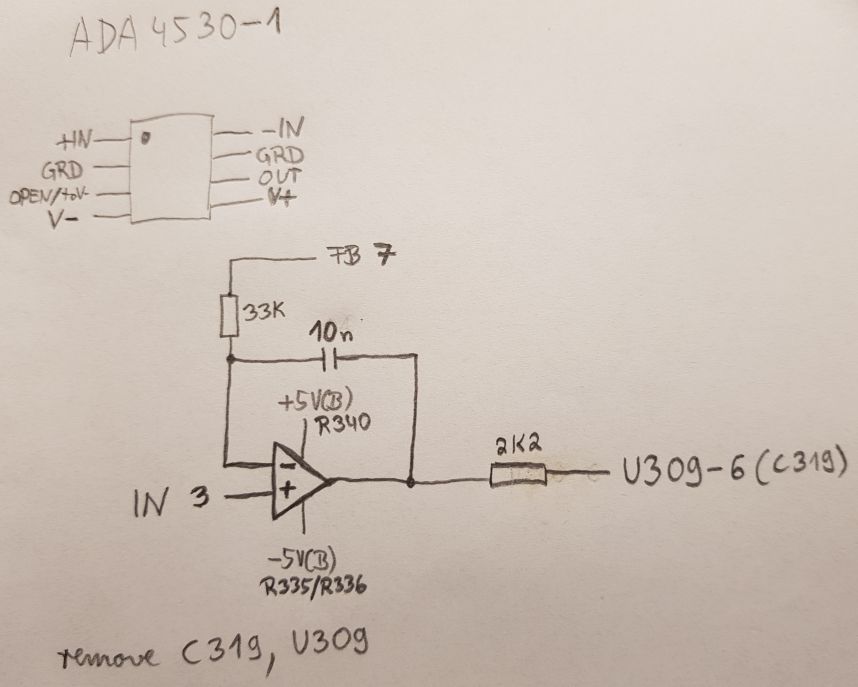
The 33k should protect the negative input up to 300V (spec: 10mA max at the inputs), for the positive input there is already more than enough protection given through 100k R333 and 10Meg R334 - even for surges (R355 not present in this unit).
As there was no 10nF in 2.5mm grid at hand, for now I put a 47nF MKS in - needs further investigation what is best value.
Seems with this replacement input protection Q311 is no longer needed as the OP AMP has input protection already - my early unit does not have it anyway.


To get an impression what this ADA4530-1 delivers, the bias current compensation and the input jack was disconnected (offset compensation already leaved with the mod in this unit).
As I would not trust old 4.5 digit ADC in this unit, my 3458A was hooked up at the preamp output.
After settling, the offset was ~300µV and bias current ~48fA (calculated) - no good sign.

I continued with performance verification of voltage ranges with help of internal voltage source.
Everything in spec according to 3458A, but the voltage source seems to have like a weared out 0V, sitting at ~200mV with horrible DNL between +-50mV.
It took me a while to realize that the output of the voltage source - even if disabled - is set to 0V and enabled all the time.
As the AD7541A DAC is in feedback, I would suggest this is the source, so put a better replacement LTC7541A on the next oversea order.

The last days the big reed relays were disconnected one after each other and bias current and offset were measured, so finally only 2pA range (K312) remained.
Disconnecting K307 improved much on bias current and now it is according to expectation ~3fA.
Every disconnected relay improved on the bias current, seems all have to be replaced - this turns into a costly repair.
Offset did not significantly change - as expected.
I guess the offset is mainly due to other sources and not from ADA4530-1 - will try to measure it in circuit later.
There is some work to do and diving into details will remain to later post...

In the meantime the search for appropriate cables was done.
For now the plan is to replace the input jack with a 3 lug triax as the options for 2 lug cables/connectors/lugs are very small and an adapter from 2 to 3 lug seems not to be economic.
Has anyone done a replacement with Keithley 7078-TRX-TBC?
For the cable I came across the Keysight N1415A, this seems to have a much better price point in comparison to the Keithley cables, any experience with this?
« Last Edit: June 22, 2019, 01:04:15 am by MiDi »
 
The following users thanked this post: egonotto, r6502

Offline TiN

  • Super Contributor
  • ***
  • Posts: 4543
  • Country: ua
    • xDevs.com
That's a rabbit hole, but you doing great. Enjoying the ride alone, thanks for all efforts.  :)
YouTube | Metrology IRC Chat room | Let's share T&M documentation? Upload! No upload limits for firmwares, photos, files.
 
The following users thanked this post: r6502

Offline rastroTopic starter

  • Frequent Contributor
  • **
  • Posts: 388
  • Country: 00
...
For now the plan is to replace the input jack with a 3 lug triax as the options for 2 lug cables/connectors/lugs are very small and an adapter from 2 to 3 lug seems not to be economic.
Has anyone done a replacement with Keithley 7078-TRX-TBC?
...

zucca did this to a K220 which is the same generation of Keithley equipment.
https://www.eevblog.com/forum/testgear/keithley-220-output-triax-connector-mod/msg393616/#msg393616

I would probably try to save any heat-shrink/insulation from the cable between the bulkhead and PCB.  I'm not sure if it is special low leakage or not.  I'd try to stick it back on maybe using heat shrink to keep it in place if you had to split it along the center.

And yes, you need to add a K220 to your shopping list!   8)

rastro
 
The following users thanked this post: MiDi


Offline MiDi

  • Frequent Contributor
  • **
  • Posts: 600
  • Country: ua
Some updates on the unit:

EDIT: Relay replacement investigation & overview moved

To give unit offset correction back, a modern approach with DAC was tested (MCP4725 - 12bit EEPROM).
For units with offset correction as stated in Datasheet (> Rev E?), this mod would be different (Rev E has different circuit for that).


Messed up the polarity, so finally the DAC is connected to GND(B) (R341) and -5V(B) (R335/R336) and set to DAC-Code 2207.
As there was no 3R3 at hand, 2R2 and 22k was chosen.


Before any questions arise:
This is another ADA4530-1 salvaged from a DIY HIZ Buffer (not needed anymore - when 617 is ready).
The DAC-Mod was done twice, first time with previous 4530 and goofed up sanity check on open unit w/o top guard cover.
Forgot to install the screw with guard connection (near empty dip-8 socket) and it showed a lot of 50Hz hum, finally I thought the op died and replaced it - with same result, but then recognized where the error came from - damn, this circuit is so sensitive :-DD

Final test today revealed no problems and with removed reed relays K307-K312, disconnected bias current adjustment & TRIAX-Input the results are impressive:


Offset (w/o zero correct): -30E-18A / 3µV (Noise: 6E-18App / 0.6µVpp -> +-3 hidden digits from GPIB)
Bias Current (15-18h): 425E-18A (STD-DEV/AC-RMS: 284E-18A)

Output pre-amp on scope (bias current measurement):


Obligatory  :box:


« Last Edit: August 21, 2019, 10:31:10 am by MiDi »
 
The following users thanked this post: TiN, bsw_m, Kosmic

Offline rastroTopic starter

  • Frequent Contributor
  • **
  • Posts: 388
  • Country: 00
I wonder if it would be possible to refurbish the old relays to bring back their original high impedance? 

Is most of the leakage failure between the reed's or also significant leakage between the reed and coil/housing?

Would methanol cleaning and then putting them in a rough vacuum a few days and maybe back flushing with nitrogen?  The setup would not be trivial but probably reasonably put together.  This would be an attempt to remove moisture and maybe some oil contamination.

Could it just be chemical reaction on the reeds and not possible to flush out?

Just some thoughts I thought I'd share.
 

Offline MiDi

  • Frequent Contributor
  • **
  • Posts: 600
  • Country: ua
When my cables arrive and input jack is exchanged, I will measure all the relays and we will see.
If leakage is from inside glas there is no chance to do anything.
On the old potted brown/black there is not much you could do besides soaking/cleaning and dry at elevated temperatures...
 

Offline MadTux

  • Frequent Contributor
  • **
  • Posts: 785
I wonder if it would be possible to refurbish the old relays to bring back their original high impedance? 

I once tried to drill out the leaky reed switch on one of these black relays, but failed horrible as the drill drifted away and mangled the poor relay coil. This were the days before I had good machining capabilities in my shed.

I would guess that on a good milling machine with rigid carbide tooling, it should be quite possible to remove the reed switch without destroying the relay coils. And then replace the reed with something good like MARR-5.

Cheap chinese reed won't do it, no SF6 filling and thereby horrible leakage and breakdown characteristics.
 

Offline MiDi

  • Frequent Contributor
  • **
  • Posts: 600
  • Country: ua
Yesterday the Triax accessories arrived (and nearly quadrupled value of unit):


I do not want to bother you with Triax exchange pron, but pics are attached  8).


The Keithley 7078-TRX-TBC is direct replacement without any problems, only the heatshrink from original shell did not survive soldering and had to be replaced - maybe it will get teflon heatshrink later.


The Keysight N1415A fits perfectly, but needs quite some force to push in / pull out.

Finally the relays were measured quickly with crude setup and not warmed up unit (all values in T\$\Omega\$):

relay # |betw. contacts |C-ES long |C-ES short |
K30730515
K308>10040300
K309702070
K310<31010
K311>100100>100
K312>500>100>100
« Last Edit: July 04, 2019, 09:01:56 pm by MiDi »
 

Offline chickenHeadKnob

  • Super Contributor
  • ***
  • Posts: 1055
  • Country: ca
To MiDi:

yes please bother us with triax pron, unlike a beautiful woman a triax connector is something I may actually hold in my hands in the near future!

I noticed you used black heat-shrink. Oh-OH, some of that stuff is no good for high impedance, carbon black or some other additive makes more conductive than is desirable for this type of application. You should measure a clean piece, maybe you got lucky. 


Share me

Digg  Facebook  SlashDot  Delicious  Technorati  Twitter  Google  Yahoo
Smf