Author Topic: Thermal Imaging Gallery  (Read 116313 times)

0 Members and 1 Guest are viewing this topic.

Offline frenkyTopic starter

  • Supporter
  • ****
  • Posts: 1003
  • Country: si
    • Frenki.net
Re: Thermal Imaging Gallery
« Reply #275 on: January 22, 2019, 07:58:57 pm »
Bathroom heater.

TE Q1+:
Upscaled with waifu2x.


Offline OrBy

  • Regular Contributor
  • *
  • Posts: 220
Re: Thermal Imaging Gallery
« Reply #276 on: January 24, 2019, 03:34:36 pm »
Some stuff I have done with a modded E4.
How do you do the larger images? Do you automate that in some way?

Yes - please see the excellent posts by tomas123 https://www.eevblog.com/forum/thermal-imaging/flir-e4-thermal-imaging-camera-teardown/msg342072/#msg342072 and focus on the panoramic information.
 
The following users thanked this post: Mr. Scram

Offline Ultrapurple

  • Super Contributor
  • ***
  • Posts: 1027
  • Country: gb
  • Just zis guy, you know?
    • Therm-App Users on Flickr
Re: Thermal Imaging Gallery
« Reply #277 on: January 24, 2019, 03:58:58 pm »
Microsoft Image Composite Editor also works pretty well and uses a very simple drag-and-drop interface - it even takes care of figuring out in what order you made the images. This thermal panorama of Weymouth beach is 2341x470 pixels and was made with a 384x288 resolution Therm-App. Click image to enlarge and get more info, or click here for the full resolution image.


More panoramas (and other Therm-App images) here.
« Last Edit: January 24, 2019, 04:17:18 pm by Ultrapurple »
Rubber bands bridge the gap between WD40 and duct tape.
 
The following users thanked this post: frenky, eKretz, Mr. Scram

Offline eKretz

  • Frequent Contributor
  • **
  • Posts: 870
Re: Thermal Imaging Gallery
« Reply #278 on: January 24, 2019, 08:33:08 pm »
I have been meaning to get that ICE program, kept forgetting. Thanks Ultra. Made a few sample images playing with gradient maps. Images from upgraded FLIR E40.


Offline eKretz

  • Frequent Contributor
  • **
  • Posts: 870
Re: Thermal Imaging Gallery
« Reply #279 on: January 24, 2019, 08:39:59 pm »
One more...
 

Offline Ultrapurple

  • Super Contributor
  • ***
  • Posts: 1027
  • Country: gb
  • Just zis guy, you know?
    • Therm-App Users on Flickr
Re: Thermal Imaging Gallery
« Reply #280 on: January 24, 2019, 09:12:40 pm »
The white hot image is very good and hints at what it's possible to achieve. The palette in the colour image is really wild and wacky - I approve! The tractor looks very interesting in that version, though the colours on the far left side of the pile are striking too.
Rubber bands bridge the gap between WD40 and duct tape.
 

Offline eKretz

  • Frequent Contributor
  • **
  • Posts: 870
Re: Thermal Imaging Gallery
« Reply #281 on: January 25, 2019, 09:08:16 am »
Yeah, neat program. Not sure why it decided to tilt the trees on the left side at a weird angle. Did you use a tripod for that panorama at the beach?
 

Offline Ultrapurple

  • Super Contributor
  • ***
  • Posts: 1027
  • Country: gb
  • Just zis guy, you know?
    • Therm-App Users on Flickr
Re: Thermal Imaging Gallery
« Reply #282 on: January 25, 2019, 12:09:43 pm »
No, the beach panorama was done hand-held. If I remember rightly I simply swept left to right and back again.

The following hi-res panoramas were also all done hand-held, some in difficult circumstances (eg for the first image, watching out for armed guards in Egypt - I wasn't sure if it was legal for civilians, particularly foreigners, to have thermal cameras! Separately, I had a narrow escape making a thermal panorama on the Aswan Dam, where the guards are always pretty twitchy).

Click to go to each image's Flickr page, where you'll find notes on how each was made. Most were created from multiple individual images, hand-held, where I just guessed where to point the thermal imager each time. Others were made from manual pan-and-scan video files. I have made some large panoramas using a Gigapan head but the results were indifferent - and it was hard to interface reliably the scan head to the mobile phone.

Apologies that some of these are probably re-posts.


This is one of my very earliest panoramas, made with no manual controls on the thermal camera and hand-stitched. My technique has improved a bit since then:


And finally, this proves that you don't always need a panorama to make a great-looking thermal shot. It's a single image from a 384x288-resolution basic Therm-App camera.


« Last Edit: January 25, 2019, 12:30:18 pm by Ultrapurple »
Rubber bands bridge the gap between WD40 and duct tape.
 
The following users thanked this post: joe-c

Offline eKretz

  • Frequent Contributor
  • **
  • Posts: 870
Re: Thermal Imaging Gallery
« Reply #283 on: January 25, 2019, 05:43:03 pm »
Nice photos. Do you find it better to make images of buildings in the day while they are heated by the sun or slightly after dawn or dusk as they are warming up or cooling down?
 

Offline eKretz

  • Frequent Contributor
  • **
  • Posts: 870
Re: Thermal Imaging Gallery
« Reply #284 on: January 26, 2019, 05:08:45 am »
Aha. Figured out the leaning trees. I should have selected the pivot option before and didn't.


Offline cuda12

  • Regular Contributor
  • *
  • Posts: 66
  • Country: us
Re: Thermal Imaging Gallery
« Reply #285 on: January 28, 2019, 02:23:03 am »
e30 45 degree lens
 

Offline eKretz

  • Frequent Contributor
  • **
  • Posts: 870
Re: Thermal Imaging Gallery
« Reply #286 on: February 03, 2019, 06:33:34 am »
Video of convection currents in little deep fryer as it was warming up:

https://youtu.be/Y-HKIksyLm0
 
The following users thanked this post: frenky

Offline PA2001

  • Newbie
  • Posts: 5
  • Country: us
Re: Thermal Imaging Gallery
« Reply #287 on: February 04, 2019, 12:46:33 am »
E-bike hub motor
Therm-app 19mm
Waifu2x
 

Offline Ultrapurple

  • Super Contributor
  • ***
  • Posts: 1027
  • Country: gb
  • Just zis guy, you know?
    • Therm-App Users on Flickr
Re: Thermal Imaging Gallery
« Reply #288 on: February 04, 2019, 08:27:27 am »
Nice photos. Do you find it better to make images of buildings in the day while they are heated by the sun or slightly after dawn or dusk as they are warming up or cooling down?

It depends what you're trying to achieve. If you're looking to detect heat leaks from within the building then you want a nice cold night during which the heating has been set to maximum.

From the artistic viewpoint, there is definitely a thermal phase lag between elements of a scene (eg a building). A joint between (say) wood and stone, even if covered over with the same paint, will show this easily: the wood warms up more quickly than the stone, but the stone stays warm longer into the night. If you have the luxury of time on your side then you can pick your moment to make an image and choose the contrast that pleases you. Mornings will often be quite 'flat', followed by relatively rapid warming of the high-emissivity, low thermal mass items. As the day wears on the contrast is likely to lessen as the ambient temperature reaches its peak (about 2pm 'solar' time) and then, as solar irradience disappears, the more thermally massive things stay warmer longer, plus or minus emissivity. The short answer is that I haven't found a 'best' time - it's complicated by weather, whether the object faces the sun, local shadows, and many more variables.

Sometimes, the thermal image is almost indistinguishable from the visible light equivalent:


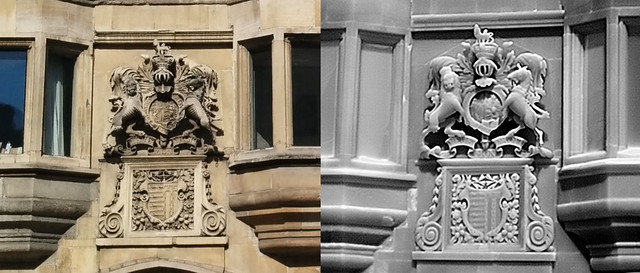
Sometimes, thermal image contrast can be fierce:


- that image was taken within minutes of the crest, both at Pembroke College, Cambridge. The crest is above a gateway to the courtyard, and I was standing more or less under the crest when imaging the buildings. They surround a courtyard and the walls were in shadow (sun to the left), which is why they're so cold (blue). But the slate roof was in blazing sunshine so it heated up to a significant degree. (There's more to that scene but it serves to illustrate the key points). It was an interesting challenge to retain some detail at both extremes of temperature.

Perhaps most obvious effect of morning warming is this panorama of Aswan High Dam (incidentally, this is the image that, to date, most nearly got me arrested or shot). Looking north from atop the Aswan Dam in the morning, the sun has already started to heat the left (west) bank but most of the right bank remains at a relatively even, lower temperature. You can see from comparing the visible and IR images that the sunny bits are clearly the warmest. But everything except the waters of the Nile and the sky are fairly warm, thanks to the climate.


There's no one 'right' answer. I would have liked to stay at the Aswan Dam for much longer (likewise the Pyramids and Abu Simbel) but the Egyptian security forces guard the dam closely and, as they had recently had a wave of 'terrorist'* attacks in the country they were understandably twitchy. Whilst touristy still pictures (ie photos) are (now) legal, videos are banned and I'm not certain whether I should even have even had a thermal imager in the country, let alone whether it was a good idea to use it in such a heavily militarised, sensitive area of such strategic importance.  :-//

I have yet to determine if there's a single 'best' time - but I'm having fun exploring the world whilst I find out.

(* Yes, I know one person's terrorist is another person's freedom fighter; this is not the place to get embroiled in politics).
« Last Edit: February 07, 2019, 02:29:15 pm by Ultrapurple »
Rubber bands bridge the gap between WD40 and duct tape.
 
The following users thanked this post: eKretz

Offline Vipitis

  • Frequent Contributor
  • **
  • Posts: 867
  • Country: de
  • aspiring thermal photography enthusiast
Re: Thermal Imaging Gallery
« Reply #289 on: February 07, 2019, 07:50:40 am »
While this forum is busy recently, I went out with my lens a few more times. I have trouble with sticking in ICE due to the upscaling and bad planing so more panorama shots will have to wait.

Here is a pigeon shot on my CST S60 with my DIY lens in whitehot from less than a meter away.
 

Offline Ultrapurple

  • Super Contributor
  • ***
  • Posts: 1027
  • Country: gb
  • Just zis guy, you know?
    • Therm-App Users on Flickr
Re: Thermal Imaging Gallery
« Reply #290 on: February 07, 2019, 02:26:40 pm »
@Vipitis - Have you tried using the 'shaky hand video' technique followed by resolution enhancement in Registax or similar? You may find it's possible to do this for each tile of a panorama and thus get a considerable increase in resolution compared to tiling individual un-enhanced images (and also much better than creating a panorama from a single video).
« Last Edit: February 07, 2019, 02:43:33 pm by Ultrapurple »
Rubber bands bridge the gap between WD40 and duct tape.
 

Offline Vipitis

  • Frequent Contributor
  • **
  • Posts: 867
  • Country: de
  • aspiring thermal photography enthusiast
Re: Thermal Imaging Gallery
« Reply #291 on: February 07, 2019, 03:57:56 pm »
@Ultrapurple
I use the Thermal Camera+ app to take my images because they are not horribly blurred like the FLIR images. The app allows me to take both: a radiometric .jpg(the blurry one) and a flat .png that uses superresolution in camera.
My current issue with post processing is the upscaling. As you can see in the image I posted it has a resolution of 680x907 - well that makes no sense. You have to know that the image gets upscaled by doubling pixels (nearest neighbor), yet from a 80x60 sensor with superresolution the 680x907 makes no sense. I asked the developer for an option to hide on screen elements to make stiching possible, so the palette, min and max temperature as well as a crosshair with point measurement are not visible with this option turned on. So images with additional information are saved as 508x640 with 28 pixels on the right side making the palette, and images saved without information burned in are saved as 680x907. This makes it it difficult to process. I need some kind of script to downscale the image to 1:1 pixel size, as stacking or registax for wavelets, finds differences in the upscaled pixel blocks. but 680x907 does not even divide into a multiple of 80x60, it is the image I would want to take because nothing is hidden behind some kind of overlayed information. If you count pixels, you will see some are 6x6, others are 5x6 or 5x5  - it is a complete mess and would require some perfectly measured imagemagick script to downscale, I have no idea why this is done - it could be to counteract distortion(although distortion is visible).

I have included an example shot I just took of my monitor. (the one with information burned in is taken without proper subtraction > you see 2 dead pixels, sharpened, and noise)


as this is a gallery enjoy a 1 raw panorama of a gas station I took last week.
 

Offline Ultrapurple

  • Super Contributor
  • ***
  • Posts: 1027
  • Country: gb
  • Just zis guy, you know?
    • Therm-App Users on Flickr
Re: Thermal Imaging Gallery
« Reply #292 on: February 07, 2019, 04:22:12 pm »
Interesting - a very strange re-size indeed. I have no immediate idea what might be going on.

I had a quick play with your image to see if I could adjust it in any useful way. I'd be interested to hear what you think. Basically, I did some local tone mapping (contrast enhancement) and changed the gamma profile (curves). I'm not sure if I think it's an improvement or not.

E: On reflection, probably not.
« Last Edit: February 08, 2019, 09:12:38 am by Ultrapurple »
Rubber bands bridge the gap between WD40 and duct tape.
 

Offline Bud

  • Super Contributor
  • ***
  • Posts: 6912
  • Country: ca
Re: Thermal Imaging Gallery
« Reply #293 on: February 07, 2019, 04:55:02 pm »
I am sure with a Flir this image would look WAY better. Flir also stores jpg and png of an image, not sure i understand hows your camera is different.  :-//
Facebook-free life and Rigol-free shack.
 

Offline Ultrapurple

  • Super Contributor
  • ***
  • Posts: 1027
  • Country: gb
  • Just zis guy, you know?
    • Therm-App Users on Flickr
Re: Thermal Imaging Gallery
« Reply #294 on: February 08, 2019, 08:25:43 am »
I am sure with a Flir this image would look WAY better. Flir also stores jpg and png of an image, not sure i understand hows your camera is different.  :-//

Your point? I believe the CAT S60 is a FLIR - a Lepton core.

Vipitis said that the FLIR software was one of the things that was giving him grief. He is producing remarkably good images with a low-end device. I am fortunate to have a selection of higher resolution devices that are capable of fairly good results; even so, an XGA (or better) resolution sensor would help me improve further. But some of the lessons I learned with my first thermal camera, an Argus 1, have served me well as I got access to better equipment. 

I have a feeling Vipitis is destined for great things once he gets his hands on research-grade instruments, which I am optimistic will happen soon.
« Last Edit: February 08, 2019, 09:41:32 am by Ultrapurple »
Rubber bands bridge the gap between WD40 and duct tape.
 

Offline Vipitis

  • Frequent Contributor
  • **
  • Posts: 867
  • Country: de
  • aspiring thermal photography enthusiast
Re: Thermal Imaging Gallery
« Reply #295 on: February 08, 2019, 02:34:43 pm »
Well, let's address those. First of all, thanks for taking the effort to edit the image and adjust the levels. Sadly, the image I posted it merely a screenshot, as the original .tiff was too large to be an attachment on the forum. I didn't touch it up myself, but I needed to limit the temprange to have a uniform panorama. As far as I can tell the .PNG is saved as a 8bit RGB image, so the greyscale has only 8bit as well. That is not great because it limits the dynamic range output. To get true 14bit greyscale images out of the sensor, there is a solution which I stirred up again.
The embedded raw image in the FLIR .jpg should contain all the raw information and there are ways to extract them for further processing. But no way I tired has worked for me. Feel free to download any of my previous radiometric .jpgs(or I can send you a few) and try to get a 80*60 image with no compression out of it. Exiftool meta data says the IR resolution is 480*640 which is incorrect, FLIR toosl reports 240*320 which is also incorrect and inconsistent. Both raw extraction methods posted by tomas elsewhere in this forum have bad no working results as images seemed to have half the bit depth that was outputted but still the false high resolution. Thermal Platte generator is working with the images, but in the upscaled 240*320 version that FLIR tools shows up with as well.

***
This is a gallery so there will be pictures. First up is the failed panorama I shot in the night of a building across the street near the gas station. The alignment is off and ICE unable to fix it no matter what mode and values I give them. The vignetting isn't helping them either. I need to plan better, get better software and work on the 3rd generation of hardware.

To proof that the camera is usable for it's intended purpose, here is are some pipes running out of our heating system, try to spot the clogged pipe.
 

Offline Ultrapurple

  • Super Contributor
  • ***
  • Posts: 1027
  • Country: gb
  • Just zis guy, you know?
    • Therm-App Users on Flickr
Re: Thermal Imaging Gallery
« Reply #296 on: February 08, 2019, 04:08:51 pm »
@Vipitis

Thanks for sending me the original files. I managed to get some sort of a result, but it was a fairly roundabout route.
First, I cropped off each image's top and bottom to get rid of the vignetting. Fortunately you had taken enough images with sufficient overlap that this wasn't a problem.
Next I did a quick auto-levels on each image.
Then I imported them into ICE using the structured image approach. For some reason it couldn't handle it - then I realised it was trying to assemble the images in 3-2-1 order rather than 1-2-3. I couldn't work out a way of changing this so I mirror-imaged each tile.
Microsoft ICE was then able to deal with the tiles and produce a composite. I used Auto-complete to tidy the edges.
Once I'd saved the image I opened it up in an editing app and flipped it back the right way and edited out some crud in the sky that had been introduced by ICE. I also did another auto-levels adjustment.
The resulting PNG was over the 1MB posting limit so I reduced it by 50% - as the original was significantly upscaled from the sensor resolution, this didn't detract much from the quality.
The result is below. It was an odd path, but it seems to have more or less worked!

(Edit: I hadn't spotted that ICE is perfectly capable of working with panoramas shot 'the other way round', which would have saved me the mirror image steps. I've learned something today!)
« Last Edit: February 08, 2019, 04:18:33 pm by Ultrapurple »
Rubber bands bridge the gap between WD40 and duct tape.
 

Offline eKretz

  • Frequent Contributor
  • **
  • Posts: 870
Re: Thermal Imaging Gallery
« Reply #297 on: February 10, 2019, 06:27:23 pm »
Made a couple vids for another thread, might as well add a couple here too:

https://youtu.be/2tnA9PWjAvo

https://youtu.be/6Vto-vfi10M

https://youtu.be/y-mk4-MnFLI

https://youtu.be/7t50SVJcs_w
 

Offline frenkyTopic starter

  • Supporter
  • ****
  • Posts: 1003
  • Country: si
    • Frenki.net
Re: Thermal Imaging Gallery
« Reply #298 on: February 10, 2019, 08:16:16 pm »
i3 TE+:

City Kranj.

single orig image:


7 stacked and upscaled:
 

Offline Vipitis

  • Frequent Contributor
  • **
  • Posts: 867
  • Country: de
  • aspiring thermal photography enthusiast
Re: Thermal Imaging Gallery
« Reply #299 on: February 10, 2019, 08:39:22 pm »
The story continues. After being unable to get a working panorama out of the first set of shots I did - even with help from Ultrapurple the result wasn't good. I went out to the building again and shot a panorama grid once more. This time I limited my palette to 8 - 18 °C(not true values due to lens) and locked it, then unlimited it again (so you don't get blue/red overflow). I also shot from 3 different angles to give you a better idea of the building.
Well the frontal view still didn't work out as I did errors in the overlap while waiting for trucks to pass by.

I present you two views of the same building from different angles. Both of these images use the same setting for palette, but as you can see there is a huge difference in the exposure due to the bias over time that is very apparent when you lock the palette. Both images are panoramas, later cropped and slightly adjusted in post.


Share me

Digg  Facebook  SlashDot  Delicious  Technorati  Twitter  Google  Yahoo
Smf