-
Hi Everybody!
I'm Lisa and new here going to UCLA summer prep class in EE off campus. Need a little help on my homework assignment. So please please help me.
How to view 12V automotive relay voltage transient with an Oscilloscope!
I have a 5 pin 12V 30amp automotive relay and need to capture the transient voltages created when the magnetic field collapses in the coil. How do I make the connections with the oscilloscope to be able to capture these voltage transients?
I connected my scope to pins 86 and 85 and can see the voltage rise and fall from the power supply but not the transient spikes across the coil.
The assignment is capture the voltage transients with the scope both with a suppressor circuit and without - just a high switching diode on the coil in reverse bias to pins 86 and 85 and then adding a Zener Diode in series with the switching diode across the coil to pin 85.
My oscilloscope is set at 100ms @50v trigger set at edge (dual) and DC coupling and measuring Rise and Fall time with Peak voltage.
My DUT relay is setup with DC Power supply set at 12V DC with 200ma positive connected to SPST switch connected to PIN 86 of relay and PIN 85 to GND. No other PINS are connected.
I put the oscillscop probe on PIN 86 and can see the voltage rise and fall as I manipulate the switch but no voltage transients show on the oscillscope when I power off at the switch - no diodes are connected accross the relay coils.
My classmates are just as clueless as I am!
Thanks Guys!

-
Hi Everybody!
Hi lisa can you tell me the pin configuration of 5 pin automotive relay.
I'm Lisa and new here going to UCLA summer prep class in EE off campus. Need a little help on my homework assignment. So please please help me.
How to view 12V automotive relay voltage transient with an Oscilloscope!
I have a 5 pin 12V 30amp automotive relay and need to capture the transient voltages created when the magnetic field collapses in the coil. How do I make the connections with the oscilloscope to be able to capture these voltage transients?
I connected my scope to pins 86 and 85 and can see the voltage rise and fall from the power supply but not the transient spikes across the coil.
The assignment is capture the voltage transients with the scope both with a suppressor circuit and without - just a high switching diode on the coil in reverse bias to pins 86 and 85 and then adding a Zener Diode in series with the switching diode across the coil to pin 85.
My oscilloscope is set at 100ms @50v trigger set at edge (dual) and DC coupling and measuring Rise and Fall time with Peak voltage.
My DUT relay is setup with DC Power supply set at 12V DC with 200ma positive connected to SPST switch connected to PIN 86 of relay and PIN 85 to GND. No other PINS are connected.
I put the oscillscop probe on PIN 86 and can see the voltage rise and fall as I manipulate the switch but no voltage transients show on the oscillscope when I power off at the switch - no diodes are connected accross the relay coils.
My classmates are just as clueless as I am!
Thanks Guys!
Sent from my SM-J700F using Tapatalk
-
I am trying to draw/picture the circuit and will help you better if you can send me the circuit diagram you are working onHi Everybody!
Hi lisa can you tell me the pin configuration of 5 pin automotive relay.
I'm Lisa and new here going to UCLA summer prep class in EE off campus. Need a little help on my homework assignment. So please please help me.
How to view 12V automotive relay voltage transient with an Oscilloscope!
I have a 5 pin 12V 30amp automotive relay and need to capture the transient voltages created when the magnetic field collapses in the coil. How do I make the connections with the oscilloscope to be able to capture these voltage transients?
I connected my scope to pins 86 and 85 and can see the voltage rise and fall from the power supply but not the transient spikes across the coil.
The assignment is capture the voltage transients with the scope both with a suppressor circuit and without - just a high switching diode on the coil in reverse bias to pins 86 and 85 and then adding a Zener Diode in series with the switching diode across the coil to pin 85.
My oscilloscope is set at 100ms @50v trigger set at edge (dual) and DC coupling and measuring Rise and Fall time with Peak voltage.
My DUT relay is setup with DC Power supply set at 12V DC with 200ma positive connected to SPST switch connected to PIN 86 of relay and PIN 85 to GND. No other PINS are connected.
I put the oscillscop probe on PIN 86 and can see the voltage rise and fall as I manipulate the switch but no voltage transients show on the oscillscope when I power off at the switch - no diodes are connected accross the relay coils.
My classmates are just as clueless as I am!
Thanks Guys!
Sent from my SM-J700F using Tapatalk
Sent from my SM-J700F using Tapatalk
-
no diodes are connected across the relay coils.
Some (but not all) automotive relays have a diode across the coil inside the plastic housing. Is there a diode symbol on the base near the coil tags or on the side of the housing?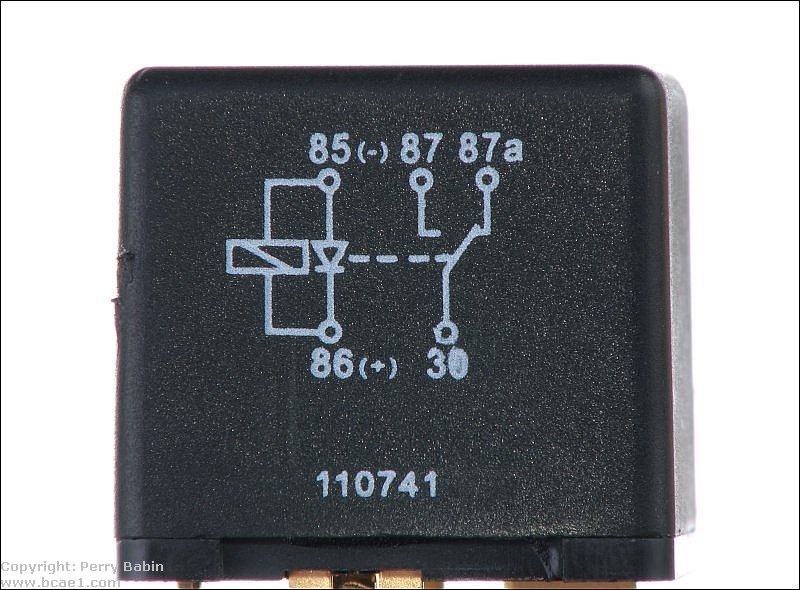
-
Ok here it is....Thank You
-
No, there is no diode on the relay. The objective of the assignment is understanding transients and lab BOM is to use an automotive relay, switch, Zener Diode, and Rectifier Diode. Plus lab equipment.
Thanks..... -
I posted drawing.
Thank You
-
NGG
For this you need a DSO and use Single shot capture.
Setup @ 10V/div and say 100ms/div.
You want to see on the display just the 12V across the coil and as it's DC you won't need the Trigger level anywhere special to see it.
Now set the trigger level above the 12V and engage Single shot mode. The trace should disappear and remain hidden until you remove the 12V supply and the resultant back EMF will take the hidden waveform above the Single shot trigger level creating a triggered event and display it on the display.........ready for you to capture on a USB stick as a screenshot to show off to your buddies later.
Ok, I will try that.
Thank You
-
To make it easier for the scope to lock on to the waveform, you can easily set up your relay to "switch itself" so it sits there turning on and off rapidly. This will generate some very big voltages indeed (if there are no additional voltage suppressing components fitted), enough to give you a bit of a shock if you touch it in fact!
To do this, take the positive wire from your power supply, and attached it to the common pin of the relays contacts (pin 30 for std automotive relay) then loop a wire from the normally closed contact output (pin 87a) to the coil input pin (pin 86) and finally from the coil output (pin 85) back to the power supply negative terminal.
When you turn on the power, current flows into the coil, causing it to energise, but when it does, it opens it's contacts, which breaks power to the coil, so it closes again. This cycle repeats at the fundamental mechanical frequency of the relay (typically 10 to 20 Hz).
Because the contacts opening is quick, and without any other path from the current to take, the inductance of the relay coil will generate a large voltage. Make sure your scope probe is set to 10:1 attenuation, and check the scopes front panel for the maximum voltage you can apply to it without damaging it, connect the scope across the relay coil. You will see several hundred volts on the contact opening edge! -
100ms is probably too slow.
The duration of the transient that you want to see is somewhere in the 10us range (no diode) or longer (ms range) with diode, so try to set your scope to a faster timebase, and you should set the trigger just a few volts above your 12V supply voltage.
-
To do this, take the positive wire from your power supply, and attached it to the common pin of the relays contacts (pin 30 for std automotive relay) then loop a wire from the normally closed contact output (pin 87a) to the coil input pin (pin 86) and finally from the coil output (pin 85) back to the power supply negative terminal.
Clever solution..
I had the same problem - I did not test it with a switch though, my time was not for that. But i'll try again. https://www.eevblog.com/forum/beginners/setting-up-a-scope-for-flyback-measurements/ -
DSO scope triggering these days amazing capability.
In the case of L load switching, like a relay coil, two main methods. One to select
V triggering, set a value, then modify as necessary to observe different parts of
the capture sample record. Or use PW, >, something on the order of 1 mS to
start with.
You can even set triggering to start at n'th transient. Lots of possibilities.
http://www.syscompdesign.com/assets/Images/AppNotes/relay-demo.pdf
Start by selecting trigger mode, set sweep to "normal" mode, and change the
trigger value until you get a triggered display. This is if you are cycling the
relay at some rate. Then move on to a single shot to get one display cycle you
can print out.
If you are not cycling the relay then set scope for Vtrigger, set that at just a
little less than power supply, say 11.5 V for a 12 V supply. Or 12.5 V. Then turn
on, or off, that should initiate a trigger you can then work with and start to
modify as necessary.
A dso captures a buffer of samples, then the software using trigger settings displays
that part of the buffer that starts with/meets the trigger condition.
Regards, Dana. -
You were right about to slow, at 500u the transients started to appear. Thank You!

-
NGG
For this you need a DSO and use Single shot capture.
Setup @ 10V/div and say 100ms/div.
You want to see on the display just the 12V across the coil and as it's DC you won't need the Trigger level anywhere special to see it.
Now set the trigger level above the 12V and engage Single shot mode. The trace should disappear and remain hidden until you remove the 12V supply and the resultant back EMF will take the hidden waveform above the Single shot trigger level creating a triggered event and display it on the display.........ready for you to capture on a USB stick as a screenshot to show off to your buddies later.
You were right - I did what you said and it worked the only thing I had to do was speed it up - to slow at 100ms. When you get a chance can you explain as to why it did not matter where the Trigger Level sat at?
I liked your way the best as the only trace I needed to see was the Transient voltage and capture to Matlab for analysis.
I got my Delta's and and inputed to Matlab and turning in my assignment!
-
To make it easier for the scope to lock on to the waveform, you can easily set up your relay to "switch itself" so it sits there turning on and off rapidly. This will generate some very big voltages indeed (if there are no additional voltage suppressing components fitted), enough to give you a bit of a shock if you touch it in fact!
To do this, take the positive wire from your power supply, and attached it to the common pin of the relays contacts (pin 30 for std automotive relay) then loop a wire from the normally closed contact output (pin 87a) to the coil input pin (pin 86) and finally from the coil output (pin 85) back to the power supply negative terminal.
When you turn on the power, current flows into the coil, causing it to energise, but when it does, it opens it's contacts, which breaks power to the coil, so it closes again. This cycle repeats at the fundamental mechanical frequency of the relay (typically 10 to 20 Hz).
I am going to try this but first I am going to view that video in How Not To Blow Up Your Oscilloscope! As one student did last week in class - that was scary
-
That was for when you were in the process of finding the 12V level.........it's DC and the scope will show it without the need for a trigger...........while in Auto trigger mode.NGG
For this you need a DSO and use Single shot capture.
Setup @ 10V/div and say 100ms/div.
You want to see on the display just the 12V across the coil and as it's DC you won't need the Trigger level anywhere special to see it.
Now set the trigger level above the 12V and engage Single shot mode. The trace should disappear and remain hidden until you remove the 12V supply and the resultant back EMF will take the hidden waveform above the Single shot trigger level creating a triggered event and display it on the display.........ready for you to capture on a USB stick as a screenshot to show off to your buddies later.
You were right - I did what you said and it worked the only thing I had to do was speed it up - to slow at 100ms. When you get a chance can you explain as to why it did not matter where the Trigger Level sat at?
I liked your way the best as the only trace I needed to see was the Transient voltage and capture to Matlab for analysis.
I got my Delta's and and inputed to Matlab and turning in my assignment!
If the Single shot did indeed capture something @ 100ms and the sweep signaled it was Stop'ped, even if the sweep speed was too slow to see the detail, while Stop'ped you increase the timebase speed to examine the detail.
Such is the power of a DSO.
Thank You so much - you explainn things so well! Its like if you were there next to me. That is exactly what I did with the timebase but was not sure so I captrured the transient again and there it was.
Thank You again! 💕💕💕💕 -
Welcome to the wonderful world of DSO's.
Enjoy your journey. -
Welcome to the wonderful world of DSO's.
Enjoy your journey.
Thank you Tautech 💋 💋 💋 💋. I got an "A" for my lab assignment and an "A" on my Matlab analysis.
Nerdy Girly Girl