-
#125 Reply
Posted by
GK
on 07 Jul, 2013 14:25
-
Thanks for the book list - I'll check them out. You are right about the heavy math in most of these texts. Analog computation was all about implementing electrical analogs of physical systems of which the first step is to formulate a mathematical model for the physical system; the analog computer then solves the mathematical model. So you can't really get around the maths! I can't pretend to have my head fully wrapped around even a tenth of it all but that is something I plan to rectify to some degree with the aid of this machine I'm building.
From that book list I posted, the titles numbered 13, 21,23 and 24 are largely devoid of really heavy math as they are concerned almost entirely with the engineering and design of the electrical components and circuits of which analog computers were comprised; they are texts on practical analog circuit design that, despite their age, should be on the bookshelf of every budding analog designer, IMO. Although the technology has moved on the fundamental principles given exhaustive treatment remain the same. Just for example the Korn & Korn volumes contain some of the most thorough analysis of sources of error in operation amplifier circuits and the most succinct and practically detailed explanation of dielectric absorption in capacitors I have found so far.
BTW, would you be interested in selling those sine/cosine pots?
-
#126 Reply
Posted by
GK
on 07 Jul, 2013 14:40
-
Well, finally, here is the Lorenz Attractor in 3-D projection with variable angles of rotation (the 3-D projection unit in action). I have to say that I am quite happy with the way the synthesized sine/cosine potentiometers worked out with the 8-bit digital pots and the sine/cosine look up table. The 1 degree step resolution and 8-bit accuracy gives a fluid variation in display that is, for all sakes and purposes, totally analog as far as I as the operator can discern. In all honesty the Lorenz Attractor probably isn't the best 3-D "object" to demonstrate the operation of the projection unit, as it is a bit complex and an interpretation of the display isn't intuitively obvious as it is with simpler shapes and objects, such as the assorted springs I posted screen photos of a few posts previously.
Here is a simplified schematic of the initial, prototype projection unit. It is based on the basic 3-D projection principle outlined in chapter 9 (
Multi-Dimensional Displays) of
Analog Computing At Ultra High Speed, D M.MacKay, M E. Fischer.

-
#127 Reply
Posted by
woodchips
on 08 Jul, 2013 11:08
-
Hi, yes, you are definitely correct about the maths! But, does it have to be so inpenetrable? About 30 years ago DSP chips appeared and I was designing the boards but they looked interesting so started to learn about signal processing. I never really got anywhere. Not so long ago I bought the book by Abbott, phew, Fourier transform with a pencil and ruler!!!!! But why couldn't all these wonderful DSP teaching texts have done the same thing?
I have found that if you want to learn something then any book published after the mid 1960s won't be of any help, they seem to have just swallowed formula and regurgitated them. Just buy lots and lots of books, they all have something of interest in but occasionally you hit a masterpiece, your Korn books for example. My interest was electromagnetism so not really relevant here, did end up with about 200 books though!
Yes, how many of the sine cosine pots did you want? Not certain how many I have got, in the middle of a serious sort out.
-
#128 Reply
Posted by
GK
on 08 Jul, 2013 13:44
-
Well, I've managed to design my 3-D projection unit without them now, but I could probably eventually find a use for two or three. What would you want for them?
-
#129 Reply
Posted by
GK
on 11 Jul, 2013 12:13
-
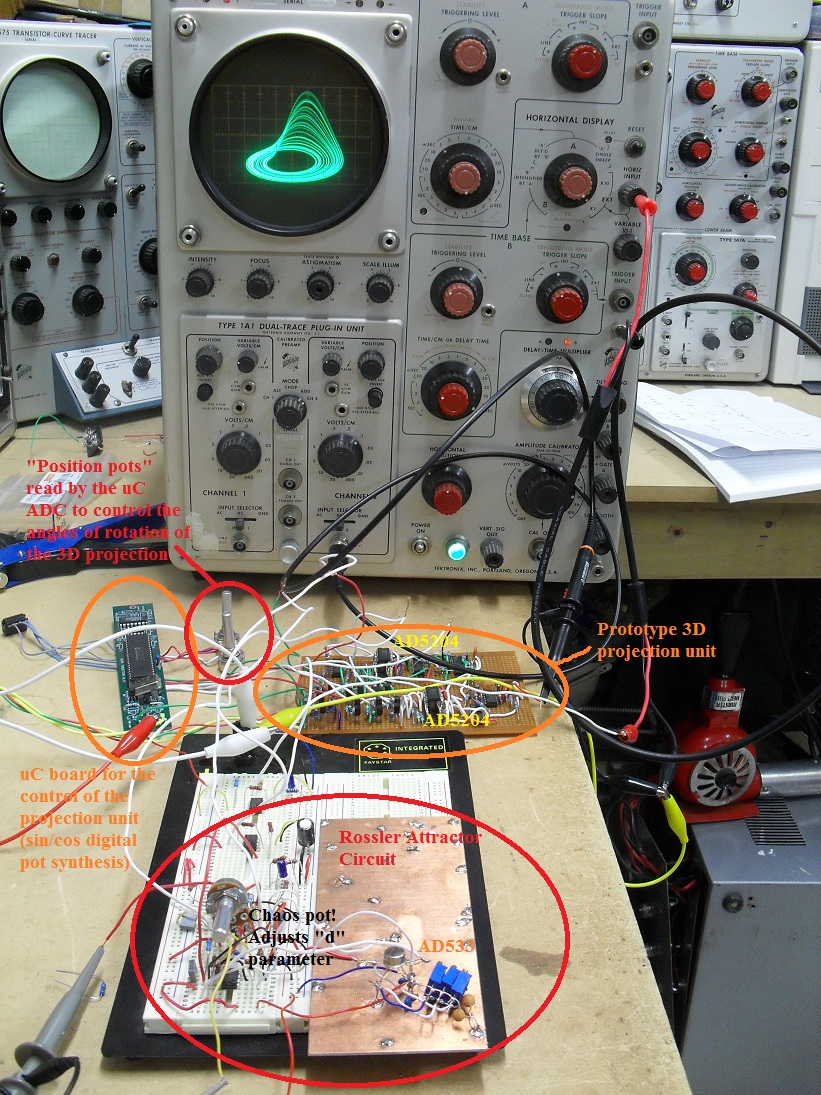
Well, after a couple of late evenings of tearing out hair and banging my head against the table I have finally managed to work out a practical and functional electrical analog for the
Rössler Attractor.
http://en.wikipedia.org/wiki/R%C3%B6ssler_attractorThe Rössler Attractor is somewhat similar to the Lorenz Attractor, but simpler, and 2 of the 3 coupled differential equations that describe it are linear. However designing a functional electrical analog of the Rössler Attractor was a bit of a challenge due to the way the variables scale and the resultant hyper sensitivity of the circuit to DC offsets (particularly those of the single multiplier stage required). However I succeeded in the end and here is the result:
The Rössler Attractor, being a simpler display that the Lorenz attractor, much better shows off the operation of my 3D projection unit, I think. Also note that I have included a "Chaos potentiometer" into the circuit, which permits me to linearly vary the "d" parameter from a high point at which oscillations cease, down to and through and beyond the point at which the oscillations begin to become chaotic. This is shown in the video.
Here is the complete setup (there is a quad op-amp hiding behind the "chaos pot"):
-
#130 Reply
Posted by
robrenz
on 11 Jul, 2013 12:32
-
Very nice! I am still following watching all this
-
#131 Reply
Posted by
GK
on 11 Jul, 2013 23:25
-
Hey, thanks for noticing!

-
#132 Reply
Posted by
GK
on 14 Jul, 2013 01:15
-
Wow, found lots more chatoic stuff ripe for analog simulation here:
http://ibiblio.org/e-notes/Chaos/contents.htmThink I'll wire up a Hénon map simulation next.
Would also like to get a slow growing Mandelbrot happening on a the display of a storage oscilloscope (my BWD 845 should do)
Also, besides the Lorenz Attractor and the Rössler Attractor (the latter of which I only discovered several days ago) does anyone know of any other chaotic systems that exhibit oscillation around one or more attractors?
-
#133 Reply
Posted by
c4757p
on 14 Jul, 2013 01:35
-
Awesome! That stuff brings back pleasant (hey, I'm not insane!) memories from when I was majoring in math. I might have to dig into some of it myself.
Hell, someday I might embark on a similar project. I've always wanted to build 1) an analog computer and 2) a digital computer.
-
#134 Reply
Posted by
GK
on 17 Jul, 2013 01:23
-
Can anyone out there offer any advice on technique for accurately drilling holes in 1/8" thick aluminium (19" relay rack) panels?
To save some bucks I'd like to buy blank (Hammond) panels and drill them myself, instead of having pre-drilled panels made by Front Panel Express. The majority of the panels needed (to fill two full height relay racks) are either 2U or 3U with a 300mm-wide section filled by a grid of 4mm banana panel jacks/sockets on a 15mm x 15mm grid spacing.
Each banana jack requires a 7mm diameter hole. However a panel ends up looking like a dogs breakfast if the holes of the banana jack grid are not very accurately positioned. My drill press is a floor standing pedestal unit. I've tried clamping down the work to the table to limit movement and vibration whilst drilling but the table isn't super rigid itself. It just seems to be a real bother to drill a panel hole of ~7mm diameter with a standard twist drill with anything better than +/-1mm accuracy in position (which is waayyy too loose a tolerance for a good looking panel).
-
#135 Reply
Posted by
notsob
on 17 Jul, 2013 01:53
-
1. new drill bits - for an accurate centre
2. centre punch the location to be drilled after you accurately mark it out.
or
3. get a small jig made up, say about 1/4 the width of your panel, but with tabs at top and bottom so you can slide it - this could be made from wood. (with guide holes pre-drilled) that you can slide across your panel, use the first drilled holes to lock it into position as you move it across the panel.
4 find someone locally that has a CNC
-
#136 Reply
Posted by
Jebnor
on 17 Jul, 2013 02:14
-
1) Centre punch the point
2) drill with a small hole (2mm) or with a center Drill that can be purchased at any machine tools shop.
3) drill with final size.
*USE a drill press*
-
#137 Reply
Posted by
GK
on 17 Jul, 2013 02:20
-
1. new drill bits - for an accurate centre
2. centre punch the location to be drilled after you accurately mark it out.
That's what I've been doing, but the "large" diameter bit still walks, no mater how accurate the initial center punch. I've even tried drilling accurate 1mm pilot holes with the dremmel, but still not good enough - the 7mm still walks to some degree. Standard twist drills are also a PITA for drilling in sheet as the larger holes never come out round.
What I can immagine I need is a 7mm drill bit with a really long, pointy tip, rather than the standard 45 degrees. Never seen something like that in the hardware store though. Or perhaps some kind of reaming bit?
Jig fabrication and/or and CNC means machine shop services; then it is easier and cheaper to just get the panels made by FPE.
-
#138 Reply
Posted by
GK
on 17 Jul, 2013 02:52
-
2) drill with a small hole (2mm) or with a center Drill that can be purchased at any machine tools shop.
You mean:

?
Used them many times in the tailstock on the lathe but never in a drill press. Instead of using one to drill a small diameter pilot hole (the larger twist drill will still walk to a degree), how about using a larger diameter one to drill the hole in its entirety?
-
#139 Reply
Posted by
robrenz
on 17 Jul, 2013 03:10
-
These are great on sheet metal. The bit on the left has a 9/32" diameter which is very close to your 7mm. These also chamfer the hole very nicely. Use a lube on it while cutting.
-
#140 Reply
Posted by
GK
on 17 Jul, 2013 03:26
-
Hmmm. I've got a "unibit" (10mm to 22mm step sizes) but didn't consider a smaller one as the damn thing became hopelessly clogged up drilling aluminium in the past. Just re-jogging my memory getting back into this now, the banana jack datasheet specifies an oddball 8.33mm hole (rather than 7mm) so I guess 1/3” will do.
http://www.newark.com/pdfs/datasheets/spc/TA-376.PDF
-
#141 Reply
Posted by
robrenz
on 17 Jul, 2013 03:34
-
That 8.33 is probably clearance for a 5/16 or 8mm. Get some TapMagic aluminum cutting fluid and that will keep the unibit from clogging up with aluminum an give a nice finish.
-
#142 Reply
Posted by
GK
on 17 Jul, 2013 04:44
-
Okkaayyyyyy........ I'll pick up a smaller diameter Unibit, a 5/16 centre drill and some appropiate cutting fluid tomorrow. See how I'll go with that.
-
#143 Reply
Posted by
poorchava
on 17 Jul, 2013 08:13
-
I'd say find a job shop or become friends with someone who has an access to a CNC.
-
#144 Reply
Posted by
woodchips
on 17 Jul, 2013 17:12
-
If you want several panels then much the best way is to make a jig from some 3mm or 1/8" steel 19" panel. This will drill much better than aluminium. Then drill through the steel into the aluminium panels, can do 6 at once. If drills don't work then try a 3 flute slot drill with centre cutting. Alternatively punch the holes again using the jig.
-
#145 Reply
Posted by
SeanB
on 17 Jul, 2013 18:29
-
I will second making a drill jig to get the initial holes, then use a 2mm or so pilot drill, followed by a larger drill, or an end mill to do the final hole size. 6 flutes and cutting fluid or wax will drill a nice clean hole. If you have a shop vacuum use it to remove the swarf to make the holes neater.
-
#146 Reply
Posted by
GK
on 18 Jul, 2013 02:31
-
A 5/16" center drill is working a treat. No walking from the center point and perfectly round holes. Yahoo.
-
#147 Reply
Posted by
notsob
on 18 Jul, 2013 03:32
-
Congrats and keep the project info coming, I really look forward to and enjoy reading each installment
-
#148 Reply
Posted by
GK
on 19 Jul, 2013 00:34
-
Hey, no worries. The next batch of panels are on backorder, so drilling has ceased for the time being. Stupid car has just swallowed $2k in maintenance, so that has put a hold on the next major parts order. My almost 10 year old exhaust system finally gave out. I knew there was something amiss when I could only barely outrun an R32 Golf (although I suspect modified). How embarrassing! Spun it up on the chassis dyno and I was down about 100hp at the wheels; internally rusted out and collapsed muffler.
-
#149 Reply
Posted by
woodchips
on 21 Jul, 2013 22:23
-