Slightly long post, sorry.
One of the "goals" I set myself when getting back into a bit of electronics was to be able to produce at least single sided and ideally double sided PCBs.
Many years ago I built myself a UV light box and, although I managed a few serviceable PCBs the results were never very good. Unfortunately the light box seems to have fallen victim to my father "tidying up" some of my old stuff so I thought I might try my hand at the "toner transfer" method. I wanted to buy a laser printer even if I wind up using photoresist as it looks like inkjet ink doesn't work terribly well to mask UV in any case.
So, I bought a Brother HL-2250DN, mainly because it was the cheapest networked mono laser I could find. It also works well with Linux which was essential - in fact it looks to be quite a useful little printer which understands PCL6 and even PostScript (much to my surprise).
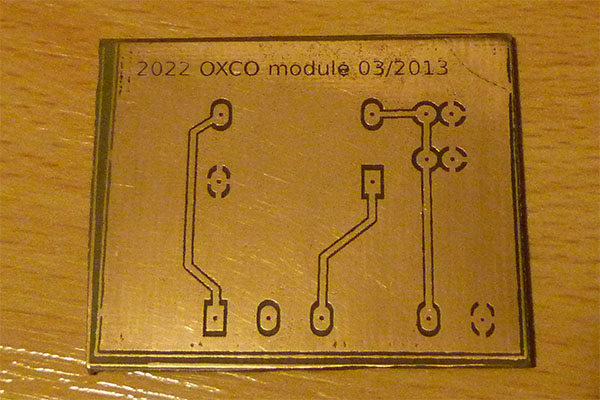
So, here's my first effort - now don't laugh! I know I'm some way from flodins' double sided, through hole plated, solder masked perfection but we all have to start somewhere. For scale the four pads in a rectangle top left are the corners of a 14 pin DIL OCXO module (oops, I've just spotted my spelling mistake on the board).

Considering it's a first attempt I don't think it's a disaster

OK, first the "discovery".
I've read several sites describing the technique for toner transfer - all mention using glossy paper - either photo paper or even magazines. All talk about soaking the paper off (and how it takes ages). Some mention the special paper you can get which is made of sugar or some such to dissolve easily. To be honest it all seemed like a bit of a faff.
So here's what I did - I took some self adhesive printer labels (2 A5 sized on an A4 sheet) and carefully removed them from the backing paper, then threw them away. I then stuck the backing paper in the printer and printed the foil pattern on the glossy side of the paper - this is the side the labels were stuck to.
Then placed it toner side down over a cleaned PCB and using an iron set to about 200
oC ironed over the pattern for a minute or so, then
peeled the paper away leaving the toner on the PCB. No water, no rubbing, no faff

OK, there were a few pin holes in the ground plane but as I said its a first effort and I have to play with the print density and quality to see if I can get more toner on the page. I also need to experiment a little with the iron temperature and pressure. Some of what looks like pinholes in the photo is actually residual toner BTW.
Also its a bit thin and has a tenancy to jam the printer - especially if the edges are curled. This is why you have to remove the label carefully - pull too fast and the backing paper just curls up (it's also best to remove from the edge towards the centre). Initially I tried the single sheet feeder which worked fine the first time, but jammed the next two - in the end I just put a sheet in the main tray and that was fine.
I suspect that pressing a few sheets flat under a ream of paper would help.
So - questions
Has anyone else tried this type of backing paper? It seems to be ideal for toner transfer as the waxy side will take the toner during printing but it doesn't adhere too well so it transfers pretty well to the PCB. I can't find anyone discussing using it but I
can't be the only one to have thought of or tried using it. If you have tried it did you stick with it or abandon it to photo paper or the specialised transfer paper? If you did abandon it what were the problems that couldn't be solved.
What size pads do people use for general through hole components. Sorry, I know this is really basic - I used a 0.1x0.06" pad for the OCXO (and intended to keep with that for DIL packages in general) but it looks too small. The circular pads were 0.08" which is a bit better but still look a bit small. I plan on using an 0.8mm drill for most holes.
What track widths/spacings are achievable with toner transfer? The tracks are 0.02" which is probably fine but the space between them and the ground plane is 0.01" which might be a bit too thin. Surprisingly (since there is an area which looks shorted) none of the tracks did wind up shorted to ground. Possibly I pressed a bit too hard and squidged the toner a bit but I think I need a bit more space here.
What do people use to get the toner off the PCB? I tried IPA, acetone, white spirit, and ethanol. In the end it had to be some 800 grit wet&dry and some Cif - nothing would dissolve it.