Hello, this is a two part question sorry

Firstly I want to make a light box for pcb manufacture for my projects, I have and laser printer which is beyond reasonable repair, I've noticed 4 purple tubes in it I wonder if they are UV tubes . and could I use them for the light box. the laser printer is Dell
Paul
Probably not.
How about posting a photograph?
The cheapest and easiest way is to search for "UV nail lamp on eBay". They work fine as they are or you can use the guts to make something that looks a bit nicer.
Rather than looking at uv tubes which need cokes etc to drive them, consider ebay UV LEDs which are surprisingly cheap when you buy 100 off.
Plenty of such designs on the web, though I made a couple of very simple A5 size boards which give good coverage and burn a board in about 4 mins.
Personally i use one pf those cheap nail owens from china. Works reasonably well for mu small home electronics needs.
Rather than looking at uv tubes which need cokes etc to drive them, consider ebay UV LEDs which are surprisingly cheap when you buy 100 off.
Plenty of such designs on the web, though I made a couple of very simple A5 size boards which give good coverage and burn a board in about 4 mins.
After I posted the original question, a friend of mine rang up, who saw the post ,and said the same, he said the UV leds are far more friendly to the Earth, which is a good thing, I saw him today, and he gave me a diagram, he wants one to so we are going to buy all the parts from a suppliers at a reduced price.
prior to the call I had considered the nail curing box on e-bay, but it's more fun to make one.
Thank you for replying
Probably not.
How about posting a photograph?
Thanks for the reply I can post a picture, although I've decided to go down the uv led route the tubes in the printer are purple about a inch thick and about 1 ft in length in old money, sorry if your metric, giving my age away.
he said the UV leds are far more friendly to the Earth
This is very, very unlikely since making semiconductors is about as dirty and environmentally harmful as it gets in electronics. I strongly doubt that phosphor-coated glass tubes with minuscule amounts of mercury are worse.
I built one using high density UV LED strips and was very pleased with the result. The self-adhesive LED strips made it very easy to make light panels with high LED density.
You can see my build log here: http://kavionic.com/blog/DIY_1188_LED_Dual_Sided_UV_Radiation_Unit
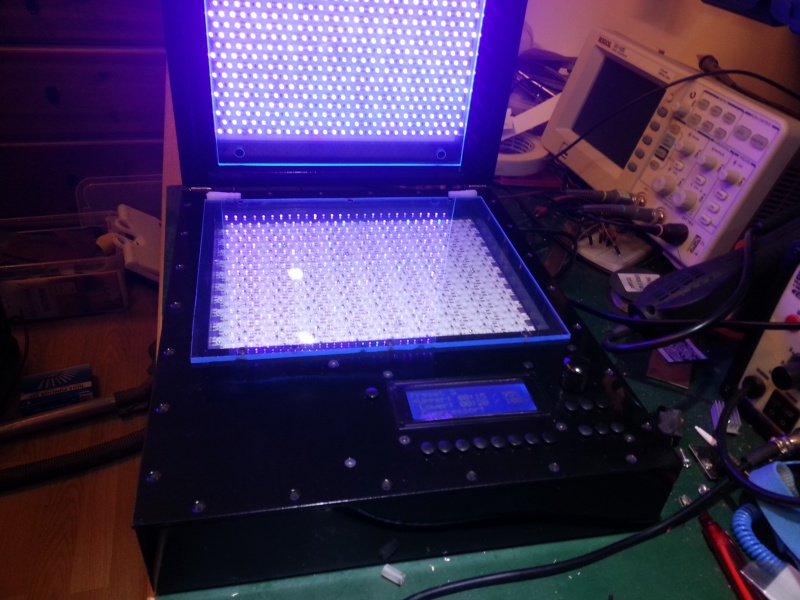
Hi Kurt ,that's a very nice build, mine won't be so sophisticated, for a start I have no idea about control panels, mine will be more of the basic ,how do I do that type. It will be a first, I'm looking at many designs.
Paul
Thanks!
You can make it just about as simple as you like. The controller PCB in my unit was made on the light panels that is now in the unit. I just placed one of the panels on the work bench, placed a spacer on each side of the panel, and then placed a piece of plexiglass over the spacers. Then I hooked the panel directly to a 12V power supply and timed it with a stop watch.
I recommend taping the LED strips to a metal plate. They generate a bit of heat and the metal help dissipate it. I isolated the steel plates with a thin self adhesive plastic film before gluing down the LED strips to make sure they did not short against the metal.
Unfortunately I did not take any proper pictures of the panels before I assembled it, and I have not got around to take it apart to get them later either. But the panels are very simple to make. I just made a "power bar" with double strips of 5mm copper tape along the two edges of the panel. One hooked to GND and one to 12V. Then I taped short stubs of copper tape from each bar to each of the respective + and - connection on the LED strips (all plusses on one side and all minuses on the other). At the end I applied solder to each joint to make sure there was a proper connection.
Make sure that you power each of the two power bars and not just apply power to one end of the first LED strip. That will cause a significant voltage drop in the first LED strip as all the current to all the LEDs will go through it. You can either solder the supply wires to each of the power bars, or what I did was to place another double strip of 5mm copper tape from one side of the panel to the other and then attach both supply wires there.
So to make a very simple UV box, just make one of these panels and place it in a box with the right depth and then cover the box with plexiglass (or normal glass). You might be able to find a picture frame with the right depth and then the whole project would be very simple

UV LED strips could make it easier. I heard soldering the LEDs aligned was important, because otherwise the UV light wouldn't be correctly distributed.
I want to make my own UV exposure box (they are called that way too, I think). I collected a lot of schematics and instructions but never got the balls and money to do it.
Thanks for your post, it's very motivational!
Hi ,OK I ended up converting one of those bug zappers which has 2 UV tubes and works very well, I also use the clear film you can use with ink jet printers, and pre-sensitised PCB, my boards are now perfect ,thanks for all the advice.