Author Topic: Voltage regulators - die pictures  (Read 30215 times)

0 Members and 2 Guests are viewing this topic.

Online magic

  • Super Contributor
  • ***
  • Posts: 6779
  • Country: pl
Re: Voltage regulators - die pictures
« Reply #100 on: August 28, 2022, 11:33:36 am »
Not sure what is the ? marked below. Hopefully just a resistor, and it should be a resistor because then we have a fairly straightforward bandgap reference.


Q1,Q2 are the 10:1 area ratio transistors and their currents need to be equal due to the PNP mirror above them. This happens when R2 voltage is whatever it takes to produce 1:10 current density ratio in the transistors, some 60mV at room temperature. If R2 voltage increases, Q2 overpowers the mirror and pulls down the supply rail by means of Sziklai pair Q7,Q8. This is fed back to R2 through R1, so the loop keeps the rail regulated at a constant voltage. The exact output equals Vbe of Q5 plus ~11x the R2 voltage, fairly typical for a 1.2V bandgap reference. There appears to be a PNP collector near the Vtrans pad which powers this shunt reference.

Q5,Q6 is a current mirror providing predictable bias on Q7. R4 is a base current compensation resistor: Q5 Vbe is a little less than Q6 (observe that R4 current is very tiny, just the base current of Q5). This trick looks dodgy as hell, but it's widespread in precision ICs and works if calculated correctly. In particular, increasing Q5 base current increases R4 voltage drop and the amount of compensation applied to Q5. The biggest weakness of this circuit is β mismatch between Q5 and Q6, or large variations in mirror current (not the case here).

Below I marked some elements which are perhaps not immediately visible, including a resistor jumping from the 1.24V test pad to the resistors of the bandgap cell and a suspected NPN transistor Qs, which may be sinking current from the "PNP mirror" as Noopy called it. Qs emitter may be connected to ground through an invisible base-type diffused resistor.
 
The following users thanked this post: Noopy

Offline NoopyTopic starter

  • Super Contributor
  • ***
  • Posts: 1734
  • Country: de
    • Richis-Lab
Re: Voltage regulators - die pictures
« Reply #101 on: August 28, 2022, 01:48:39 pm »
Ah, there is the bandgap reference! I first assumed there has to be one but I didn't see it. Thanks!

I would assume the ? is an additional resistor, a base resistor, two of them. Perhaps a way to do tuning by changing the metal layer in earlier stage of development.

Offline David Hess

  • Super Contributor
  • ***
  • Posts: 16618
  • Country: us
  • DavidH
Re: Voltage regulators - die pictures
« Reply #102 on: August 28, 2022, 04:35:58 pm »
Isn't that a pinch resistor?  That other resistor in series with it sure is not 100k.
 

Offline NoopyTopic starter

  • Super Contributor
  • ***
  • Posts: 1734
  • Country: de
    • Richis-Lab
Re: Voltage regulators - die pictures
« Reply #103 on: August 28, 2022, 04:39:57 pm »
For me it looks like three contacts and the middle one could be connected to one or both of the outer ones so shorting one or two wide base resistor stripes.

Online magic

  • Super Contributor
  • ***
  • Posts: 6779
  • Country: pl
Re: Voltage regulators - die pictures
« Reply #104 on: August 28, 2022, 04:52:36 pm »
Resistor values are of course guesstimates.

In the past, I calculated 0.9~1kΩ/sq sheet resistance for metal film resistors in AD58x voltage references. It was based on eyeballing resistor dimensions on Noopy's images and a few data points obtained from the datasheet - I recall using at least NR pin output impedance and resistance of user-accessible scaling networks in the 588.

Here, I just assumed each of those strips near the 10:1 transistors is 10kΩ, which is hopefully within an order of magnitude.
100kΩ is a snake consisting of effectively 8 such strips plus ? plus the zener-zap variable resistance.

Very similar circuit is found in the LM385-1.2 reference; nominal divider values given in the datasheet are 500kΩ and 50kΩ.
« Last Edit: August 28, 2022, 04:58:50 pm by magic »
 

Offline iMo

  • Super Contributor
  • ***
  • Posts: 4789
  • Country: pm
  • It's important to try new things..
Re: Voltage regulators - die pictures
« Reply #105 on: August 28, 2022, 05:55:11 pm »
Do we have an analysis of the MAC01 (should be "a clone of the REF01")? Is it made with a buried zener or with a bandgap?
LM385-1.2 - I've just made a "MyWestone cell"  :) :) around it - with an 1.5V AA battery, 20k resistor, always on  8) (w/ some 15uA current). It works, but rather high tempco, still in burn-in period, however..
 

Offline NoopyTopic starter

  • Super Contributor
  • ***
  • Posts: 1734
  • Country: de
    • Richis-Lab
Re: Voltage regulators - die pictures
« Reply #106 on: August 28, 2022, 06:07:18 pm »
Do we have an analysis of the MAC01 (should be "a clone of the REF01")? Is it made with a buried zener or with a bandgap?

No, a MAC01 is not in the pipeline up to now... Unfortunately

Online magic

  • Super Contributor
  • ***
  • Posts: 6779
  • Country: pl
Re: Voltage regulators - die pictures
« Reply #107 on: August 28, 2022, 06:15:32 pm »
REF01 is bandgap and a clone ought to be the same.

As for LM385-1.2, there's nothing you can do about its quadratic TC, but if linear component is too bad already, try selecting a different specimen with different 25°C output. Its supposed to be correlated with TC. You will see similar plots in TL431 datasheets and others.

I found the 285 grade to be generally much tighter at 25°C than 385, but small sample size so YMMV.
 

Offline iMo

  • Super Contributor
  • ***
  • Posts: 4789
  • Country: pm
  • It's important to try new things..
Re: Voltage regulators - die pictures
« Reply #108 on: August 28, 2022, 06:28:33 pm »
@magic: I've found only a single 385-1.2V in my junkbox (bought 20y back), but got several 385-2.5V so perhaps I will do some measurements later on (all epoxy TO-92). Tempco of the 1.2 some 60-70ppm/C at 15uA. The good message is I have not seen any change in voltage between 15 - 30uA, thus you may use a resistor with any reasonable tempco :)
Interestingly an oldest datasheet I found says 20ppm max, all newer one 60..
Re MAC01 - several highest grades in metal here, if one of them got damaged in my experiments I would send it to Noopy then.. DS: https://www.teslakatalog.cz/MAC01.html
Btw. what the Tempco="0.7ppm/K/%" in that DS means??
PS: the translation "The proportional change of the tempco of the reference voltage with setting/(adjustment?) = 0.7ppm/K/%"..
PPS: the REF01's DS got it mentioned in two params:
« Last Edit: August 28, 2022, 06:53:08 pm by imo »
 

Offline NNNI

  • Contributor
  • Posts: 43
  • Country: de
    • YouTube channel
Re: Voltage regulators - die pictures
« Reply #109 on: August 28, 2022, 08:46:15 pm »
Hello everyone!
I originally asked Noopy to decap this IC because it has fascinated me for years, so I guess I'm responsible for this mess  ;D
The boundary detection circuit particularly caught my fancy, and I really wanted to see what made it tick under the hood. I was sure that this IC would reveal a lot of LT's design secrets and I could learn a lot from it (I hope to do analog design one day).
Well, now I know where to ask if I have questions! Thanks everyone for your commentary on this chip and thanks again to Noopy for buying the chip and decapping it for me!
P.S. If you deviate slightly from the datasheet circuit, you can optimize for faster charging time, here's a video I made about it:
 
The following users thanked this post: SeanB, doktor pyta

Offline NoopyTopic starter

  • Super Contributor
  • ***
  • Posts: 1734
  • Country: de
    • Richis-Lab
Re: Voltage regulators - die pictures
« Reply #110 on: August 29, 2022, 03:24:20 am »
Re MAC01 - several highest grades in metal here, if one of them got damaged in my experiments I would send it to Noopy then..

 :-+ :-+ :-+ :)


DS: https://www.teslakatalog.cz/MAC01.html
Btw. what the Tempco="0.7ppm/K/%" in that DS means??
PS: the translation "The proportional change of the tempco of the reference voltage with setting/(adjustment?) = 0.7ppm/K/%"..

That´s really strange...  :-//

Online magic

  • Super Contributor
  • ***
  • Posts: 6779
  • Country: pl
Re: Voltage regulators - die pictures
« Reply #111 on: August 29, 2022, 05:23:23 am »
I think it's how the TC changes when the output is trimmed 1% with an external pot.
This spec is not given in REF01 datasheet, all they say is "not significantly".

I originally asked Noopy to decap this IC because it has fascinated me for years, so I guess I'm responsible for this mess  ;D
The boundary detection circuit particularly caught my fancy, and I really wanted to see what made it tick under the hood. I was sure that this IC would reveal a lot of LT's design secrets and I could learn a lot from it (I hope to do analog design one day).
Well, you can see it now. Some 1:4 emitter followers ??? (not sure how well the supposed 36mV offset is controlled over temperature) going into another differential pair comparator and then some logic.

This chip is far for crazy, kind of NE555 on steroids. Try LT1021 or LT1027 :scared:
 

Online magic

  • Super Contributor
  • ***
  • Posts: 6779
  • Country: pl
Re: Voltage regulators - die pictures
« Reply #112 on: October 03, 2022, 05:35:21 pm »
Do we have an analysis of the MAC01 (should be "a clone of the REF01")?
Turns out, we actually do :o
https://commons.wikimedia.org/wiki/File:MAC01.jpg
At  first glance, it looks similar to the original.

The author of this pic is a madman :popcorn:
https://commons.wikimedia.org/wiki/User:Mister_rf/Gallery
 

Offline NoopyTopic starter

  • Super Contributor
  • ***
  • Posts: 1734
  • Country: de
    • Richis-Lab
Re: Voltage regulators - die pictures
« Reply #113 on: October 03, 2022, 09:13:24 pm »
He really takes some nice pictures!  :-+ ...and he has the same problems as I have (mirrored bondwires)...  ;D

Online magic

  • Super Contributor
  • ***
  • Posts: 6779
  • Country: pl
Re: Voltage regulators - die pictures
« Reply #114 on: October 04, 2022, 05:17:51 am »
Also has a problem with transparent bondwires.
There should be some way to restrict those stackers to only use a subset of frames on selected areas like wires and their shadows ::)
 

Offline NoopyTopic starter

  • Super Contributor
  • ***
  • Posts: 1734
  • Country: de
    • Richis-Lab
Re: Voltage regulators - die pictures
« Reply #115 on: October 04, 2022, 05:22:08 am »
I assume some some artificial intelligence would really help here.
Helicon Focus does a good job but it's far from perfect.

Online magic

  • Super Contributor
  • ***
  • Posts: 6779
  • Country: pl
Re: Voltage regulators - die pictures
« Reply #116 on: November 03, 2022, 11:17:09 pm »
I just noticed that on Zeptobars there is an old image of the most popular (and worst ::)) switching voltage regulator in the world - the MC34063.
Maybe there are some MC34063 fanboys here...
https://zeptobars.com/en/read/MC34063

A quick rundown:

The big stuff on the left is of course the switch. Then the driver above it. Ten lateral PNPs next to the driver are a current source (mirror), which provides driver base current. Right above them is a smaller NPN which controls the driver by grounding the base to turn it off. As we can see, in buck mode the darlington switch works as emitter follower, with output voltage 1.5~2V less than VCC (PNP saturation + 2 base-emitter junctions + small resistance), this is confirmed by the datasheet. For 5V to 3.3V conversion it could pretty much work as a linear regulator, no inductor necessary :P

Next to those PNPs is another column of PNPs for miscellaneous internal current sources. Below is a slightly complex PNP current mirror charging the oscillator capacitor and right near it the Schmitt-triggered comparator and logic of the oscillator. Further down, the peak current comparator - when triggered, it shoves a lot of current into the oscillator cap, causing the cycle to terminate earlier. In top right, near the feedback input, is the feedback comparator and the latch logic. Bottom right, above GND pad, a simple Brokaw type bandgap reference with a ton of resistors, zener zapped for accuracy.

The rest is more resistors, biasing, boring crap. I'm surprised it's that complex. There is even a fairly sophisticated bias generator powering solely the voltage reference. I wonder if the Chinese clones blindly copy all of it, or maybe simplify things a little. But I'm afraid I don't care enough to try finding out...

I could swear that capacitor charging/discharging currents in the oscillator increase with die temperature, I don't get it :wtf:
 
The following users thanked this post: Noopy

Offline NoopyTopic starter

  • Super Contributor
  • ***
  • Posts: 1734
  • Country: de
    • Richis-Lab
Re: Voltage regulators - die pictures
« Reply #117 on: November 18, 2022, 08:54:40 pm »


The TBA325B is an old 12V voltage regulator developed by SGS ATES. The input voltage may go up to 27V. The output voltage is regulated to within 1% at a current of up to 720mA.


In the magazine Electronics I found an ad for the TBA325B, which alternatively quotes the designation L036. While almost no information can be found to the TBA325B, for the L036 there is a datasheet from SGS ATES.


The above L036 schematic is taken from the "Professional Semiconductor Databook 2" from SGS ATES (1973/1974) and was colored by me. The left area contains the bias circuit. While powering up the yellow area provides an initial reference voltage, which generates a reference current in the cyan area. This current is mirrored over several current mirrors (blue). When the circuit is started, the current mirrors supply the reference current generator too, which then has a higher potential than the start-up circuit. Subsequently, it is isolated from the start-up circuit by the transverse diode.

The power transistor which sets the 12V at the output is a Darlington transistor (red). Its current limiter (green) monitors the voltage drop across a shunt in the emitter path. Unusually, the voltage is tapped within the Darlington circuit. It could be that with its temperature drift the temperature drift of the overcurrent protection transistor is compensated.

The regulation is done by a differential amplifier (purple), which compares the voltage of a voltage divider at the output with the internal reference voltage. A capacitor limits the frequency range. In the left path there are two transistors above each other. Apparently this cascode circuit isolates the differential amplifier from voltage fluctuations at the input.


The case contains a large heatspreader. The die is located on a small socket on this heatspreader.

For reading back the output voltage, the output pin is connected with an additional bondwire to a dedicated bondpad on the die.


The die is 1,33mm x 1,28mm.


On the upper edge, there are the characters L036 in the metal layer. This suggests that this TBA325B is indeed an L036. It could be that SGS ATES has combined two very similar voltage regulators into one product.

The individual function blocks can easily be seen. The power transistor is integrated in the upper left corner. It consists of three lines with several individual emitter areas. Special measures for a symmetrical distribution of the load current were apparently not necessary.


In the upper right corner there are some resistor strips which are the voltage divider for the feedback of the output voltage. Most likely, you can alternatively set the output voltages to 5V and 15V by changing the metal layer (L005 / TBA325A and L037 / TBA325C).

Between the power transistor and the output bondpad three resistors are integrated, which represent the shunt for current limiting. In this voltage regulator, two of the resistors are connected. It can be assumed that if the output voltage is changed, the appropriate maximum currents can be set here. If you add the third resistor, you get from 720mA to 850mA. If you use only the wide resistor, you get the 600mA of the 15V version. Probably at higher voltages the SOA of the power transistor allows just the lower currents.


In the lower right corner of the die the right transistor of the differential amplifier is integrated. The structure is quite unusual because the capacitor between base and collector has been integrated there as well. It seems that the capacitor is represented by an additional emitter area, which has to be connected to the collector. Here the connection is missing. Apparently, the amplifier works stable without an additional limitation of the bandwidth.

In the left corner, among others, are the PNP transistors of the four current sources.


https://www.richis-lab.de/voltageregulator19.htm

 :-/O
 
The following users thanked this post: SeanB, doktor pyta, RoGeorge

Offline David Hess

  • Super Contributor
  • ***
  • Posts: 16618
  • Country: us
  • DavidH
Re: Voltage regulators - die pictures
« Reply #118 on: November 20, 2022, 02:57:46 am »
In the lower right corner of the die the right transistor of the differential amplifier is integrated. The structure is quite unusual because the capacitor between base and collector has been integrated there as well. It seems that the capacitor is represented by an additional emitter area, which has to be connected to the collector. Here the connection is missing. Apparently, the amplifier works stable without an additional limitation of the bandwidth.

I have heard of charge storage PNPs, but could that be a charge storage NPN?

The charge stored under the emitter is most effective in obtaining a fast charge transfer from base to emitter with minimum change of emitter base voltage.
« Last Edit: November 20, 2022, 03:00:24 am by David Hess »
 
The following users thanked this post: Noopy

Online magic

  • Super Contributor
  • ***
  • Posts: 6779
  • Country: pl
Re: Voltage regulators - die pictures
« Reply #119 on: November 20, 2022, 08:44:38 am »
The power transistor which sets the 12V at the output is a Darlington transistor (red). Its current limiter (green) monitors the voltage drop across a shunt in the emitter path. Unusually, the voltage is tapped within the Darlington circuit. It could be that with its temperature drift the temperature drift of the overcurrent protection transistor is compensated.
It's a foldback limiter too, because as GND moves up towards Vout (or whatever ;)) then voltage applied to the limiting transistor's base increases for the same amount of load current.

In the lower right corner of the die the right transistor of the differential amplifier is integrated. The structure is quite unusual because the capacitor between base and collector has been integrated there as well. It seems that the capacitor is represented by an additional emitter area, which has to be connected to the collector. Here the connection is missing. Apparently, the amplifier works stable without an additional limitation of the bandwidth.
This junction capacitor would break down in the 12V and 15V versions.
Perhaps 5V needed it for stability due to higher loop gain.
 
The following users thanked this post: Noopy

Offline NoopyTopic starter

  • Super Contributor
  • ***
  • Posts: 1734
  • Country: de
    • Richis-Lab
Re: Voltage regulators - die pictures
« Reply #120 on: November 20, 2022, 09:59:46 am »
In the lower right corner of the die the right transistor of the differential amplifier is integrated. The structure is quite unusual because the capacitor between base and collector has been integrated there as well. It seems that the capacitor is represented by an additional emitter area, which has to be connected to the collector. Here the connection is missing. Apparently, the amplifier works stable without an additional limitation of the bandwidth.

I have heard of charge storage PNPs, but could that be a charge storage NPN?

The charge stored under the emitter is most effective in obtaining a fast charge transfer from base to emitter with minimum change of emitter base voltage.


That´s possible...  :-//


The power transistor which sets the 12V at the output is a Darlington transistor (red). Its current limiter (green) monitors the voltage drop across a shunt in the emitter path. Unusually, the voltage is tapped within the Darlington circuit. It could be that with its temperature drift the temperature drift of the overcurrent protection transistor is compensated.
It's a foldback limiter too, because as GND moves up towards Vout (or whatever ;)) then voltage applied to the limiting transistor's base increases for the same amount of load current.

You are right (as usual  ;D). I should add that information.


In the lower right corner of the die the right transistor of the differential amplifier is integrated. The structure is quite unusual because the capacitor between base and collector has been integrated there as well. It seems that the capacitor is represented by an additional emitter area, which has to be connected to the collector. Here the connection is missing. Apparently, the amplifier works stable without an additional limitation of the bandwidth.
This junction capacitor would break down in the 12V and 15V versions.
Perhaps 5V needed it for stability due to higher loop gain.

That´s seems quite likely!  :-+
I´m not sure what the maximum voltage at the capacitor is but it´s probably too high for the 12V and the 15V version.

Offline NoopyTopic starter

  • Super Contributor
  • ***
  • Posts: 1734
  • Country: de
    • Richis-Lab
Re: Voltage regulators - die pictures
« Reply #121 on: November 30, 2022, 06:09:15 pm »
The Linear Technology LT3750...


We had this strange NPN transistors in the LT3750.


I found a good explanation for these structures in the book "The Art of Analog Layout" by Alan Hastings.

The basis is a so-called CDI bipolar transistor, as it is common in a BiCMOS process. CDI stands for "collector diffused isolation" and describes the isolation of the transistor from its environment by an n-doped well within the p-doped epitaxial layer. The special feature is the emitter, which is created by applying a heavily n-doped polysilicon layer over an oxide mask and allowing its doping to diffuse into the base surface.

A transistor constructed in this way has a small emitter with high doping. The base area can also be made more highly doped and thinner. All this has a positive effect on the transistor's properties. Current gain and switching frequency are very high.

Consequently, the dark areas of the transistors are the openings where the red polysilicon layer forms the emitter surfaces. Whether this is really a BiCMOS process remains questionable, since no MOSFETs can be seen in the whole circuit. Nevertheless, the emitters can be represented by a polysilicon layer.


https://www.richis-lab.de/voltageregulator18.htm#Poly-Emitter

 :-/O
 
The following users thanked this post: SeanB

Offline NoopyTopic starter

  • Super Contributor
  • ***
  • Posts: 1734
  • Country: de
    • Richis-Lab
Re: Voltage regulators - die pictures
« Reply #122 on: January 04, 2023, 07:59:10 pm »


Like many other manufacturers, Mikroelektronika Botevgrad has also distributed voltage regulators of the 79xx series. The model at hand is a -15V regulator from 1989.


As with the 7812 from Mikroelektronika Botevgrad (https://www.richis-lab.de/voltageregulator13.htm), one can say with a fair degree of certainty that the design originated from ST Microelectronics due to the specific auxiliary structures and inscriptions. Either it was produced under licence or ST Microelectronics supplied finished wafers to Mikroelektronika Botevgrad.

The die has an edge length of 2,0mm and was protected with a silicone-like gel.


The upper area shows the typical ST Microelectronics auxiliary structures. Below them are fuses for adjusting the output voltage. The top fuse has been triggered and thus interrupted.

The labels are similar to those on the 7824 from ST Microelectronics (https://www.richis-lab.de/voltageregulator12.htm) and the 7812 from Mikroelektronika Botevgrad (https://www.richis-lab.de/voltageregulator13.htm).

On the left is a test transistor that appears to contain a round and a square emitter.


The datasheet from ST Microelectronics contains a circuit diagram. As will be shown in a moment, the circuit diagram matches the actual circuit except for minor details.

The pink circuit section ensures a clean start-up. The Z-diode D1 generates a voltage that is coupled into the rest of the circuit via Q2 as a reference voltage. In normal operation, the voltage in the orange section is higher and Q2 remains blocked.

In the 7824C, ST Microelectronics used a bandgap reference voltage source. In the 7915 there is just the Z-diode D2 (orange). The base-emitter path of transistor Q3 has a negative temperature coefficient and thus compensates for the positive temperature coefficient of the Z-diode. In the blue area, the combination Q7/R5/R6/Q8/Q7 generates a reference current from the reference voltage, which supplies various circuit parts via several current mirrors.

In the centre of the circuit is a differential amplifier that compares the reference voltage with the output voltage (grey). The input transistors Q10/Q18 are shielded from voltage fluctuations by the cascode transistors Q11/Q17. A current mirror is located in the lower area. The voltage amplification (cyan) takes place at the cascode transistor Q17. The limitation of the frequency response does not take place directly at this transistor, but in the current mirror.

The output stage (red) is controlled by transistor Q19 and consists of the Darlington stage Q20/Q21. The voltage divider R17/R19 (yellow) provides the feedback of the output voltage to the differential amplifier.

The green area represents the protection circuit of the output stage. R16 determines the output current of the voltage regulator. Q22/Q20/Q16 reduce the base current of Q16 if the current is too high. The Z-diode D3 ensures that the current flow is reduced even more in case of high voltage drops across the output stage transistor.

The function of transistor Q12 (dark green) is not entirely clear. In normal operation, this transistor should not be necessary. Perhaps it reduces the output stage's drive while the circuit is starting up.  :-//


Despite the not optimal image quality, all circuit parts can be identified on the die. The Darlington transistor in the power path consists of two times four elements. The voltage divider R17/R19 is located in the lower right corner, where various resistor combinations allow setting different output voltages.

Above the capacitor CQ14 at the transistor Q14, a second capacitor is integrated, which is electrically located between the collector of Q14 and the IN potential. Another difference to the circuit diagram in the datasheet is the resistor RQ19 in the emitter path of transistor Q19. Furthermore, transistor Q3 is missing.


Since this is a voltage regulator for negative voltages, the input is connected to the emitters of the power transistor. Thin strips represent small emitter resistors that ensure even current distribution. The actual emitter surfaces are triangular. Between them are the vias from the metal layer to the base. The collector connection is on the far right. At the upper end of the power transistor, an emitter triangle serves as a shunt for current measurement.


If the circuit diagram is corrected according to the real circuit, it becomes apparent that the reference voltage is tapped at a different point. In this circuit, the path Q7/R5/R6/Q8/R7/Q9 is used to compensate for the positive temperature coefficient of the Z-diode.

The additional capacitor at transistor Q14 and the emitter resistor at transistor Q19 have not been drawn in here.


https://www.richis-lab.de/voltageregulator20.htm

 :-/O
 
The following users thanked this post: SeanB, RoGeorge

Offline NoopyTopic starter

  • Super Contributor
  • ***
  • Posts: 1734
  • Country: de
    • Richis-Lab
Re: Voltage regulators - die pictures
« Reply #123 on: March 25, 2023, 02:55:45 pm »


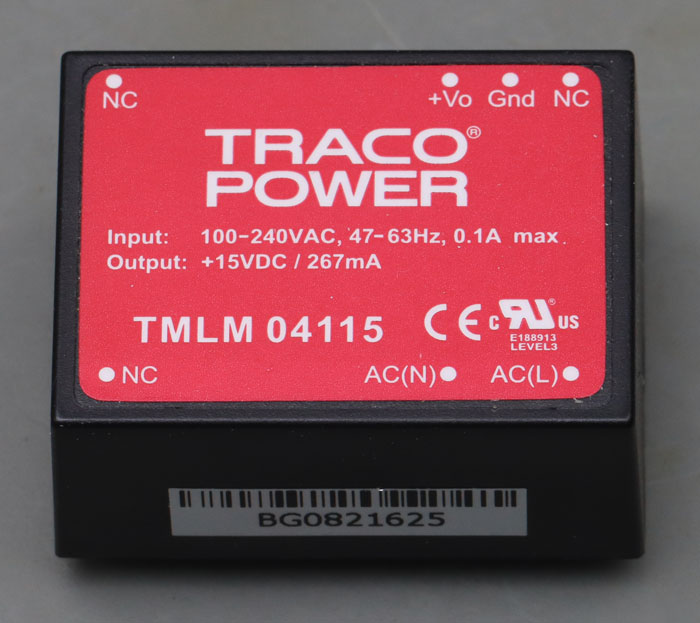
Traco Power manufactures various AC/DC and DC/DC converters, which are generally known for good quality. The TMLM series has a wide range input (90-246VAC) and offers output powers between 4W and 20W. The TMLM04115 generates 15V with a power handling capacity of 267mA. Efficiency is rated at 74%. Dimensions are 36,5mm x 27mm x 17,1mm.

The model here is a relatively early failure. It has blown a upstream 1A fuse.


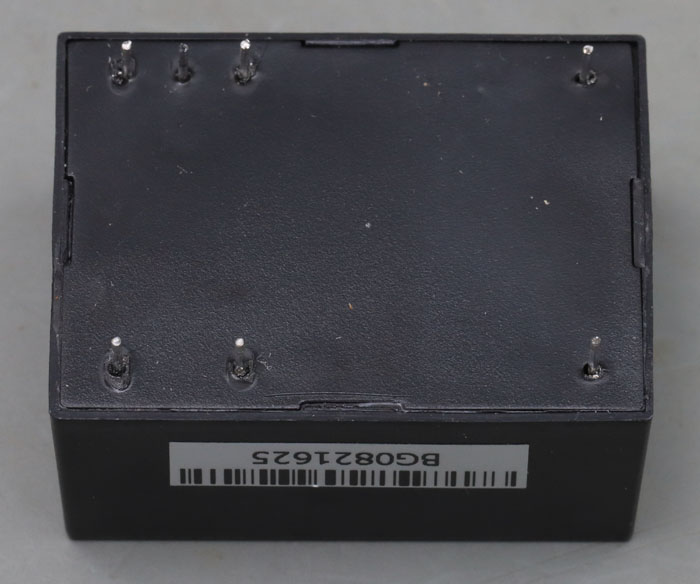
The case has seven pins, two of which only serve to stabilize the module. The switching regulator is located in a plastic cup that has been potted and closed with a lid on the bottom.


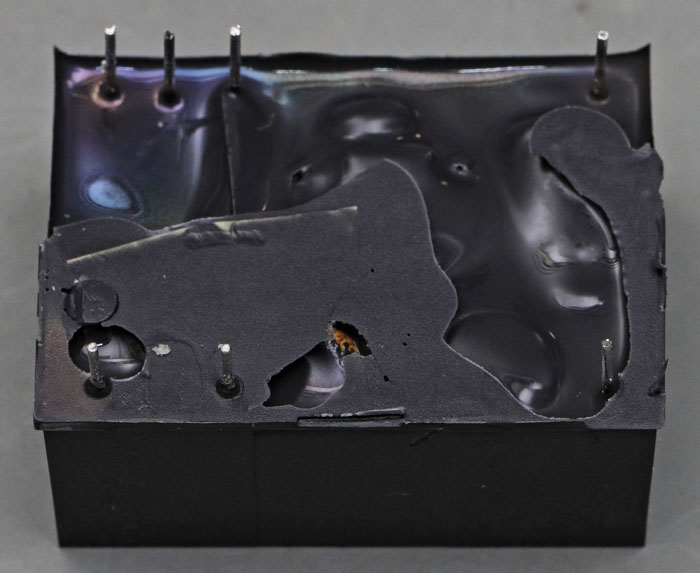
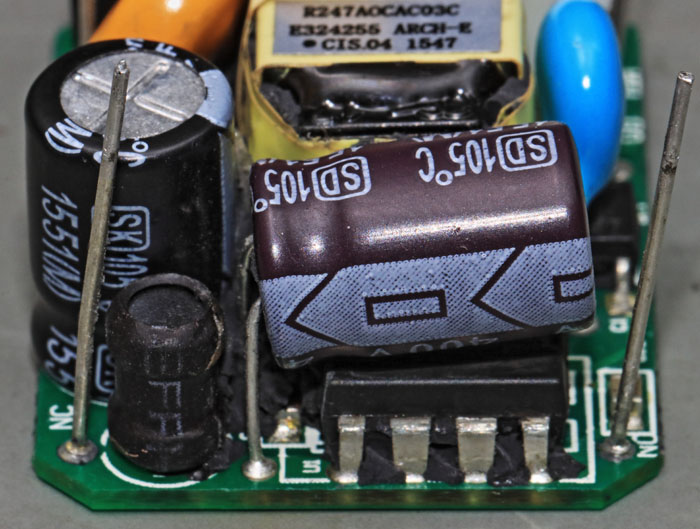
The silicone-like potting can be removed easily. The high packing density of the components is immediately noticeable.


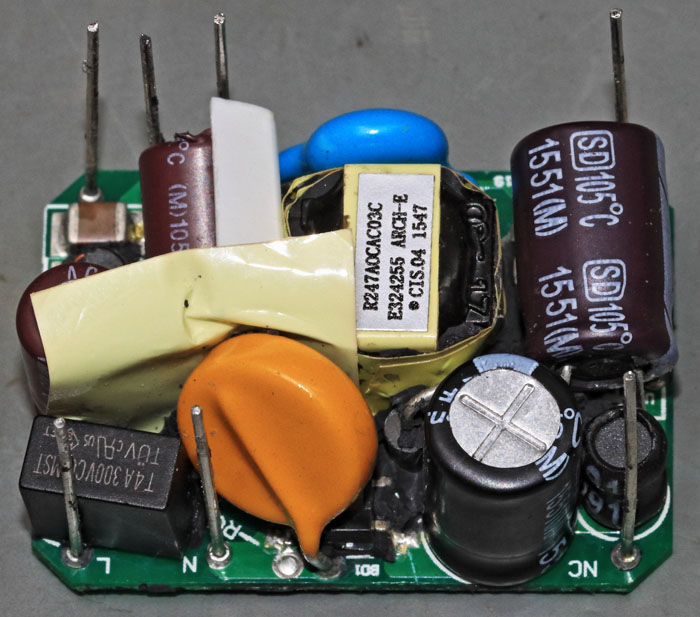
The galvanic isolation between the mains voltage and the output voltage is clearly visible. In the lower and right area are the circuit parts that work with mains voltage. In the upper left corner the low voltage part is built up. The isolation section is bridged in the middle by a transformer and a blue Y1 capacitor.

Since the input and output circuits are directly next to each other at the left edge, an additional foil had to be inserted here for isolation. To the left of the transformer, a plastic element has been inserted, whose function is not quite clear. The transformer itself seems to be sufficiently insulated. Maybe the plastic element guarantees a minimum distance to the Y1 capacitor.


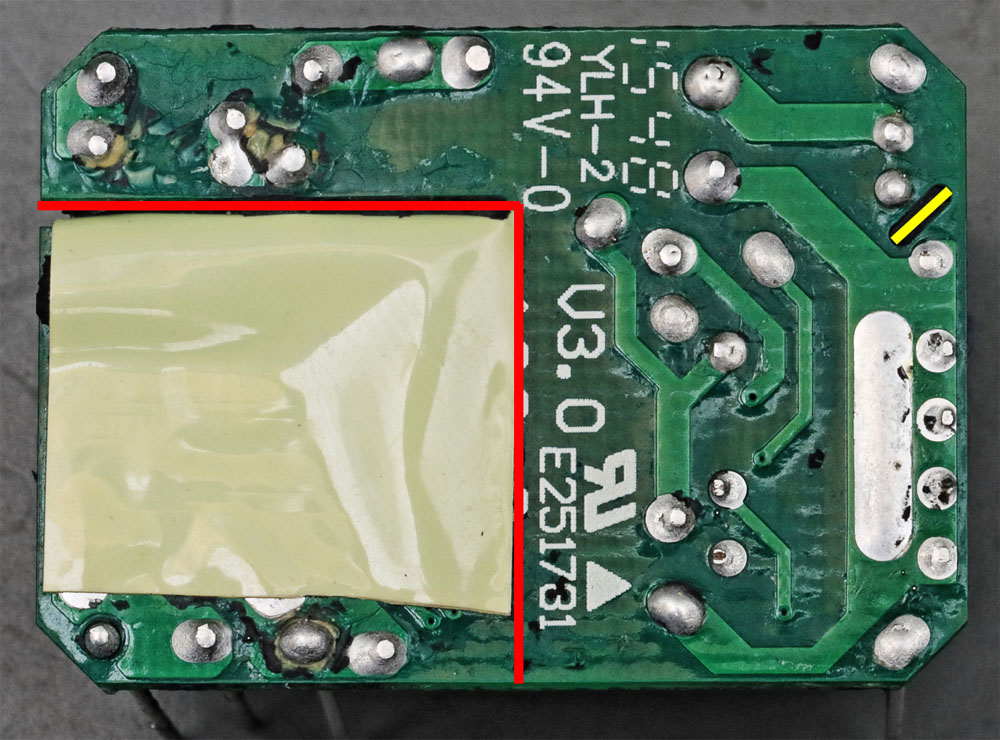
On the bottom side of the board, the foil for isolating the mains voltage has been glued to the low voltage area. At the right edge the potentials of the mains voltage are so close to each other that a slot had to be milled into the board.


If you remove the large elements, the lower components become visible. The damage to the inductor in the upper left corner was done while removing the potting.


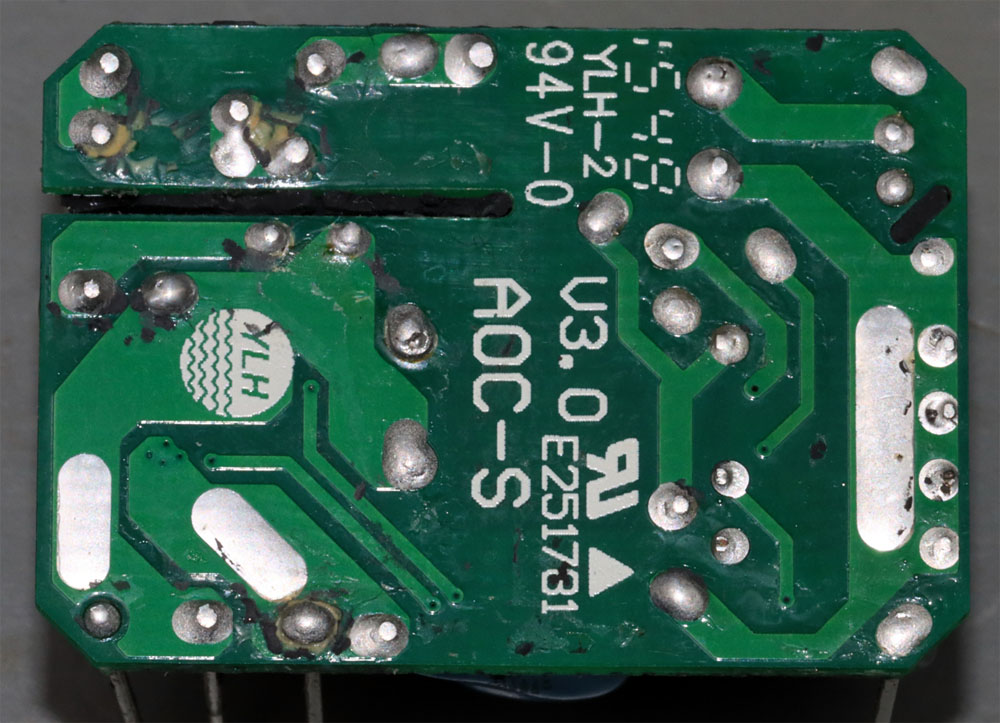
Underneath the insulation foil, it shows that the PCB was manufactured by the Chinese manufacturer YLH Electronics.


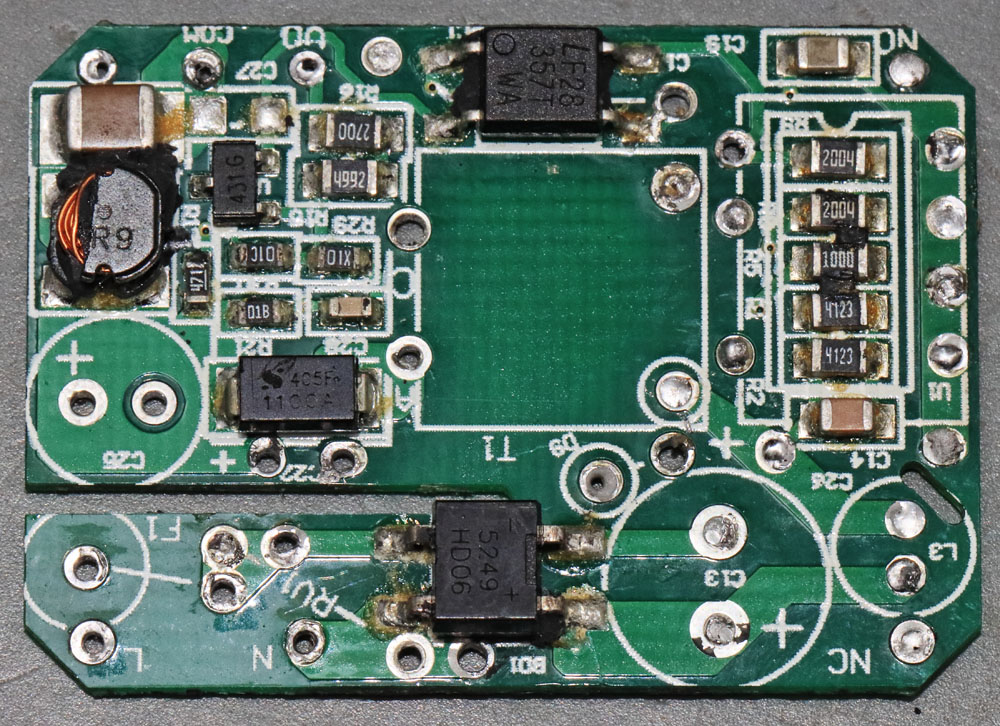
The last components only become visible when the TNY274 is desoldered. Five resistors are soldered under this component.


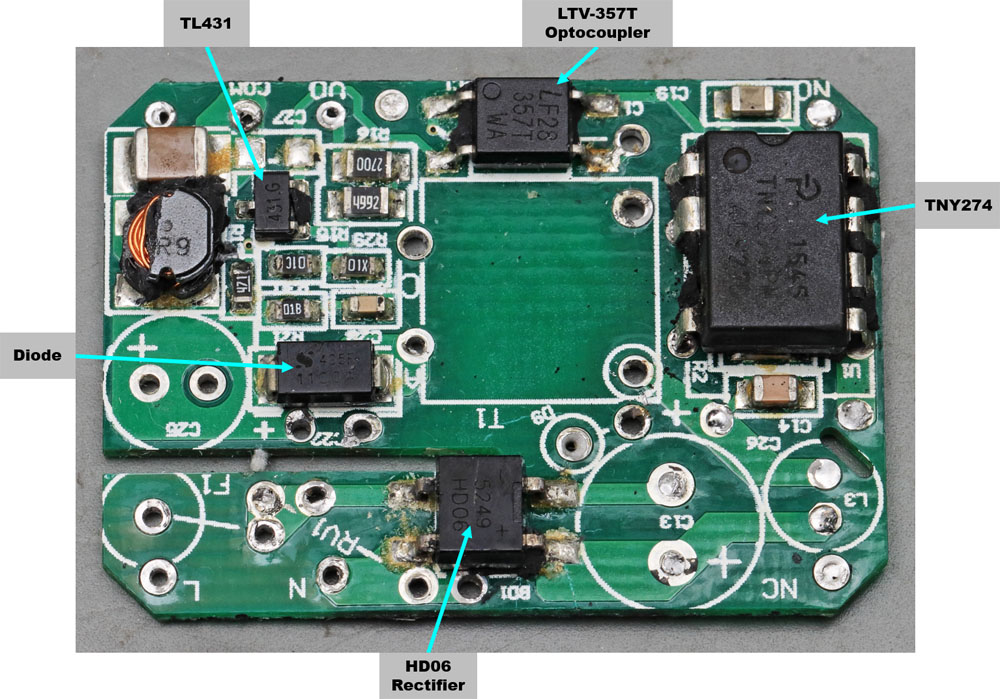
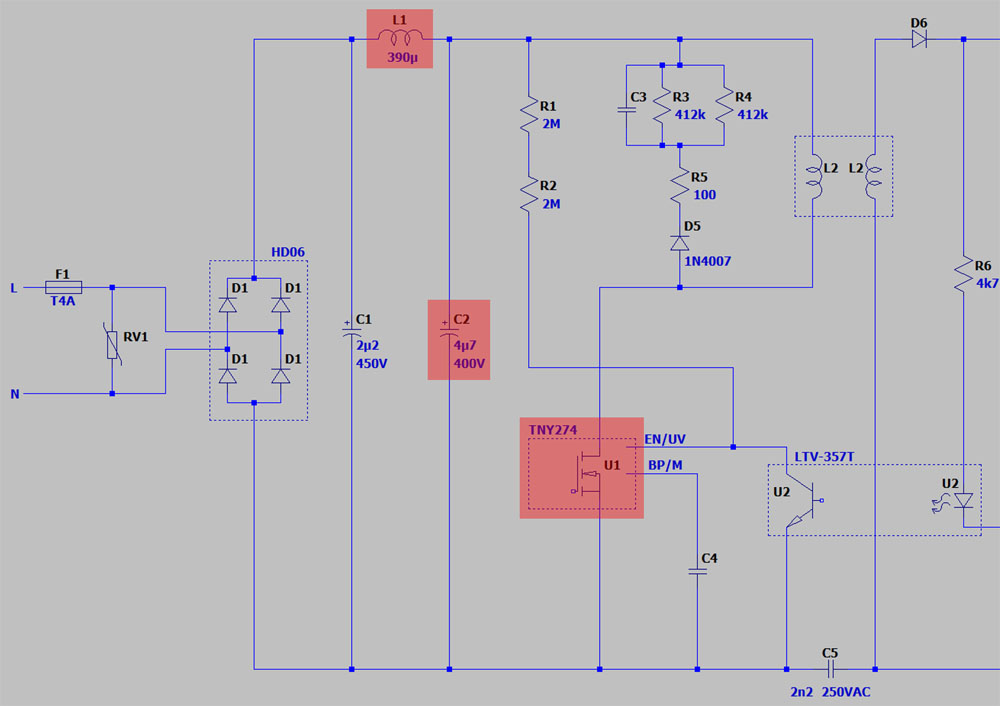
The circuit is not too complex. It is a typical flyback converter. Although the datasheet calls for a 3,15A slow-blow fuse externally, there is an additional 4A slow-blow fuse at the input. This is followed by a 350VAC varistor to protect against overvoltage pulses. The HD06 bridge rectifier safely blocks up to 600V.

On the primary side, two electrolytic capacitors are found, separated by a 390µH inductor. C1 is mainly used for smoothing the rectified line voltage. C2, as an intermediate circuit capacitor, supplies the current peaks that the switching regulator absorbs. The inductance L1 ensures on the one hand that the capacitor C1 is not loaded with the fast current changes and reduces on the other hand the emission of noise into the supply network.

The TNY274 is a switching regulator that contains not only the controller but also the power transistor. It is from Power Integrations' TinySwitch-III family. Its clock frequency is 132kkHz. According to the datasheet, it can provide up to 5W of output power in a sealed package. Parallel to the primary coil of the transformer is the snubber circuit C3/R3/R4/R5/D5, which reduces the voltage peaks when the power transistor is switched off.

The transformer has just two windings. The TNY274 supplies itself directly from the power circuit, more precisely from its drain pin. An internal voltage regulator charges capacitor C4. While the power transistor is active, it serves as energy storage.

On the secondary side, rectification is done via D6. The capacitors C6/C7 absorb the energy packets and thus ensure a smoothed output voltage. The LC filter L3/C8 reduces the emission of high-frequency noise. Resistor R12 provides a minimum load so that the module operates stably even in no-load operation.

The output voltage is compared with the reference voltage of a TL431 shunt regulator. The voltage divider R9/R10/R11 defines the reference voltage. The RC element R8/C5 optimizes the behavior of the circuit at high frequencies. The magnitude of the output voltage defines the current through the LTV-357T optocoupler, which is the feedback of the switching regulator. Through the resistors R1/R2 the switching regulator monitors the mains voltage so that it can switch off in case of undervoltage.


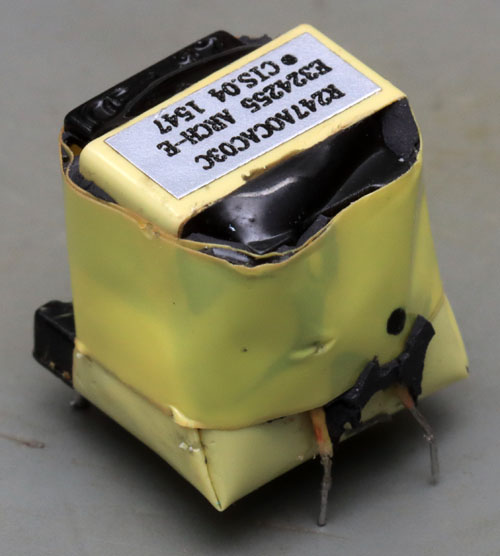
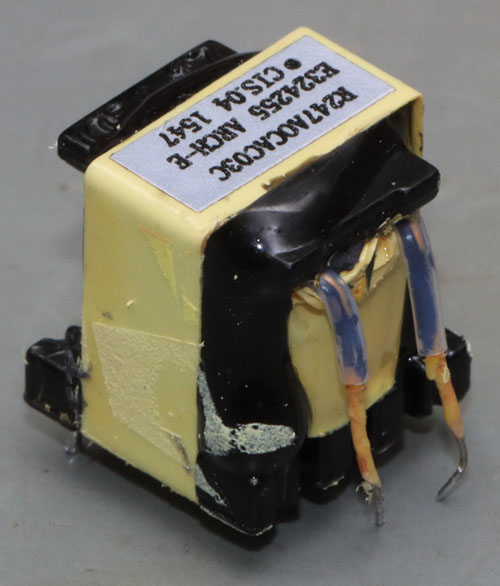
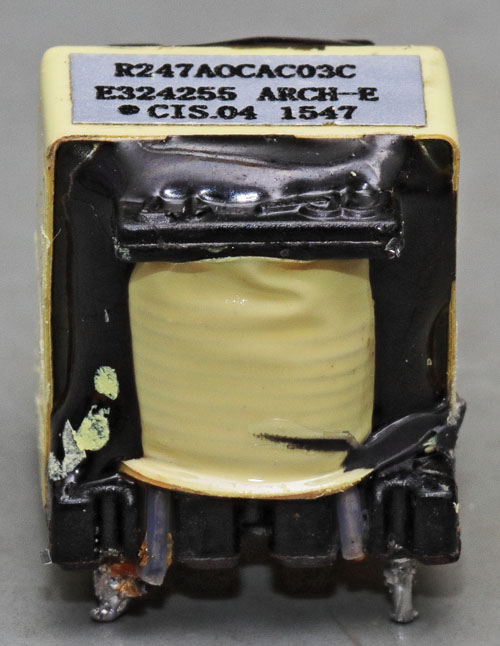
The transformer itself is potted with a hard black compound. The thicker leads of the secondary side were guided through the plastic body and fix the transformer to the PCB. The thin wires of the primary side run through the transformer body to the PCB without any guide. The wires from the primary and secondary sides are additionally insulated with tubing. The distance and the additional insulation are necessary to be able to represent the reinforced insulation against the mains voltage.


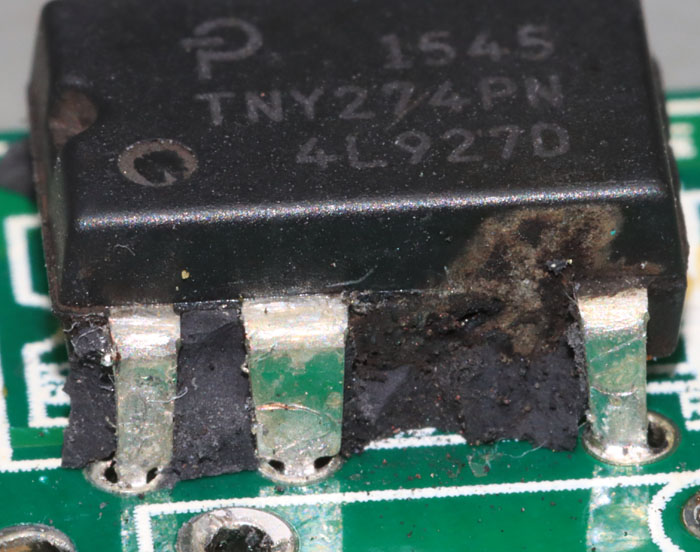
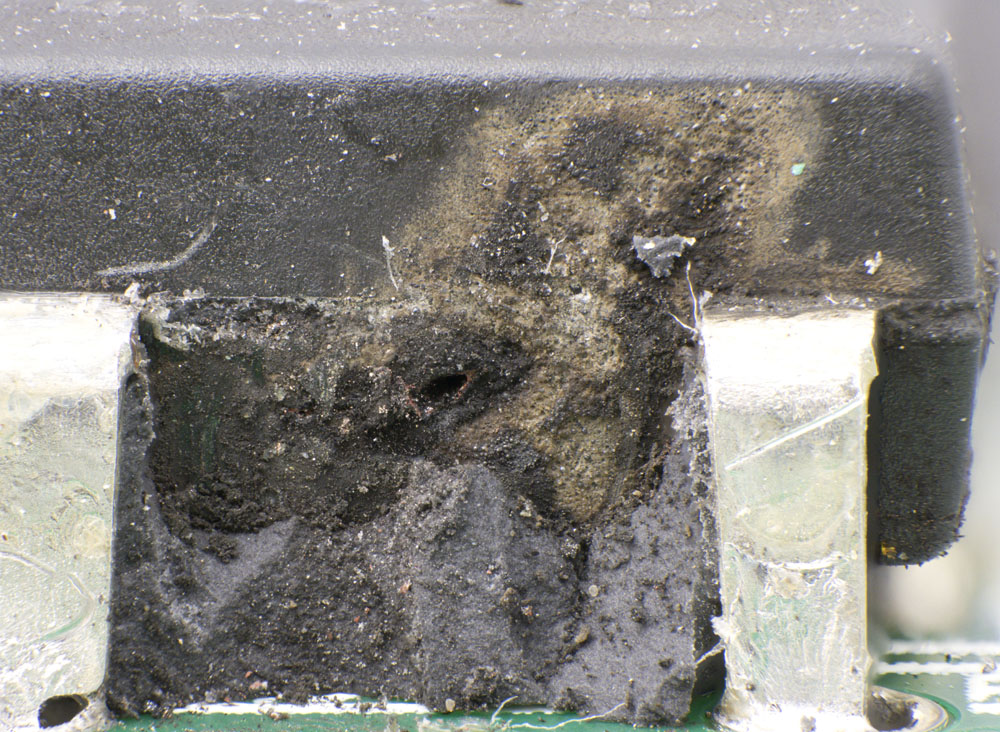
A closer look reveals that the switching regulator is definitely destroyed. A hole has burned into the side of the case and the surface of the case shows traces of a plasma.


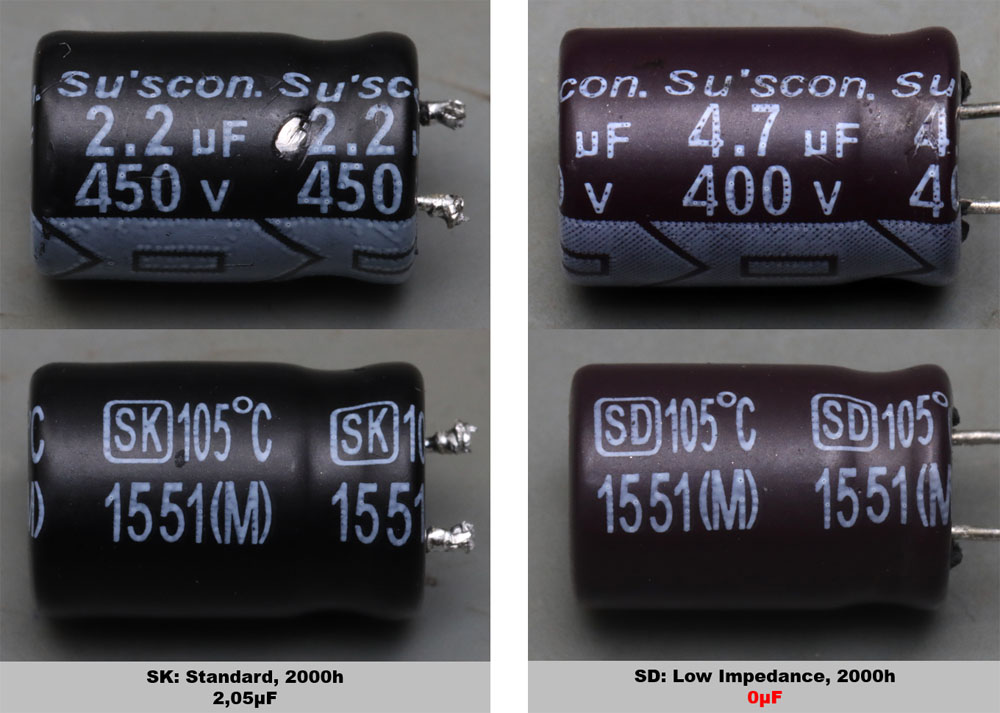
Two different electrolytic capacitors from the Taiwanese company Su'scon are used on the primary side. The less heavily loaded capacitor, which is mainly responsible for smoothing the rectified mains voltage, is one of the standard SK series capacitors. Directly on the switching regulator is an SD type with a reduced internal resistance. The lifetime of both types is specified at 2000 hours (at maximum current and temperature load). On the output side, on the other hand, there are KY capacitors from Nippon Chemi-Con with a estimated lifetime of 5000h.

It turns out that the capacitor on the switching regulator no longer offers any capacity at all.


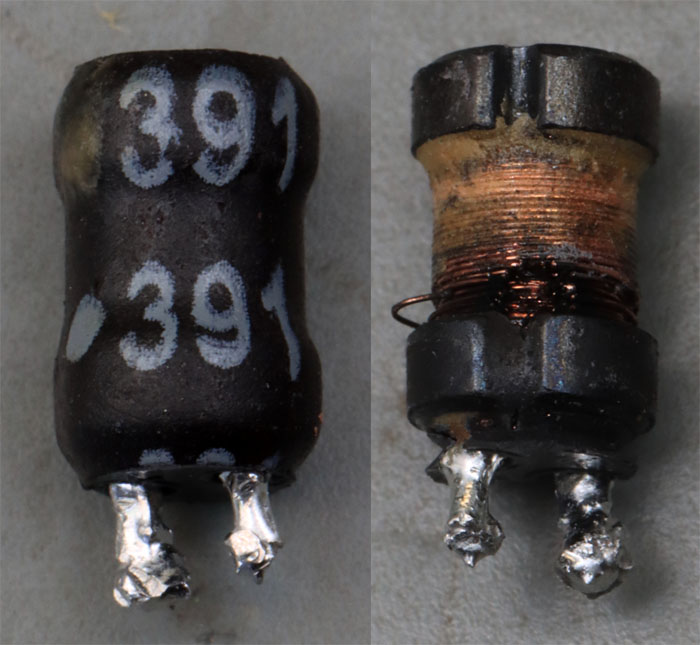
The inductance between the two electrolytic capacitors is defective too. This becomes clear when you remove the heat shrink tubing.


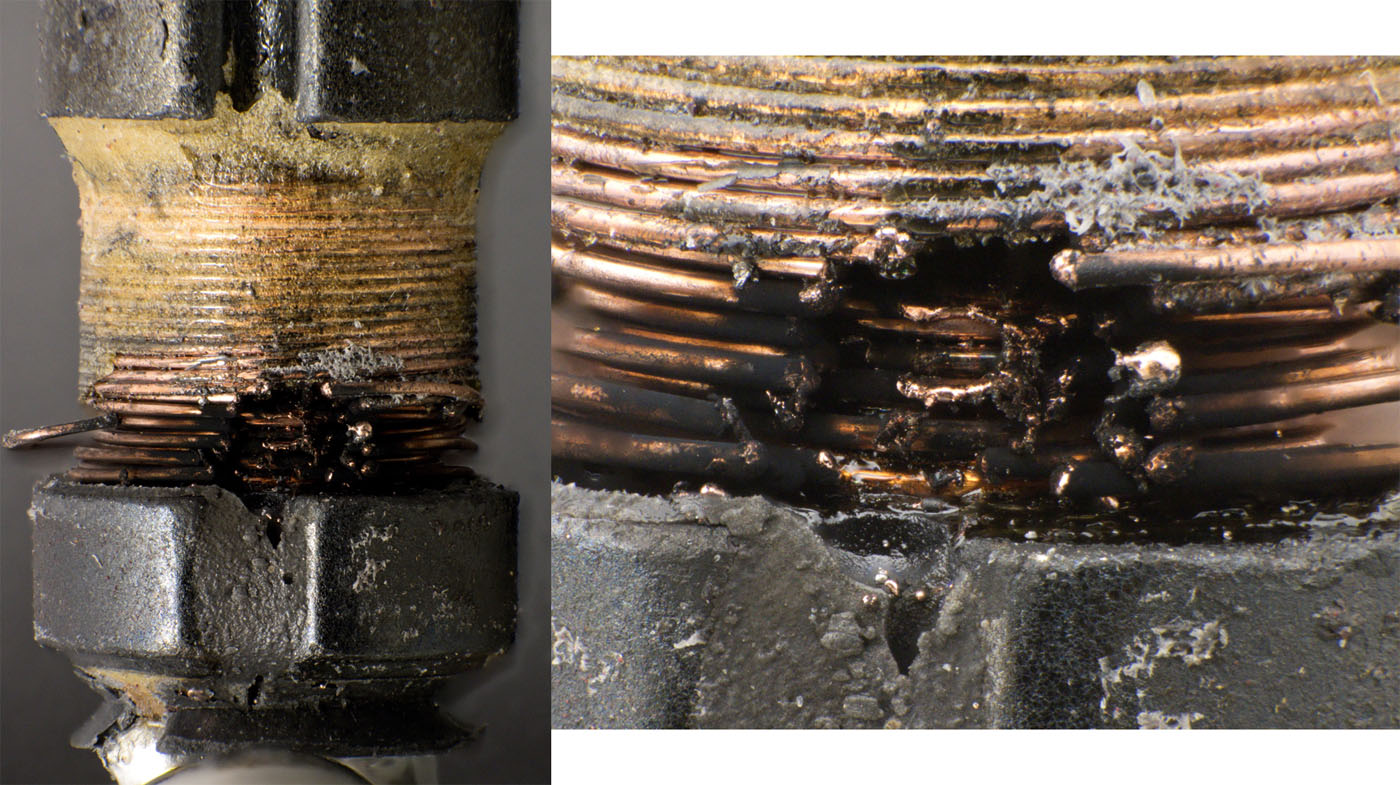
Where normally the wire of the inductor is led to the pin on the bottom side, a massive damage shows up. Several turns have melted open.


The damage of the inductance L1 could be caused by the defect of the switching regulator U1. However, this does not explain the missing capacitance of capacitor C2. It seems most likely that this capacitor was the starting point of the damage. Without sufficient capacitance at the input of the switching regulator, its supply voltage fluctuates very strongly. The inductance L1 can then even generate overvoltages. It was probably this instability that caused the switching regulator to be overloaded and eventually destroyed. The short circuit in the switching regulator then led to an overload of the inductance L1. It is quite possible that this was already overloaded before, because without the capacitor C2 much stronger current fluctuations had to be supplied from the capacitor C1. However, the inductance L1 did not interrupt the current flow like a fuse. This is shown by the many melted windings. In the end, the external fuse tripped.


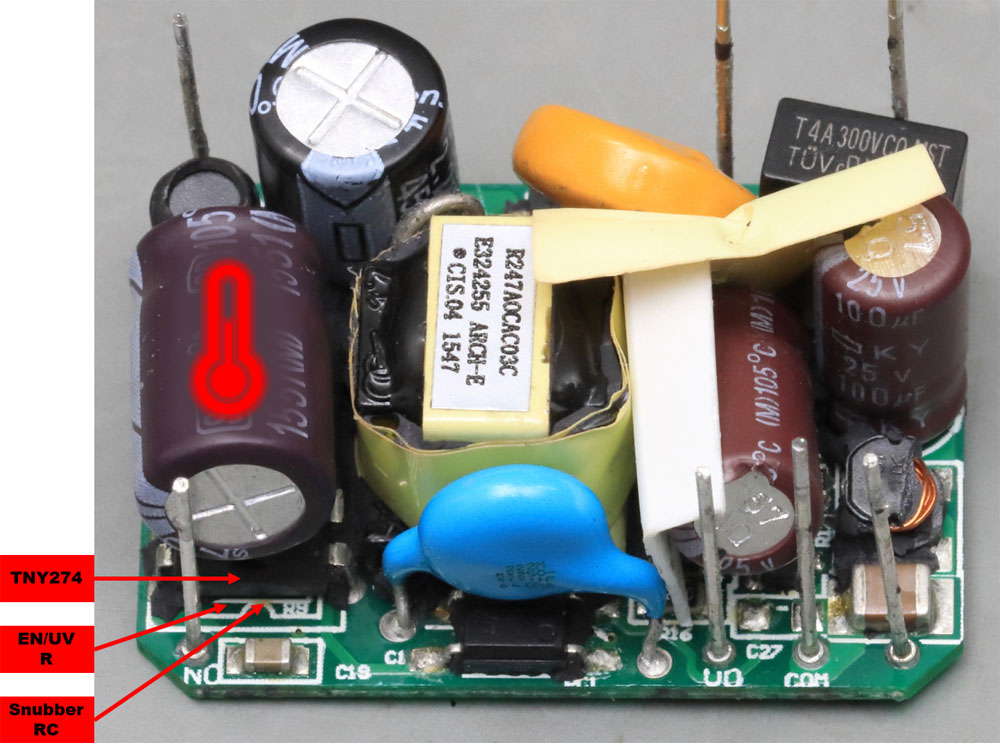
If you look at the setup, it's not surprising that capacitor C2 finally led to the defect of the module. It is located directly above the switching regulator, which according to the datasheet can reach temperatures of up to 110°C at its pins. In addition to the power dissipation of the switching regulator, there is also the power dissipation of the components underneath the module (voltage measurement and snubber). The maximum permissible operating temperature of the capacitor, on the other hand, appears to be very low at 105°C, since it is also subject to a certain amount of self-heating due to its current load. The relatively short specified lifetime of 2000 hours in combination with the high load then ensures early failures.

The TNY274 datasheet specifies a rated power of 5W when used in a sealed enclosure. Traco Power specifies the TMLM family at only 4W. The reason for this is probably the limited and encapsulated installation space, which makes heat dissipation more difficult. The maximum operating temperature of the TMLM modules, which is only 60°C, also shows how critical this point is.


https://www.richis-lab.de/TMLM04115.htm

 :-/O


...you are right, there is no die picture...  ;D
 
The following users thanked this post: SeanB, doktor pyta, RoGeorge, MegaVolt

Online RoGeorge

  • Super Contributor
  • ***
  • Posts: 6203
  • Country: ro
Re: Voltage regulators - die pictures
« Reply #124 on: March 25, 2023, 03:39:20 pm »
there is no die picture...  ;D

...only "when regulators die" pictures.  8)


Share me

Digg  Facebook  SlashDot  Delicious  Technorati  Twitter  Google  Yahoo
Smf