How to restore original firmware/NANDimagine you screwed something up and wish to restore the firmware to the original version
(which you of course saved before wth the backup tools from this thread ... you don't? Well do it now.
If it's already too late then send me PM, i can help you to restore your DSO)There are two ways :
- over JTAG
- over UART/USB
As most ppl don't have a nice H-JTAG USB (or whatever ARM JTAG) i will skip here the restore over JTAG part,
because if you have one you know how to use it
(all you need in principle is to flash in raw mode, so with OOB blocks the combined backup file fw_backup.bin and reboot)
Restore over UART/USBYou need some tools:
- dnw.exe
- supervivi.bin
- vivi.bin (just in case, see later why)
These tools are attached already here:
https://www.eevblog.com/forum/index.php?action=dlattach;topic=1571.0;attach=4153The dnw.exe need a device driver and inf file, you can find them here:
(from
http://www.friendlyarm.net/downloads page)
http://www.friendlyarm.net/dl.php?file=usb-downloaddr-setup_20090421.ziphttp://www.friendlyarm.net/dl.php?file=usb-downloaddr_20090421.zipThe first one is complette setup program, the second just inf/device drive, use the one you like, both works
For Win64 users: i know there are some dnw.exe/drivers out there for Win64, search for them or use Win32 to restore
Now the first step is to create a complette restore file, the backup tool from this thread is creating 3 dumps:
boot.bin
kernel.bin
root.bin
They are only MTD partitions backups (with NAND OOB blocks), what missing is some empty space
which has been not saved during backup and NAND MTD endblock.
You can find them here:
(
https://www.eevblog.com/forum/index.php?topic=1571.msg26930#msg26930)
https://www.eevblog.com/forum/index.php?action=dlattach;topic=1571.0;attach=4903https://www.eevblog.com/forum/index.php?action=dlattach;topic=1571.0;attach=4904Download these two files, put them into a folder with boot.bin, root.bin and kernel.bin
and run from dos prompt following:
copy /B boot.bin + blank.bin + kernel.bin + root.bin + mizi_tag.bin fw_backup.bin
The resulting
fw_backup.bin is the full backup wich we need to proceed with restore.
Now connect your DSO over UART to your PC, open the terminal application, connect to whatever com port your
DSO is connected to (set 115200, 8n1) and power up your DSO.
While powering up try multiple times to hit space key, if the boot process have not stopped at following screen power off DSO
and try again until you see something like that :

This is the bootload prompt. Unfortunately the original Tekway/Hantek bootloader have NO USB support
so we have first to upload another one bootloader (with USB support) - that's the supervivi.bin
IMPORTANT: use only the supervivi.bin provided by me, if you use different version the restore might not work properly
or you screw up the MTD patritions.
To do this type in the bootloader prompt following:
load flash vivi xand click enter. Now in your terminal application (i'm using hyperterm, sure not the best solution but it works)
chose "Transfer->send file", select the supervivi.bin, select Xmodem as protocol
(the
x in what you typed in bootloader prompt means Xprotocol too).
Now you should see somehing like this picture:

After this step reboot your DSO, hit again during boot multiple times space key until the DSO stop at such screen:
 to get the bootloader menu system:<br /><br />[img]https://www.eevblog.com/forum/index.php?action=dlattach;topic=1571.0;attach=17584)

The next step is to connect the DSO over USB and to install the device drivers to allow dnw.exe to communicate
with DSO. After you installed drivers run the dnw.exe, if everything worked you should see
in the dnw.exe top status line something like USB:OK

If you see this you can continue with fw/NAND restore, if not close dnw.exe, reconnect USB cable and try again.
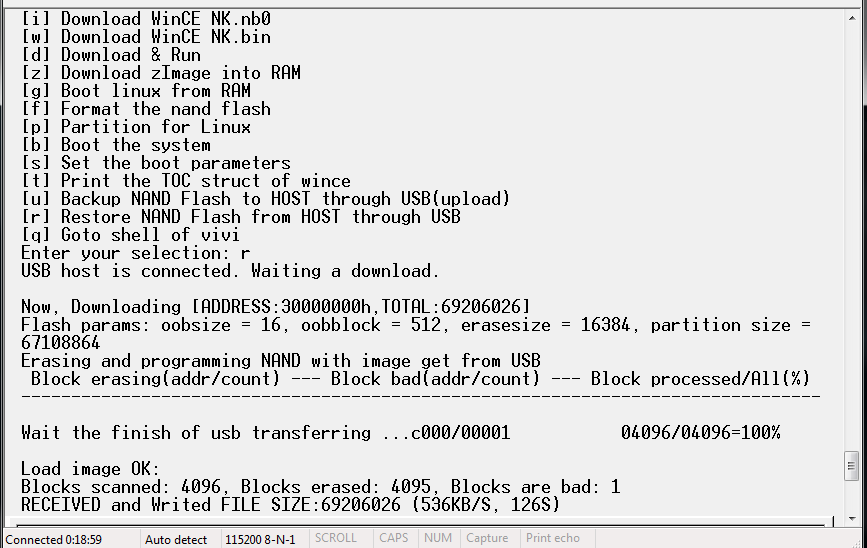
Now type in the supervivi bootloader menu "r" - this means restore, immediately after that in dnw.exe menu
chose "Usb Port->Transmit/Restore" and chose the previously created full backup
fw_backup.binDon't wait too long, dnw.exe is sometimes really bitchy with timeouts.
You should see now in the dnw.exe and your terminal application the transfer/flashing progress:


After the supervivi bootloader flashed the NAND with your fw_backup.bin the menu will be shown again, just
scroll back to see the flashing status, here my example (note, my NAND have one bad block, not a bog deal):
That's all, now close dnw.exe, disconnect USB cable from DSO and reboot DSO - you will have
now your original firmware restored.
Note: if you have too many bad NAND sectors the restore might not work, then you will have to buy new empty NAND chip,
solder it and repalce the broken one and of course use ARM JTAG to program the NAND backup (or at least the bootloader).
Extra note: after restore the bootloader is again the original HanTekway vivi.bin (the same as the attached),
if you lazy you can remove it of course by the supervivi.bin - the DSO will still work and you will have
nice way (over USB/dnw.exe) to backup/restore NAND (if you hacking often and have no JTAG cable this is the fastest way)


