-
So, it looks like I have what I need, Ardunio uno, breadboard , Ardunio IDE which also installed Avrdude. But I still do not understand how to get the Hex and eprom file into the ardunio world? Like I keep trying to get across , all the tutorials on using the arduinio as a ISP, show loading the blink sketch into a blank micro which is already in the sketch folder and it's a INO type. I need to know how to get a non INO file into (I guess) the sketch folder, is this right? Also what is this Makefile thing? Does it have to be loaded into the sketch too. And how do load/start Avrdude, which you guys say is included in the Ardunio IDE, I didn't see it anywhere in the menu's? Totally frustrated! Why can't this stuff be drag and drop!
The *.hex and *.eep files are there and they are the compiled files from the C sources (*.ino files) that are also there. Just get the compiled files and use them.
AVRdude is called automatically when you upload the bin files to the Arduino. You need explicitly call the AVRdude in the command line when you are not using Arduino IDE. Only in the last case you need to write the AVRdude command I wrote in an older post.
-
"Just get the compiled files and use them", could you clarify that statement-How do you do that?, I don't understand. How do I upload the bin files to the Arduino IDE? Where do I put them in the Arduino IDE? I have downloaded the file folder called Component-tester 1.34m, there are tons of files, which files do I use? There is a ton of .c ,.h, files, I see no .eep files. Am I to assume that the .h is the .hex files? I have the M328kit as shown in the previously posted PDF.
No, *.h files are not *.hex. The *.h are headers for the C source files *.c and you can open them with a text editor. The *.hex files (you can also open it) are machine commands for the MCU and they are in hexadecimal text format.
Inside the repository https://www.mikrocontroller.net/svnbrowser/transistortester/Software/trunk/mega328_color_kit/ you will find the *.hex and *.eep files for the mega328 color display. If you go to the parent directory you will find other versions (*.hex and *.epp) as well as all the source files (*.h and *.c)
You can always use the *.c files but you have to re-compile. If you want to re-compile from the sources, then you have to use the Arduino IDE, but instead, if you want to use directly the *.hex and *.eep files, you have to use the command line AVRDude+external programmer (like USBAsp) without the Arduino hardware or IDE itself.
Of course it is possible to use the Arduino UNO as a Programmer and the breadboard with ATMega328p connected, but personally, I did not use it before. You can find more info for the last solution at
https://www.arduino.cc/en/Tutorial/ArduinoToBreadboard
https://www.instructables.com/id/Program-ATmega-328-Using-Arduino-Arduino-As-ISP/
-
Hi everybody.
it's been a while (like 2 years) that I want to buy a meter like this but I always postponed for various reasons.
I did read the thread in this long time, and I am asking you if something changed speaking about models/revisions.
I had in plan to get one of these (seems the same, just different color?).
Is there anything better as of 2019, keeping in mind that I'd like to use one of the enhanced firmwares?
Have a nice day,
Chicco -
The one with the black PCB seems to be pre-assembled (?), since it mostly uses SMD parts.
You might want to check whether it also uses a SMD version of the ATmega328P microcontroller, or if it still uses the more conventional DIP version.
If it's the SMD version, you might find it harder to flash new firmware onto it via SPI compared to just removing the DIP package from its socket and plugging it into a breadboard.
I own the red AY-AT variant. -
The one with the black PCB seems to be pre-assembled (?), since it mostly uses SMD parts.
You might want to check whether it also uses a SMD version of the ATmega328P microcontroller, or if it still uses the more conventional DIP version.
If it's the SMD version, you might find it harder to flash new firmware onto it via SPI compared to just removing the DIP package from its socket and plugging it into a breadboard.
I own the red AY-AT variant.
Thank you towe96.
Apart from "Preassembled/Kit", and "SMD/DIP atmega 328P" any other difference between these kind of models? I'll try to catch one with DIP 328p for sure, but in case I can't find one no problem to program via SPI.
Any modification needed/suggested required to the board?
Never knew what "AY-AT" variant is reffered to, but from what you say It seems that the ones I linked are quite great for what I want to do.
Have a nice day,
Chicco -
Both are AY-AT based clones. There are also a few testers with ATmega 644 (more flash) but they don't use the additional I/O pins for hardware options. At the moment the AY-AT is still the best choice when buying. If you want all the cool stuff you have to DIY.
-
Both are AY-AT based clones. There are also a few testers with ATmega 644 (more flash) but they don't use the additional I/O pins for hardware options. At the moment the AY-AT is still the best choice when buying. If you want all the cool stuff you have to DIY.
Is there a wiki/docs somewhere that maps the common asian boards to the build parameters required for the current firmware?
-
Karl-Heinz provides a precompiled k-firmware for several clones (see the Makefile for settings). For the m-firmware you'll find settings for a few clones in the "Clones" file.
-
Both are AY-AT based clones. There are also a few testers with ATmega 644 (more flash) but they don't use the additional I/O pins for hardware options. At the moment the AY-AT is still the best choice when buying. If you want all the cool stuff you have to DIY.
Thanks, nice.
If it's still the best choice I'll go with it
also "boffin" asked a good thing. I extend that question to know if there's some wiki/repo where we can find the possible/recommended modification, even hardware ones. No problems DIYing
Thank you all for the great info.
Chicco -
Karl-Heinz' documentation is a good starting point: https://github.com/madires/Transistortester-Warehouse/tree/master/Documentation
-
What are the main differences between K and M versions ?
-
The differences are explained in the m-firmware's README file. The m-firmware doesn't support the SamplingADC, but it offers an IR RC decoder, IR RC sender, dedicated optocoupler check, servo check, OneWire (DS18B20), touchscreen, remote control interface via serial port, and some measurements/checks are done a little bit different.
Can't find the Readme file, can you point me the exact url link? -
The README file is in the tar.gz source code package.
-
Does someone with a ST7036 display like to test the m-firmware's new ST7036 driver?
-
Hi!
I got yesterday my new, clone measuring tool from ebay, where I don't know which is my version of my FW.
I read lot posts here and sorry if I jump over the answer...
I have several questions because I'm really confused now:
I found this link with great resources about this tool ( probably most of you know this link ):
https://yadi.sk/d/yW8xa5NJgUo5z
There is two jpg, one is labeled with:
LCR-T4(T3)NoStripGreed ( actually this is my hardware )
And one is labeled with:
LCR-T4(T3)StripGreed
So, what this means "StripGreed" & "NoStripGreed" ?
Which version of firmware is maybe better? Or how to determine the right version?
1.13K or 1.13M ?
Or even can I mix up the versions?
Now I have an 8MHz oscillator on my pcb, is it prefferable to change it to 16MHz?
I can see there is the same unit with 8 and 16MHz osc...
Thank you for any suggestion.
-
I have several questions because I'm really confused now:
I found this link with great resources about this tool ( probably most of you know this link ):
https://yadi.sk/d/yW8xa5NJgUo5z
There is two jpg, one is labeled with:
LCR-T4(T3)NoStripGreed ( actually this is my hardware )
And one is labeled with:
LCR-T4(T3)StripGreed
So, what this means "StripGreed" & "NoStripGreed" ?
Whether attentively you read the user guide from the author?
https://www.mikrocontroller.net/svnbrowser/transistortester/Doku/trunk/pdftex/
It is necessary to read STRIP GRID, but not STRIPGREED
On page 10 of a manual there is a description:
"The software can follow to another pin assignment of port D for a simpler connection of the LCD display. The following table 2.2 shows the modifies assignments for the strip grid layout and the alternativ connection of a graphical display for the micocontrollers ATmega328."Compare schematic circuits on these clones and you will see a difference in connection of the display to PD ports.
In a manual there are also answers to other your questions.
-
Oh, my fault, thank you so much for this explanation.
I didn't got for what is that "strip grid" standing for.
I will re-read again that doc from the link you sent.
Thank you. -
Which version of firmware is maybe better? Or how to determine the right version?
1.13K or 1.13M ?
Or even can I mix up the versions?
The current m-firmware is 1.35m (soon 1.36m ). The README file of the m-firmware explains the differences briefly. The main difference is that the k-firmware supports the SamplingADC for measuring low value caps and coils, and that the m-firmware offers several additional features like IR RC receiver/decoder, IR RC sender, servo tester and so on. I'd suggest to get another tester and run both firmwares.Now I have an 8MHz oscillator on my pcb, is it prefferable to change it to 16MHz?
I can see there is the same unit with 8 and 16MHz osc...
Yes, it doubles the limit of anything frequency related and improves time related measurements, e.g. max. squarewave frequency, frequency counter and inductance measurement. It also speeds up the display output (matters for color displays). -
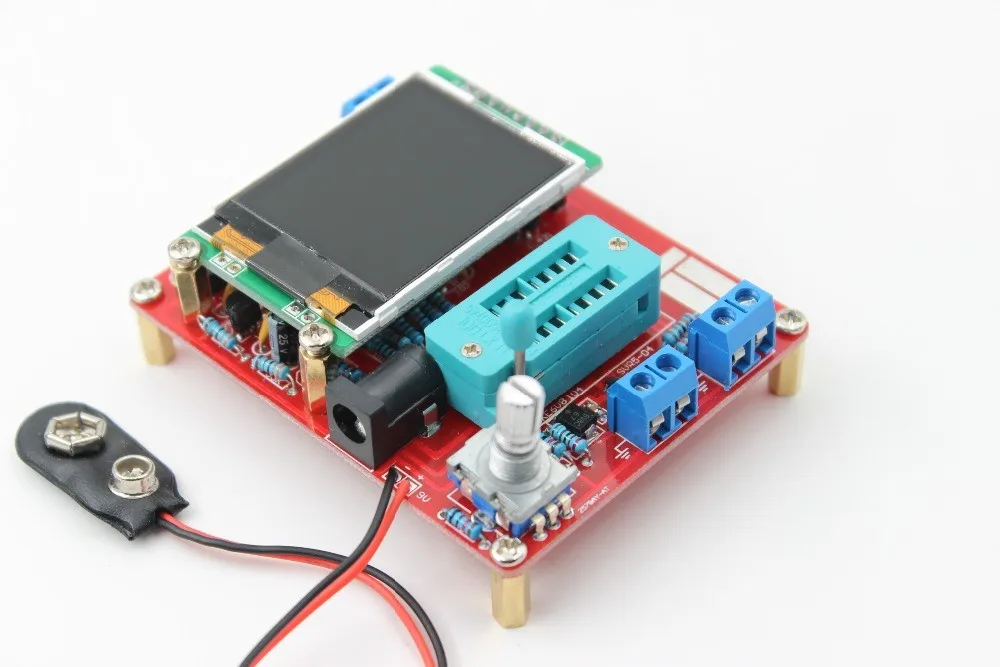
Hi,
I have a GM328A+TFT. I want to install the firmware 1.34mRus(8MHz).zip from CloneTtester. I have create a new folder and i've decrompressed the file from ComponentTester-1.35m. After i've decompressed the firmware 1.34mRus(8MHz).zip in this folder. I replaced the for english in my config.h.
I open with WinAVR Makefile and follow the WINAVR [Make All]. But i have these errors.
> "make.exe" all
0 [main] sh 9940 sync_with_child: child 5456(0x1D8) died before initialization with status code 0xC0000142
57296 [main] sh 9940 sync_with_child: *** child state waiting for longjmp
/usr/bin/sh: fork: Resource temporarily unavailable
avr-gcc -mmcu=atmega328 -Wall -mcall-prologues -I. -Ibitmaps -DF_CPU=8000000UL -DOSC_STARTUP=16384 -gdwarf-2 -std=gnu99 -Os -funsigned-char -funsigned-bitfields -fpack-struct -fshort-enums -MD -MP -MT main.o -MF dep/main.o.d -c main.c
main.c: In function 'main':
main.c:1239:3: error: 'POWER_DDR' undeclared (first use in this function)
POWER_DDR = (1 << POWER_CTRL); /* set pin as output */
^
main.c:1239:3: note: each undeclared identifier is reported only once for each function it appears in
main.c:1240:3: error: 'POWER_PORT' undeclared (first use in this function)
POWER_PORT = (1 << POWER_CTRL); /* set pin to drive power management transistor */
^
main.c:1331:9: error: 'BUTTON_PIN' undeclared (first use in this function)
if (!(BUTTON_PIN & (1 << TEST_BUTTON))) /* test button pressed */
^
make.exe: *** [main.o] Error 1
> Process Exit Code: 2
See lines:
Line 1239 POWER_DDR = (1 << POWER_CTRL); /* set pin as output */
Line 1240 POWER_PORT = (1 << POWER_CTRL); /* set pin to drive power management transistor */
Line 1331 if (!(BUTTON_PIN & (1 << TEST_BUTTON))) /* test button pressed */
Thanks for your help and sorry for my english
-
Presumably you're using an outdated config_328.h.
From the CHANGES file for 1.35m:
- Separated pin configuration for test push button and power control
(CONTROL_PORT -> POWER_PORT and BUTTON_PORT). -
Hi,
I use the config_328 included in ComponentTester-1.35m.
With rotary does anyone know what we can do ?
Thanks
-
Do you have following in your config_328.h?Code: [Select]
/*
 *  power control
 */

#define POWER_PORT       PORTD     /* port data register */
#define POWER_DDR        DDRD      /* port data direction register */
#define POWER_CTRL       PD6       /* controls power (1: on / 0: off) */


/*
 *  test push button
 */

#define BUTTON_PORT      PORTD     /* port data register */
#define BUTTON_DDR       DDRD      /* port data direction register */
#define BUTTON_PIN       PIND      /* port input pins register */
#define TEST_BUTTON      PD7       /* test/start push button (low active) */
For the rotary encoder (GM328A is AY-AT):Code: [Select]#define ENCODER_PORT PORTD /* port data register */
#define ENCODER_DDR DDRD /* port data direction register */
#define ENCODER_PIN PIND /* port input pins register */
#define ENCODER_A PD1 /* rotary encoder A signal */
#define ENCODER_B PD3 /* rotary encoder B signal */
and in config.h:Code: [Select]#define HW_ENCODER
#define ENCODER_PULSES 4 /* usually 4 pulses per step */
#define ENCODER_STEPS 20 /* usually 20 detents */ -
Hi madires,
I modified all parameters and now i have a new error.
0 [main] sh 12708 sync_with_child: child 1236(0x1CC) died before initialization with status code 0xC0000142
59229 [main] sh 12708 sync_with_child: *** child state waiting for longjmp
/usr/bin/sh: fork: Resource temporarily unavailable
avr-gcc -mmcu=atmega328 -Wall -mcall-prologues -I. -Ibitmaps -DF_CPU=8000000UL -DOSC_STARTUP=16384 -gdwarf-2 -std=gnu99 -Os -funsigned-char -funsigned-bitfields -fpack-struct -fshort-enums -MD -MP -MT main.o -MF dep/main.o.d -c main.c
In file included from main.c:24:0:
config.h:802:26: error: 'CAP_PCB' undeclared here (not in a function)
#define C_ZERO CAP_PCB + CAP_WIRES + CAP_PROBELEADS
^
variables.h:108:31: note: in expansion of macro 'C_ZERO'
#define NV_C_ZERO C_ZERO
^
variables.h:112:77: note: in expansion of macro 'NV_C_ZERO'
const Adjust_Type NV_Adjust_1 EEMEM = {R_MCU_LOW, R_MCU_HIGH, R_ZERO, NV_C_ZERO, UREF_OFFSET, COMPARATOR_OFFSET, LCD_CONTRAST, 0};
^
make.exe: *** [main.o] Error 1
> Process Exit Code: 2
Thanks for your help