Just for interest's sake, is it possible to buy a replacement lens or will that also need recalibration? And how much would it cost?
I very much doubt that the problem results from the lens. Something at the surface of the lens will be so much out of focus, it would be hard to notice it. Definately not only 4-5 pixel wide. More likely something lays on the sensor. Maybe a piece of plastic (from mounting)
You may screw out the lens completely and then blow directly onto the sensor and you can also clean the bottom side of the lens. Even turning it only a few degrees will show if the spot moves too.
I noticed a spot on my lens, which I tried to clean with a Q-Tip soaked in some isopropyl alcohol and canned air. The spot is still there but now I have a small circular spot on my thermal images as well  It's quite hard to see after powering up the E4, but gets more prominent after some time. That circle is shown to be a little warmer than the surrounding environment, except when I point the camera to a hot surface, then it seems to be colder.
Since any dirt on the lens should be out of focus (?), did I somehow manage to move dust or oil droplets inside the housing to the sensor surface by blowing on the lens?
I had a spot in my image as well, see the picture in my post
https://www.eevblog.com/forum/testgear/flir-e4-thermal-imaging-camera-teardown/msg329239/#msg329239It behaved much like yours, seeming warmer than the surrounds, except when pointing at something hot.
This turned out to be a speck of dust on the sensor. I took the camera apart as per mikes instructions and used a camera sensor dusting ball to clean it after which the spot was gone.
If you do, be very careful to mark the original position of the lens, if it's off just a tiny bit you'll be pretty far out of focus at infinity (it took me several iterations to get it back even though i marked it well).
Also, download the full E4 manual from FLIRs site and browse to page 21. There you have directions for cleaning the lens, including recommended liquids.
Cotton wool with IPA at concentrations ABOVE 30%, among many other much stronger solvents, is recommended. I doubt you have damaged it.
http://support.flir.com/DocDownload/Assets/92/English/T559828-en-US$AB.pdfEdit: Added manual URL
Blimey, I just read the manuals section on lens cleaning. I am surprised at the content, but they make the things, so know best. I personally would not worry too much about IPA on a Germanium lens if care is used, but going near it with acetone makes me shiver because acetone can be so harmful to plastics. The lens holder must be resistant to solvents ?
Yeah, i'd probably stay away from acetone. Hell, i'd stay away from touching the lens with anything unless absolutely required.
I mainly wanted to set his mind at ease regarding possible damage to the lens, i'm not really looking to give out maintenance tips..

Indeed.
I have seen a 'blooming' effect on glass lenses after the use of IPA. It may be that the lens just needs a very gentle wipe with a glasses cleaning microfiber cloth after 'huffing' on the lens ? Very low risk if you are gentle and it may solve the 'halo' problem
I thought the floors and some of the chairs in there would have been a LOT hotter...
Actually, the thermal camera cannot see through the glass. It's only the MSX outlines (from the regular camera) of the chairs etc inside the building that you are seeing
If you were a thermal imaging comany, wouldn't it be fun to have a logo on your building that was only visible through a TIC... 
..or on a smaller scale, how about some T-shirts printed in inks with different emissivities, with logos you can only see with a TIC...
That's like something out of They Live. Instead of the glasses you need a TIC.
"I have come to chew bubblegum and kick ass..."
"I have come to chew bubblegum and kick ass..."
...and I'm all out of gum!
My Flir has a new name...
Got my Flir E48 from Tequipment, unlocked with no trouble
Does anyone have the extra lenses http://store.flir.com/category/e-series-accessories if so can you post some pictures with them?
Thanks
I believe those lenses are for the Exx models. The Ex has no stock provisions for extra lens mounting (but it is possible with the adapters designed earlier in this thread).
How do you get the rset commands to stick through a restart?
My order came in yesterday.
FW 1.19.8
Thanks Mike!
Image of my water cooled PC
after:

before:
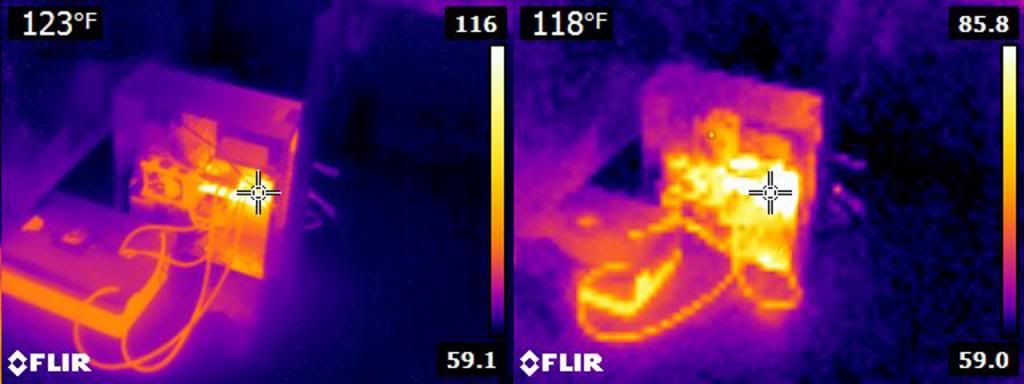
Image of my water cooled PC ..... after: before:
OK that's going to start ANOTHER rush on stock !! Excellent comparison shots !!
Water Cooling
Dual H100s on Xeon X5690s
are blocks cold? or shiny?
How do you get the rset commands to stick through a restart?
Depending on what part of the resource tree ... making a .cfg with a CRC01 , or making a .rsc with a CRC32
So what particular rset commands do you want to make persistent?
I had a spot in my image as well, see the picture in my post https://www.eevblog.com/forum/testgear/flir-e4-thermal-imaging-camera-teardown/msg329239/#msg329239
I saw that image the time you posted it, but in my memory the spot was somewhat bigger, so I didn't bother searching for your post. After now seeing it again and realize it's the same size and shape, it convinced me to play around a little. So I used a duster ball to blow air in some of the housings cavities, in the hope of again moving something inside. With success, after this "treatment" a 2nd spot with the same appearance showed up on my image

So any grain of dust on the sensor may create a similar looking disturbance, with it's thermal intensity depending on the size of this dust particle.
After this I evaluated my options in cleaning the sensor surface using Mike's teardown video. Then one led to the other and in the end I had my unit disassembled, the sensor dusted and everything reassembled again.
I'm now spot free, so my sensor and lens are OK
To keep things exciting, I now have some offset between my thermal and the visual image, making MSX look a little odd on greater distances.
Anyone knows where to adjust this? Is this done in software or do I have to dismantle my E4+ again?
I got mine 10 min ago
Model: Flir E8+


Site: Flir systems ou Estonia
Calibration date: November 22, 2013
To keep things exciting, I now have some offset between my thermal and the visual image, making MSX look a little odd on greater distances.
Anyone knows where to adjust this? Is this done in software or do I have to dismantle my E4+ again?
Are you sure you set your focus correctly to inifinity?
Or maybe your distance settings in the config menu is set to anything less then ">3m"?
there are register options (rset) - I posted them some while ago - in case that somebody misaligned the image ... but the physical setup for precise distance is very important
Distance setting should be at >3m, but I'm not sure about focus. I'm lacking a proper lens tool, so I adjusted the lens according to my marks before reassembling the device. Most probably it's a bit off, yes. But I didn't notice any degradation in image quality, so I was satisfied for now. I think it's hard to get it right, since those thermal images don't offer that much contrast and will always look a bit softer. I guess I need to dremel some simple tool for lens adjustment and start experimenting.
Oh, and it's not just the parallax error resulting from the lens distance, it's off sideways as well.
Good to know there is a software setting for this. I think you're referring to this post:
https://www.eevblog.com/forum/testgear/flir-e4-thermal-imaging-camera-teardown/msg327178/#msg327178By "physical setup" you're talking about those calibration steps mentioned in the linked post?
Then obviously it's finally time for RNDIS mode. I only did the resolution hack yet, addmenu was still on my todo list for future exercises.
Good to know there is a software setting for this. I think you're referring to this post:
https://www.eevblog.com/forum/testgear/flir-e4-thermal-imaging-camera-teardown/msg327178/#msg327178
By "physical setup" you're talking about those calibration steps mentioned in the linked post?
Yes, that's the post - I think it's clear what to do if taking basic trigonometry and the lens-lens-distance in consideraton - one has to align the camera's face-plane geometrically parallel to the reference object plane (ideally a surface with thermal and visual markings/features/borders)
Hello,
I need the flir eeprom unlocked, it needs password

anyone unlooked it yet?
cant find it, please please help me
thx!
Hello,
I need the flir eeprom unlocked, it needs password
anyone unlooked it yet?
cant find it, please please help me
thx!
You can edit the eeprom via the I2C command. The test mode seems to implement some simple access control but not looked at this.
EEPROM records are protected by a simple 16 bit checksum - this is documented fairly early in this thread
Hello,
I need the flir eeprom unlocked, it needs password
anyone unlooked it yet?
cant find it, please please help me
thx!
Instead of just asking for unlocking the Eeprom it would be more helpful if you post why you need to unlock it, what you have done with your E30, what worked and what worked not, where you had problems and how you solved them. Exactly what Mike and Taucher and others were doing. Then you will get much more feedback from many more people as they are interested in solving a challenge.
Look how the E4 hack worked ... many people provided little peaces of helpful (and sometimes not helpful) information - and together the 320x240 and the menu hack were possible. It is as always: a good team can make anything possible, one on its own often not.