-
I did consider it
That you did consider it is a given with you
Video, not mine, for the uneducated on large capacitor fun: You certainly would not want to be too close to one those blowing off that's for sure, although I did think that one was a bit lame compared to those loony Russian electricians 
-
That's looking really good, I never realised that you would have to wind your own toroids, would thought as a kit that they would be already wound for you?
Yeah you get a bag of toroids and two reels of wire in the kit. There is an order form in the kit for people who don't want to wind them but they are quite easy once you've done a few before so it's hardly worth it. Plus I'm one of those sadists who likes winding themThat you did consider it is a given with you
You certainly would not want to be too close to one those blowing off that's for sure, although I did think that one was a bit lame compared to those loony Russian electricians
Yeah it wasn't that good really. The Russian capacitors are probably designed to keep the population down
-
Having been diagnosed with TEAS for about a year now, I have been making notes on some side effects or, if you will, manifestations of the syndrome. For example, at hamfests I spend an inordinate amount of time looking for large, bulky electrolytic capacitors, boxes full of meters, oscilloscope probe parts, test leads, and gray knobs of a certain size while ignoring all the radios and other gear intended to actually receive or transmit RF signals, unless to or from a piece of test equipment. I also seem to be inordinately fascinated with any sort of box that has a Tektronix, HP, or General Radio logo on it, especially if it probably doesn't work, obviously needs to be repaired, or has a sticky on it that says, make me an offer.
I dunno, is this weird?
It is indeed weird to look for bulky electrolytic capacitors of unknown provenance.
Weird it is, but I do have standards! I only buy new old stock. I buy from a list of caps I can use in various power supplies I am working on, and I am very very very cheap. I figure if I only a third of what I bring home is actually in usable condition, I am doing pretty well.
Or at least that's what I tell myself.
-
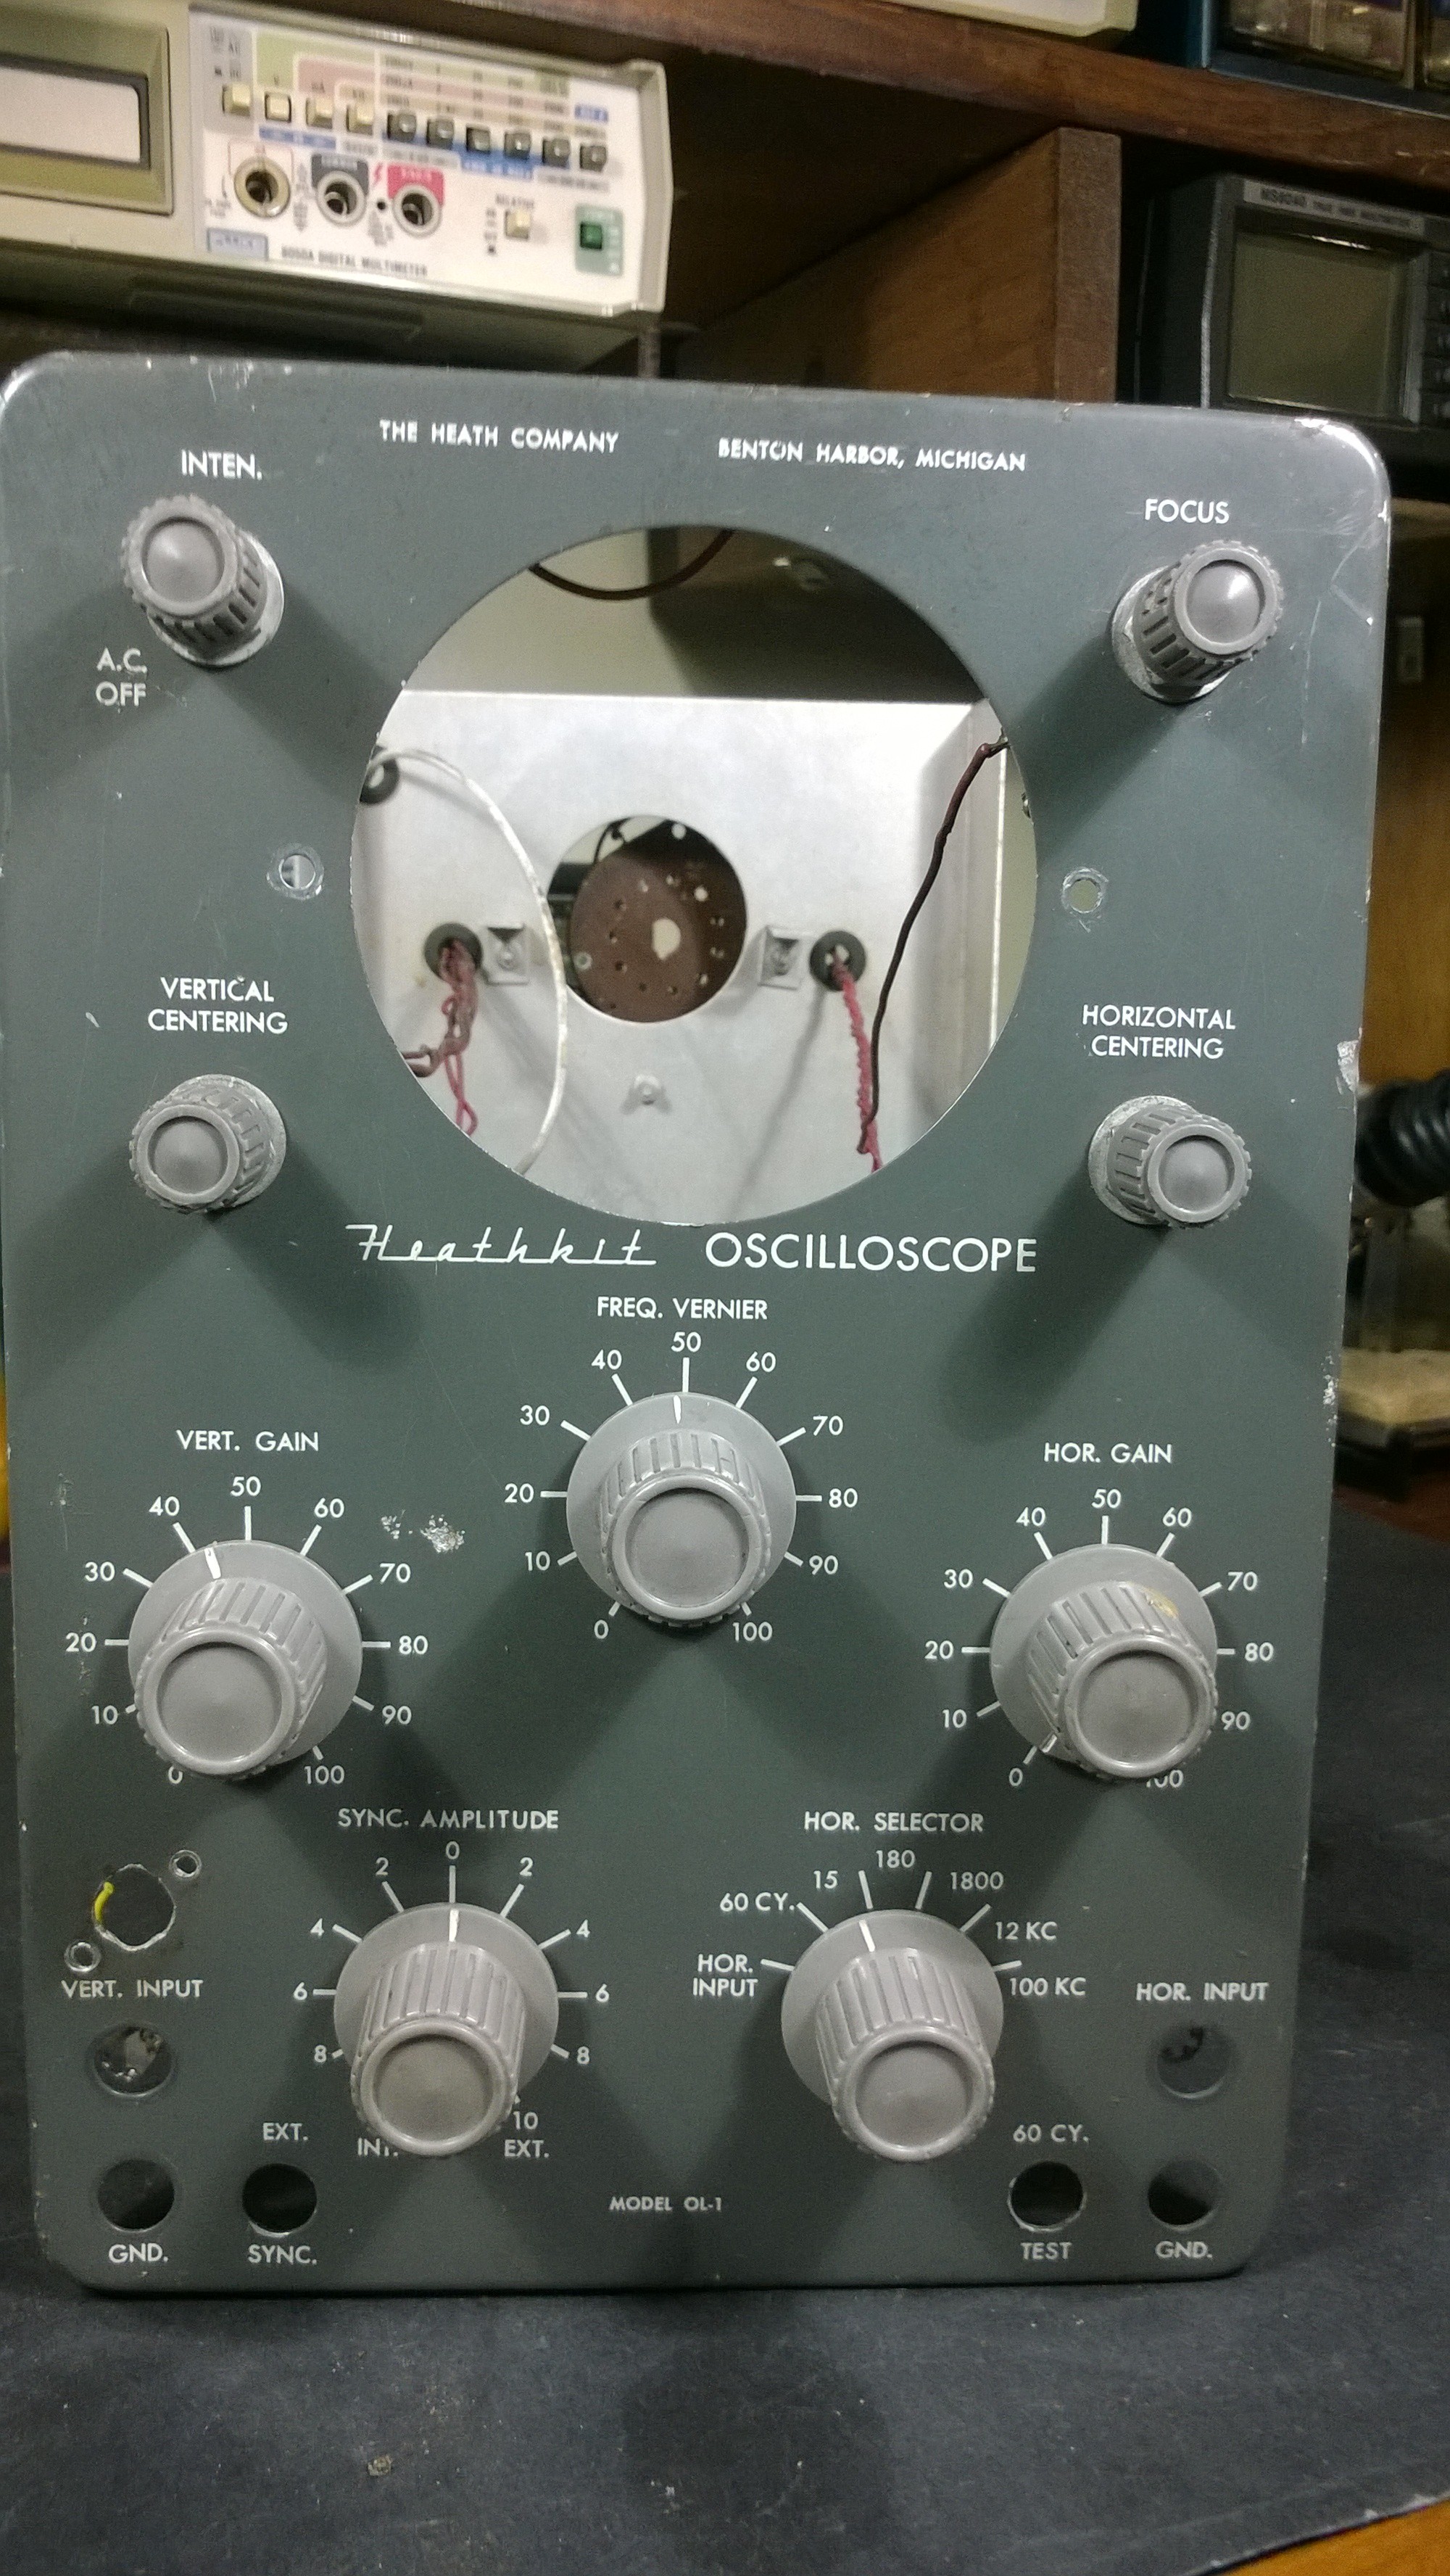
Cover up a bodge with another bodge? Surely you jest.Progress. The cabinet has been cleaned and scrubbed with Simple Green and dish detergent with a hot water rinse and dry. It is ready for spray paint which will be tomorrow. I pulled the front face plate and gave it the same treatment, along with the knobs and hardware. The pots and controls got a healthy spray of dexoit. Here it is assembled minus the banana jacks. Need new ones...on order. That jagged hole on the left was someone installed a BNC jack. I will install that too. Also the CRT bezel needs to be polished and painted.
 Compare this pix with the one earlier today. A massive improvement.
Already an amazing transformation!
If it were mine... I'd seal the front around that BNC hole with tape, fill in the holes with epoxy, then find/make myself a cal sticker or "interesting" asset tag to cover the ugly.
mnem
Carry on, wayward son!

 Actually I plan on using the BNC. I even polished the jack so it's nice and shiny.
The BNC was a bodge. It was haphazardly done, and is not period-correct. This is repair & restoration, which you're already engaged in.
I mean, sure... the correct way to fix that bodge would be to scan the front panel, make a scale silk-screen from that scan, then strip the front panel, TIG those holes shut, grind it all down inside & out, pattern-sand the inside so the swirl-marks approximate original appearance, then repaint it with the correct (and IIRC, highly toxic) self-etching epoxy paint, then finally re-silk-screen the legend. (Or search for the next decade for a donor unit to replace that panel )
)
I know how to do all these things.
But I am of the opinion that the equally valid restoration path is repair to original operating standards, done as non-invasively as possible to preserve as much of the original manufacture as possible. An epoxy patch done from the inside achieves that, while preserving the original paint and legend over 99% of the device.But I get your POV... it's the same old argument with car people... on the one hand you have the "restorers"... who want the correct screws and bolts everywhere, numbers matching, bias-ply tires and the correct paint splashes on the coil springs that the vehicle came with from the factory. I know how to do THAT as well.
On the other hand you have the hot-rodders who want to take something old that's been driven into the ground and make it something COMPLETELY NEW... like CADDZILLA below. I REALLLY know how to do that.
And then you have the resto-rod people... who try to walk the fine line between those two; keep it as original as possible, while adding new stuff that doesn't require butchering the original vehicle.
The problem you're facing is that your project has already been butchered. The question now is whether you try and reverse that butchery as inconspicuously as possible with a little body work, or double down on the butchery and try to make it "a thing".
My personal opinion is that since this 'scope is pretty much useless as a 'scope even with the bodged-in BNC jack, it is primarily a shelf-queen. As such, the former course is more appropriate.
Cheers,
mnem
*Veteran of a thousandpsychic warscar projects*
-
Techie post here with a video of the process here https://www.eevblog.com/forum/reviews/40w-300x200mm-laser-cutter-engraver-vollerun/msg2426109/#msg2426109
Just visible to the naked eye but not in a photo, subtle under flash so add some back lighting or front side engraved and make a statement?
Paint the inside surface of the panelto match the frontcharcoal gray to match the top, then laser-etch the logo as you've done. THEN, if it still doesn't show up, some discrete warm-white or neon-orange-shaded LED illumination behind. Looks like there's room for like 4 2830 or 5050 LEDs there. Then, of course, backlight the meter to match.
mnem

-
Cover up a bodge with another bodge? Surely you jest.Progress. The cabinet has been cleaned and scrubbed with Simple Green and dish detergent with a hot water rinse and dry. It is ready for spray paint which will be tomorrow. I pulled the front face plate and gave it the same treatment, along with the knobs and hardware. The pots and controls got a healthy spray of dexoit. Here it is assembled minus the banana jacks. Need new ones...on order. That jagged hole on the left was someone installed a BNC jack. I will install that too. Also the CRT bezel needs to be polished and painted.
Compare this pix with the one earlier today. A massive improvement.
Already an amazing transformation!
If it were mine... I'd seal the front around that BNC hole with tape, fill in the holes with epoxy, then find/make myself a cal sticker or "interesting" asset tag to cover the ugly.
mnem
Carry on, wayward son! Actually I plan on using the BNC. I even polished the jack so it's nice and shiny.
The BNC was a bodge. It was haphazardly done, and is not period-correct. This is repair & restoration, which you're already engaged in.
I mean, sure... the correct way to fix that bodge would be to scan the front panel, make a scale silk-screen from that scan, then strip the front panel, TIG those holes shut, grind it all down inside & out, pattern-sand the inside so the swirl-marks approximate original appearance, then repaint it with the correct (and IIRC, highly toxic) self-etching epoxy paint, then finally re-silk-screen the legend. (Or search for the next decade for a donor unit to replace that panel)
I know how to do all these things.
But I am of the opinion that the equally valid restoration path is repair to original operating standards, done as non-invasively as possible to preserve as much of the original manufacture as possible. An epoxy patch done from the inside achieves that, while preserving the original paint and legend over 99% of the device.
On the other hand you have the hot-rodders who want to take something old that's been driven into the ground and make it something COMPLETELY NEW... like CADDZILLA below. I REALLLY know how to do that.
And then you have the resto-rod people... who try to walk the fine line between those two; keep it as original as possible, while adding new stuff that doesn't require butchering the original vehicle.
The problem you're facing is that your project has already been butchered. The question now is whether you try and reverse that butchery as inconspicuously as possible with a little body work, or double down on the butchery and try to make it "a thing".
My personal opinion is that since this 'scope is pretty much useless as a 'scope even with the bodged-in BNC jack, it is primarily a shelf-queen. As such, the former course is more appropriate.
Cheers,
mnem
*Veteran of a thousandpsychic warscar projects*
Boy are you gonna have a shit fit later today when you find out what color I painted the case.
-
Things that make you go "Hmmmmmmm..."
↑ Currently sorting the contents of ONE small (approx 2 gallons volume) box from the JENGA in my garage and wondering:
"WHY THE EFF did I spend real MONEY on THIS?" ↓
mnem
-
(SNIP)
Boy are you gonna have a shit fit later today when you find out what color I painted the case.
The problem you're facing is that your project has already been butchered. The question now is whether you try and reverse that butchery as inconspicuously as possible with a little body work, or double down on the butchery and try to make it "a thing".
My personal opinion is that since this 'scope is pretty much useless as a 'scope even with the bodged-in BNC jack, it is primarily a shelf-queen. As such, the former course is more appropriate.
Cheers,
mnem
*Veteran of a thousandpsychic warscar projects*
Nope. I long ago learned the #1 Rule of Consulting:
Give your best considered opinion, in detail, but NEVER allow yourself to be sucked into someone else's Charlie-Foxtrot.
Charlie-Foxtrot at will, good sir. I shall observe from a safe distance.
mnem
-
Or at least that's what I tell myself.
I like it when people skewer themselves, because it means other people don't have to do it for them
-
Yup... that's how I wound up dumping three 45-tray RAACO boxes and several shoe-boxes of assorted electrolytics in the tip a few months ago. I knew the youngest I'd bought NEW were at least 20 years old, and all the NOS ones had been IN MY POSSESSION for 10-30 years.
Weird it is, but I do have standards!(SNIP) I dunno, is this weird?
It is indeed weird to look for bulky electrolytic capacitors of unknown provenance. I only buy new old stock. I buy from a list of caps I can use in various power supplies I am working on, and I am very very very cheap. I figure if I only a third of what I bring home is actually in usable condition, I am doing pretty well. Or at least that's what I tell myself.
I was left with ONE Shoebox half-full of VERY random leftovers from recent projects as the ONLY ones I felt even reasonably safe to employ.
mnem
"Don't fall in love with your junk." ~mom -
Boy are you gonna have a shit fit later today when you find out what color I painted the case.
Charlie-Foxtrot at will, good sir. I shall observe from a safe distance.
mnem
With that in mind, I just stumbled across this small hoard of reference: http://www.nostalgiaair.org/ while trying to re-locate THIS PDF of the above Heathkit probe for you.
If you can use them, I have these old B&K PR-24 direct/low capacity probes which would probably be suitable:Just say the word & I'll drop 'em in the mail tooya; they've been languishing in the back of my toolbox long enough.
mnem
-
Appreciate the offer. I have one of those old Heathkit scope probes buried somewhere.
-
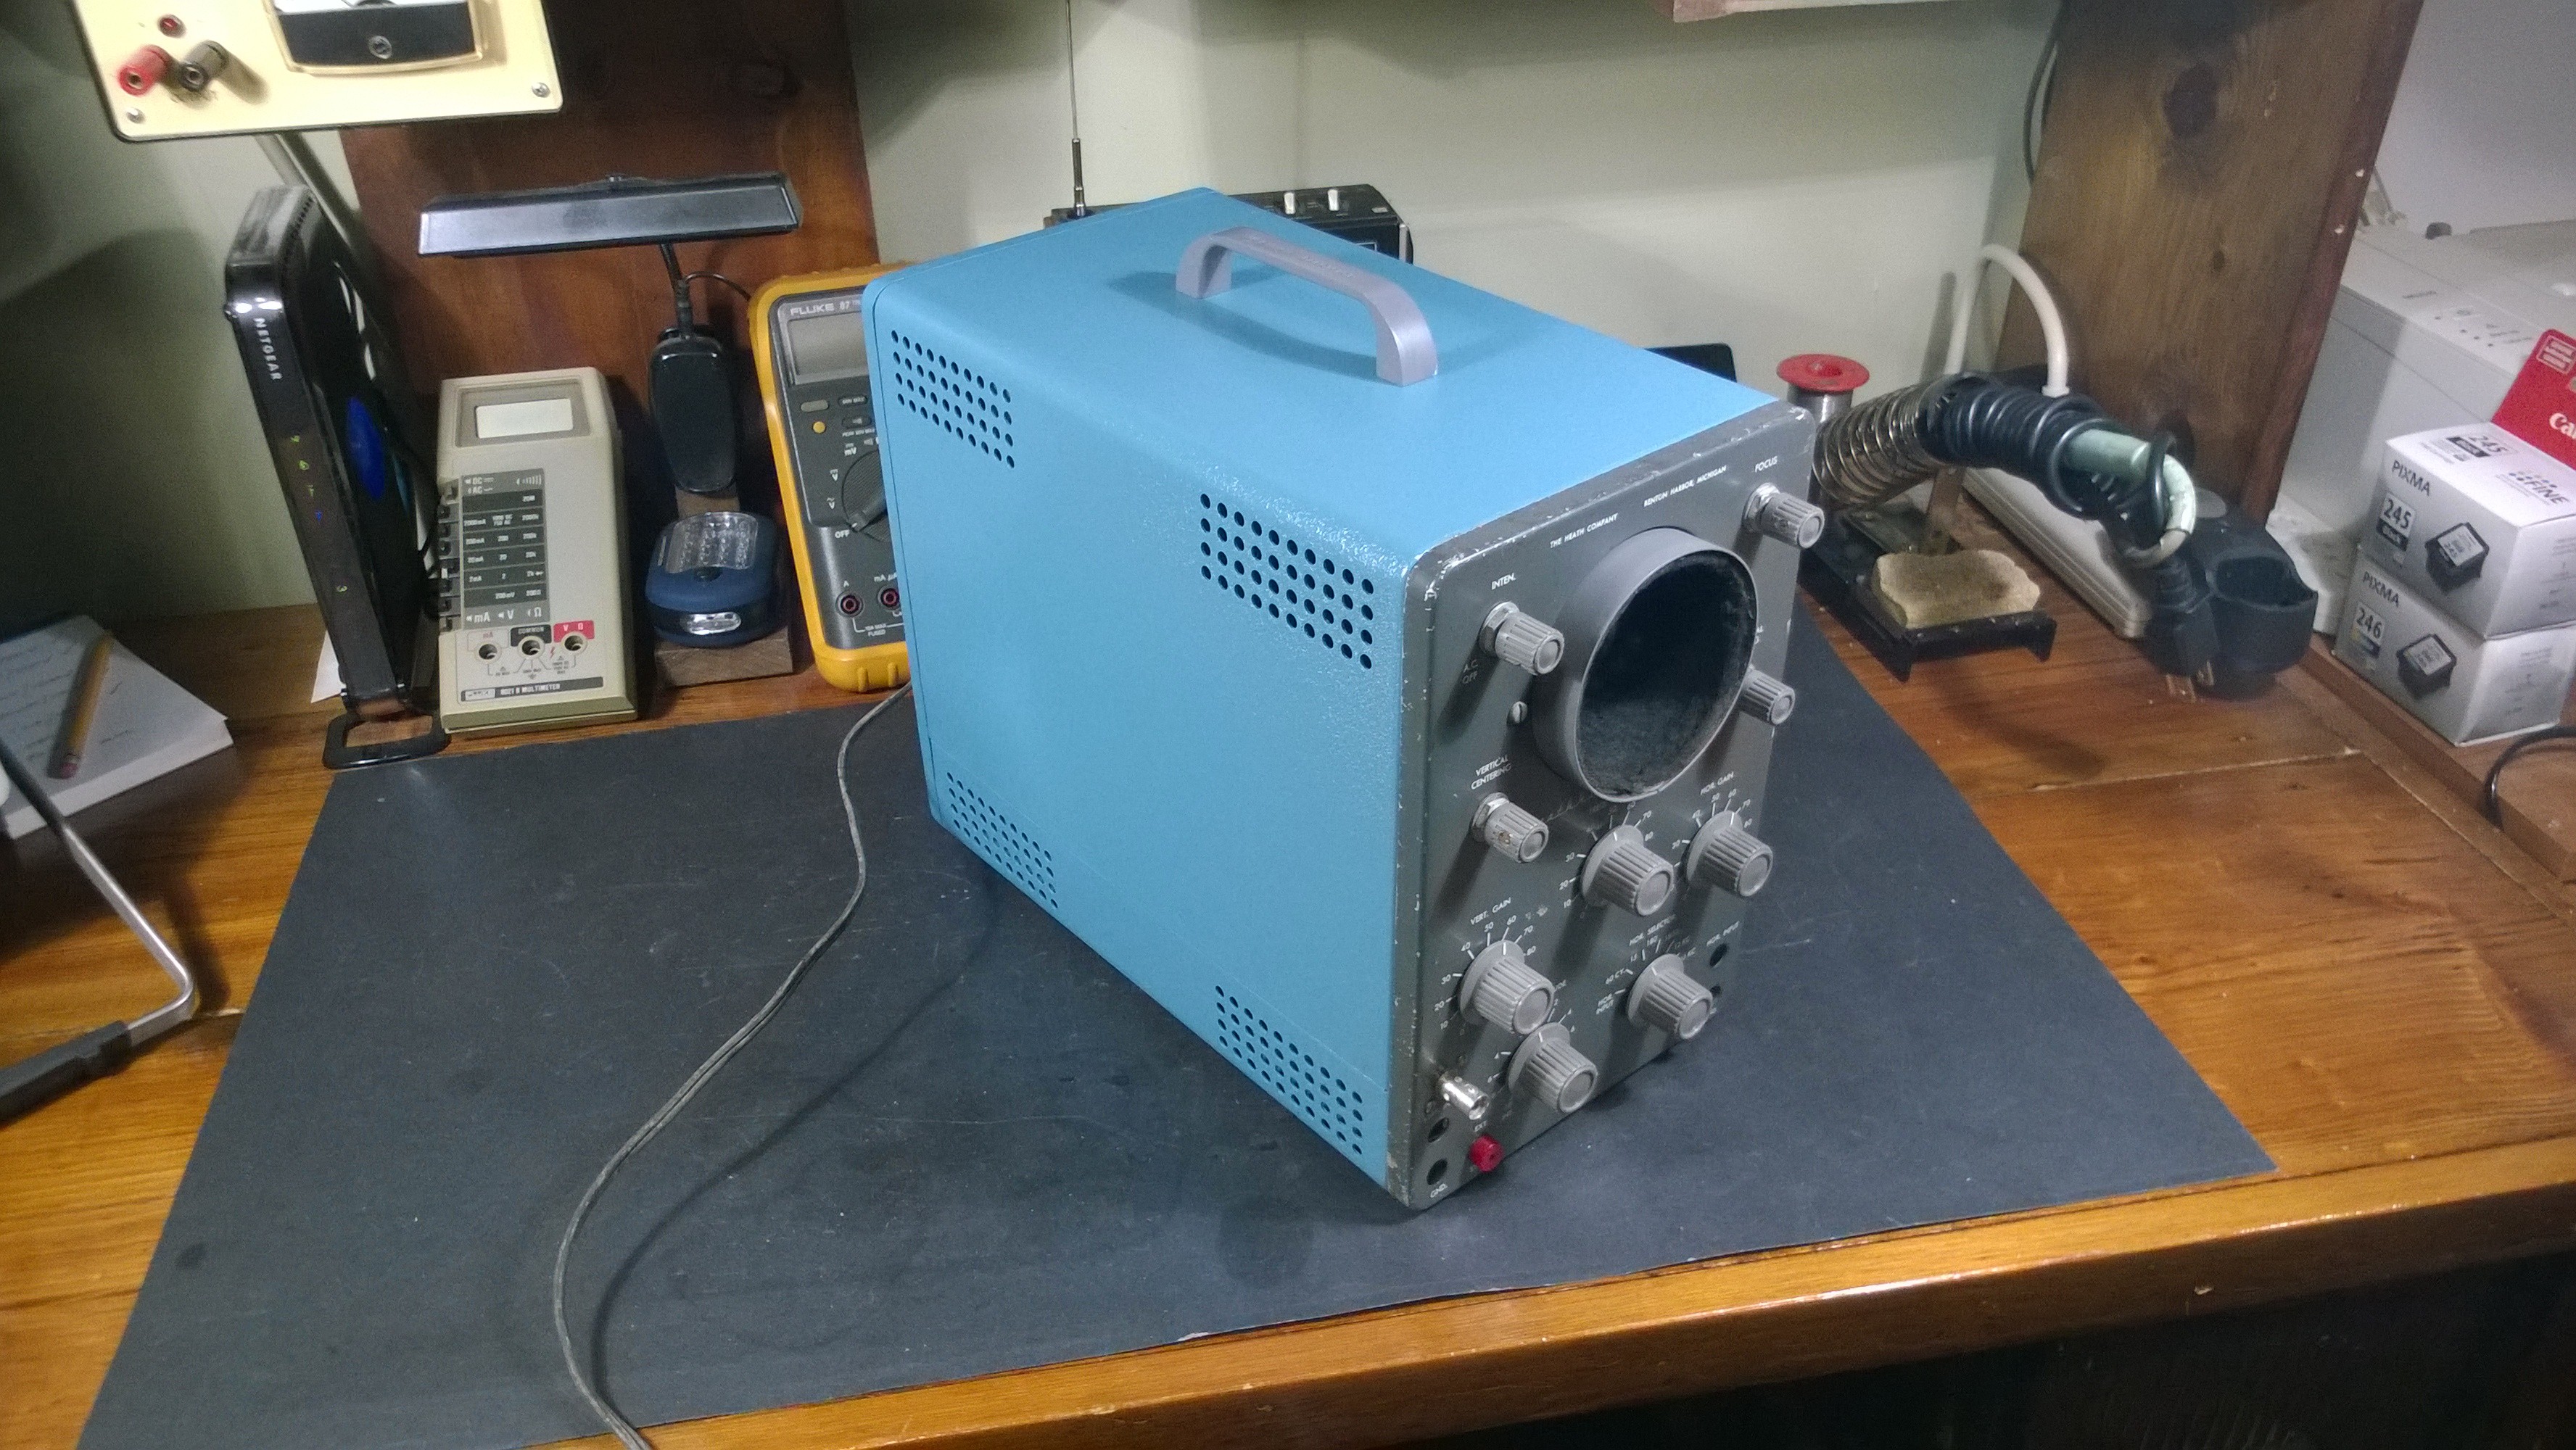
I do not perform “restorations”. I repair and make functional. And if I decide I will modify and improve. My equipment is not museum pieces. It is meant to be used. So the case of the Heath OL-1 got a coat of blue paint rather than the original gray. Why? Because I felt like it. I wanted to match my other scopes. And in the late 1960's Heathkit did convert to a blue color scheme for some of their test equipment. And.....I felt like it.
The exterior is just about done except for the banana jacks which are on order. They should arrive Friday along with the replacement capacitors. The CRT bezel has also been sanded, painted, and reinstalled. That was originally bright steel and is now....gray.
Oh and.....the BNC has been reinstalled too.
-
Yea this part of the song is starting to describe conditions here -
'Plenty of room at the Hotel California
Any time of year (any time of year) you can find it here"
More apropos;
Last thing I remember
I was running for the door
I had to find the passage back to the place I was before
"Relax," said the night man
"We are programmed to receive
You can check-out any time you like
But you can never leave! -
If you can use them, I have these old B&K PR-24 direct/low capacity probes which would probably be suitable:
Appreciate the offer.
mnem I have one of those old Heathkit scope probes buried somewhere.
Anybody else want 'em? I just sorted my 'scope probes into a single bin, and they're already boxed up. Time for them to go.
mnem
-
I do not perform “restorations”. I repair and make functional. And if I decide I will modify and improve. My equipment is not museum pieces. It is meant to be used. (SNIP)
Oh and.....the BNC has been reinstalled too.
Used? For what? Pretty much anything you can use that boat anchor for (aside from a doorstop) is better diag-ed by ear!
Right back atcha, buddy! "Ewww... yuckyputz..."
mnem
Pants are highly overrated. -
Used? For what? Pretty much anything you can use that boat anchor for (aside from a doorstop) is better diag-ed by ear!
He might be pulling your leg med6753! You never know with him!
-
I rather like that. It's a HeathTek!
I'm going to build a TelequipMeg now
K2 problems here. There's a problem with the PLL reference oscillator. I reverse engineered how it worked and after bouncing around debug stuff it turns out the batch of JFET (J310) are duff they sent out and the PLL stops working at the default control voltage causing the lock to be lost. Fffffuuuu. Anyway they've been super helpful and are dispatching new parts out. I have substituted a J309 in for now and the PLL cal worked although they said it wouldn't. Hmm same part just different Idss and historically they used them in a distant predecessor of the K2!
At least I have lots of test gear to poke at it with
-
Speaking of "What'll you use it for...?"
 A question for you photography buffs:
I have one of these in THE BOX; IT'S 120VAC, 300W, HotShoe mount. I've kept it for years because every once in a rare while, I want to do some closeup photography against a backdrop, or some stationary video and the adjustable spot/fill is good for that.
Question is: Would anybody ELSE still use this antique, and would it sell for enough to be worth the time to list it?
mnem
*kiddle time* -
Techie post here with a video of the process here https://www.eevblog.com/forum/reviews/40w-300x200mm-laser-cutter-engraver-vollerun/msg2426109/#msg2426109
Just visible to the naked eye but not in a photo, subtle under flash so add some back lighting or front side engraved and make a statement?
Would visibility be improved by doing the inverse? Etch the entire panel except for the logo. If anything, that would hide the uninteresting shielding and make it easier to back light with LEDs (if you chose that route). -
So the case of the Heath OL-1 got a coat of blue paint rather than the original gray. Why? Because I felt like it. I wanted to match my other scopes. And in the late 1960's Heathkit did convert to a blue color scheme for some of their test equipment. And.....I felt like it.
...
Which mfg and paint color is that? How similar is it to "Tek blue"? -
Speaking of "What'll you use it for...?"
A question for you photography buffs:
I have one of these in THE BOX; IT'S 120VAC, 300W, HotShoe mount. I've kept it for years because every once in a rare while, I want to do some closeup photography against a backdrop, or some stationary video and the adjustable spot/fill is good for that.
Question is: Would anybody ELSE still use this antique, and would it sell for enough to be worth the time to list it?
I'm not sure how many people still use it. There are 7 active listings between $10 and $44, but only one sold in the last 90 days. It went for $7.50 plus shipping. -
So the case of the Heath OL-1 got a coat of blue paint rather than the original gray. Why? Because I felt like it. I wanted to match my other scopes. And in the late 1960's Heathkit did convert to a blue color scheme for some of their test equipment. And.....I felt like it.
...
Which mfg and paint color is that? How similar is it to "Tek blue"?
This.... And yes, it is a known acceptable substitute for genuine Tek blue. I have sprayed Tek cabinets with it and you'd be hard pressed to tell the difference. And I like what Bd said....."HeathTek"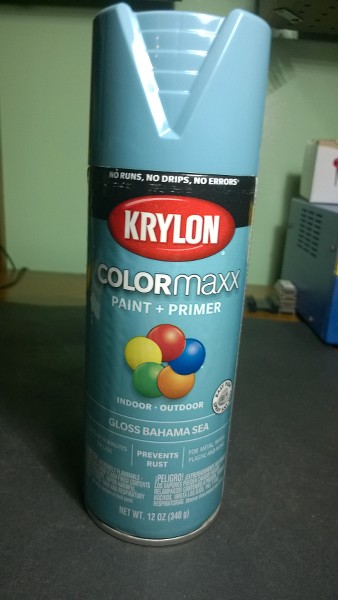
-
If you can use them, I have these old B&K PR-24 direct/low capacity probes which would probably be suitable:
Appreciate the offer.
mnem I have one of those old Heathkit scope probes buried somewhere.
Anybody else want 'em? I just sorted my 'scope probes into a single bin, and they're already boxed up. Time for them to go.
I dunno. Hard to find info on these things. What I did find is that the B+K 277 and 290 meters as well as 1403 scope came with a PR21 10 MHz probe. My B+K 177 VTVM came with a PR43 probe, which seems to be 4 MHz. There was an optional AV-1A probe that was 250 MHz. Not sure what the specs are on the PR24. -
So the case of the Heath OL-1 got a coat of blue paint rather than the original gray. Why? Because I felt like it. I wanted to match my other scopes. And in the late 1960's Heathkit did convert to a blue color scheme for some of their test equipment. And.....I felt like it.
...
Which mfg and paint color is that? How similar is it to "Tek blue"?
This.... And yes, it is a known acceptable substitute for genuine Tek blue. I have sprayed Tek cabinets with it and you'd be hard pressed to tell the difference. And I like what Bd said....."HeathTek"
Thanks. Added to the POI. It may work well for Power Designs enclosures, too.